Attention: Here be dragons
This is the latest
(unstable) version of this documentation, which may document features
not available in or compatible with released stable versions of Godot.
Checking the stable version of the documentation...
플레이어 씬 만들기
프로젝트 설정이 완료되면 플레이어가 제어하는 캐릭터 작업을 시작할 수 있습니다.
첫 번째 씬은 Player 오브젝트를 정의합니다. 별도의 플레이어 씬을 만드는 것의 장점 중 하나는 게임의 다른 부분을 만들기 전에도 별도로 테스트할 수 있다는 것입니다.
노드 구조
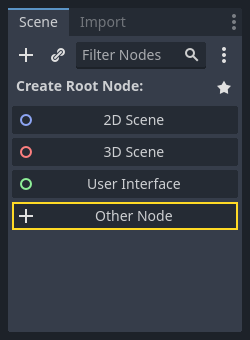
시작하려면 플레이어 오브젝트의 루트 노드를 선택해야 합니다. 일반적으로 씬의 루트 노드는 개체가 원하는 기능, 즉 개체가 *무엇*인지를 반영해야 합니다. "다른 노드(Other Node)" 버튼을 클릭하고 씬에 Area2D 노드를 추가하세요.
참고
Godot also provides the CharacterBody2D node, specifically designed for 2D characters, which includes built-in support for some of the processes explained in this tutorial. In many real world projects, CharacterBody2D would be a better choice for players and enemies. However, this tutorial focuses on core concepts that apply to a wider range of nodes and use cases.
Area2D 노드를 추가하면 Godot는 씬 트리에서 해당 노드 옆에 다음과 같은 경고 아이콘을 표시합니다.

이 경고는 Area2D 노드가 콜리전이나 겹침을 감지하려면 모양이 필요하다는 것을 알려줍니다. 플레이어의 시각적 요소를 (애니메이션 스프라이트를 사용하여) 먼저 설정할 것이므로, 이 경고를 일시적으로 무시할 수 있습니다. 시각적 요소가 준비되면, 자식 노드로 콜리전 모양을 추가할 것입니다. 이렇게 하면 스프라이트의 외형에 맞춰 모양의 크기와 위치를 정확하게 조정할 수 있습니다.
Area2D를 사용하면 플레이어와 겹치거나 충돌하는 물체를 감지할 수 있습니다. 노드를 더블 클릭하여 노드 이름을 Player로 변경하세요. 이제 씬의 루트 노드를 설정했으므로 노드를 추가해 더 많은 기능을 줄 수 있습니다.
Player 노드에 자식을 추가하기 전에, 실수로 자식을 클릭해서 자식이 움직이거나 크기가 바뀌지 않도록 해야 합니다. 노드를 선택하고 자물쇠 오른쪽에 있는 아이콘을 클릭하세요. 노드의 툴 팁에는 "오브젝트의 자식을 선택하지 않도록 합니다." 라고 표시됩니다.

씬을 player.tscn으로 저장합니다. 씬 -> 저장을 클릭하거나 Windows/Linux에서는 Ctrl + S를, Mac에서는 Cmd + S를 누르세요.
참고
이 프로젝트에서, 우리는 Godot의 명명 규칙을 따를 것입니다.
GDScript: 클래스(노드)는 파스칼 표기법(PascalCase)을 사용하고, 변수와 함수는 스네이크_표기법(snake_case)을 사용하며, 상수는 전부 대문자(ALL_CAPS)를 사용합니다(GDScript 스타일 가이드 참조).
C#: 클래스, export 변수 그리고 메서드는 파스칼 표기법(PascalCase)을 사용합니다. private 필드는 카멜 표기법(_camelCase)를 사용합니다. 지역변수와 매개변수는 카멜 표기법(camelCase)을 사용합니다(C# 스타일 가이드 참고). 시그널을 연결할 때는 메서드 이름을 정확하게 입력하도록 주의하세요.
스프라이트 애니메이션
Player 노드를 클릭하고 AnimatedSprite2D를 자식 노드로 추가(Windows/Linux에서는 Ctrl + A 또는 macOS에서는 Cmd + A)하세요. AnimatedSprite2D는 플레이어에 대한 모양과 애니메이션을 처리합니다. 노드 옆에 경고 기호가 있는 것을 확인하세요. AnimatedSprite2D에는 표시할 수 있는 애니메이션의 목록인 SpriteFrames 리소스가 필요합니다. AnimatedSprite2D가 선택되어 있는지 확인한 다음 인스펙터에서 애니메이션 섹션 아래의 스프라이트 프레임 속성을 찾아 "[비었음]" -> "새 SpriteFrames"를 클릭하세요.
방금 만든 SpriteFrames를 클릭하여 "SpriteFrames" 패널을 엽니다:
왼쪽에 애니메이션 목록이 있습니다. default를 클릭하여 walk로 이름을 변경합니다. 그리고 애니메이션 추가 버튼을 클릭하여 up이라는 두 번째 애니메이션을 만듭니다.
파일시스템 독에서 플레이어 이미지를 찾으세요. 이 이미지는 이전에 압축을 푼 art 폴더 안에 있습니다. 각 애니메이션의 두 이미지를 해당 애니메이션에 대한 패널의 애니메이션 프레임 쪽으로 끌어다 놓으세요:
walk애니메이션에는playerGrey_walk1과playerGrey_walk2를 사용합니다up애니메이션에는playerGrey_up1과playerGrey_up2를 사용합니다
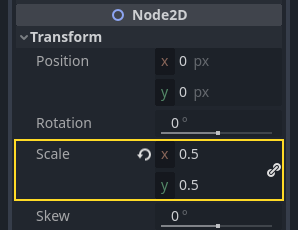
플레이어 이미지가 게임 창에 비해 너무 크기 때문에, 크기를 줄여야 합니다. AnimatedSprite2D 노드를 클릭하고 스케일 속성을 (0.5, 0.5)로 설정하세요. 인스펙터의 Node2D에서 찾을 수 있습니다.
마지막으로, CollisionShape2D를 Player의 자식으로 추가하세요. 이것이 플레이어의 "히트박스", 즉 콜리전 영역을 결정합니다. 이 캐릭터에게는 CapsuleShape2D 노드가 가장 잘 맞습니다, 그러므로 인스펙터의 "모양" 옆에 "[비었음]" -> "새 CapsuleShape2D"를 클릭하세요. 스프라이트 전체를 덮도록 두 개의 크기 핸들을 사용해 모양의 크기를 조절하세요:

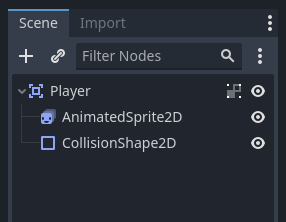
다 되셨다면, 당신의 Player 씬은 이렇게 되어야 합니다:
이 작업이 완료되면 Area2D 노드에 대한 경고가 사라집니다. 이제 모양이 할당되었고 다른 오브젝트와 상호작용할 수 있기 때문입니다.
이러한 변경 후에 씬을 다시 저장하는 것을 잊지 마세요.
다음 부분에서는 Player 노드에 스크립트를 추가하여 플레이어를 움직이고 애니메이션을 적용하겠습니다. 그런 다음 콜리전 감지를 설정하여 플레이어가 무언가에 부딪혔을 때를 파악하겠습니다.