Attention: Here be dragons
This is the latest
(unstable) version of this documentation, which may document features
not available in or compatible with released stable versions of Godot.
Checking the stable version of the documentation...
2D 빛과 그림자
소개
기본적으로 Godot의 2D 장면은 음영 처리되지 않으며 빛과 그림자가 보이지 않습니다. 렌더링 속도는 빠르지만 음영 처리되지 않은 장면은 단조롭게 보일 수 있습니다. Godot는 실시간 2D 조명과 그림자를 사용하는 기능을 제공하여 프로젝트의 깊이감을 크게 향상시킬 수 있습니다.
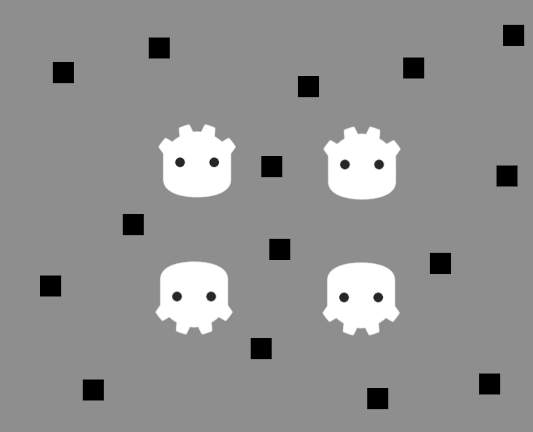
2D 조명이나 그림자가 없으며 씬는 음영처리되지 않습니다.
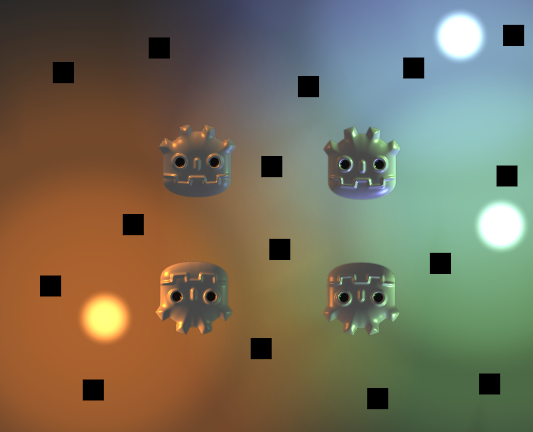
2D 조명 활성화 (그림자 없음)

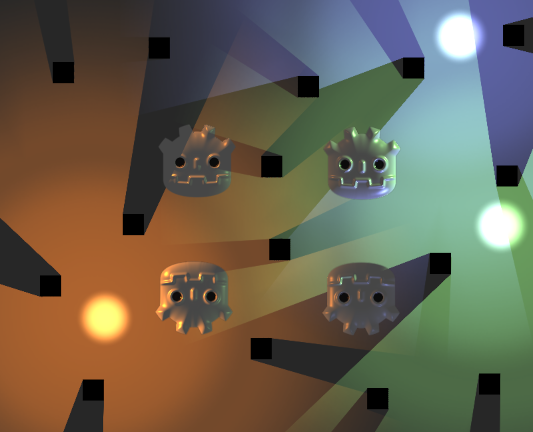
2D 빛과 그림자 활성화
노드
완전한 2D 조명 설정에는 여러 가지 노드가 포함됩니다.
CanvasModulate 는 씬을 어둡게 하는데 사용됩니다.
:ref:`PointLight2D <class_PointLight2D>`(전방향 또는 스포트라이트용)
:ref:`DirectionalLight2D <class_DirectionalLight2D>`(햇빛 또는 달빛용)
Sprite2D 또는 TileMapLayer와 같이 조명을 받는 다른 2D 노드.
:ref:`CanvasModulate <class_CanvasModulate>`는 기본 "주변" 색상으로 작동할 색상을 지정하여 씬을 어둡게 하는 데 사용됩니다. 이는 2D 조명이 도달하지 않는 영역의 최종 조명 색상입니다. CanvasModulate 노드가 없으면 최종 씬는 너무 밝게 보일 것입니다. 2D 조명은 기존의 음영 처리되지 않은 모양(완전히 켜져 있는 것처럼 보임)만 밝게 하기 때문입니다.
Sprites 는 빛 블롭, 배경, 그림자 캐스터의 텍스처를 보여주는 데 사용됩니다.
Light2Ds 씬을 비추기 위해 사용됩니다. The way a light typically works is by adding a selected texture over the rest of the scene to simulate lighting. But it can be used in other ways, for example masking out parts of the scene.
LightOccluder2Ds are used to tell the shader which parts of the scene cast shadows. 그림자는 Light2D 로 덮여진 부분에만 나타나고 그림자의 방향은 Light 의 중심에 기반을 둡니다 .
LightOccluder2Ds are used to tell the shader which parts of the scene cast shadows. 그림자는 Light2D 로 덮여진 부분에만 나타나고 그림자의 방향은 Light 의 중심에 기반을 둡니다 .
점 조명
포인트 라이트(위치 조명이라고도 함)는 2D 조명에서 가장 일반적인 요소입니다. 포인트 라이트는 횃불, 불, 발사체 등의 빛을 나타내는 데 사용할 수 있습니다.
PointLight2D는 인스펙터에서 조정할 수 있는 다음 속성을 제공합니다:
텍스처: 광원으로 사용할 텍스처입니다. 텍스처의 크기에 따라 빛의 크기가 결정됩니다. 텍스처에는 Light2D의 Mix 블렌드 모드를 사용할 때 유용한 알파 채널이 있을 수 있지만 Add**(기본값) 또는 **Subtract 블렌드 모드를 사용할 경우에는 필요하지 않습니다.
오프셋: 가벼운 텍스처의 오프셋입니다. 조명 노드를 이동할 때와 달리 오프셋을 변경해도 그림자가 이동하지 않습니다.
텍스처 스케일: 조명 크기에 대한 승수입니다. 값이 높을수록 빛이 더 멀리 확장됩니다. 조명이 클수록 화면의 더 많은 픽셀에 영향을 미치므로 성능 비용이 높아지므로 조명 크기를 늘리기 전에 이 점을 고려하십시오.
높이: 노멀 매핑과 관련된 조명의 가상 높이입니다. 기본적으로 빛은 빛을 받는 표면에 매우 가깝습니다. 노멀 매핑을 사용하면 조명이 거의 보이지 않게 되므로 이 값을 늘리는 것이 좋습니다. 라이트의 높이를 조정하면 노멀 매핑을 사용하는 표면에서만 눈에 띄는 차이가 발생합니다.
조명에 사용할 미리 만들어진 텍스처가 없는 경우 이 "중립" 포인트 라이트 텍스처를 사용할 수 있습니다(마우스 오른쪽 버튼 클릭 > 다른 이름으로 이미지 저장…).
텍스처 가져오기
다른 폴오프가 필요한 경우 조명의 Texture 속성에 New GradientTexture2D**를 할당하여 절차적으로 텍스처를 만들 수 있습니다. 리소스를 생성한 후 **채우기 섹션을 확장하고 채우기 모드를 **방사형**으로 설정합니다. 그런 다음 불투명한 흰색에서 투명한 흰색으로 시작하도록 그라디언트 자체를 조정하고 시작 위치를 중앙으로 이동해야 합니다.
방향성 조명
방향성 조명은 햇빛이나 달빛을 표현하는 데 사용됩니다. 광선은 서로 평행하게 투사됩니다. 마치 태양이나 달이 빛을 받는 표면에서 무한히 멀리 떨어져 있는 것처럼 보입니다.
HUD는 다음의 정보들을 보여줍니다:
높이: 노멀 매핑을 기준으로 한 조명의 가상 높이입니다(
0.0= 표면에 평행,1.0= 표면에 수직). 기본적으로 빛은 빛을 받는 표면과 완전히 평행합니다. 노멀 매핑을 사용하면 조명이 거의 보이지 않게 되므로 이 값을 늘리는 것이 좋습니다. 라이트의 높이를 조정하면 노멀 매핑을 사용하는 표면에서만 시각적인 차이가 발생합니다. **높이**는 그림자의 모양에 영향을 주지 않습니다.최대 거리: 카메라 중심 객체로부터의 최대 거리는 그림자가 제거되기 전의 거리입니다(픽셀 단위). 이 값을 줄이면 카메라 외부에 있는 객체가 그림자를 드리우는 것을 방지할 수 있습니다(성능도 향상됨). Camera2D 확대/축소는 **최대 거리**에 의해 고려되지 않습니다. 즉, 확대/축소 값이 높을수록 특정 지점을 확대할 때 그림자가 더 빨리 사라지는 것처럼 보입니다.
참고
방향성 그림자는 Height 속성 값에 관계없이 항상 무한히 길게 나타납니다. 이것은 Godot에서 2D 조명에 사용되는 그림자 렌더링 방법의 한계입니다.
무한히 길지 않은 방향성 그림자를 가지려면 DirectionalLight2D에서 그림자를 비활성화하고 대신 2D 부호 있는 거리 필드에서 읽는 사용자 정의 셰이더를 사용해야 합니다. 이 거리 필드는 씬에 있는 LightOccluder2D 노드에서 자동으로 생성됩니다.
속성 그루핑(Grouping)
PointLight2D와 DirectionalLight2D는 모두 Light2D 기본 클래스의 일부인 공통 속성을 제공합니다.
활성화됨: 조명의 가시성을 전환할 수 있습니다. 조명 노드를 숨기는 것과 달리 이 속성을 비활성화해도 조명의 자식 노드는 숨겨지지 않습니다.
편집기 전용: 활성화된 경우 조명은 편집기 내에서만 표시됩니다. 실행 중인 프로젝트에서는 자동으로 비활성화됩니다.
색상: 조명의 색상입니다.
에너지: 빛의 강도 배율입니다. 값이 높을수록 빛이 더 밝아집니다.
블렌드 모드: 가벼운 계산에 사용되는 블렌딩 공식입니다. 기본 추가**는 대부분의 사용 사례에 적합합니다. **감산**은 네거티브 라이트에 사용할 수 있으며 물리적으로 정확하지는 않지만 특수 효과에 사용할 수 있습니다. **믹스 블렌드 모드는 선형 보간을 통해 빛의 텍스처에 해당하는 픽셀 값과 그 아래의 픽셀 값을 혼합합니다.
범위 > Z 최소: 빛의 영향을 받는 가장 낮은 Z 지수입니다.
범위 > Z 최대: 빛의 영향을 받는 가장 높은 Z 지수입니다.
범위 > 레이어 최소: 빛의 영향을 받는 가장 낮은 시각적 레이어입니다.
범위 > 레이어 최대: 빛의 영향을 받는 가장 높은 시각적 레이어입니다.
범위 > 아이템 컬 마스크: 다른 노드' 활성화된 시각적 레이어 **차폐 라이트 마스크**에 따라 어떤 노드가 이 노드로부터 빛을 수신하는지 제어합니다. 이는 특정 물체가 빛을 받는 것을 방지하는 데 사용될 수 있습니다.
메시(mesh) 설정하기
PointLight2D 또는 DirectionalLight2D 노드에서 Shadow > Enabled 속성을 활성화한 후에는 처음에는 시각적 차이가 나타나지 않습니다. 이는 씬의 노드에 아직 그림자 투사의 기초로 사용되는 *차단기*가 없기 때문입니다.
씬에 그림자가 나타나도록 하려면 LightOccluder2D 노드를 씬에 추가해야 합니다. 이러한 노드에는 스프라이트의 윤곽선과 일치하도록 설계된 폐색 다각형도 있어야 합니다.
LightOccluder2D 노드에는 다각형 리소스(시각적 효과를 갖도록 설정해야 함)와 함께 2가지 속성이 있습니다.
SDF 충돌: 활성화된 경우 차단기는 사용자 정의 셰이더에서 사용할 수 있는 실시간 생성 *서명된 거리 필드*의 일부가 됩니다. 이 SDF에서 읽는 사용자 정의 셰이더를 사용하지 않는 경우 이를 활성화하면 시각적 차이가 없고 성능 비용도 발생하지 않으므로 편의를 위해 기본적으로 활성화됩니다.
Occluder Light Mask: 이는 PointLight2D 및 DirectionalLight2D의 Shadow > Item Cull Mask 속성과 함께 사용되어 각 조명에 대해 그림자를 투사하는 객체를 제어합니다. 이는 특정 객체가 그림자를 드리우는 것을 방지하는 데 사용할 수 있습니다.
이렇게 하고 싶어하는 몇 가지 이유가 있습니다:
라이트 오클루더 자동 생성
Occluder는 노드를 선택하고 2D 편집기 상단의 Sprite2D 메뉴를 클릭한 다음 **만들기 LightOccluder2D Sibling**을 선택하여 Sprite2D 노드에서 자동으로 생성할 수 있습니다.
나타나는 대화 상자에서 스프라이트 가장자리를 둘러싸는 윤곽선이 표시됩니다. 윤곽선이 스프라이트의 가장자리와 거의 일치하면 확인**을 클릭할 수 있습니다. 윤곽선이 스프라이트 가장자리에서 너무 멀리 떨어져 있는 경우(또는 스프라이트 가장자리를 "먹고 있는" 경우) **늘이기(픽셀) 및 **줄이기(픽셀)**를 조정한 다음 **미리 보기 업데이트**를 클릭하세요. 만족스러운 결과를 얻을 때까지 이 작업을 반복합니다.
라이트 오클루더를 수동으로 그리기
만들기 a LightOccluder2D 노드를 선택한 다음 노드를 선택하고 2D 편집기 상단에 있는 "+" 버튼을 클릭하세요. 폴리곤 리소스를 생성하라는 메시지가 표시되면 **예**라고 대답하세요. 그런 다음 클릭하여 새 점을 생성하여 폐색 다각형 그리기를 시작할 수 있습니다. 기존 점을 마우스 오른쪽 버튼으로 클릭하여 제거할 수 있으며, 선을 클릭한 다음 드래그하여 기존 선에서 새 점을 만들 수 있습니다.
그림자가 활성화된 2D 조명에서는 다음 속성을 조정할 수 있습니다.
색상: 음영처리된 영역의 색상입니다. 기본적으로 음영 처리된 영역은 완전히 검은색이지만 예술적 목적으로 변경할 수 있습니다. 색상의 알파 채널은 그림자가 지정된 색상으로 착색되는 정도를 제어합니다.
필터: 그림자에 사용할 필터 모드입니다. 기본 **없음**은 렌더링 속도가 가장 빠르며 픽셀 아트 미학이 있는 게임에 매우 적합합니다("블록형" 시각적 특성으로 인해). 부드러운 그림자를 원하면 대신 **PCF5**를 사용하세요. **PCF13**은 훨씬 더 부드럽지만 렌더링이 가장 까다롭습니다. PCF13은 렌더링 비용이 높기 때문에 한 번에 몇 개의 조명에만 사용해야 합니다.
필터 매끄러움: 필터**가 **PCF5 또는 **PCF13**으로 설정된 경우 그림자에 적용되는 부드러움 정도를 제어합니다. 값이 높을수록 그림자가 부드러워지지만 밴딩 아티팩트가 표시될 수 있습니다(특히 PCF5의 경우).
아이템 컬 마스크(Item Cull Mask): 각각의 Occluder Light Mask 속성에 따라 LightOccluder2D 노드가 그림자를 드리우는 것을 제어합니다.
참고
픽셀 아트 게임의 조명 및 그림자 해상도
엔진은 소스 텍스처의 텍셀 해상도가 아닌 **뷰포트의 픽셀 해상도**에서 2D 조명과 그림자를 계산합니다. 빛과 그림자의 모양은 개별 스프라이트 텍스처의 해상도가 아니라 창이나 뷰포트 해상도에 따라 달라집니다.
픽셀 아트 게임을 만들고 아트 스타일에 맞는 픽셀화되거나 블록화된 조명과 그림자를 원하는 경우 가장 가까운 텍스처 필터링으로는 이 효과를 얻을 수 없습니다. 가장 가까운 필터링은 엔진이 텍스처를 샘플링하는 방식에만 영향을 미치며 엔진이 조명과 그림자를 렌더링하는 방식에는 영향을 주지 않습니다.
픽셀화된 조명과 그림자를 얻으려면 사용자 정의 셰이더를 사용하여 LIGHT_VERTEX 및 SHADOW_VERTEX``를 수정하여 조명 샘플링을 픽셀 그리드에 맞춥니다. 다음 셰이더는 ``floor() 기능을 사용하여 조명을 그리드에 맞춥니다.
shader_type canvas_item;

uniform float pixel_size = 4.0;

void fragment() {
    // Snap lighting and shadows to pixel grid.
    LIGHT_VERTEX.xy = floor(LIGHT_VERTEX.xy / pixel_size) * pixel_size;
    SHADOW_VERTEX = floor(SHADOW_VERTEX / pixel_size) * pixel_size;

    // Normal rendering.
    COLOR = texture(TEXTURE, UV);
}
이는 위치를 ``pixel_size``로 나누어 그리드 공간으로 변환하고, ``floor()``를 사용하여 가장 가까운 그리드 점으로 반올림한 다음 다시 곱하여 화면 공간으로 변환하는 방식으로 작동합니다. 결과적으로 엔진은 개별 그리드 위치에서 조명을 샘플링하여 픽셀화된 효과를 생성합니다.
컴퓨트 셰이더가 작동하는 방식에 대한 자세한 정보는 컴퓨트 셰이더 사용하기를 확인해 주세요.
거칠거나 부드러운 그림자 표현.

부드러운 그림자(PCF13, 필터 스무스 1.5)

Filter Smooth가 너무 높기 때문에 줄무늬 아티팩트가 있는 부드러운 그림자(PCF5, Filter Smooth 4)
노멀 및 스페큘러 맵
노멀 맵과 반사 맵은 2D 조명의 깊이감을 크게 향상시킬 수 있습니다. 3D 렌더링에서 이러한 작업이 작동하는 방식과 유사하게 노멀 맵은 빛을 받는 표면의 방향(픽셀 기준)에 따라 강도를 변경하여 조명을 덜 평면적으로 보이게 만드는 데 도움이 될 수 있습니다. 반사 맵은 빛의 일부를 보는 사람에게 다시 반사시켜 시각 효과를 향상시키는 데 도움이 됩니다.
PointLight2D와 DirectionalLight2D는 모두 법선 매핑과 반사 매핑을 지원합니다. Normal 및 Specular 맵은 Node2D 또는 Control에서 상속된 노드를 포함하여 모든 2D 요소에 할당할 수 있습니다.
노멀 맵은 각 픽셀이 "가리키는" 방향을 나타냅니다. 그런 다음 이 정보는 엔진에서 물리적으로 그럴듯한 방식으로 2D 표면에 조명을 올바르게 적용하는 데 사용됩니다. 노멀 맵은 일반적으로 손으로 그린 하이트 맵에서 생성되지만 다른 텍스처에서 자동으로 생성될 수도 있습니다.
반사 맵은 각 픽셀이 빛을 얼마나 반사해야 하는지(그리고 반사 맵에 색상이 포함된 경우 어떤 색상으로) 정의합니다. 값이 밝을수록 텍스처의 해당 지점에서 반사가 더 밝아집니다. 반사 맵은 일반적으로 확산 텍스처를 기본으로 사용하여 수동 편집을 통해 생성됩니다.
팁
스프라이트에 대한 법선 또는 반사 맵이 없는 경우 무료 오픈 소스 Laigter 도구를 사용하여 생성할 수 있습니다.
2D 노드에 노멀 맵 및/또는 반사 맵을 설정하려면 노드의 텍스처를 그리는 속성에 대한 새 CanvasTexture 리소스를 생성하세요. 예를 들어 Sprite2D에서는 다음과 같습니다.
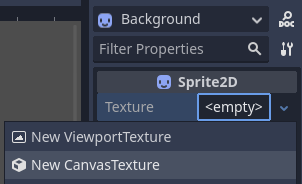
Sprite2D 노드에 대한 CanvasTexture 리소스 만들기
새로 생성된 리소스를 확장합니다. 조정해야 할 몇 가지 속성을 찾을 수 있습니다.
확산 > 텍스처: 기본 색상 텍스처입니다. 이 속성에서 스프라이트 자체에 사용 중인 텍스처를 로드합니다.
노멀 맵 > 텍스처: 노멀 맵 텍스처입니다. 이 속성에서는 높이 맵에서 생성한 노멀 맵 텍스처를 로드합니다(위 팁 참조).
반사광 > 텍스처: 확산 텍스처에 있는 각 픽셀의 반사광 강도를 제어하는 반사광 맵 텍스처입니다. 반사 맵은 일반적으로 회색조이지만 그에 따라 반사 색상을 곱하는 색상을 포함할 수도 있습니다. 이 속성에서 생성한 반사 맵 텍스처를 로드합니다(위 팁 참조).
반사광 > 색상: 반사광 반사에 대한 색상 승수입니다.
반사광 > 광택도: 반사에 사용할 반사광 지수입니다. 값이 낮을수록 반사의 밝기가 증가하고 확산이 더 커지며, 값이 높을수록 반사가 더 국지화됩니다. 높은 값은 젖어 보이는 표면에 더 적합합니다.
텍스처 > 필터: 노드 속성의 설정(또는 렌더링 > 텍스처 > 캔버스 텍스처 > 기본 텍스처 필터 프로젝트 설정)에 관계없이 텍스처 필터링 모드를 재정의하도록 설정할 수 있습니다.
텍스처 > 반복: 노드 속성의 설정(또는 렌더링 > 텍스처 > 캔버스 텍스처 > 기본 텍스처 반복 프로젝트 설정)에 관계없이 텍스처 필터링 모드를 재정의하도록 설정할 수 있습니다.
노멀 매핑을 활성화한 후에는 조명이 더 약해지는 것을 볼 수 있습니다. 이 문제를 해결하려면 PointLight2D 및 DirectionalLight2D 노드에서 Height 속성을 늘리세요. 노멀 매핑을 활성화하기 전의 조명 강도에 더 가까워지기 위해 조명의 에너지 속성을 약간 높일 수도 있습니다.
2D 조명에 대한 더 빠른 대안으로 추가 스프라이트 사용
2D 조명을 사용할 때 성능 문제가 발생하면 일부를 추가 블렌딩을 사용하는 Sprite2D 노드로 교체하는 것이 좋습니다. 이는 총알이나 폭발과 같이 수명이 짧은 동적 효과에 특히 적합합니다.
추가 스프라이트는 별도의 렌더링 파이프라인을 거칠 필요가 없기 때문에 렌더링 속도가 훨씬 빠릅니다. 또한 AnimatedSprite2D(또는 Sprite2D + AnimationPlayer)와 함께 이 접근 방식을 사용하여 애니메이션 2D "조명"을 생성할 수 있습니다.
그러나 추가 스프라이트에는 2D 조명에 비해 몇 가지 단점이 있습니다.
블렌딩 공식은 "실제" 2D 조명과 비교하여 부정확합니다. 일반적으로 조명이 충분히 켜진 영역에서는 문제가 되지 않지만, 이로 인해 추가 스프라이트가 완전히 어두운 영역을 올바르게 조명하지 못하게 됩니다.
추가 스프라이트는 조명이 아니기 때문에 그림자를 투사할 수 없습니다.
Additive Sprite는 다른 Sprite에 사용되는 Normal 및 Specular 맵을 무시합니다.
추가 블렌딩을 사용하여 스프라이트를 표시하려면 Sprite2D 노드를 만들고 여기에 텍스처를 할당합니다. 인스펙터에서 CanvasItem > Material 섹션까지 아래로 스크롤하여 펼치고 Material 속성 옆에 있는 드롭다운을 클릭합니다. **New CanvasItemMaterial**을 선택하고 새로 생성된 재질을 클릭하여 편집한 다음 **Blend Mode**를 **Add**로 설정합니다.