Attention: Here be dragons
This is the latest
(unstable) version of this documentation, which may document features
not available in or compatible with released stable versions of Godot.
Checking the stable version of the documentation...
2D 애니메이션 특징 소개
AnimationPlayer 노드는 간단한 애니메이션부터 복잡한 애니메이션까지 만들 수 있습니다.
이 가이드는 다음을 배웁니다:
애니메이션 패널 작업
노드의 속성 애니메이션하기
간단한 애니메이션 만들기
Godot에서 당신은 인스펙터의 노드 변형, 스프라이트, UI 요소, 입자, 가시성 및 재료 색상 기타 등을 애니메이션 할 수 있습니다. 스크립트 변수 값을 수정하고 임의의 함수를 호출할 수도 있습니다.
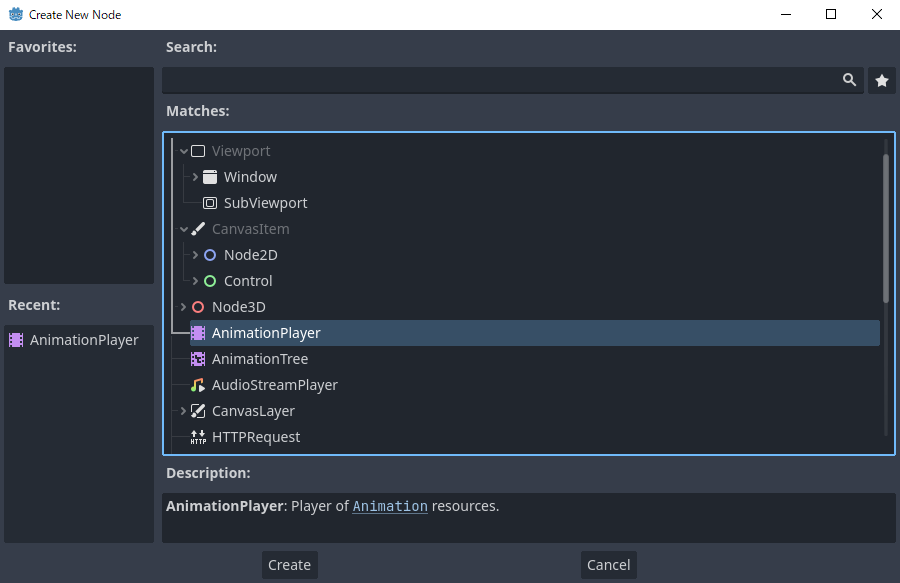
AnimationPlayer 노드 만들기
애니메이션 툴을 사용하기 위해서는 먼저 AnimationPlayer 노드를 만들어야 합니다.
AnimationPlayer 노드 유형은 애니메이션의 데이터 컨테이너입니다. AnimationPlayer 노드 하나로 여러 애니메이션을 저장할 수 있으며 자동으로 서로 전환될 수 있습니다.
AnimationPlayer 노드
노드 탭에서 AnimationPlayer 노드를 클릭해서 뷰포트 하단의 애니메이션 패널을 엽니다.

애니메이션 패널 위치
애니메이션 패널은 5가지 부분으로 구성되어 있습니다:

애니메이션 패널
애니메이션 컨트롤(예: 애니메이션 추가, 로드, 저장 및 삭제)
트랙 목록
키프레임이 포함된 타임라인
예를 들어 타임라인을 확대/축소하고 트랙을 편집할 수 있는 타임라인 및 트랙 컨트롤입니다.
컴퓨터 애니메이션은 키프레임에 의존합니다
키프레임은 특정 시점의 속성이 가지는 값을 정의합니다.
다이아몬드 모양은 타임라인의 키프레임을 나타냅니다. 두 키프레임 사이의 선은 값이 둘 사이에서 변경되지 않음을 나타냅니다.

Godot에서의 키프레임
노드 속성 값을 설정하고 해당 속성에 대한 애니메이션 키프레임을 만듭니다. 애니메이션이 실행되면 엔진은 키프레임 사이의 값을 보간하여 시간이 지남에 따라 점차적으로 변경됩니다.

두 개의 키프레임만 있으면 부드러운 움직임을 얻을 수 있습니다
타임라인은 애니메이션에 소요되는 시간을 정의합니다. 다양한 지점에 키프레임을 삽입하고 타이밍을 변경할 수 있습니다.

애니메이션 패널에서의 타임라인
애니메이션 패널의 각 줄은 노드의 Normal 또는 Transform 속성을 참조하는 애니메이션 트랙입니다. Each track stores a path to a 노드 and its affected property. 예를 들어 그림의 위치 트랙은 Sprite2D 노드의 position 속성을 참조합니다.

일반 애니메이션 트랙의 예
튜토리얼: 간단한 애니메이션 만들기
씬 설정
이 튜토리얼에서는 AnimationPlayer를 자식으로 사용하여 Sprite 노드를 만듭니다. 화면의 두 지점 사이를 이동하도록 스프라이트에 애니메이션을 적용하겠습니다.

씬 설정
경고
AnimationPlayer는 Node2D 또는 Node3D 대신 노드에서 상속합니다. 즉, 자식 노드는 계층 구조에 존재하는 베어 노드로 인해 상위 노드에서 변환을 상속하지 않습니다.
따라서 2D/3D 변환이 있는 노드를 AnimationPlayer 노드의 하위 항목으로 추가하는 것은 권장되지 않습니다.
스프라이트는 이미지 텍스처를 보유합니다. 이 튜토리얼에서는 Sprite2D 노드를 선택하고 인스펙터에서 Texture를 클릭한 다음 Load를 클릭합니다. 스프라이트 텍스처에 대한 기본 Godot 아이콘을 선택하세요.
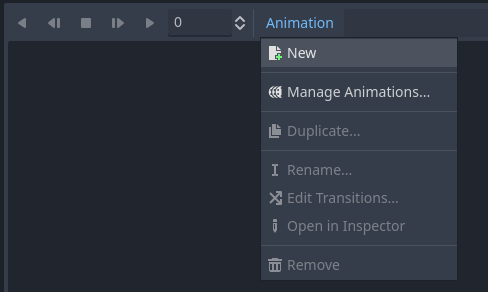
애니메이션 추가하기
AnimationPlayer 를 선택하고 "애니메이션" 버튼을 클릭한 다음 "새 파일"을 클릭하세요. 새 애니메이션을 "walk"로 이름을 지으세요. 애니메이션 길이를 0.6 로 설정하고 "Loop" 버튼을 클릭해서 애니메이션이 반복되도록 하세요.
새 애니메이션 추가
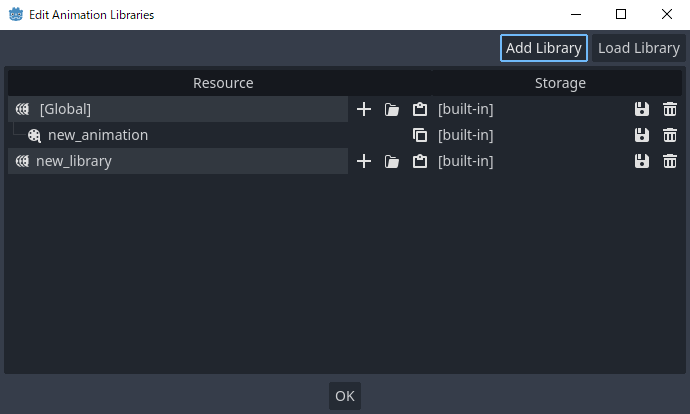
애니메이션 라이브러리 관리하기
재사용성을 위해 애니메이션은 애니메이션 라이브러리 리소스의 목록에 등록됩니다. 별도의 설정 없이 AnimationPlayer에 애니메이션을 추가하면 해당 애니메이션은 AnimationPlayer가 기본적으로 가지고 있는 [Global] 애니메이션 라이브러리에 등록됩니다.
애니메이션 관리
애니메이션 라이브러리가 여러 개 있고 애니메이션을 추가하려고 하면 옵션이 포함된 대화 상자가 나타납니다.

라이브러리 옵션으로 새 애니메이션 추가
트랙 추가
스프라이트에 대한 새 트랙을 추가하려면 해당 트랙을 선택하고 도구 모음을 살펴보세요.

편의버튼
이러한 스위치와 버튼을 사용하면 선택한 노드의 위치, 회전 및 배율에 대한 키프레임을 추가할 수 있습니다. 우리는 스프라이트의 위치에만 애니메이션을 적용하고 있으므로 위치 스위치만 선택되었는지 확인하세요. 선택된 스위치는 파란색입니다.
키 버튼을 클릭하여 첫 번째 키프레임을 만듭니다. 아직 Position 속성에 대한 트랙 설정이 없기 때문에 Godot는 우리를 위해 트랙을 생성하도록 제안할 것입니다. **만들기**를 클릭합니다.
Godot는 새 트랙을 생성하고 타임라인 시작 부분에 첫 번째 키프레임을 삽입합니다:

스프라이트 트랙
두 번째 키프레임
스프라이트의 종료 위치와 해당 위치에 도달하는 데 걸리는 시간을 설정해야 합니다.
점 사이를 이동하는 데 2초가 걸리기를 원한다고 가정해 보겠습니다. 기본적으로 애니메이션은 1초만 지속되도록 설정되어 있으므로 애니메이션 패널의 타임라인 헤더 오른쪽에 있는 컨트롤에서 애니메이션 길이를 2로 변경하세요.

애니메이션 길이
이제 스프라이트를 오른쪽으로 이동하여 최종 위치로 이동합니다. 도구 모음에서 *이동 도구*를 사용하거나 *인스펙터*에서 *위치*의 X 값을 설정할 수 있습니다.
애니메이션 패널에서 2초 표시 근처의 타임라인 헤더를 클릭한 다음 도구 모음에서 키 버튼을 클릭하여 두 번째 키프레임을 만듭니다.
애니메이션 실행
"처음부터 재생"(|처음부터 재생|) 버튼을 클릭하세요.
이야! 애니메이션은 다음과 같이 실행됩니다.
애니메이션
불러오면 자동재생
AnimationPlayer 노드 씬이 시작되거나 다른 씬에 합류할 때 애니메이션이 자동으로 재생되도록 만들 수 있습니다. 이렇게 하려면 애니메이션 편집기에서 편집 버튼 바로 옆에 있는 "로드 시 자동 재생" 버튼을 클릭하세요.

애니메이션 이름 앞에도 해당 아이콘이 표시되므로 자동 재생 애니메이션이 무엇인지 쉽게 식별할 수 있습니다.
앞뒤로
Godot에는 애니메이션에 사용할 수 있는 흥미로운 기능이 있습니다. 애니메이션 반복이 설정되었지만 애니메이션 끝에 지정된 키프레임이 없으면 첫 번째 키프레임이 마지막 키프레임이기도 합니다.
이것은 이제 애니메이션 길이를 4초로 연장할 수 있다는 것을 의미하며, Godot는 또한 스프라이트를 앞뒤로 이동하면서 마지막 키프레임부터 첫 번째 키프레임까지 프레임을 계산할 것입니다.

애니메이션 루프
트랙의 루프 모드를 변경하여 이 동작을 변경할 수 있습니다. 이에 대해서는 다음 장에서 다룹니다.
트랙 설정
각 속성 트랙 끝에는 업데이트 모드, 트랙 보간 및 루프 모드를 설정할 수 있는 설정 패널이 있습니다.

트랙 설정
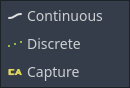
트랙의 업데이트 모드는 Godot에게 언제 속성 값을 업데이트할지 알려줍니다. 이는 다음과 같습니다.
지속적: 각 프레임의 속성을 업데이트합니다.
개별적: 키프레임의 속성만 업데이트합니다.
캡처: 첫 번째 키프레임의 시간이 ``0.0``보다 큰 경우 속성의 현재 값이 기억되어 첫 번째 애니메이션 키와 혼합됩니다. 예를 들어 캡처 모드를 사용하여 어디에나 있는 노드를 특정 위치로 이동할 수 있습니다.
툴 모드
일반적으로 "연속" 모드를 사용합니다. 다른 유형은 스크립트 복잡한 애니메이션에 사용됩니다.
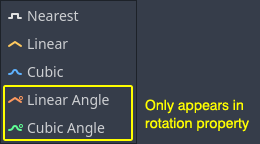
트랙 보간은 Godot에게 키프레임 사이의 프레임 값을 계산하는 방법을 알려줍니다. 다음 보간 모드가 지원됩니다.
Nearest: Set the nearest keyframe value
선형: 두 키프레임 간의 선형 함수 계산을 기반으로 값을 설정합니다.
큐빅: 두 키프레임 간의 큐빅 함수 계산을 기반으로 값을 설정합니다.
선형 각도(회전 속성에만 나타남): 최단 경로 회전이 포함된 선형 모드
큐빅 각도(회전 속성에만 나타남): 최단 경로 회전이 포함된 큐빅 모드
트랙 보간
큐빅 보간을 사용하면 애니메이션이 키프레임에서는 느리고 키프레임 사이에서는 빨라지므로 보다 자연스러운 움직임이 가능합니다. 큐빅 보간은 일반적으로 캐릭터 애니메이션에 사용됩니다. 선형 보간은 고정된 속도로 변화에 애니메이션을 적용하여 보다 로봇적인 효과를 만들어냅니다.
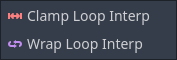
Godot는 루프로 설정된 경우 애니메이션에 영향을 미치는 두 가지 루프 모드를 지원합니다:
루프 모드
클램프 루프 보간: 이 항목을 선택하면 이 트랙의 마지막 키프레임 이후 애니메이션이 중지됩니다. 첫 번째 키프레임에 다시 도달하면 애니메이션이 해당 값으로 재설정됩니다.
랩 루프 보간: 이것을 선택하면 Godot는 마지막 키프레임 이후의 애니메이션을 계산하여 첫 번째 키프레임의 값에 다시 도달합니다.
다른 속성에 대한 키프레임
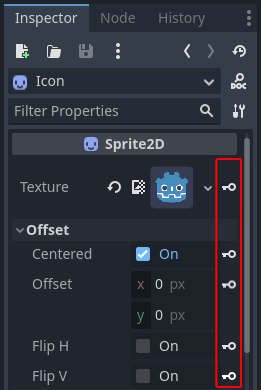
Godot의 애니메이션 시스템은 위치, 회전, 크기에 제한되지 않습니다. 모든 속성에 애니메이션을 적용할 수 있습니다.
애니메이션 패널이 보이는 동안 스프라이트를 선택하면 Godot는 각 스프라이트 속성에 대해 *인스펙터*에 작은 키프레임 버튼을 표시합니다. 현재 애니메이션에 트랙과 키프레임을 추가하려면 이 버튼 중 하나를 클릭하세요.
다른 속성에 대한 키프레임
키프레임 편집
애니메이션 타임라인에서 키프레임을 클릭하면 *인스펙터*에서 해당 값을 표시하고 편집할 수 있습니다.
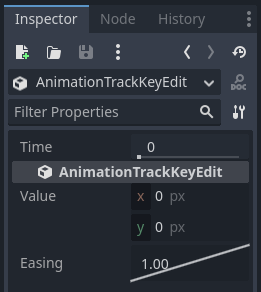
키를 편집하는 키프레임 편집기
여기에서 이징 곡선을 클릭하고 드래그하여 키프레임의 이징 값을 편집할 수도 있습니다. 이는 Godot가 이 키프레임에 도달할 때 애니메이션 속성을 보간하는 방법을 알려줍니다.
움직임이 "올바르게 보일" 때까지 이 방법으로 애니메이션을 조정할 수 있습니다.
공백 사용하기
"기본 포즈"를 포함하도록 특수 RESET 애니메이션을 설정할 수 있습니다. 이는 씬을 저장하고 편집기에서 다시 열 때 기본 포즈가 복원되도록 하는 데 사용됩니다.
기존 트랙의 경우 "RESET"(대소문자 구분)이라는 애니메이션을 추가한 다음 재설정하려는 각 속성에 대한 트랙을 추가할 수 있습니다. 유일한 키프레임은 시간 0에 있어야 하며 각 트랙에 대해 원하는 기본값을 지정해야 합니다.
AnimationPlayer의 Reset On Save 속성이 true``로 설정된 경우 씬는 적용된 재설정 애니메이션의 효과와 함께 저장됩니다(``0.0 시간을 검색한 것처럼). 이는 저장된 파일에만 영향을 미칩니다. 편집기의 속성 트랙은 원래 위치에 유지됩니다.
편집기에서 트랙을 재설정하려면 AnimationPlayer 노드를 선택하고 애니메이션 하단 패널을 연 다음 애니메이션 편집기의 편집 드롭다운 메뉴에서 **재설정 적용**을 선택합니다.
인스펙터의 속성 옆에 있는 키프레임 아이콘을 사용하면 편집기에서 자동으로 RESET 트랙을 생성하라는 메시지를 표시합니다.
참고
RESET 트랙은 블렌딩을 위한 참조 값으로도 사용됩니다. `더 나은 블렌딩을 위해 <../animation/animation_tree.html#for-better-blending>`__도 참조하세요.
애니메이션 설정
Godot의 애니메이션 편집기를 사용하면 애니메이션을 만드는 동안 어니언 스키닝을 사용할 수 있습니다. 이 기능을 켜려면 애니메이션 편집기 오른쪽 상단에 있는 양파 아이콘을 클릭하세요. 이제 애니메이션의 이전 위치에 애니메이션 중인 항목의 투명한 빨간색 복사본이 있게 됩니다.

어니언 스키닝 버튼 옆에 있는 세 개의 점 버튼을 누르면 향후 프레임에 어니언 스키닝을 사용하는 기능을 포함하여 작동 방식을 조정할 수 있는 드롭다운 메뉴가 열립니다.
AnimationPlayer
애니메이션 마커를 사용하면 전체가 아닌 애니메이션의 특정 부분을 재생할 수 있습니다. 다음은 사용 사례의 예입니다. 캐릭터가 두 가지 개별 작업을 수행하는 애니메이션 파일이 있으며 프로젝트에는 전체 애니메이션과 두 작업이 개별적으로 필요합니다. 두 개의 추가 애니메이션을 만드는 대신 타임라인에 마커를 배치할 수 있으며 이제 두 작업을 개별적으로 재생할 수 있습니다.
애니메이션에 마커를 추가하려면 타임라인 위의 공간을 마우스 오른쪽 버튼으로 클릭하고 **마커 삽입...**을 선택합니다.

모든 마커에는 애니메이션 내에서 고유한 이름이 필요합니다. 정리를 개선하기 위해 마커 색상을 설정할 수도 있습니다.
두 마커 사이의 애니메이션 부분을 재생하려면 play_section_with_markers() 및 play_section_with_markers_backwards() 메서드를 사용합니다. 시작 마커를 지정하지 않으면 애니메이션의 시작 부분이 사용되며, 종료 마커를 지정하지 않으면 애니메이션의 끝 부분이 사용됩니다.
종료 마커가 애니메이션 끝 뒤에 있는 경우 ``AnimationPlayer``는 섹션 끝을 고정하여 애니메이션 끝을 지나치지 않도록 합니다.
두 마커 사이의 애니메이션을 미리 보려면 :kbd:`Shift + Click`을 사용하여 마커를 선택하세요. 두 개를 선택하면 그 사이의 공간이 빨간색으로 강조 표시되어야 합니다.

이제 모든 애니메이션 재생 버튼은 선택한 영역이 전체 애니메이션인 것처럼 작동합니다. **시작부터 애니메이션 재생**은 첫 번째 마커를 애니메이션의 시작으로 처리하고, **끝에서 뒤로 애니메이션 재생**은 두 번째 마커를 끝으로 처리하는 식입니다.