Attention: Here be dragons
This is the latest
(unstable) version of this documentation, which may document features
not available in or compatible with released stable versions of Godot.
Checking the stable version of the documentation...
씬 테스트하기
이제 우리가 한 모든 작업을 하나로 모아 플레이 가능한 게임 씬을 만들 차례입니다.
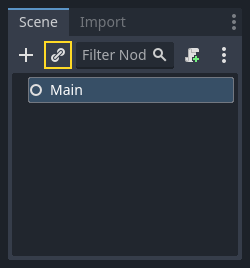
이제 모든 것을 하나로 모을 때입니다. 새 장면을 만들고 Main이라는 이름의 Node를 추가하세요. Node2D가 아닌 Node를 만들어야 합니다. "인스턴스화(Instance)" 버튼을 클릭하고 저장된 Player.tscn을 선택하세요.
인스턴스 버튼(체인 링크 아이콘으로 나타남)을 클릭하고 저장된 player.tscn을 선택하세요.
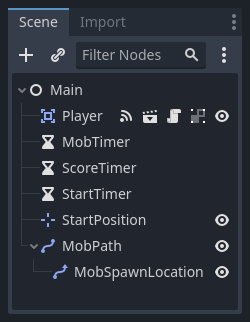
Main 의 자식으로 다음의 노드들을 추가하고, 설명대로 이름을 지으세요 (값은 초 단위입니다):
Timer (
MobTimer라고 이름 지음) - 얼마나 자주 몹이 소환하는지를 조절하기 위해 사용Timer (
ScoreTimer라고 이름 지음) - 매 초마다 점수를 증가시키기 위해 사용Timer (
StartTimer라고 이름 지음) - 시작하기 전에 지연을 주기 위해 사용Marker2D (
StartPosition이라고 이름 지음) - 플레이어의 시작 위치를 나타내기 위해 사용
각 Timer마다 Wait Time 속성을 다음과 같이 설정하세요:
MobTimer:0.5ScoreTimer:1StartTimer:2
그리고, StartTimer 속성의 One Shot을 "사용(On)"으로 설정하고 StartPosition 노드의 Position을 (240, 450) 으로 설정하세요.
몹 소환하기
메인 노드는 새로운 몹을 소환할 것이고 우리는 몹이 화면 가장자리 아무 위치에서나 나타나도록 만들고 싶습니다. Path2D 노드를 Main의 자식으로 추가하고 MobPath라고 이름지으세요. Path2D를 선택하면 편집기 위쪽에 새로운 버튼들이 나타납니다:

가운데 버튼 "점 추가(Add Point)"을 선택하고 점을 추가하기 위해 표시된 모서리를 클릭해서 경로를 그리세요. 점이 그리드에 스냅(snap)되도록 하려면 "격자 스냅 사용(Use Grid Snap)" 및 "스냅 사용(Use Snap)"이 모두 선택되어 있는지 확인하세요. 이 옵션은 "잠금(Lock)" 버튼 왼쪽에서 찾을 수 있으며, 각각 점과 교차선 옆에 자석이 있는 모양입니다.

중요
시계 방향으로 그리세요, 그렇지 않으면 몹들은 안쪽이 아닌 바깥쪽으로 향해 소환될 것입니다!

이미지에서 4개의 점을 찍고 난 후, "곡선 닫기(Close Curve)" 버튼을 누르면 곡선이 완성됩니다.
이제 경로를 정의하기 위해 PathFollow2D 노드를 MobPath의 자식으로 추가한 후 MobSpawnLocation이라고 이름 지으세요. 이 노드는 자동으로 회전하고 이동하면서 경로를 따라갈 것입니다, 그러므로 경로를 따라 임의의 위치와 방향을 선택하기 위해 이것을 사용할 수 있습니다.
씬 트리는 다음과 같아야 합니다:
메인 스크립트
Main에 스크립트를 추가합니다. 스크립트의 위에 export (PackedScene)를 사용해서 우리가 인스턴스화하길 원하는 몹 씬을 고를 수 있도록 만듭니다.
extends Node

@export var mob_scene: PackedScene
var score
using Godot;

public partial class Main : Node
{
    // Don't forget to rebuild the project so the editor knows about the new export variable.

    [Export]
    public PackedScene MobScene { get; set; }

    private int _score;
}
Main 노드를 클릭하면 인스펙터의 "Script Variables" 아래에서 Mob 속성을 볼 수 있습니다.
다음 두 가지 방법으로 이 속성의 값을 할당할 수 있습니다:
"파일시스템" 독에서
mob.tscn을 끌어서 Mob Scene 속성에 놓으세요."[비었음]" 옆에 아래쪽 화살표를 클릭하고 "불러오기"를 고르세요.
mob.tscn을 선택하세요.
Next, select the instance of the Player scene under Main node in the Scene dock,
and access the Signals dock on the sidebar.
Player 노드에 대한 시그널 목록이 표시되어야 합니다. 목록에서 hit 시그널을 찾아 더블 클릭하세요(또는 마우스 오른쪽 단추로 클릭하고 "연결..." 선택). 그러면 시그널 연결 대화 상자가 열립니다. 우리는 게임이 끝났을 때 일어날 일을 처리할 game_over라는 새로운 함수를 만들고 싶습니다. 신호 연결 대화 상자 아래쪽의 "받는 메서드" 상자에 "game_over"를 입력하고 "연결"을 클릭하세요. 다음 코드를 새 함수에 추가하고 새 게임에 대한 모든 것을 설정하는 new_game 함수를 추가합니다:
func game_over():
    $ScoreTimer.stop()
    $MobTimer.stop()

func new_game():
    score = 0
    $Player.start($StartPosition.position)
    $StartTimer.start()
public void GameOver()
{
    GetNode<Timer>("MobTimer").Stop();
    GetNode<Timer>("ScoreTimer").Stop();
}

public void NewGame()
{
    _score = 0;

    var player = GetNode<Player>("Player");
    var startPosition = GetNode<Marker2D>("StartPosition");
    player.Start(startPosition.Position);

    GetNode<Timer>("StartTimer").Start();
}
이제 각 타이머 노드(StartTimer, ScoreTimer 및 MobTimer)의 timeout() 시그널를 기본 스크립트에 연결합니다. 세 가지 타이머 각각에 대해 씬 독에서 타이머를 선택하고 노드 독의 시그널 탭을 연 다음 목록에서 timeout() 시그널를 두 번 클릭합니다. 그러면 새로운 시그널 연결 대화 상자가 열립니다. 이 대화 상자의 기본 설정은 괜찮으므로 **연결**를 선택하여 새 시그널 연결을 만듭니다.
세 개의 타이머가 모두 설정되면 각 타이머에 해당 timeout() 시그널에 대한 시그널 연결이 해당 시그널 탭 내에서 녹색으로 표시되는 것을 볼 수 있습니다.
(MobTimer의 경우):
_on_mob_timer_timeout()(스코어타이머의 경우):
_on_score_timer_timeout()(StartTimer의 경우):
_on_start_timer_timeout()
이제 각 Timer 노드(StartTimer, ScoreTimer 및 MobTimer)의 timeout() 시그널을 메인 스크립트에 연결하세요. StartTimer는 다른 두 타이머를 작동시킵니다. ScoreTimer는 점수를 1씩 증가시킵니다.
func _on_score_timer_timeout():
    score += 1

func _on_start_timer_timeout():
    $MobTimer.start()
    $ScoreTimer.start()
// We also specified this function name in PascalCase in the editor's connection window.
private void OnScoreTimerTimeout()
{
    _score++;
}

// We also specified this function name in PascalCase in the editor's connection window.
private void OnStartTimerTimeout()
{
    GetNode<Timer>("MobTimer").Start();
    GetNode<Timer>("ScoreTimer").Start();
}
_on_MobTimer_timeout()에서 우리는 몹 인스턴스를 만들고, Path2D에 따라 무작위 시작점을 결정하고, 몹이 움직이도록 설정할 것입니다. PathFollow2D 노드는 자동으로 경로를 따라 돌기 때문에 몹들의 위치와 방향을 선택하기 위해서 사용할 수 있습니다.
새로운 인스턴스는 add_child()를 사용해야 추가할 수 있습니다.
func _on_mob_timer_timeout():
    # Create a new instance of the Mob scene.
    var mob = mob_scene.instantiate()

    # Choose a random location on Path2D.
    var mob_spawn_location = $MobPath/MobSpawnLocation
    mob_spawn_location.progress_ratio = randf()

    # Set the mob's position to the random location.
    mob.position = mob_spawn_location.position

    # Set the mob's direction perpendicular to the path direction.
    var direction = mob_spawn_location.rotation + PI / 2

    # Add some randomness to the direction.
    direction += randf_range(-PI / 4, PI / 4)
    mob.rotation = direction

    # Choose the velocity for the mob.
    var velocity = Vector2(randf_range(150.0, 250.0), 0.0)
    mob.linear_velocity = velocity.rotated(direction)

    # Spawn the mob by adding it to the Main scene.
    add_child(mob)
// We also specified this function name in PascalCase in the editor's connection window.
private void OnMobTimerTimeout()
{
    // Create a new instance of the Mob scene.
    Mob mob = MobScene.Instantiate<Mob>();

    // Choose a random location on Path2D.
    var mobSpawnLocation = GetNode<PathFollow2D>("MobPath/MobSpawnLocation");
    mobSpawnLocation.ProgressRatio = GD.Randf();

    // Set the mob's direction perpendicular to the path direction.
    float direction = mobSpawnLocation.Rotation + Mathf.Pi / 2;

    // Set the mob's position to a random location.
    mob.Position = mobSpawnLocation.Position;

    // Add some randomness to the direction.
    direction += (float)GD.RandRange(-Mathf.Pi / 4, Mathf.Pi / 4);
    mob.Rotation = direction;

    // Choose the velocity.
    var velocity = new Vector2((float)GD.RandRange(150.0, 250.0), 0);
    mob.LinearVelocity = velocity.Rotated(direction);

    // Spawn the mob by adding it to the Main scene.
    AddChild(mob);
}
중요
왜 PI인가요? 각도가 필요한 함수에서 GDScript는 디그리(degree)가 아닌 라디안(radians)을 사용합니다. 디그리를 가지고 작업하는 것이 더 편하다면 deg2rad()와 rad2deg() 함수를 사용해 변환해야 합니다.
씬 테스트하기
모든 것이 제대로 작동하는지 확인하기 위해 씬을 테스트해 보겠습니다. _ready()에 다음을 추가합니다:
func _ready():
    new_game()
public override void _Ready()
{
    NewGame();
}
게임이 시작될 때 자동으로 실행되는 "Main Scene"으로 Main을 지정해 보겠습니다. "재생" 버튼을 누르고 메시지가 표시되면 main.tscn을 선택합니다.
팁
이미 다른 씬을 "메인 씬"으로 설정한 경우, 파일시스템 독에서 main.tscn을 마우스 오른쪽 버튼으로 클릭하고 "메인 씬으로 설정"을 선택할 수 있습니다.
플레이어를 움직이고, 몹들이 소환되는 것을 보고, 플레이어가 몹과 충돌할 때 사라지는 것을 볼 수 있어야 합니다.
모든 것이 제대로 작동한다고 확신한다면 '_ready()'에서 new_game() 함수 호출을 제거하세요.
우리 게임에 무엇이 부족할까요? 바로 사용자 인터페이스입니다. 다음 단원에서는 타이틀 화면을 추가하고 플레이어의 점수를 표시하겠습니다.