Attention: Here be dragons
This is the latest
(unstable) version of this documentation, which may document features
not available in or compatible with released stable versions of Godot.
Checking the stable version of the documentation...
헤드업 디스플레이
우리 게임에 필요한 마지막 요소는 점수, "게임 오버" 메시지, 재시작 버튼과 같은 항목을 표시할 사용자 인터페이스(UI)입니다.
새 씬을 만들고 "Other Node" 버튼을 클릭하여 HUD 라는 이름의 CanvasLayer 노드를 추가합니다. "HUD"는 "헤드업 디스플레이"의 약자로, 게임 뷰 위에 오버레이로 나타나는 정보 표시입니다.
CanvasLayer 노드는 게임 위 레이어에 우리의 UI 요소들을 그릴수 있게 해주고, 이로써 보여지는 정보가 플레이어나 몹과 같은 게임 요소들에 의해 가려지지 않게 만듭니다.
HUD는 다음 정보를 표시해야 합니다:
ScoreTimer에 의해 변경되는 점수(Score)."Game Over"나 "Get Ready!"와 같은 메시지
게임을 시작하기 위한 "Start" 버튼.
UI 요소의 기초가 되는 노드는 Control입니다. UI를 만들기 위해, 우리는 두 가지 타입의 Control 노드: Label과 Button을 사용할 것입니다.
다음 노드들을 HUD 노드의 자식으로 추가하세요:
ScoreLabel로 이름 지은 Label.Message로 이름 지은 Label.StartButton으로 이름 지은 Button.MessageTimer로 이름 지은 Timer.
ScoreLabel을 클릭하고 인스펙터에서 텍스트 필드에 숫자를 입력하세요. Control 노드에 대한 디폴트 글꼴은 작아서 크기 조절이 잘 되지 않습니다. 게임 애셋에는 "Xolonium-Regular.ttf"라는 글꼴 파일이 있습니다. 이 글꼴을 사용하려면, 다음과 같이 하세요:
"테마 오버라이드 > 글꼴"에서 "불러오기"를 선택하고 "Xolonium-Regular.ttf" 파일을 선택합니다.
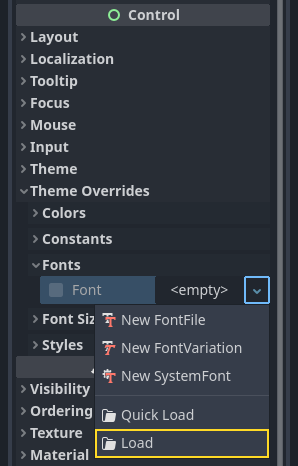
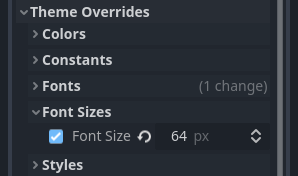
글꼴 크기가 여전히 너무 작으므로 "테마 오버라이드 > 글꼴 크기"에서 64로 늘립니다. ScoreLabel로 이 작업을 완료한 후에는 Message 및 StartButton 노드에 대해서도 변경사항을 반복합니다.
참고
앵커: Control 노드에는 위치와 크기가 있지만 앵커도 있습니다. 앵커는 노드의 가장자리에 대한 기준점인 원점을 정의합니다.
여러분은 노드를 드래그해서 수동으로 놓을 수도 있지만 더 정확하게 하고 싶다면 다음 설정을 사용하세요:
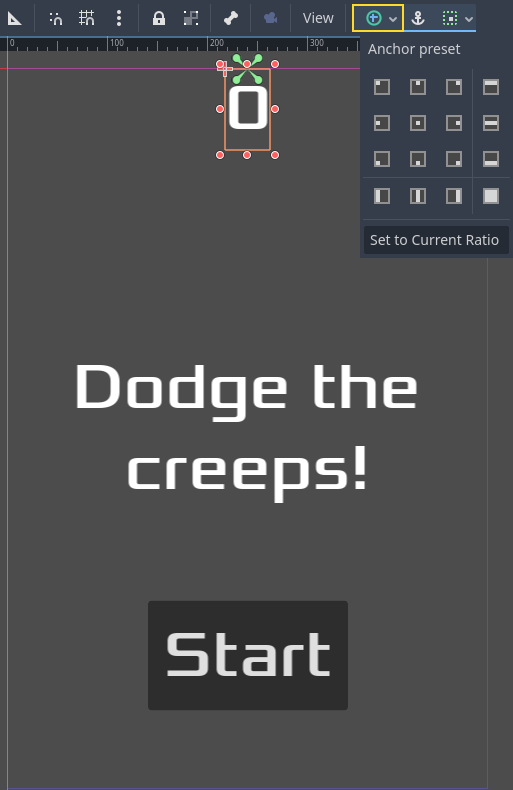
ScoreLabel
텍스트
0을 추가합니다."가로 정렬"과 "세로 정렬"을
가운데로 설정합니다."앵커 프리셋(Anchor Preset)"을
중심 상단(Center Top)으로 선택합니다.
메시지
메인에 HUD를 연결하기
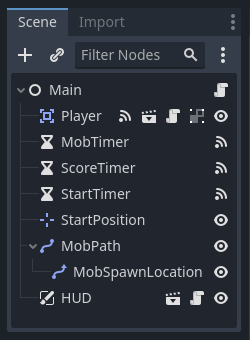
이제 HUD 씬 만들기가 끝났으니 저장하고 다시 Main으로 돌아가세요. Player 씬에서 했듯이 HUD 씬을 Main에 인스턴스화하고, 트리의 맨 아래에 배치하세요. 모든 트리는 다음처럼 보여야 하므로, 놓친 것이 없는지 확인해보세요:
이제 HUD 기능을 Main 스크립트에 연결할 것입니다. 여기에는 Main 씬에 추가적인 것들이 요구됩니다:
In the Signals tab, connect the HUD's start_game signal to the new_game()
function of the Main node by clicking the "Pick" button in the "Connect a Signal"
window and selecting the new_game() method or type "new_game" below "Receiver Method"
in the window. Verify that the green connection icon now appears next to
func new_game() in the script.
new_game()에서, 점수 표시를 업데이트하고 "Get Ready" 메시지를 보이게 합니다:
$HUD.update_score(score)
$HUD.show_message("Get Ready")
var hud = GetNode<HUD>("HUD");
hud.UpdateScore(_score);
hud.ShowMessage("Get Ready!");
game_over()에서는, 해당 HUD 함수를 호출해야 합니다:
$HUD.show_game_over()
GetNode<HUD>("HUD").ShowGameOver();
마지막으로, _on_ScoreTimer_timeout()을 추가해서 점수가 바뀌면 화면과 일치하도록 합니다:
$HUD.update_score(score)
GetNode<HUD>("HUD").UpdateScore(_score);
경고
모든 것이 제대로 작동한다고 확신한다면 '_ready()'에서 new_game() 함수 호출을 제거하세요.
이제 실행할 준비가 끝났습니다! "프로젝트 실행" 버튼을 누르세요. 메인 씬을 선택하라고 물어보면 Main.tscn을 골라줍시다.
오래된 적들 제거하기
"Game Over"까지 플레이한 다음 바로 새 게임을 시작하면 이전 게임의 크립이 화면에 계속 표시될 수 있습니다. 새 게임이 시작될 때 모두 사라지면 더 좋을 것입니다. 우리는 모든 몹에게 스스로 제거하도록 지시할 방법이 필요합니다. "그룹(group)" 기능으로 이 작업을 수행할 수 있습니다.
Mob 씬에서 루트 노드를 선택하고 인스펙터 옆에 "노드" 탭을 클릭하세요 (노드의 시그널이 있는 곳과 같은 장소). "시그널" 옆에 "그룹"을 클릭하여 그룹 개요를 열고, "+" 버튼을 클릭하여 "새 그룹 만들기" 대화 상자를 엽니다.

그룹 이름을 ``mobs``로 지정하고 "확인"을 클릭하여 새 씬 그룹을 추가합니다.

이제 모든 몹은 "몹" 그룹에 속하게 됩니다.

이제 모든 몹이 "몹" 그룹에 포함됩니다. 그런 다음 Main의 game_over() 함수에 다음 줄을 추가하세요:
get_tree().call_group("mobs", "queue_free")
// Note that for calling Godot-provided methods with strings,
// we have to use the original Godot snake_case name.
GetTree().CallGroup("mobs", Node.MethodName.QueueFree);
call_group() 함수는 그룹의 모든 노드에서 지정된 함수를 호출합니다. 이 경우 모든 몹에게 자신을 삭제하도록 지시합니다.
이제 게임의 대부분이 완성되었습니다. 다음이자 마지막 부분에서는 배경, 반복되는 음악, 몇 가지 키보드 단축키를 추가하여 게임을 조금 더 다듬어 보겠습니다.