Attention: Here be dragons
This is the latest
(unstable) version of this documentation, which may document features
not available in or compatible with released stable versions of Godot.
Checking the stable version of the documentation...
적 만들기
이제 우리의 플레이어가 피할 몹을 만들 차례입니다. 이들의 행동은 그리 복잡하진 않을 것입니다: 몹이 무작위로 화면의 가장자리에서 소환하고 무작위 방향을 선택해 직선으로 이동합니다.
먼저 Mob 장면을 생성할 것입니다. 그런 다음 인스턴스화해서 게임에서 원하는 수의 독립적인 몹을 생성할 수 있습니다.
노드 설정하기
상단 메뉴에서 씬 -> 새 씬을 클릭하고 다음 노드을 추가하세요:
RigidBody2D (
Mob라고 이름 지음)
Don't forget to set the children so they can't be selected, like you did with
the Player scene. This is done by selecting the parent node (RigidBody2D) in the
Scene tree dock, then using the button at the top of the 2D editor
(Ctrl + G or Cmd + G on macOS).
Mob 노드를 선택하고 인스펙터의 RigidBody2D 섹션에서 Gravity Scale 속성을 0으로 설정합니다. 이렇게 하면 적이 아래로 떨어지는 것을 방지할 수 있습니다.
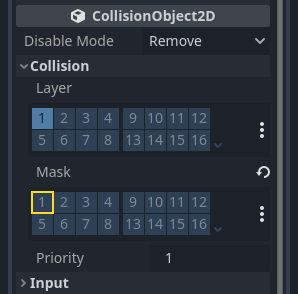
In addition, in the Mob node inspector,
under the CollisionObject2D
section, expand the Collision group and
uncheck the 1 inside the Mask property.
This will ensure the mobs do not collide with each other.
플레이어에서 설정한 것처럼 AnimatedSprite를 설정합니다. 이번에는 fly, swim, walk의 3가지 애니메이션이 있습니다. art 폴더에는 각 애니메이션에 대해 두 개의 이미지가 있습니다.
Animation Speed 속성은 각 개별 애니메이션에 대해 설정해야 합니다. 모든 3개의 애니메이션에 대해 이를 3으로 조정합니다.
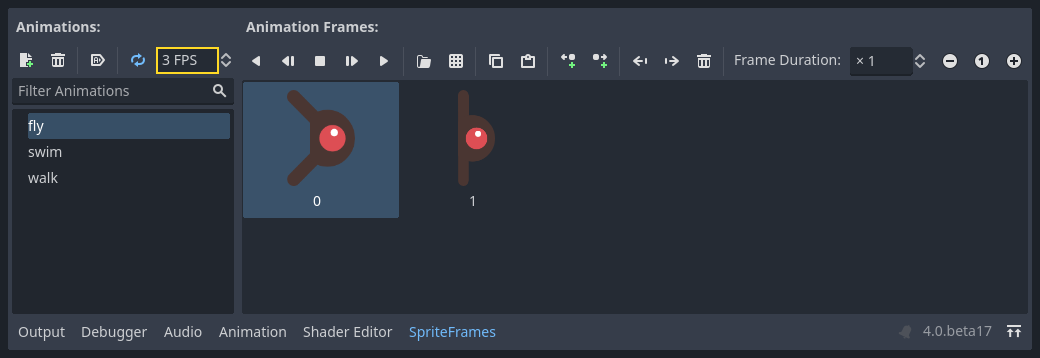
애니메이션을 미리보기 위해 Animation Speed 입력 필드 오른쪽에 있는 "Play Animation(애니메이션 실행)" 버튼을 사용할 수 있습니다.
몬스터가 다양해질 수 있도록 이 애니메이션 중 하나를 무작위로 선택할 것입니다.
플레이어 이미지처럼, 이 몹 이미지들도 크기를 줄일 필요가 있습니다. AnimatedSprite의 Scale 속성을 (0.75, 0.75)로 설정하세요.
Player 씬처럼 콜리전을 위한 CapsuleShape2D을 추가하세요. 이미지와 모양이 같도록, Node2D 아래 Rotation Degrees 속성을 90으로 설정해야 합니다 (인스펙터의 "변형" 아래에 있음).
씬을 저장하세요.
적 스크립트
Mob에게 스크립트를 추가해주고 다음 멤버 변수를 추가해주세요:
extends RigidBody2D
using Godot;

public partial class Mob : RigidBody2D
{
    // Don't forget to rebuild the project.
}
이제 스크립트의 나머지를 봅시다. _ready() 에서 우리는 무작위로 세 개의 애니메이션 유형 중 하나를 고릅니다:
func _ready():
    var mob_types = Array($AnimatedSprite2D.sprite_frames.get_animation_names())
    $AnimatedSprite2D.animation = mob_types.pick_random()
    $AnimatedSprite2D.play()
public override void _Ready()
{
    var animatedSprite2D = GetNode<AnimatedSprite2D>("AnimatedSprite2D");
    string[] mobTypes = animatedSprite2D.SpriteFrames.GetAnimationNames();
    animatedSprite2D.Play(mobTypes[GD.Randi() % mobTypes.Length]);
}
먼저 AnimatedSprite의 frames 속성에서 애니메이션 이름 목록을 가져옵니다. 이것은 ["walk", "swim", "fly"]의 세 가지 애니메이션 이름을 모두 포함하는 배열을 반환합니다.
그런 다음 목록에서 이 이름 중 하나를 선택하려면 0과 2 사이의 임의의 숫자를 선택해야 합니다(배열 인덱스는 0에서 시작). randi() % n은 0과 n-1 사이의 임의의 정수를 선택합니다.
마지막으로 ``play()``를 호출하여 선택한 애니메이션 재생을 시작합니다.
마지막 과정은 몹이 화면을 떠날 때 스스로 삭제하도록 하는 것입니다. VisibilityNotifier2D 노드의 screen_exited() 시그널을 연결하고 다음 코드를 추가합니다:
func _on_visible_on_screen_notifier_2d_screen_exited():
    queue_free()
// We also specified this function name in PascalCase in the editor's connection window.
private void OnVisibleOnScreenNotifier2DScreenExited()
{
    QueueFree();
}
``queue_free()``는 프레임 끝에서 노드를 기본적으로 '해제'하거나 삭제하는 기능입니다.
이것으로 Mob 씬이 완성되었습니다.
플레이어와 적이 준비되었으므로, 다음 단계에서는 새로운 씬에 이들을 함께 배치할 것입니다. 적들이 게임 보드 주변에 무작위로 소환되어 앞으로 이동하게 하여, 우리의 프로젝트를 플레이 가능한 게임으로 만들 것입니다.