Attention: Here be dragons
This is the latest
(unstable) version of this documentation, which may document features
not available in or compatible with released stable versions of Godot.
Checking the stable version of the documentation...
doc_inspector_plugins
인스펙터 도크를 사용하면 플러그인을 통해 속성을 편집하는 사용자 정의 위젯을 만들 수 있습니다. 이 기능을 사용하여 내장 유형에 대한 검사기 위젯을 변경할 수 있지만 이는 사용자 정의 데이터 유형 및 리소스로 작업할 때 유용할 수 있습니다. 특정 속성, 전체 개체 및 특정 데이터 유형과 관련된 별도의 컨트롤에 대한 사용자 정의 컨트롤을 디자인할 수 있습니다.
이 가이드에서는 EditorInspectorPlugin 및 EditorProperty 클래스를 사용하여 정수에 대한 사용자 정의 인터페이스를 만들고 기본 동작을 0에서 99 사이의 임의 값을 생성하는 버튼으로 바꾸는 방법을 설명합니다.
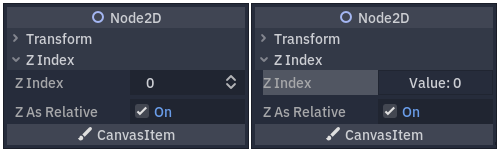
왼쪽은 기본 동작이고 오른쪽은 최종 결과입니다.
씬 설정하기
만들기 새로운 빈 플러그인을 시작하세요.
더 보기
새 플러그인을 설정하려면 플러그인 만들기 가이드를 참조하세요.
플러그인 폴더 이름이 my_inspector_plugin``라고 가정해 보겠습니다. 그렇다면 ``plugin.cfg 및 plugin.gd``라는 두 개의 파일이 포함된 새 ``addons/my_inspector_plugin 폴더가 생성되어야 합니다.
이전과 마찬가지로 plugin.gd``는 :ref:`class_EditorPlugin`를 확장하는 스크립트이며 해당 ``_enter_tree 및 _exit_tree 메서드에 대한 새 코드를 도입해야 합니다. 검사기 플러그인을 설정하려면 스크립트를 로드한 다음 ``add_inspector_plugin()``를 호출하여 인스턴스를 만들고 추가해야 합니다. 플러그인이 비활성화된 경우 ``remove_inspector_plugin()``를 호출하여 추가한 인스턴스를 제거해야 합니다.
참고
여기서는 압축된 씬이 아닌 스크립트를 로드합니다. 따라서 instantiate() 대신 ``new()``를 사용해야 합니다.
# plugin.gd
@tool
extends EditorPlugin

var plugin


func _enter_tree():
    plugin = preload("res://addons/my_inspector_plugin/my_inspector_plugin.gd").new()
    add_inspector_plugin(plugin)


func _exit_tree():
    remove_inspector_plugin(plugin)
// Plugin.cs
#if TOOLS
using Godot;

[Tool]
public partial class Plugin : EditorPlugin
{
    private MyInspectorPlugin _plugin;

    public override void _EnterTree()
    {
        _plugin = new MyInspectorPlugin();
        AddInspectorPlugin(_plugin);
    }

    public override void _ExitTree()
    {
        RemoveInspectorPlugin(_plugin);
    }
}
#endif
쿼터니언(quaternions) 으로 보간하기
검사기 도크와 상호 작용하려면 my_inspector_plugin.gd 스크립트가 EditorInspectorPlugin 클래스를 확장해야 합니다. 이 클래스는 검사기가 속성을 처리하는 방법에 영향을 미치는 여러 가상 메서드를 제공합니다.
어떤 효과가 있으려면 스크립트가 _can_handle() 메서드를 구현해야 합니다. 이 함수는 편집된 각 :ref:`class_Object`에 대해 호출되며 이 플러그인이 개체 또는 해당 속성을 처리해야 하는 경우 ``true``를 반환해야 합니다.
참고
여기에는 개체에 연결된 모든 :ref:`class_Resource`가 포함됩니다.
네 가지 다른 메서드를 구현하여 특정 위치에 있는 검사기에 컨트롤을 추가할 수 있습니다. _parse_begin() 및 _parse_end() 메소드는 각 객체에 대한 구문 분석 시작과 끝에서 각각 한 번만 호출됩니다. ``add_custom_control()``를 호출하여 검사기 레이아웃의 상단이나 하단에 컨트롤을 추가할 수 있습니다.
편집기는 객체를 구문 분석하면서 _parse_category() 및 _parse_property() 메서드를 호출합니다. 여기서 add_custom_control() 외에도 add_property_editor() 및 ``add_property_editor_for_multiple_properties()``를 모두 호출할 수 있습니다. EditorProperty 기반 컨트롤을 구체적으로 추가하려면 마지막 두 가지 방법을 사용하세요.
# my_inspector_plugin.gd
extends EditorInspectorPlugin

var RandomIntEditor = preload("res://addons/my_inspector_plugin/random_int_editor.gd")


func _can_handle(object):
    # We support all objects in this example.
    return true


func _parse_property(object, type, name, hint_type, hint_string, usage_flags, wide):
    # We handle properties of type integer.
    if type == TYPE_INT:
        # Create an instance of the custom property editor and register
        # it to a specific property path.
        add_property_editor(name, RandomIntEditor.new())
        # Inform the editor to remove the default property editor for
        # this property type.
        return true
    else:
        return false
// MyInspectorPlugin.cs
#if TOOLS
using Godot;

public partial class MyInspectorPlugin : EditorInspectorPlugin
{
    public override bool _CanHandle(GodotObject @object)
    {
        // We support all objects in this example.
        return true;
    }

    public override bool _ParseProperty(GodotObject @object, Variant.Type type,
        string name, PropertyHint hintType, string hintString,
        PropertyUsageFlags usageFlags, bool wide)
    {
        // We handle properties of type integer.
        if (type == Variant.Type.Int)
        {
            // Create an instance of the custom property editor and register
            // it to a specific property path.
            AddPropertyEditor(name, new RandomIntEditor());
            // Inform the editor to remove the default property editor for
            // this property type.
            return true;
        }

        return false;
    }
}
#endif
노드 속성
EditorProperty 클래스는 검사기 도크의 편집된 개체와 상호 작용할 수 있는 특별한 유형의 :ref:`class_Control`입니다. 아무것도 표시하지 않지만 복잡한 장면을 포함하여 다른 컨트롤 노드를 수용할 수 있습니다.
:ref:`class_EditorProperty`를 확장하는 스크립트에는 세 가지 필수 부분이 있습니다.
제어 노드' 구조를 설정하려면
_init()메소드를 정의해야 합니다.외부의 데이터 변경 사항을 처리하려면 ``_update_property()``를 구현해야 합니다.
시그널는 컨트롤이 ``emit_changed``를 사용하여 속성을 변경했음을 검사관에게 알리기 위해 어느 시점에서 방출되어야 합니다.
두 가지 방법으로 사용자 정의 위젯을 표시할 수 있습니다. 속성 이름 오른쪽에 표시하려면 기본 add_child() 메서드를 사용하고, 이름 아래에 배치하려면 add_child() 다음에 ``set_bottom_editor()``를 사용합니다.
# random_int_editor.gd
extends EditorProperty


# The main control for editing the property.
var property_control = Button.new()
# An internal value of the property.
var current_value = 0
# A guard against internal changes when the property is updated.
var updating = false


func _init():
    # Add the control as a direct child of EditorProperty node.
    add_child(property_control)
    # Make sure the control is able to retain the focus.
    add_focusable(property_control)
    # Setup the initial state and connect to the signal to track changes.
    refresh_control_text()
    property_control.pressed.connect(_on_button_pressed)


func _on_button_pressed():
    # Ignore the signal if the property is currently being updated.
    if (updating):
        return

    # Generate a new random integer between 0 and 99.
    current_value = randi() % 100
    refresh_control_text()
    emit_changed(get_edited_property(), current_value)


func _update_property():
    # Read the current value from the property.
    var new_value = get_edited_object()[get_edited_property()]
    if (new_value == current_value):
        return

    # Update the control with the new value.
    updating = true
    current_value = new_value
    refresh_control_text()
    updating = false

func refresh_control_text():
    property_control.text = "Value: " + str(current_value)
// RandomIntEditor.cs
#if TOOLS
using Godot;

public partial class RandomIntEditor : EditorProperty
{
    // The main control for editing the property.
    private Button _propertyControl = new Button();
    // An internal value of the property.
    private int _currentValue = 0;
    // A guard against internal changes when the property is updated.
    private bool _updating = false;

    public RandomIntEditor()
    {
        // Add the control as a direct child of EditorProperty node.
        AddChild(_propertyControl);
        // Make sure the control is able to retain the focus.
        AddFocusable(_propertyControl);
        // Setup the initial state and connect to the signal to track changes.
        RefreshControlText();
        _propertyControl.Pressed += OnButtonPressed;
    }

    private void OnButtonPressed()
    {
        // Ignore the signal if the property is currently being updated.
        if (_updating)
        {
            return;
        }

        // Generate a new random integer between 0 and 99.
        _currentValue = (int)GD.Randi() % 100;
        RefreshControlText();
        EmitChanged(GetEditedProperty(), _currentValue);
    }

    public override void _UpdateProperty()
    {
        // Read the current value from the property.
        var newValue = (int)GetEditedObject().Get(GetEditedProperty());
        if (newValue == _currentValue)
        {
            return;
        }

        // Update the control with the new value.
        _updating = true;
        _currentValue = newValue;
        RefreshControlText();
        _updating = false;
    }

    private void RefreshControlText()
    {
        _propertyControl.Text = $"Value: {_currentValue}";
    }
}
#endif
위의 예제 코드를 사용하면 정수에 대한 기본 SpinBox 컨트롤을 임의의 값을 생성하는 :ref:`class_Button`로 바꾸는 사용자 정의 위젯을 만들 수 있습니다.