Attention: Here be dragons
This is the latest
(unstable) version of this documentation, which may document features
not available in or compatible with released stable versions of Godot.
Checking the stable version of the documentation...
플러그인 만들기
플러그인에 대하여
플러그인은 편집기에 유용한 툴을 추가할 수 있는 좋은 방법입니다. 편집기를 다시 로드하지 않고도 GDScript와 표준 씬만으로 플러그인을 만들 수 있습니다. 모듈과 다르게, C++ 코드를 만들거나 엔진을 다시 컴파일할 필요도 없습니다. 이로 인해 플러그인의 기능이 덜 강력해지긴 하지만 그럼에도 플러그인으로 할 수 있는 작업은 많습니다. 플러그인은 편집기 기능을 추가하기 위해 스크립트를 사용해 생성된다는 점만 빼면 기존의 다른 씬들과 유사합니다.
이 튜토리얼에서는 두 가지 플러그인을 만드는 방법을 안내하여 플러그인의 작동 방식을 이해하고 자신만의 플로그인을 개발할 수 있도록 합니다. 첫 번째는 프로젝트의 모든 씬에 추가할 수 있는 사용자 지정 노드이고, 나머지는 편집기에 추가되는 사용자 지정 독입니다.
플러그인 생성하기
시작하기 전에 원하는 위치에 빈 프로젝트를 만드세요. 이는 플러그인을 개발하고 테스트하기 위한 기본 역할을 합니다.
가장 먼저 편집기가 새 플러그인을 인식하기 위해 두 개의 파일이 필요합니다. 구성을 위한 plugin.cfg와 기능이 포함된 툴 스크립트입니다. 플러그인은 프로젝트 폴더 내에 addons/plugin_name 형태의 표준 경로를 가지고 있습니다. Godot는 해당 파일을 생성하고 필요한 위치에 배치하기 위한 대화 상자를 제공합니다.
메인 툴바에서 프로젝트 드롭다운을 클릭하세요. 그런 다음 프로젝트 설정...을 클릭하세요. 플러그인 탭으로 이동한 다음 오른쪽 상단에 있는 새 플러그인 만들기 버튼을 클릭하세요.
다음과 같이 대화 상자가 나타나는 것을 볼 수 있습니다:
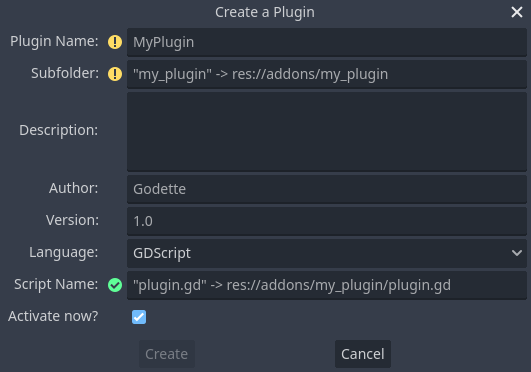
각 필드의 자리 표시자 텍스트는 플러그인의 파일 생성 및 구성 파일 값에 어떤 영향을 미치는지 설명합니다.
예제를 계속하려면, 다음 값을 사용하세요:
Plugin Name: My Custom Node
Subfolder: my_custom_node
Description: A custom node made to extend the Godot Engine.
Author: Your Name Here
Version: 1.0.0
Language: GDScript
Script Name: custom_node.gd
Plugin Name: My Custom Node
Subfolder: MyCustomNode
Description: A custom node made to extend the Godot Engine.
Author: Your Name Here
Version: 1.0.0
Language: C#
Script Name: CustomNode.cs
경고
다른 모든 C# 스크립트와 마찬가지로 EditorPlugin 스크립트를 컴파일해야 프로젝트를 빌드해야 하기 때문에 C#에서 지금 활성화하시겠습니까? 옵션을 선택 취소해야 합니다. 프로젝트를 빌드한 후 프로젝트 설정의 플러그인 탭에서 플러그인을 활성화할 수 있습니다.
다음과 같은 디렉터리 구조로 끝나야 합니다:
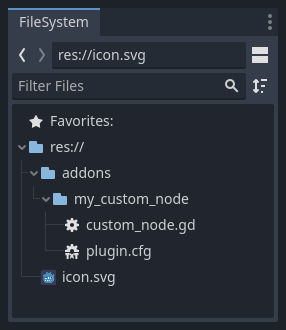
``plugin.cfg``는 플러그인에 대한 메타데이터가 포함된 INI 파일입니다. 이름과 설명은 사람들이 그 기능을 이해하는 데 도움이 됩니다. 이름을 남겨두면 작업한 업무에 대해 적절한 인정을 받는 데 도움이 됩니다. 버전 번호는 다른 사람들이 오래된 버전인지 알 수 있도록 도와줍니다. 버전 번호를 찾는 방법을 잘 모르겠으면 `Semantic Versioning <https://semver.org/>`_을 확인하세요. 메인 스크립트 파일은 플러그인이 활성화되면 에디에서 플러그인이 수행하는 작업을 Godot에게 지시니다.
스크립트 파일
플러그인이 생성되면 대화 상자에서 EditorPlugin 스크립트가 자동으로 열립니다. 스크립트에는 변경할 수 없는 두 가지 요구 사항이 있습니다. 즉, @tool 스크립트여야 합니다. 그렇지 않으면 편집기에 제대로 로드되지 않으며 :ref:`class_EditorPlugin`에서 상속해야 합니다.
경고
EditorPlugin 스크립트 외에도 플러그인에서 사용하는 다른 GDScript도 또한 도구여야 합니다. 편집기에서 사용하는 ``@tool``가 없는 GDScript는 빈 파일처럼 작동합니다!
리소스 초기화 및 정리를 처리하는 것이 중요합니다. 좋은 방법은 가상 함수 :ref:`_enter_tree() <class_Node_private_method__enter_tree>`를 사용하여 플러그인을 초기화하고 :ref:`_exit_tree() <class_Node_private_method__exit_tree>`를 사용하여 플러그인을 정리하는 것입니다. 다행히 대화 상자에서 이러한 콜백을 생성합니다. 스크립트는 다음과 같아야 합니다.
@tool
extends EditorPlugin


func _enter_tree():
    # Initialization of the plugin goes here.
    pass


func _exit_tree():
    # Clean-up of the plugin goes here.
    pass
#if TOOLS
using Godot;

[Tool]
public partial class CustomNode : EditorPlugin
{
    public override void _EnterTree()
    {
        // Initialization of the plugin goes here.
    }

    public override void _ExitTree()
    {
        // Clean-up of the plugin goes here.
    }
}
#endif
이는 새로운 플러그인을 생성할 때 사용하기 좋은 템플릿입니다.
맞춤형 노드
때로는 사용자 정의 씬 또는 재사용할 수 있는 컨트롤과 같은 많은 노드에서 특정 동작을 원할 수도 있습니다. 인스턴싱은 많은 경우에 도움이 되지만 때로는 번거로울 수 있습니다. 특히 많은 프로젝트에서 사용하는 경우에는 더욱 그렇습니다. 이에 대한 좋은 해결책은 사용자 정의 동작으로 노드를 추가하는 플러그인을 만드는 것입니다.
이 튜토리얼에서는 클릭하면 메시지를 인쇄하는 버튼을 만듭니다. 이를 위해서는 :ref:`class_Button`에서 확장되는 스크립트가 필요합니다. 원하는 경우 :ref:`class_BaseButton`를 확장할 수도 있습니다.
# Optional, add to execute in the editor.
@tool

# Icons are optional.
# Alternatively, you may use the UID of the icon or the absolute path.
@icon("icon.svg")

# Automatically register the node in the Create New Node dialog
# and make it available for use with other scripts.
class_name MyButton
extends Button


func _enter_tree():
    pressed.connect(clicked)


func clicked():
    print("You clicked me!")
using Godot;

// Optional, add to execute in the editor.
[Tool]

// Icons are optional.
// Alternatively, you may use the UID of the icon or the absolute path.
[Icon("icon.svg")]

// Automatically register the node in the Create New Node dialog
// and make it available for use with other scripts.
[GlobalClass]
public partial class MyButton : Button
{
    public override void _EnterTree()
    {
        Pressed += Clicked;
    }

    public void Clicked()
    {
        GD.Print("You clicked me!");
    }
}
That's it for our basic button. You can save this as my_button.gd inside the
plugin folder. You may have a 16×16 icon to show in the scene tree. If you
don't have one, you can grab the default one from the engine and save it in your
addons/my_custom_node folder as icon.svg, or use the default Godot logo
(@icon("res://icon.svg")).
팁
사용자 정의 노드 아이콘으로 사용되는 SVG 이미지에는 Editor > Scale With Editor Scale 및 Editor > Convert Colors With Editor Theme :ref:`import options <doc_importing_images_editor_import_options>`이 활성화되어 있어야 합니다. 이는 아이콘이 Godot의 자체 아이콘과 동일한 색상 팔레트로 디자인된 경우 아이콘이 편집기의 규모 및 테마 설정을 따를 수 있도록 합니다.
완료되면 **프로젝트 설정**의 플러그인 목록에서 해당 플러그인을 이미 사용할 수 있으므로 `Checking the results`_에 설명된 대로 활성화하세요.
그런 다음 새 노드를 추가하여 사용해 보세요.
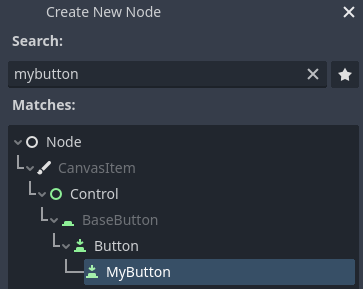
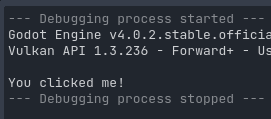
노드를 추가하면 생성한 스크립트가 이미 연결되어 있음을 확인할 수 있습니다. 버튼에 텍스트를 설정하고 씬을 저장하고 실행합니다. 버튼을 클릭하면 콘솔에서 일부 텍스트를 볼 수 있습니다.
맞춤형 도크
때로는 편집기를 확장하고 항상 사용할 수 있는 도구를 추가해야 하는 경우도 있습니다. 이를 수행하는 쉬운 방법은 플러그인을 사용하여 새 도크를 추가하는 것입니다. Dock은 Control을 기반으로 하는 장면이므로 일반적인 GUI 장면과 유사한 방식으로 생성됩니다.
맞춤형 도크 생성은 맞춤형 노드처럼 수행됩니다. 만들기 addons/my_custom_dock 폴더에 새 plugin.cfg 파일을 만들고 다음 내용을 추가합니다.
[plugin]

name="My Custom Dock"
description="A custom dock made so I can learn how to make plugins."
author="Your Name Here"
version="1.0"
script="custom_dock.gd"
[plugin]

name="My Custom Dock"
description="A custom dock made so I can learn how to make plugins."
author="Your Name Here"
version="1.0"
script="CustomDock.cs"
그런 다음 동일한 폴더에 스크립트 ``custom_dock.gd``를 만듭니다. 좋은 시작을 위해 :ref:`우리가 전에 본 템플릿 <doc_making_plugins_template_code>`로 채우세요.
새로운 사용자 정의 도크를 추가하려고 하므로 도크의 콘텐츠를 생성해야 합니다. 이것은 표준 Godot 씬에 지나지 않습니다. 편집기에서 새 씬을 만든 다음 편집하면 됩니다.
편집기 도크의 경우 루트 노드 반드시 Control 또는 해당 하위 클래스 중 하나여야 합니다. 이 튜토리얼에서는 단일 버튼을 만들 수 있습니다. 버튼에 텍스트를 추가하는 것을 잊지 마세요.
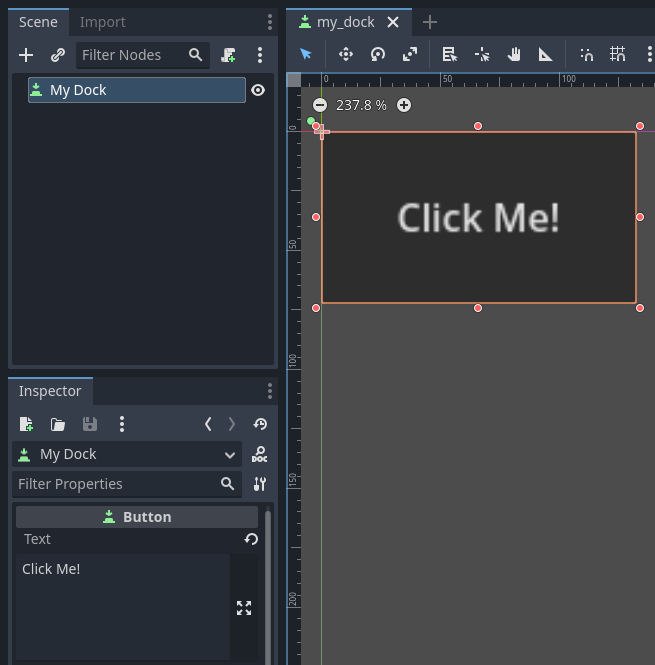
이 씬을 ``my_dock.tscn``로 저장합니다. 이제 우리가 만든 씬을 가져와서 편집기에 도크로 추가해야 합니다. 이를 위해 EditorPlugin 클래스의 add_dock() 함수를 사용할 수 있습니다.
도킹 위치를 선택하고 추가할 컨트롤(방금 생성한 씬)을 정의해야 합니다. 플러그인이 비활성화되면 **도크를 제거**하는 것을 잊지 마세요. 스크립트는 다음과 같습니다.
@tool
extends EditorPlugin


# A class member to hold the dock during the plugin life cycle.
var dock


func _enter_tree():
    # Initialization of the plugin goes here.
    # Load the dock scene and instantiate it.
    var dock_scene = preload("res://addons/my_custom_dock/my_dock.tscn").instantiate()

    # Create the dock and add the loaded scene to it.
    dock = EditorDock.new()
    dock.add_child(dock_scene)

    dock.title = "My Dock"

    # Note that LEFT_UL means the left of the editor, upper-left dock.
    dock.default_slot = DOCK_SLOT_LEFT_UL

    # Allow the dock to be on the left or right of the editor, and to be made floating.
    dock.available_layouts = EditorDock.DOCK_LAYOUT_VERTICAL | EditorDock.DOCK_LAYOUT_FLOATING

    add_dock(dock)


func _exit_tree():
    # Clean-up of the plugin goes here.
    # Remove the dock.
    remove_dock(dock)
    # Erase the control from the memory.
    dock.queue_free()
#if TOOLS
using Godot;

[Tool]
public partial class CustomDock : EditorPlugin
{
    private EditorDock _dock;

    public override void _EnterTree()
    {
        var _dock_scene = GD.Load<PackedScene>("res://addons/MyCustomDock/MyDock.tscn").Instantiate<Control>();

        // Create the dock and add the loaded scene to it.
        _dock = new EditorDock();
        _dock.AddChild(dock_scene);

        _dock.Title = "My Dock";

        // Note that LeftUl means the left of the editor, upper-left dock.
        _dock.DefaultSlot = DockSlot.LeftUl;

        // Allow the dock to be on the left or right of the editor, and to be made floating.
        _dock.AvailableLayouts = DockLayout.Horizontal | DockLayout.Floating;

        AddDock(_dock);
    }

    public override void _ExitTree()
    {
        // Clean-up of the plugin goes here.
        // Remove the dock.
        RemoveDock(_dock);
        // Erase the control from the memory.
        _dock.QueueFree();
    }
}
#endif
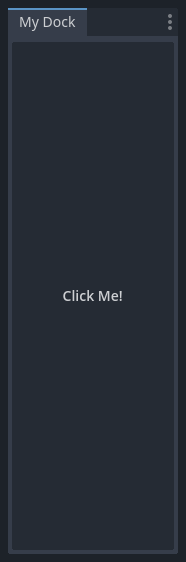
도크는 처음에 지정된 위치에 나타나지만 사용자는 위치를 자유롭게 변경하고 결과 레이아웃을 저장할 수 있습니다.
결과 확인
이제 작업 결과를 확인할 시간입니다. 프로젝트 설정**를 열고 **플러그인 탭을 클릭합니다. 귀하의 플러그인이 목록에 있는 유일한 플러그인이어야 합니다.

플러그인이 활성화되지 않은 것을 볼 수 있습니다. 플러그인을 활성화하려면 활성화 확인란을 클릭하세요. 설정 창을 닫기도 전에 도크가 표시되어야 합니다. 이제 사용자 정의 도크가 생겼습니다.
플러그인에 자동 로드/싱글톤 등록
플러그인이 활성화되면 편집기 플러그인이 자동으로 :ref:`autoloads <doc_singletons_autoload>`을 등록할 수 있습니다. 여기에는 플러그인이 비활성화된 경우 자동 로드 등록 취소도 포함됩니다.
편집기 플러그인에서 자동 로드를 사용해야 하는 경우 더 이상 프로젝트 설정에 자동 로드를 수동으로 추가할 필요가 없으므로 사용자는 플러그인을 더 빠르게 설정할 수 있습니다.
외부 편집기를 설정하는 방법은 아래 구획들을 확인하세요:
@tool
extends EditorPlugin

# Replace this value with a PascalCase autoload name, as per the GDScript style guide.
const AUTOLOAD_NAME = "SomeAutoload"


func _enable_plugin():
    # The autoload can be a scene or script file.
    add_autoload_singleton(AUTOLOAD_NAME, "res://addons/my_addon/some_autoload.tscn")


func _disable_plugin():
    remove_autoload_singleton(AUTOLOAD_NAME)
#if TOOLS
using Godot;

[Tool]
public partial class MyEditorPlugin : EditorPlugin
{
    // Replace this value with a PascalCase autoload name.
    private const string AutoloadName = "SomeAutoload";

    public override void _EnablePlugin()
    {
        // The autoload can be a scene or script file.
        AddAutoloadSingleton(AutoloadName, "res://addons/MyAddon/SomeAutoload.tscn");
    }

    public override void _DisablePlugin()
    {
        RemoveAutoloadSingleton(AutoloadName);
    }
}
#endif
플러그인 만들기
종종 플러그인은 사용자 정의 노드 및 패널과 같은 여러 항목을 추가합니다. 이러한 경우 각 기능에 대해 별도의 플러그인 스크립트를 갖는 것이 더 쉬울 수 있습니다. 이를 위해 하위 플러그인을 사용할 수 있습니다.
먼저 모든 플러그인과 하위 플러그인을 일반 플러그인으로 만듭니다.

그런 다음 하위 플러그인을 기본 플러그인 폴더로 이동합니다.

Godot는 사용자가 하위 플러그인을 활성화하거나 비활성화할 수 없도록 플러그인 목록에서 하위 플러그인을 숨깁니다. 대신 기본 플러그인 스크립트는 다음과 같이 하위 플러그인을 활성화 및 비활성화해야 합니다.
@tool
extends EditorPlugin

# The main plugin is located at res://addons/my_plugin/
const PLUGIN_NAME = "my_plugin"

func _enable_plugin():
    EditorInterface.set_plugin_enabled(PLUGIN_NAME + "/node", true)
    EditorInterface.set_plugin_enabled(PLUGIN_NAME + "/panel", true)

func _disable_plugin():
    EditorInterface.set_plugin_enabled(PLUGIN_NAME + "/node", false)
    EditorInterface.set_plugin_enabled(PLUGIN_NAME + "/panel", false)
너머로
이제 기본 플러그인을 만드는 방법을 배웠으므로 여러 가지 방법으로 편집기를 확장할 수 있습니다. GDScript를 사용하면 편집기에 많은 기능을 추가할 수 있습니다. 이는 C++ 모듈을 깊이 파고들 필요 없이 전문화된 편집기를 만드는 강력한 방법입니다.
자신만의 플러그인을 만들어 `자산 라이브러리 <https://godotengine.org/asset-library/>`_에서 공유하여 사람들이 귀하의 작업으로부터 이익을 얻을 수 있도록 할 수 있습니다.