Attention: Here be dragons
This is the latest
(unstable) version of this documentation, which may document features
not available in or compatible with released stable versions of Godot.
Checking the stable version of the documentation...
맞춤형 후처리
소개
Godot는 :ref:`doc_environment_and_post_processing`에 설명된 Bloom, DOF 및 SSAO를 포함하여 즉시 사용 가능한 다양한 후처리 효과를 제공합니다. 그러나 고급 사용 사례에는 사용자 정의 효과가 필요할 수 있습니다. 이 문서에서는 사용자 정의 효과를 작성하는 방법을 설명합니다.
사용자 정의 후처리 셰이더를 구현하는 가장 쉬운 방법은 화면 텍스처에서 읽는 Godot의 내장 기능을 사용하는 것입니다. 이에 익숙하지 않다면 먼저 :ref:`스크린 읽기 셰이더 튜토리얼 <doc_screen-reading_shaders>`을 읽어보세요.
단일 패스 후처리
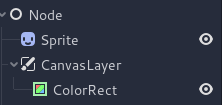
후처리 효과는 Godot가 프레임을 렌더링한 후 프레임에 적용되는 셰이더입니다. 셰이더를 프레임에 적용하려면 :ref:`CanvasLayer <class_CanvasLayer>`을 생성하고 :ref:`ColorRect <class_ColorRect>`을 지정합니다. 새로 생성된 ``ColorRect``에 새로운 :ref:`ShaderMaterial <class_ShaderMaterial>`을 할당하고 ``ColorRect``의 앵커 사전 설정을 Full Rect로 설정합니다.

ColorRect 노드에서 앵커 사전 설정을 Full Rect로 설정
씬 계층 구조는 다음과 같이 보일 것입니다:
참고
또 다른 더 효율적인 방법은 :ref:`BackBufferCopy <class_BackBufferCopy>`를 사용하여 화면 영역을 버퍼에 복사하고 ``hint_screen_texture``를 사용하여 ``sampler2D``를 통해 셰이더 스크립트에서 해당 영역에 액세스하는 것입니다.
참고
이 글을 쓰는 시점에서 Godot는 동시에 여러 버퍼로의 렌더링을 지원하지 않습니다. 당신의 후처리 셰이더는 Godot에 의해 노출되지 않은 다른 렌더 패스와 버퍼(예: 깊이 또는 일반/거칠기)에 액세스할 수 없습니다. 당신은 Godot가 샘플러로 노출한 렌더링된 프레임과 버퍼에만 접근할 수 있습니다.
Sprite 의 가운데에 있는 이 작은 십자가가 회전 중심점입니다:
새로운 셰이더 <class_Shader>`를 ``ColorRect``의 ``ShaderMaterial``에 할당합니다. ``hint_screen_texture` 및 내장된 SCREEN_UV 유니폼을 사용하여 ``sampler2D``로 프레임의 텍스처와 UV에 액세스할 수 있습니다.
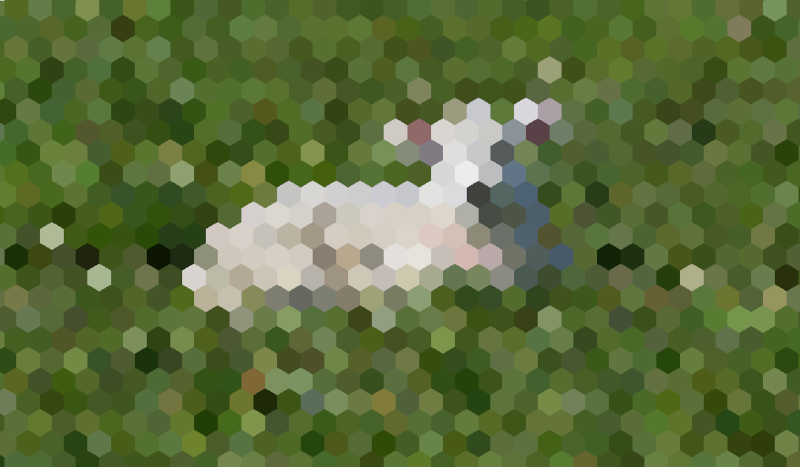
다음 코드를 셰이더에 복사하세요. 아래 코드는 `arlez80 <https://bitbucket.org/arlez80/hex-mosaic/src/master/>`_의 16진수 픽셀화 셰이더입니다.
shader_type canvas_item;

uniform vec2 size = vec2(32.0, 28.0);
// If you intend to read from mipmaps with `textureLod()` LOD values greater than `0.0`,
// use `filter_nearest_mipmap` instead. This shader doesn't require it.
uniform sampler2D screen_texture : hint_screen_texture, repeat_disable, filter_nearest;

void fragment() {
        vec2 norm_size = size * SCREEN_PIXEL_SIZE;
        bool less_than_half = mod(SCREEN_UV.y / 2.0, norm_size.y) / norm_size.y < 0.5;
        vec2 uv = SCREEN_UV + vec2(norm_size.x * 0.5 * float(less_than_half), 0.0);
        vec2 center_uv = floor(uv / norm_size) * norm_size;
        vec2 norm_uv = mod(uv, norm_size) / norm_size;
        center_uv += mix(vec2(0.0, 0.0),
                         mix(mix(vec2(norm_size.x, -norm_size.y),
                                 vec2(0.0, -norm_size.y),
                                 float(norm_uv.x < 0.5)),
                             mix(vec2(0.0, -norm_size.y),
                                 vec2(-norm_size.x, -norm_size.y),
                                 float(norm_uv.x < 0.5)),
                             float(less_than_half)),
                         float(norm_uv.y < 0.3333333) * float(norm_uv.y / 0.3333333 < (abs(norm_uv.x - 0.5) * 2.0)));

        COLOR = textureLod(screen_texture, center_uv, 0.0);
}
씬 계층 구조는 다음과 같이 보일 것입니다:
다중 패스 후처리
흐림과 같은 일부 후처리 효과는 리소스를 많이 사용합니다. 여러 패스로 분해하면 훨씬 더 빠르게 실행되도록 할 수 있습니다. In a multipass material, each pass takes the result from the previous pass as an input and processes it.
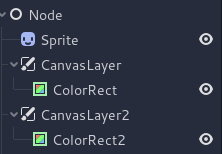
다중 패스 후처리 셰이더를 생성하려면 CanvasLayer``와 ``ColorRect 노드를 쌓습니다. 위 예에서는 CanvasLayer 개체를 사용하여 아래 레이어의 프레임을 사용하여 셰이더를 렌더링합니다. 노드 구조를 제외하면 단계는 단일 패스 후처리 셰이더와 동일합니다.
씬 계층 구조는 다음과 같이 보일 것입니다:
예를 들어, 다음 코드 조각을 각 ColorRect 노드에 연결하여 전체 화면 가우스 흐림 효과를 작성할 수 있습니다. 셰이더를 적용하는 순서는 씬 트리에서 ``CanvasLayer``의 위치에 따라 달라지며, 높을수록 더 빠릅니다. 이 흐림 셰이더의 경우 순서는 중요하지 않습니다.
shader_type canvas_item;

uniform sampler2D screen_texture : hint_screen_texture, repeat_disable, filter_nearest;

// Blurs the screen in the X-direction.
void fragment() {
    vec3 col = texture(screen_texture, SCREEN_UV).xyz * 0.16;
    col += texture(screen_texture, SCREEN_UV + vec2(SCREEN_PIXEL_SIZE.x, 0.0)).xyz * 0.15;
    col += texture(screen_texture, SCREEN_UV + vec2(-SCREEN_PIXEL_SIZE.x, 0.0)).xyz * 0.15;
    col += texture(screen_texture, SCREEN_UV + vec2(2.0 * SCREEN_PIXEL_SIZE.x, 0.0)).xyz * 0.12;
    col += texture(screen_texture, SCREEN_UV + vec2(2.0 * -SCREEN_PIXEL_SIZE.x, 0.0)).xyz * 0.12;
    col += texture(screen_texture, SCREEN_UV + vec2(3.0 * SCREEN_PIXEL_SIZE.x, 0.0)).xyz * 0.09;
    col += texture(screen_texture, SCREEN_UV + vec2(3.0 * -SCREEN_PIXEL_SIZE.x, 0.0)).xyz * 0.09;
    col += texture(screen_texture, SCREEN_UV + vec2(4.0 * SCREEN_PIXEL_SIZE.x, 0.0)).xyz * 0.05;
    col += texture(screen_texture, SCREEN_UV + vec2(4.0 * -SCREEN_PIXEL_SIZE.x, 0.0)).xyz * 0.05;
    COLOR.xyz = col;
}
shader_type canvas_item;

uniform sampler2D screen_texture : hint_screen_texture, repeat_disable, filter_nearest;

// Blurs the screen in the Y-direction.
void fragment() {
    vec3 col = texture(screen_texture, SCREEN_UV).xyz * 0.16;
    col += texture(screen_texture, SCREEN_UV + vec2(0.0, SCREEN_PIXEL_SIZE.y)).xyz * 0.15;
    col += texture(screen_texture, SCREEN_UV + vec2(0.0, -SCREEN_PIXEL_SIZE.y)).xyz * 0.15;
    col += texture(screen_texture, SCREEN_UV + vec2(0.0, 2.0 * SCREEN_PIXEL_SIZE.y)).xyz * 0.12;
    col += texture(screen_texture, SCREEN_UV + vec2(0.0, 2.0 * -SCREEN_PIXEL_SIZE.y)).xyz * 0.12;
    col += texture(screen_texture, SCREEN_UV + vec2(0.0, 3.0 * SCREEN_PIXEL_SIZE.y)).xyz * 0.09;
    col += texture(screen_texture, SCREEN_UV + vec2(0.0, 3.0 * -SCREEN_PIXEL_SIZE.y)).xyz * 0.09;
    col += texture(screen_texture, SCREEN_UV + vec2(0.0, 4.0 * SCREEN_PIXEL_SIZE.y)).xyz * 0.05;
    col += texture(screen_texture, SCREEN_UV + vec2(0.0, 4.0 * -SCREEN_PIXEL_SIZE.y)).xyz * 0.05;
    COLOR.xyz = col;
}
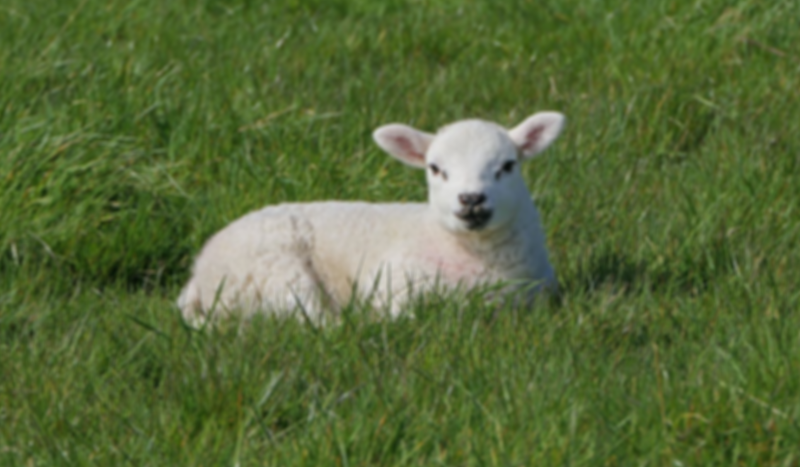
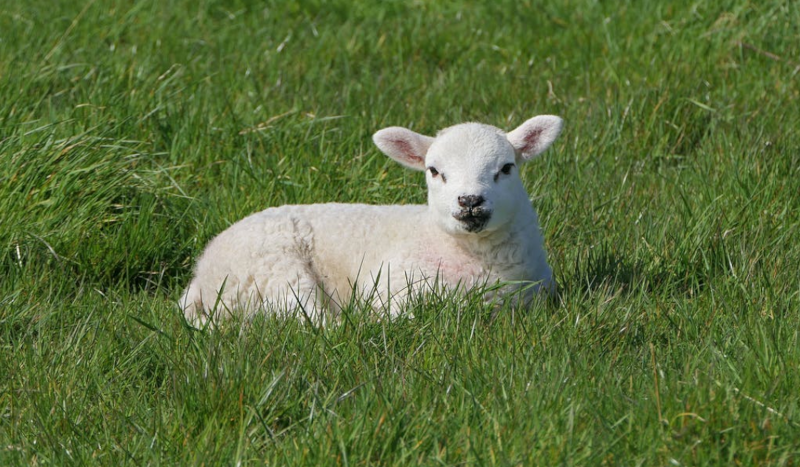
위의 코드를 사용하면 아래와 같은 전체 화면 흐림 효과가 나타나게 됩니다.