Attention: Here be dragons
This is the latest
(unstable) version of this documentation, which may document features
not available in or compatible with released stable versions of Godot.
Checking the stable version of the documentation...
몹 씬 설계하기
이 파트에서는 몹이라고 부르는 괴물을 코딩해 보겠습니다. 다음 단원에서는 몹을 플레이 가능한 영역에 무작위로 소환하겠습니다.
새 씬에서 몬스터 자체를 디자인해 봅시다. 노드 구조는 player.tscn 씬과 비슷할 것입니다.
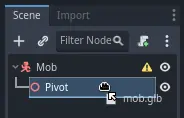
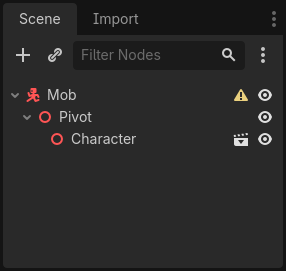
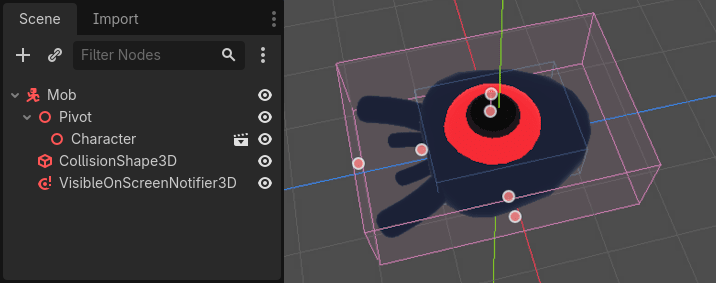
다시 한 번 CharacterBody3D 노드를 루트로 하여 씬을 생성합니다. 이름을 Mob으로 지정합니다. 자식 노드인 Node3D를 추가하고 이름을 Pivot으로 지정합니다. 그리고 파일시스템 독에서 mob.glb 파일을 Pivot으로 끌어다 놓아 몬스터의 3D 모델을 씬에 추가합니다.
새로 만든 mob 노드의 이름을 Character로 변경할 수 있습니다.
바디가 동작하려면 콜리전 모양이 필요합니다. 씬의 루트인 Mob 노드를 마우스 오른쪽 버튼으로 클릭하고 자식 노드 추가를 클릭합니다.
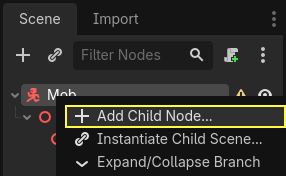
CollisionShape3D를 추가합니다.
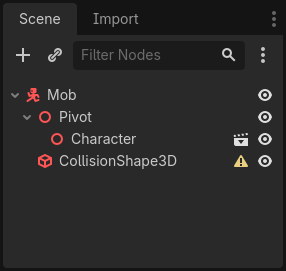
인스펙터에서 BoxShape3D를 모양속성에 할당합니다.

3D 모델에 더 잘 맞도록 크기를 변경해야 합니다. 주황색 점을 클릭하고 드래그하여 대화형으로 변경할 수 있습니다.
상자는 바닥에 닿아야 하며 모델보다 약간 얇아야 합니다. 물리 엔진은 플레이어의 구체가 상자의 모서리에 닿으면 콜리전이 발생하는 방식으로 작동합니다. 상자가 3D 모델에 비해 너무 크면 몬스터와 멀리 떨어진 곳에서 죽을 수 있으며 플레이어에게 게임이 불공평하게 느껴질 수 있습니다.
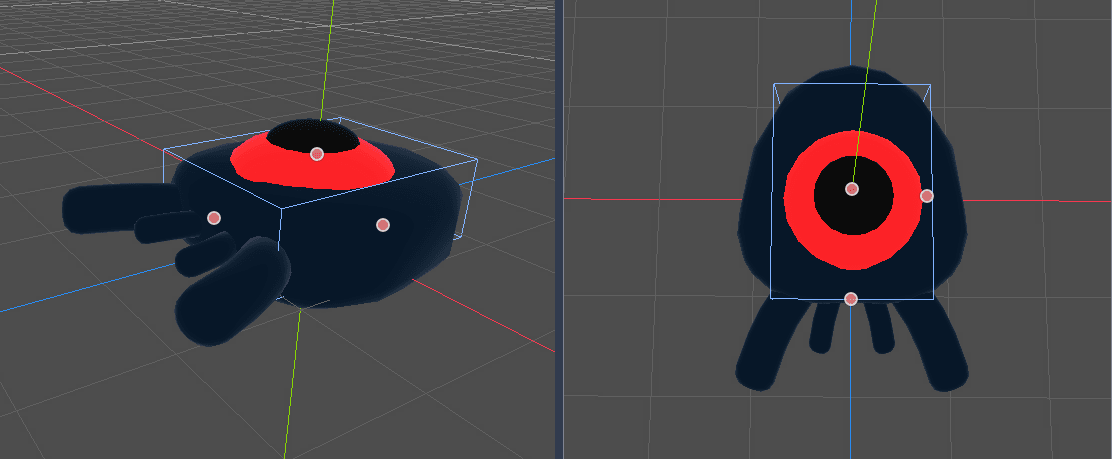
내 상자가 괴물보다 더 큰 것을 알 수 있습니다. 이 게임에서는 위에서 고정된 시점을 사용하여 장면을 보고 있기 때문에 괜찮습니다. 콜리전 모양이 모델과 정확히 일치할 필요는 없습니다. 테스트할 때 게임의 느낌에 따라 형태와 크기를 결정해야 합니다.
화면 밖에서 괴물 제거하기
게임 레벨에서 일정한 시간 간격으로 괴물을 소환할 것입니다. 조심하지 않으면 괴물의 수가 무한대로 늘어날 수 있는데, 이런 상황을 원하지 않습니다. 각 몹 인스턴스에는 메모리와 처리 비용이 모두 있으며, 몹이 화면 밖에 있을 때는 비용을 지불하고 싶지 않습니다.
몬스터가 화면을 떠나면 더 이상 필요하지 않으므로 삭제해야 합니다. 고닷에는 오브젝트가 화면을 떠나는 시점을 감지하는 노드인 :ref:`VisibleOnScreenNotifier3D <class_VisibleOnScreenNotifier3D>`가 있으며, 이를 사용하여 몹을 파괴할 것입니다.
참고
객체를 계속 인스턴스화할 때 인스턴스를 항상 생성하고 소멸하는 비용을 피하기 위해 풀링이라는 기술을 사용할 수 있습니다. 풀링은 객체 배열을 미리 생성하고 이를 반복해서 재사용하는 방식으로 구성됩니다.
When working with GDScript, this usually isn't needed. The main reason to use pools is to avoid freezes with garbage-collected languages like C# or Lua. GDScript uses a different technique to manage memory, reference counting, which doesn't have that caveat. You can learn more about that here: 메모리 관리.
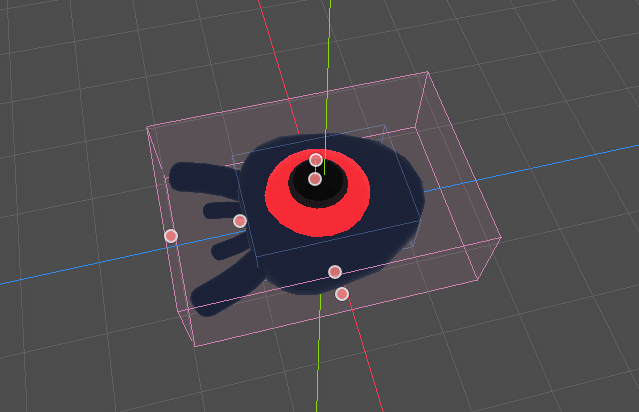
Mob 노드를 선택하고 자식 노드 :ref:`VisibleOnScreenNotifier3D <class_VisibleOnScreenNotifier3D>`를 추가합니다. 이번에는 분홍색의 또 다른 상자가 나타납니다. 이 상자가 화면에서 완전히 사라지면 노드는 신호를 방출합니다.
전체 3D 모델을 덮을 때까지 주황색 점을 사용하여 크기를 조절합니다.
몹의 움직임 코딩하기
몬스터의 동작을 구현해 봅시다. 이 작업은 두 단계로 진행하겠습니다. 먼저 몬스터를 초기화하는 함수를 정의하는 스크립트를 Mob 에 작성합니다. 그런 다음 main.tscn 씬에서 무작위 소환 메커니즘을 코딩하고 거기에서 함수를 호출합니다.
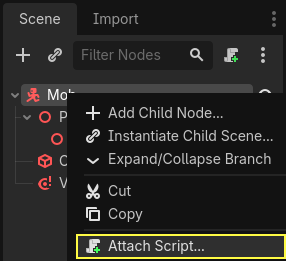
노드에 스크립트를 추가하기.
먼저 시작할 이동 코드는 다음과 같습니다. min_speed 와 max_speed 라는 두 프로퍼티를 정의하여 임의의 속도 범위를 정의하고, 나중에 CharacterBody3D.velocity 를 정의하는 데 사용할 것입니다.
extends CharacterBody3D

# Minimum speed of the mob in meters per second.
@export var min_speed = 10
# Maximum speed of the mob in meters per second.
@export var max_speed = 18


func _physics_process(_delta):
    move_and_slide()
using Godot;

public partial class Mob : CharacterBody3D
{
    // Don't forget to rebuild the project so the editor knows about the new export variable.

    // Minimum speed of the mob in meters per second
    [Export]
    public int MinSpeed { get; set; } = 10;
    // Maximum speed of the mob in meters per second
    [Export]
    public int MaxSpeed { get; set; } = 18;

    public override void _PhysicsProcess(double delta)
    {
        MoveAndSlide();
    }
}
플레이어와 마찬가지로 CharacterBody3D.move_and_slide() 함수를 호출하여 몹을 매 프레임마다 이동시킵니다. 이번에는 매 프레임마다 ``velocity``를 업데이트하지 않고, 몬스터가 장애물에 부딪히더라도 일정한 속도로 움직이며 화면을 벗어나도록 합니다.
CharacterBody3D.velocity 를 계산하기 위해 다른 함수를 정의해야 합니다. 이 함수는 몬스터가 플레이어를 향해 움직이고 그 각도와 속도를 모두 무작위화합니다.
이 함수는 몹의 소환 위치인 start_position과 player_position을 인수로 받습니다.
몹을 start_position 에 배치하고 look_at_from_position() 메서드를 사용하여 플레이어를 향해 돌리고, Y축을 중심으로 임의의 양을 회전시켜 각도를 랜덤화합니다. 아래 randf_range() 는 -PI / 4 라디안과 PI / 4 라디안 사이의 임의의 값을 출력합니다.
# This function will be called from the Main scene.
func initialize(start_position, player_position):
    # We position the mob by placing it at start_position
    # and rotate it towards player_position, so it looks at the player.
    look_at_from_position(start_position, player_position, Vector3.UP)
    # Rotate this mob randomly within range of -45 and +45 degrees,
    # so that it doesn't move directly towards the player.
    rotate_y(randf_range(-PI / 4, PI / 4))
// This function will be called from the Main scene.
public void Initialize(Vector3 startPosition, Vector3 playerPosition)
{
    // We position the mob by placing it at startPosition
    // and rotate it towards playerPosition, so it looks at the player.
    LookAtFromPosition(startPosition, playerPosition, Vector3.Up);
    // Rotate this mob randomly within range of -45 and +45 degrees,
    // so that it doesn't move directly towards the player.
    RotateY((float)GD.RandRange(-Mathf.Pi / 4.0, Mathf.Pi / 4.0));
}
임의의 위치를 얻었으니 이제 random_speed 가 필요합니다. randi_range() 는 임의의 정수 값을 제공하므로 유용하며, min_speed 와 max_speed 를 사용합니다. random_speed 는 그냥 정수이며, CharacterBody3D.velocity 를 곱하는 데 사용합니다. random_speed 가 적용된 후 CharacterBody3D.velocity Vector3를 플레이어를 향해 회전시킵니다.
func initialize(start_position, player_position):
    # ...

    # We calculate a random speed (integer)
    var random_speed = randi_range(min_speed, max_speed)
    # We calculate a forward velocity that represents the speed.
    velocity = Vector3.FORWARD * random_speed
    # We then rotate the velocity vector based on the mob's Y rotation
    # in order to move in the direction the mob is looking.
    velocity = velocity.rotated(Vector3.UP, rotation.y)
public void Initialize(Vector3 startPosition, Vector3 playerPosition)
{
    // ...

    // We calculate a random speed (integer).
    int randomSpeed = GD.RandRange(MinSpeed, MaxSpeed);
    // We calculate a forward velocity that represents the speed.
    Velocity = Vector3.Forward * randomSpeed;
    // We then rotate the velocity vector based on the mob's Y rotation
    // in order to move in the direction the mob is looking.
    Velocity = Velocity.Rotated(Vector3.Up, Rotation.Y);
}
화면 떠나기
몹이 화면을 떠날 때 파괴해야 합니다. 이를 위해 VisibleOnScreenNotifier3D 노드의 screen_exited 신호를 Mob 에 연결합니다.
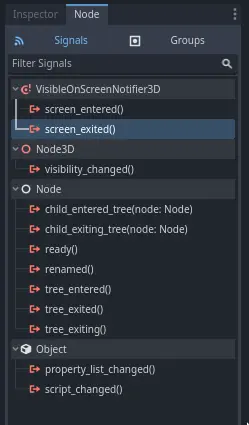
VisibleOnScreenNotifier3D 노드를 선택하고 인터페이스의 오른쪽에서 노드 독으로 이동합니다. screen_exited() 시그널을 더블 클릭합니다.
시그널을 Mob에 연결합니다
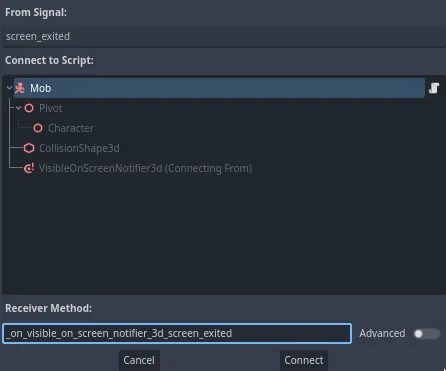
이렇게 하면 몹 스크립트에 _on_visible_on_screen_notifier_3d_screen_exited() 라는 새 함수가 추가됩니다. 이 함수에서 queue_free() 메서드를 호출합니다. 이 함수는 호출된 인스턴스를 파괴합니다.
func _on_visible_on_screen_notifier_3d_screen_exited():
    queue_free()
// We also specified this function name in PascalCase in the editor's connection window.
private void OnVisibilityNotifierScreenExited()
{
    QueueFree();
}
괴물이 게임에 참가할 준비가 되었습니다! 다음 부분에서는 게임 레벨에 괴물을 소환합니다.
다음은 참조할 수 있는 전체 Mob.gd 스크립트입니다.
extends CharacterBody3D

# Minimum speed of the mob in meters per second.
@export var min_speed = 10
# Maximum speed of the mob in meters per second.
@export var max_speed = 18

func _physics_process(_delta):
    move_and_slide()

# This function will be called from the Main scene.
func initialize(start_position, player_position):
    # We position the mob by placing it at start_position
    # and rotate it towards player_position, so it looks at the player.
    look_at_from_position(start_position, player_position, Vector3.UP)
    # Rotate this mob randomly within range of -45 and +45 degrees,
    # so that it doesn't move directly towards the player.
    rotate_y(randf_range(-PI / 4, PI / 4))

    # We calculate a random speed (integer)
    var random_speed = randi_range(min_speed, max_speed)
    # We calculate a forward velocity that represents the speed.
    velocity = Vector3.FORWARD * random_speed
    # We then rotate the velocity vector based on the mob's Y rotation
    # in order to move in the direction the mob is looking.
    velocity = velocity.rotated(Vector3.UP, rotation.y)

func _on_visible_on_screen_notifier_3d_screen_exited():
    queue_free()
using Godot;

public partial class Mob : CharacterBody3D
{
    // Minimum speed of the mob in meters per second.
    [Export]
    public int MinSpeed { get; set; } = 10;
    // Maximum speed of the mob in meters per second.
    [Export]
    public int MaxSpeed { get; set; } = 18;

    public override void _PhysicsProcess(double delta)
    {
        MoveAndSlide();
    }

    // This function will be called from the Main scene.
    public void Initialize(Vector3 startPosition, Vector3 playerPosition)
    {
        // We position the mob by placing it at startPosition
        // and rotate it towards playerPosition, so it looks at the player.
        LookAtFromPosition(startPosition, playerPosition, Vector3.Up);
        // Rotate this mob randomly within range of -45 and +45 degrees,
        // so that it doesn't move directly towards the player.
        RotateY((float)GD.RandRange(-Mathf.Pi / 4.0, Mathf.Pi / 4.0));

        // We calculate a random speed (integer).
        int randomSpeed = GD.RandRange(MinSpeed, MaxSpeed);
        // We calculate a forward velocity that represents the speed.
        Velocity = Vector3.Forward * randomSpeed;
        // We then rotate the velocity vector based on the mob's Y rotation
        // in order to move in the direction the mob is looking.
        Velocity = Velocity.Rotated(Vector3.Up, Rotation.Y);
    }

    // We also specified this function name in PascalCase in the editor's connection window.
    private void OnVisibilityNotifierScreenExited()
    {
        QueueFree();
    }
}