Up to date
This page is up to date for Godot 4.0.
If you still find outdated information, please open an issue.
Using TileMaps
See also
This page assumes you have created or downloaded a TileSet already. If not, please read Using TileSets first as you will need a TileSet to create a TileMap.
Introduction
A tilemap is a grid of tiles used to create a game's layout. There are several benefits to using TileMap nodes to design your levels. First, they make it possible to draw the layout by "painting" the tiles onto a grid, which is much faster than placing individual Sprite2D nodes one by one. Second, they allow for much larger levels because they are optimized for drawing large numbers of tiles. Finally, you can add collision, occlusion, and navigation shapes to tiles, adding greater functionality to the TileMap.
Note
Godot 4.0 has moved several per-tile properties, such as tile rotation, from TileMap to TileSet. Individual tiles can no longer be rotated while in the TileMap editor. Instead, the TileSet editor must be used to create alternative rotated tiles.
This change allows for greater design consistency, as not every tile needs to be rotated or flipped within a TileSet.
Specifying the TileSet in the TileMap
If you've followed the previous page on Using TileSets, you should have a TileSet resource that is built-in to the TileMap node. This is good for prototyping, but in a real world project, you will generally have multiple levels reusing the same tileset.
The recommended way to reuse the same TileSet in several TileMap nodes is to save the TileSet to an external resource. To do so, click the dropdown next to the TileSet resource and choose Save:

Saving the built-in TileSet resource to an external resource file
Creating TileMap layers
As of Godot 4.0, you can place several layers in a single TileMap node. For example, this allows you to distinguish foreground tiles from background tiles for better organization. You can place one tile per layer at a given location, which allows you to overlap several tiles together if you have more than one layer.
By default, a TileMap node automatically has one premade layer. You do not have to create additional layers if you only need a single layer, but if you wish to do so now, select the TileMap node and unfold the Layers section in the inspector:

Creating layers in a TileMap node (example with "background" and "foreground")
Each layer has several properties you can adjust:
Name: A human-readable name to display in the TileMap editor. This can be something like "background", "buildings", "vegetation", etc.
Enabled: If
true, the layer is visible in the editor and when running the project.Modulate: The color to use as a multiplier for all tiles on the layer. This is also multiplied with the per-tile Modulate property and the TileMap node's Modulate property. For example, you can use this to darken background tiles to make foreground tiles stand out more.
Y Sort Enabled: If
true, sorts tiles based on their Y position on the TileMap. This can be used to prevent sorting issues with certain tile setups, especially with isometric tiles.Y Sort Origin: The vertical offset to use for Y-sorting on each tile (in pixels). Only effective if Y Sort Enabled is
true.Z Index: Controls whether this layer is drawn in front of or behind other TileMap layers. This value can be positive or negative; the layer with the highest Z Index is drawn on top of other layers. If several layers have an equal Z Index property, the layer that is last in the list of layers (the one which appears at the bottom in the list) is drawn on top.
You can reorder layers by drag-and-dropping the "three horizontal bars" icon on the left of the entries in the Layers section.
Note
You can create, rename or reorder layers in the future without affecting existing tiles. Be careful though, as removing a layer will also remove all tiles that were placed on the layer.
Opening the TileMap editor
Select the TileMap node, then open the TileMap panel at the bottom of the editor:
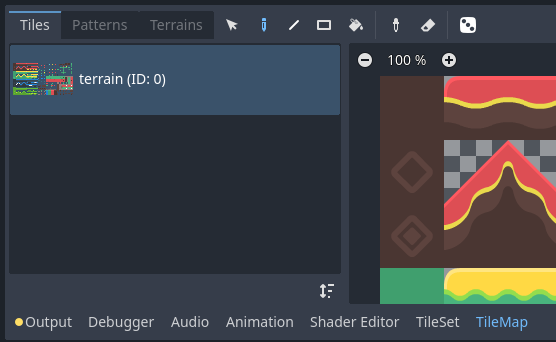
Opening the TileMap panel at the bottom of the editor. The TileMap node must be selected first.
Selecting tiles to use for painting
First, if you've created additional layers above, make sure you've selected the layer you wish to paint on:
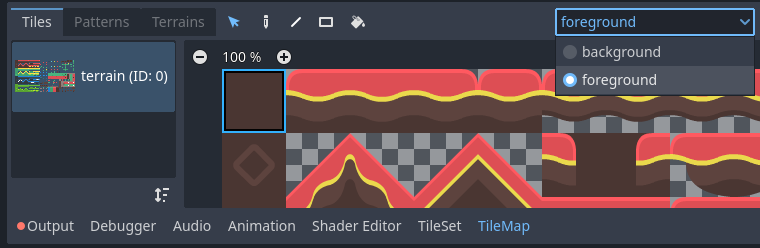
Selecting a layer to paint on in the TileMap editor
Tip
In the 2D editor, the layers you aren't currently editing from the same TileMap node will appear grayed out while in the TileMap editor. You can disable this behavior by clicking the icon next to the layer selection menu (Highlight Selected TileMap Layer tooltip).
You can skip the above step if you haven't created additional layers, as the first layer is automatically selected when entering the TileMap editor.
Before you can place tiles in the 2D editor, you must select one or more tiles in the TileMap panel located at the bottom of the editor. To do so, click a tile in the TileMap panel, or hold down the mouse button to select multiple tiles:
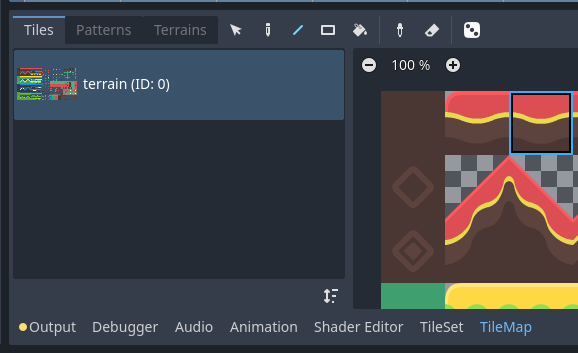
Selecting a tile in the TileMap editor by clicking it
Tip
Like in the 2D and TileSet editors, you can pan across the TileMap panel using the middle or right mouse buttons, and zoom using the mouse wheel or buttons in the top-left corner.
You can also hold down Shift to append to the current selection. When selecting more than one tile, multiple tiles will be placed every time you perform a painting operation. This can be used to paint structures composed of multiple tiles in a single click (such as large platforms or trees).
The final selection does not have to be contiguous: if there is empty space between selected tiles, it will be left empty in the pattern that will be painted in the 2D editor.
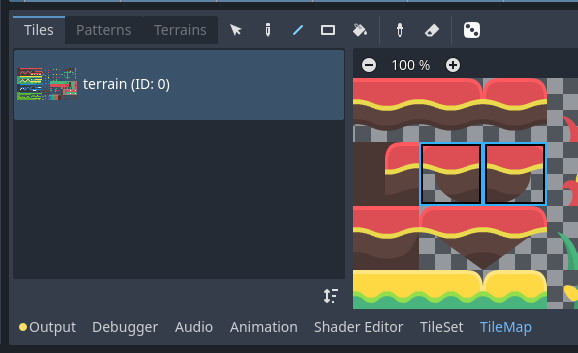
Selecting multiple tiles in the TileMap editor by holding down the left mouse button
If you've created alternative tiles in your TileSet, you can select them for painting on the right of the base tiles:
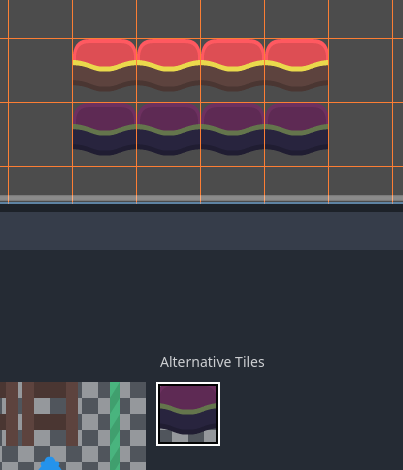
Selecting an alternative tile in the TileMap editor
Lastly, if you've created a scenes collection in the TileSet, you can place scene tiles in the TileMap:
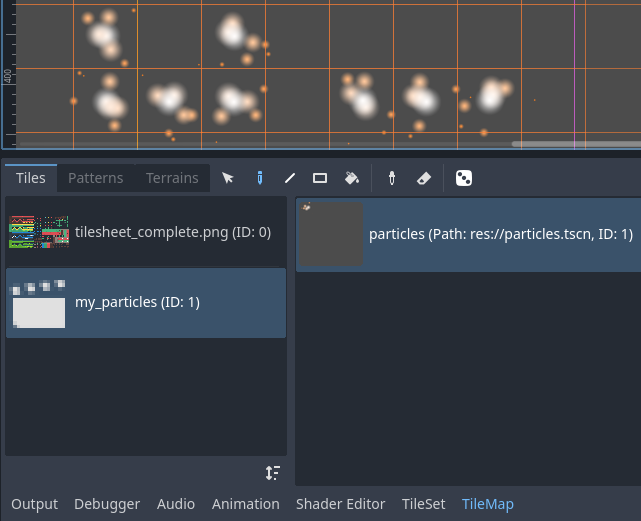
Placing a scene tile containing particles using the TileMap editor
Painting modes and tools
Using the toolbar at the top of the TileMap editor, you can choose between several painting modes and tools. These modes affect operation when clicking in the 2D editor, not the TileMap panel itself.
From left to right, the painting modes and tools you can choose are:
Selection
Select tiles by clicking a single tile, or by holding down the left mouse button to select multiple with a rectangle in the 2D editor. Note that empty space cannot be selected: if you create a rectangle selection, only non-empty tiles will be selected.
To append to the current selection, hold Shift then select a tile. To remove from the current selection, hold Ctrl then select a tile.
The selection can then be used in any other painting mode to quickly create copies of an already-placed pattern.
While in Selection mode, you can't place new tiles, but you can still erase tiles by right-clicking after making a selection. The whole selection will be erased, regardless of where you click in the selection.
You can toggle this mode temporarily while in Paint mode by holding Ctrl then performing a selection.
Tip
You can copy and paste tiles that were already placed by performing a selection, pressing Ctrl + C then pressing Ctrl + V. The selection will be pasted after left-clicking. You can press Ctrl + V another time to perform more copies this way. Right-click or press Escape to cancel pasting.
Paint
The standard Paint mode allows you to place tiles by clicking or holding down the left mouse button.
If you right-click, the currently selected tile will be erased from the tilemap. In other words, it will be replaced by empty space.
If you have selected multiple tiles in the TileMap or using the Selection tool, they will be placed every time you click or drag the mouse while holding down the left mouse button.
Tip
While in Paint mode, you can draw a line by holding Shift before holding down the left mouse button, then dragging the mouse to the line's end point. This is identical to using the Line tool described below.
You can also draw a rectangle by holding Ctrl and Shift before holding down the left mouse button, then dragging the mouse to the rectangle's end point. This is identical to using the Rectangle tool described below.
Lastly, you can pick existing tiles in the 2D editor by holding Ctrl then clicking on a tile (or holding and dragging the mouse). This will switch the currently painted tile(s) to the tile(s) you've just clicked. This is identical to using the Picker tool described below.
Line
After selecting Line Paint mode, you can draw in a line that is always 1 tile thick (no matter its orientation).
If you right-click while in Line Paint mode, you will erase in a line.
If you have selected multiple tiles in the TileMap or using the Selection tool, you can place them in a repeating pattern across the line.
You can toggle this mode temporarily while in Paint or Eraser mode by holding Shift then drawing.

Using the line tool after selecting two tiles to draw platforms diagonally
Rectangle
After selecting Rectangle Paint mode, you can draw in an axis-aligned rectangle.
If you right-click while in Rectangle Paint mode, you will erase in an axis-aligned rectangle.
If you have selected multiple tiles in the TileMap or using the Selection tool, you can place them in a repeating pattern within the rectangle.
You can toggle this mode temporarily while in Paint or Eraser mode by holding Ctrl and Shift then drawing.
Bucket Fill
After selecting Bucket Fill mode, you can choose whether painting should be limited to contiguous areas only by toggling the Contiguous checkbox that appears on the right of the toolbar.
If you enable Contiguous (the default), only matching tiles that touch the current selection will be replaced. This contiguous check is performed horizontally and vertically, but not diagonally.
If you disable Contiguous, all tiles with the same ID in the entire TileMap will be replaced by the currently selected tile. If selecting an empty tile with Contiguous unchecked, all tiles in the rectangle that encompasses the TileMap's effective area will be replaced instead.
If you right-click while in Bucket Fill mode, you will replace matching tiles with empty tiles.
If you have selected multiple tiles in the TileMap or using the Selection tool, you can place them in a repeating pattern within the filled area.
Using the Bucket Fill tool
Picker
After selecting Picker mode, you can pick existing tiles in the 2D editor by holding Ctrl then clicking on a tile. This will switch the currently painted tile to the tile you've just clicked. You can also pick multiple tiles at once by holding down the left mouse button and forming a rectangle selection. Only non-empty tiles can be picked.
You can toggle this mode temporarily while in Paint mode by holding Ctrl then clicking or dragging the mouse.
Eraser
This mode is combined with any other painting mode (Paint, Line, Rectangle, Bucket Fill). When eraser mode is enabled, tiles will be replaced by empty tiles instead of drawing new lines when left-clicking.
You can toggle this mode temporarily while in any other mode by right-clicking instead of left-clicking.
Painting randomly using scattering
While painting, you can optionally enable randomization. When enabled, a random tile will be chosen between all the currently selected tiles when painting. This is supported with the Paint, Line, Rectangle and Bucket Fill tools. For effective paint randomization, you must select multiple tiles in the TileMap editor or use scattering (both approaches can be combined).
If Scattering is set to a value greater than 0, there is a chance that no tile will be placed when painting. This can be used to add occasional, non-repeating detail to large areas (such as adding grass or crumbs on a large top-down TileMap).
Example when using Paint mode:
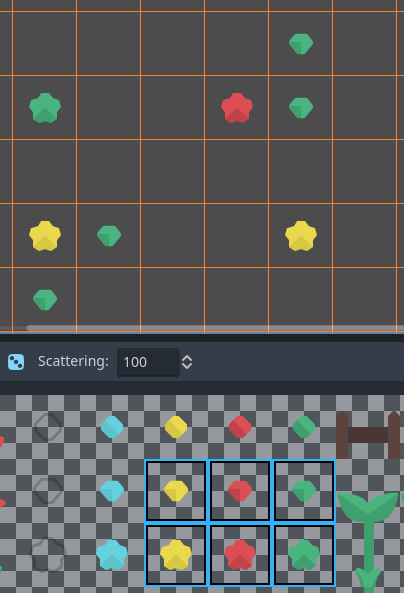
Selecting from several times to randomly choose, then painting by holding down the left mouse button
Example when using Bucket Fill mode:
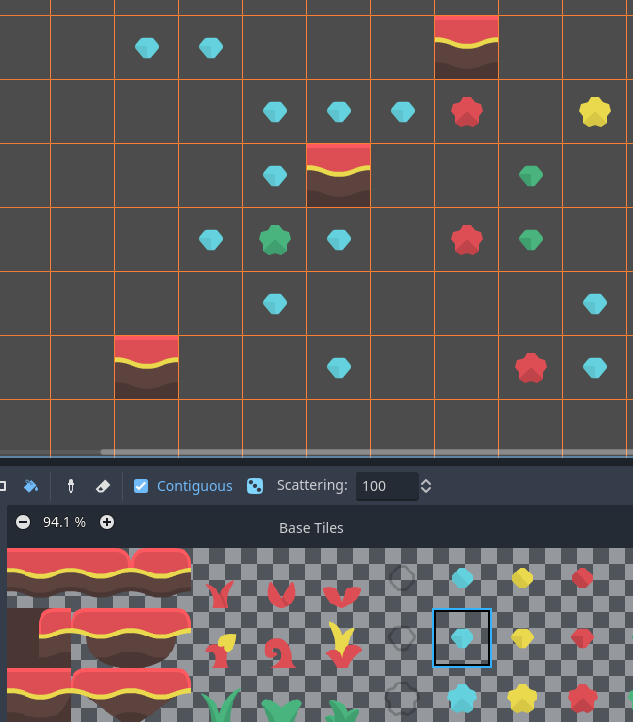
Using Bucket Fill tool with a single tile, but with randomization and scattering enabled
Note
Eraser mode does not take randomization and scattering into account. All tiles within the selection are always removed.
Saving and loading premade tile placements using patterns
While you can copy and paste tiles while in Select mode, you may wish to save premade patterns of tiles to place together in a go. This can be done on a per-TileMap basis by choosing the Patterns tab of the TileMap editor.
To create a new pattern, switch to Select mode, perform a selection and press Ctrl + C. Click on empty space within the Patterns tab (a blue focus rectangle should appear around the empty space), then press Ctrl + V:
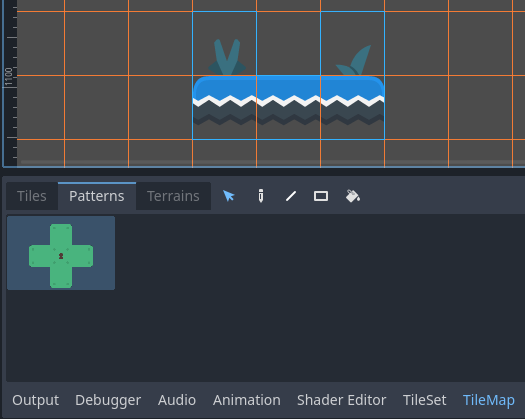
Creating a new pattern from a selection in the TileMap editor
To use an existing pattern, click its image in the Patterns tab, switch to any painting mode, then left-click somewhere in the 2D editor:
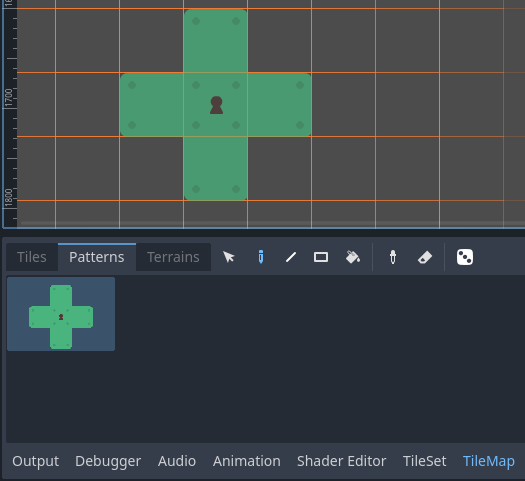
Placing an existing pattern using the TileMap editor
Like multi-tile selections, patterns will be repeated if used with the Line, Rectangle or Bucket Fill painting modes.
Note
Despite being edited in the TileMap editor, patterns are stored in the TileSet resource. This allows reusing patterns in different TileMap nodes after loading a TileSet resource saved to an external file.
Handling tile connections automatically using terrains
To use terrains, the TileMap node must feature at least one terrain set and a terrain within this terrain set. See Creating terrain sets (autotiling) if you haven't created a terrain set for the TileSet yet.
There are 3 kinds of painting modes available for terrain connections:
Connect, where tiles are connected to surrounding tiles on the same TileMap layer.
Path, where tiles are connected to tiles painted in the same stroke (until the mouse button is released).
Tile-specific overrides to resolve conflicts or handle situations not covered by the terrain system.
The Connect mode is easier to use, but Path is more flexible as it allows for more artist control during painting. For instance, Path can allow roads to be directly adjacent to each other without being connected to each other, while Connect will force both roads to be connected.
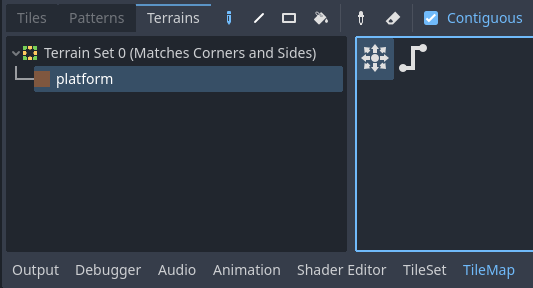
Selecting Connect mode in the TileMap editor's Terrains tab

Selecting Path mode in the TileMap editor's Terrains tab
Lastly, you can select specific tiles from the terrain to resolve conflicts in certain situations:
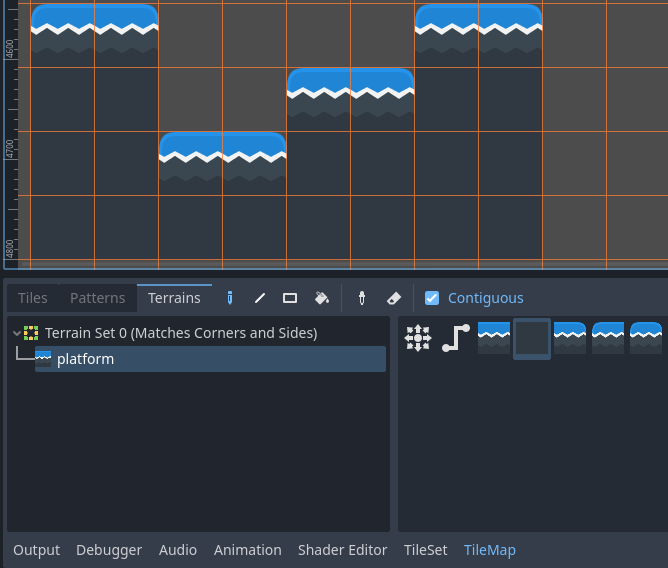
Painting with specific tiles in the TileMap editor's Terrains tab
Any tile that has at least one of its bits set to a value set to the corresponding terrain ID will appear in the list of tiles to choose from.
Handling missing tiles
If you remove tiles in the TileSet that are referenced in a TileMap, the TileMap will display a placeholder to indicate that an invalid tile ID is placed:
Missing tiles in the TileMap editor due to the TileSet reference being broken
These placeholders are not visible in the running project, but the tile data is still persisted to disk. This allows you to safely close and reopen such scenes. Once you re-add a tile with the matching ID, the tiles will appear with the new tile's appearance.
Note
Missing tile placeholders may not be visible until you select the TileMap node and open the TileMap editor.