Up to date
This page is up to date for Godot 4.0.
If you still find outdated information, please open an issue.
Environment and post-processing
Godot 4 provides a redesigned Environment resource, as well as a new post-processing system with many available effects right out of the box.
Note
As of Godot 4, Environment performance/quality settings are defined in the project settings instead of in the Environment resource. This makes global adjustments easier, as you no longer have to tweak Environment resources individually to suit various hardware configurations.
Note that most Environment performance/quality settings are only visible after enabling the Advanced toggle in the Project Settings.
Environment
The Environment resource stores all the information required for controlling the 2D and 3D rendering environment. This includes the sky, ambient lighting, tone mapping, effects, and adjustments. By itself, it does nothing, but you can enable it by using it in one of the following locations, in order of priority:
Camera3D node (high priority)
An Environment can be set to a Camera3D node. It will have priority over any other setting.
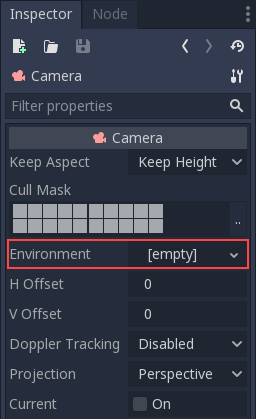
This is mostly useful when you want to override an existing environment, but in general it's a better idea to use the option below.
WorldEnvironment node (medium priority, recommended)
The WorldEnvironment node can be added to any scene, but only one can exist per active scene tree. Adding more than one will result in a warning.
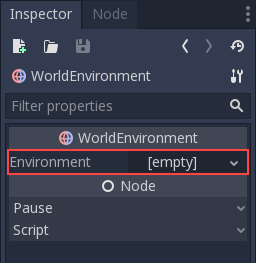
Any Environment added has higher priority than the default Environment (explained below). This means it can be overridden on a per-scene basis, which makes it quite useful.
Preview environment and sun (low priority)
Note
Since Godot 4, the preview environment and sun system replace the
default_env.tres file that was used in Godot 3 projects.
If no WorldEnvironment node or DirectionalLight3D node is present in the current scene, the editor will display a preview environment and sun instead. This can be disabled using the buttons at the top of the 3D editor:
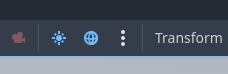
Clicking on the 3 vertical dots on the right will display a dialog which allows you to customize the appearance of the preview environment:
The preview sun and sky is only visible in the editor, not in the running project. Using the buttons at the bottom of the dialog, you can add the preview sun and sky into the scene as nodes.
Tip
If you hold Shift while clicking Add Sun to Scene or Add Environment to Scene in the preview environment editor, this will add both a preview sun and environment to the current scene (as if you clicked both buttons separately). Use this to speed up project setup and prototyping.
Camera attributes
Note
In Godot 4, exposure and depth of field information was split from the Environment resource into a separate CameraAttributes resource. This allows adjusting those properties independently of other Environment settings more easily.
The CameraAttributes resource stores exposure and depth of field information. It also allows enabling automatic exposure adjustments depending on scene brightness.
There are two kinds of CameraAttribute resources available:
CameraAttributesPractical: Features are exposed using arbitrary units, which are easier to reason about for most game use cases.
CameraAttributesPhysical: Features are exposed using real world units, similar to a digital camera. For example, field of view is set using a focal length in millimeters instead of a value in degrees. Recommended when physical accuracy is important, such as for photorealistic rendering.
Both CameraAttribute resource types allow you to use the same features, but they are configured differently. If you don't know which one to choose, use CameraAttributesPractical.
Note
Using a CameraAttributesPhysical on a Camera3D node will lock out FOV and aspect adjustments in that Camera3D, as field of view is adjusted in the CameraAttributesPhysical resource instead. If used in a WorldEnvironment, the CameraAttributesPhysical will not override any Camera3D in the scene.
A CameraAttributes resource can be added to a Camera3D or a WorldEnvironment node. When the current camera has a CameraAttributes set, it will override the one set in WorldEnvironment (if any).
In most situations, setting the CameraAttributes resource on the Camera3D node instead of the WorldEnvironment is recommended. Unlike WorldEnvironment, assigning the CameraAttributes resource to the Camera3D node prevents depth of field from displaying in the 3D editor viewport, unless the camera is being previewed.
Environment options
The following is a detailed description of all environment options and how they are intended to be used.
Background
The Background section contains settings on how to fill the background (parts of the screen where objects were not drawn). The background not only serves the purpose of displaying an image or color. By default, it also affects how objects are affected by ambient and reflected light. This is called image-based lighting (IBL).
As a result, the background sky may greatly impact your scene's overall appearance, even if the sky is never directly visible on screen. This should be taken into account when tweaking lighting in your scene.
There are several background modes available:
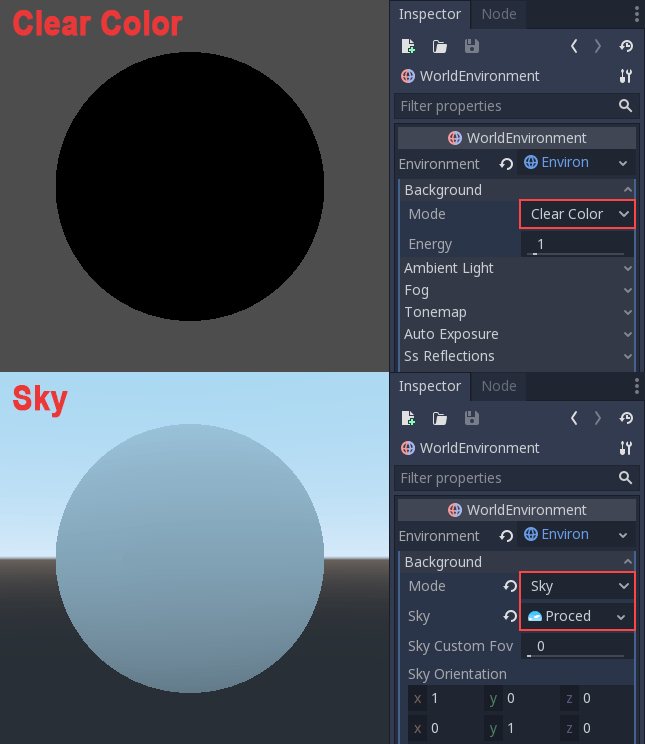
Clear Color uses the default clear color defined in the project settings. The background will be a constant color.
Custom Color is like Clear Color, but with a custom color value.
Sky lets you define a background sky material (see below). By default, objects in the scene will reflect this sky material and absorb ambient light from it.
Canvas displays the 2D scene as a background to the 3D scene.
Keep does not draw any sky, keeping what was present on previous frames instead. This improves performance in purely indoor scenes, but creates a "hall of mirrors" visual glitch if the sky is visible at any time.
Sky materials
When using the Sky background mode (or the ambient/reflected light mode is set to Sky), a Sky subresource becomes available to edit in the Environment resource. Editing this subresource allows you to create a SkyMaterial resource within the Sky.
There are 3 built-in sky materials to choose from:
PanoramaSkyMaterial: Use a 360 degree panorama sky image (2:1 aspect ratio recommended). To benefit from high dynamic range, the panorama image must be in an HDR-compatible format such as
.hdror.exrrather than a standard dynamic range format like.pngor.jpg.ProceduralSkyMaterial: Use a procedurally generated sky with adjustable ground, sun, sky and horizon colors. This is the type of sky used in the editor preview. The sun's position is automatically derived from the first 4 DirectionalLight3D nodes present in the scene. There can be up to 4 suns at a given time.
PhysicalSkyMaterial: Use a physically-based procedural sky with adjustable scattering parameters. The sun's position is automatically derived from the first DirectionalLight3D node present in the scene. PhysicalSkyMaterial is slightly more expensive to render compared to ProceduralSkyMaterial. There can be up to 1 sun at a given time.
Panorama sky images are sometimes called HDRIs (High Dynamic Range Images). You can find freely licensed HDRIs on Poly Haven.
Note
HDR PanoramaSkyMaterial textures with very bright spots (such as real life photos with the sun visible) may result in visible sparkles on ambient and specular reflections. This is caused by the texture's peak exposure being too high.
To resolve this, select the panorama texture in the FileSystem dock, go to the Import dock, enable HDR Clamp Exposure then click Reimport.
If you need a custom sky material (e.g. for procedural clouds), you can create a custom sky shader.
Ambient light
Ambient light (as defined here) is a type of light that affects every piece of geometry with the same intensity. It is global and independent of lights that might be added to the scene. Ambient light is one of the two components of image-based lighting. Unlike reflected light, ambient light does not vary depending on the camera's position and viewing angle.
There are several types of ambient light to choose from:
Background: Source ambient light from the background, such as the sky, custom color or clear color (default). Ambient light intensity will vary depending on the sky image's contents, which can result in more visually appealing ambient lighting. A sky must be set as background for this mode to be visible.
Disabled: Do not use any ambient light. Useful for purely indoor scenes.
Color: Use a constant color for ambient light, ignoring the background sky. Ambient light intensity will be the same on all sides, which may result in the scene's lighting looking more flat. Useful for indoor scenes where pitch black shadows may be too dark, or to maximize performance on low-end devices.
Sky: Source ambient light from a specified sky, even if the background is set to a mode other than Sky. If the background mode is already Sky, this mode behaves identically to Background.
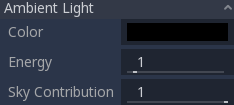
When the ambient light mode is set to Sky or Background (and background is set
to Sky), it's possible to blend between the ambient color and sky using the
Sky Contribution property. This value is set to 1.0 by default, which
means that only the ambient sky is used. The ambient color is ignored unless
Sky Contribution is decreased below 1.0.
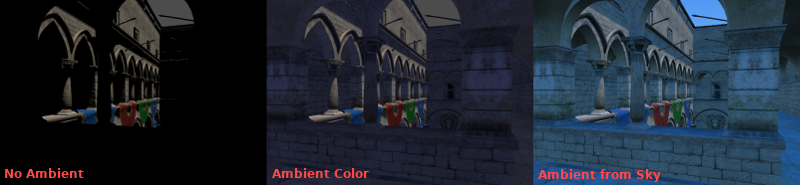
Here is a comparison of how different ambient light affects a scene:
Finally, there is an Energy setting which is a multiplier. It's useful when working with HDR.
In general, you should only rely on ambient light alone for simple scenes or large exteriors. You may also do so to boost performance. Ambient light is fast to render, but it doesn't provide the best lighting quality. It's better to generate ambient light from ReflectionProbe, VoxelGI or SDFGI, as these will simulate how indirect light propagates more accurately. Below is a comparison, in terms of quality, between using a flat ambient color and a VoxelGI:

Using one of the methods described above will replace constant ambient lighting with ambient lighting from the probes.
Reflected light
Reflected light (also called specular light) is the other of the two components of image-based lighting.
Reflected light can be set to one of 3 modes:
Background: Reflect from the background, such as the sky, custom color or clear color (default).
Disabled: Do not reflect any light from the environment. Useful for purely indoor scenes, or to maximize performance on low-end devices.
Sky: Reflect from the background sky, even if the background is set to a mode other than Sky. If the background mode is already Sky, this mode behaves identically to Background.
Fog
Note
This section refers to non-volumetric fog only. It is possible to use both non-volumetric fog and Volumetric fog and fog volumes at the same time.
Fog, as in real life, makes distant objects fade away into a uniform color. There are two kinds of fog in Godot:
Depth Fog: This one is applied based on the distance from the camera.
Height Fog: This one is applied to any objects below (or above) a certain height, regardless of the distance from the camera.
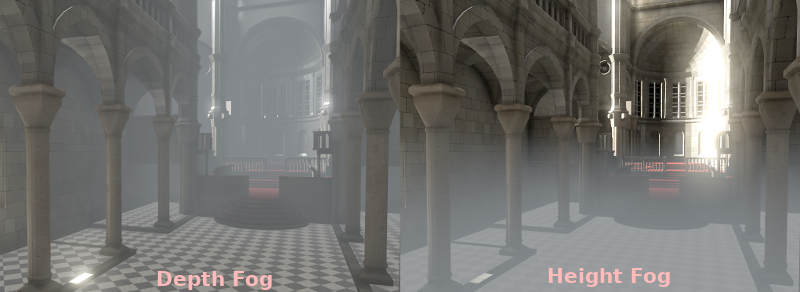
Both of these fog types can have their curve tweaked, making their transition more or less sharp.
Two properties can be tweaked to make the fog effect more interesting:
The first is Sun Amount, which makes use of the Sun Color property of the fog. When looking towards a directional light (usually a sun), the color of the fog will be changed, simulating the sunlight passing through the fog.
The second is Transmit Enabled which simulates more realistic light transmittance. In practice, it makes light stand out more across the fog.

Volumetric Fog
Volumetric fog provides a realistic fog effect to the scene, with fog color being affected by the lights that traverse the fog.
See also
See Volumetric fog and fog volumes for documentation on setting up volumetric fog.
Tonemap
Tonemap selects the tonemapping curve that will be applied to the scene, from a list of standard curves used in the film and game industries. Tonemapping operators other than Linear are used to make light and dark areas more homogeneous, while also avoiding clipping of bright highlights.
The tone mapping options are:
Mode: The tone mapping mode to use.
Linear: The default tonemapping mode. This is the fastest and simplest tonemapping operator, but it causes bright lighting to look blown out, with noticeable clipping in the output colors.
Reinhardt: Performs a variation on rendered pixels' colors by this formula:
color = color / (1 + color). This avoids clipping bright highlights, but the resulting image can look a bit dull.Filmic: This avoids clipping bright highlights, with a resulting image that usually looks more vivid than Reinhardt.
ACES: Academy Color Encoding System tonemapper. ACES is slightly more expensive than other options, but it handles bright lighting in a more realistic fashion by desaturating it as it becomes brighter. ACES typically has a more contrasted output compared to Reinhardt and Filmic. ACES is the recommended option when aiming for photorealistic visuals. This tonemapping mode was called "ACES Fitted" in Godot 3.x.
Exposure: Tone mapping exposure which simulates amount of light received over time (default:
1.0). Higher values result in an overall brighter appearance. If the scene appears too dark as a result of a tonemapping operator or whitepoint change, try increasing this value slightly.White: Tone mapping whitepoint, which simulates where in the scale white is located (default:
1.0). For photorealistic lighting, recommended values are between6.0and8.0. Higher values result in less blown out highlights, but make the scene appear slightly darker as a whole.
Mid- and post-processing effects
The Environment resource supports many popular mid- and post-processing effects.
Note
Screen-space effects such as SSR, SSAO, SSIL and glow do not operate on geometry that is located outside the camera view or is occluded by other opaque geometry. Consider this when tweaking their settings to avoid distracting changes during gameplay.
Screen-Space Reflections (SSR)
This feature is only available when using the Forward+ backend, not Mobile or Compatibility.
While Godot supports several sources of reflection data such as Reflection probes, they may not provide enough detail for all situations. Scenarios where screen-space reflections make the most sense are when objects are in contact with each other (object over floor, over a table, floating on water, etc).
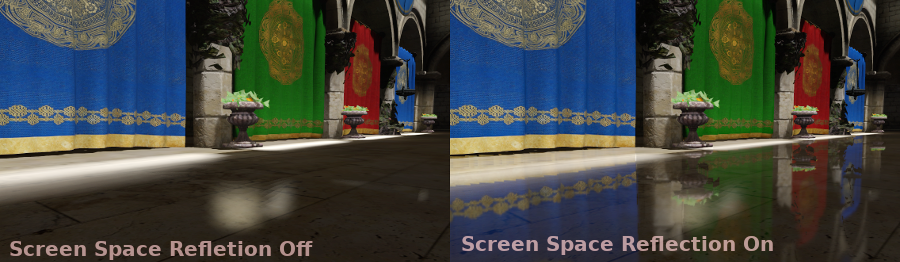
On top of providing more detail, screen-space reflections also work in real-time (while other types of reflections are usually precomputed). This can be used to make characters, cars, etc. reflect on surrounding surfaces when moving around.
Screen-space reflections can be used at the same time as other reflection sources to benefit from detailed reflections when possible, while having a fallback when screen-space reflections cannot be used (for example, to reflect off-screen objects).
A few user-controlled parameters are available to better tweak the technique:
Max Steps: Determines the length of the reflection. The bigger this number, the more costly it is to compute.
Fade In: Allows adjusting the fade-in curve, which is useful to make the contact area softer.
Fade Out: Allows adjusting the fade-out curve, so the step limit fades out softly.
Depth Tolerance: Can be used to allow screen-space rays to pass behind objects. The rays will treat each object as if it has this depth in determining if it can pass behind the object. Higher values will make screen-space reflections exhibit fewer "breakups", at the cost of some objects creating physically incorrect reflections.
Keep in mind that screen-space-reflections only work for reflecting opaque
geometry. Transparent materials won't be reflected, as they don't write to the depth buffer.
This also applies to shaders that use hint_screen_texture or hint_depth_texture
uniforms.
Screen-Space Ambient Occlusion (SSAO)
This feature is only available when using the Forward+ backend, not Mobile or Compatibility.
As mentioned in the Ambient section, areas where light from light nodes does not reach (either because it's outside the radius or shadowed) are lit with ambient light. Godot can simulate this using VoxelGI, ReflectionProbe, the Sky, or a constant ambient color. The problem, however, is that all the methods proposed previously act more on a larger scale (large regions) than at the smaller geometry level.
Constant ambient color and Sky are the same everywhere, while GI and Reflection probes have more local detail, but not enough to simulate situations where light is not able to fill inside hollow or concave features.
This can be simulated with Screen Space Ambient Occlusion. As you can see in the image below, its purpose is to make sure concave areas are darker, simulating a narrower path for the light to enter:
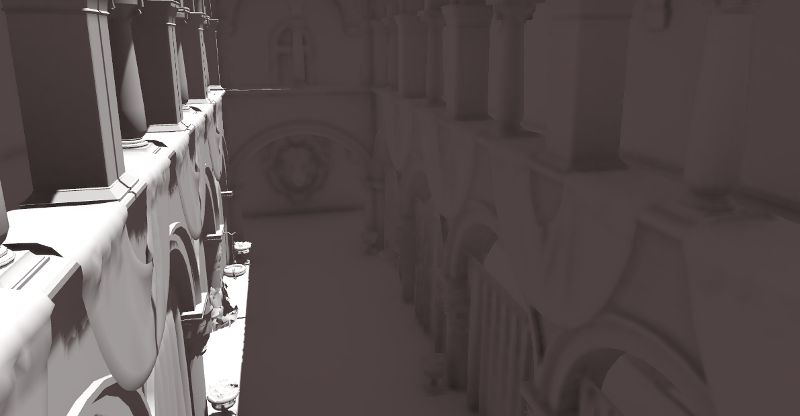
It is a common mistake to enable this effect, turn on a light, and not be able to appreciate it. This is because SSAO only acts on ambient light. It does not affect direct light.
This is why, in the image above, the effect is less noticeable under the direct light (on the left). If you want to force SSAO to work with direct light too, use the Light Affect parameter. Even though this is not physically correct, some artists like how it looks.
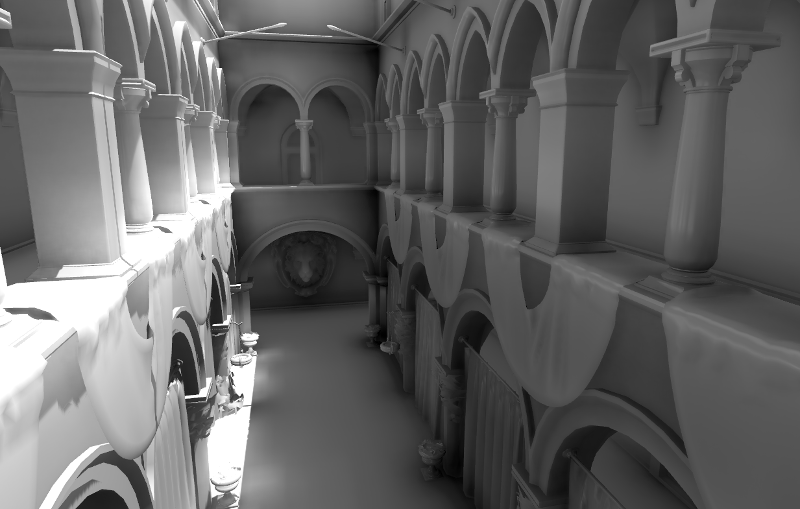
SSAO looks best when combined with a real source of indirect light, like VoxelGI:
Tweaking SSAO is possible with several parameters:
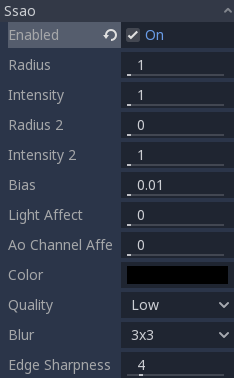
Radius: The distance at which objects can occlude each other when calculating screen-space ambient occlusion. Higher values will result in occlusion over a greater distance at the cost of performance and quality.
Intensity: The primary screen-space ambient occlusion intensity. Acts as a multiplier for the screen-space ambient occlusion effect. A higher value results in darker occlusion. Since SSAO is a screen-space effect, it's recommended to remain conservative with this value. SSAO that is too strong can be distracting during gameplay.
Power: The distribution of occlusion. A higher value results in darker occlusion, similar to Intensity, but with a sharper falloff.
Detail: Sets the strength of the additional level of detail for the screen-space ambient occlusion effect. A high value makes the detail pass more prominent, but it may contribute to aliasing in your final image.
Horizon: The threshold for considering whether a given point on a surface is occluded or not represented as an angle from the horizon mapped into the 0.0-1.0 range. A value of 1.0 results in no occlusion.
Sharpness: The amount that the screen-space ambient occlusion effect is allowed to blur over the edges of objects. Setting too high will result in aliasing around the edges of objects. Setting too low will make object edges appear blurry.
Light Affect: The screen-space ambient occlusion intensity in direct light. In real life, ambient occlusion only applies to indirect light, which means its effects can't be seen in direct light. Values higher than 0 will make the SSAO effect visible in direct light. Values above
0.0are not physically accurate, but some artists prefer this effect.
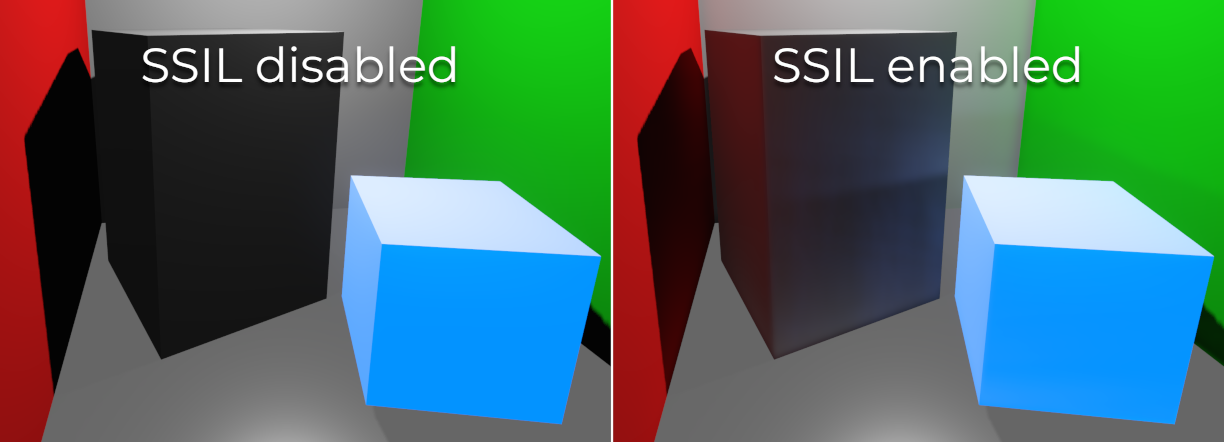
Screen-Space Indirect Lighting (SSIL)
This feature is only available when using the Forward+ backend, not Mobile or Compatibility.
SSIL provides indirect lighting for small details or dynamic geometry that other global illumination techniques cannot cover. This applies to bounced diffuse lighting, but also emissive materials. When SSIL is enabled on its own, the effect may not be that noticeable, which is intended.
Instead, SSIL is meant to be used as a complement to other global illumination techniques such as VoxelGI, SDFGI and LightmapGI. SSIL also provides a subtle ambient occlusion effect, similar to SSAO but with less detail.
This feature only provides indirect lighting. It is not a full global illumination solution. This makes it different from screen-space global illumination (SSGI) offered by other 3D engines. SSIL can be combined with SSR and/or SSAO for greater visual quality (at the cost of performance).
Tweaking SSIL is possible with several parameters:
Radius: The distance that bounced lighting can travel when using the screen space indirect lighting effect. A larger value will result in light bouncing further in a scene, but may result in under-sampling artifacts which look like long spikes surrounding light sources.
Intensity: The brightness multiplier for the screen-space indirect lighting effect. A higher value will result in brighter light.
Sharpness: The amount that the screen-space indirect lighting effect is allowed to blur over the edges of objects. Setting too high will result in aliasing around the edges of objects. Setting too low will make object edges appear blurry.
Normal Rejection: Amount of normal rejection used when calculating screen-space indirect lighting. Normal rejection uses the normal of a given sample point to reject samples that are facing away from the current pixel. Normal rejection is necessary to avoid light leaking when only one side of an object is illuminated. However, normal rejection can be disabled if light leaking is desirable, such as when the scene mostly contains emissive objects that emit light from faces that cannot be seen from the camera.
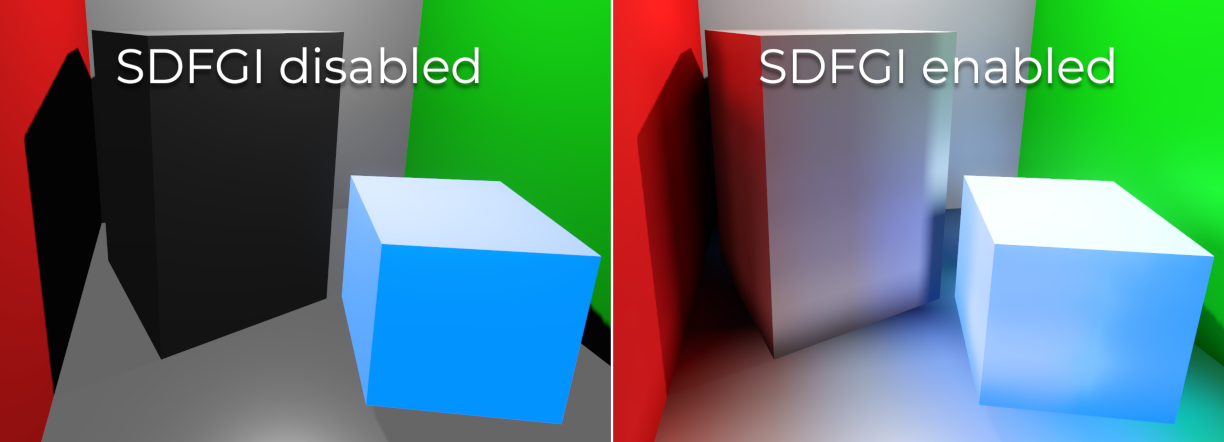
Signed Distance Field Global Illumination (SDFGI)
This feature is only available when using the Forward+ backend, not Mobile or Compatibility.
Signed distance field global illumination (SDFGI) is a form of real-time global illumination. It is not a screen-space effect, which means it can provide global illumination for off-screen elements (unlike SSIL).
See also
See Signed distance field global illumination (SDFGI) for instructions on setting up this global illumination technique.
Glow
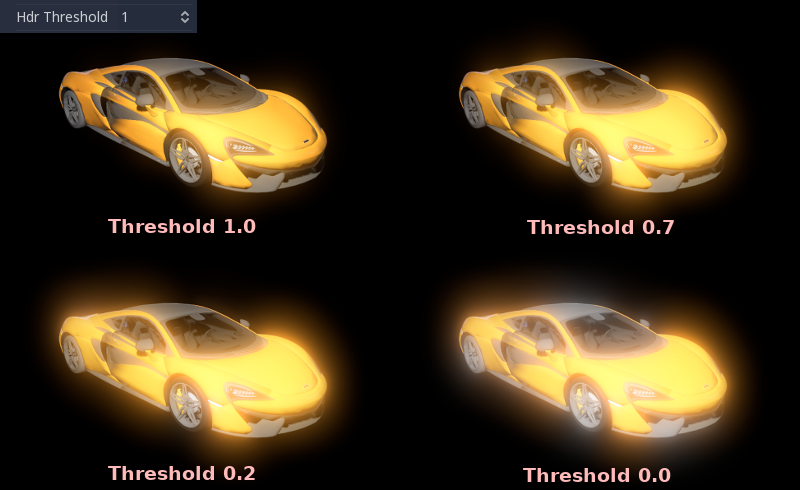
In photography and film, when light amount exceeds the maximum luminance (brightness) supported by the media, it generally bleeds outwards to darker regions of the image. This is simulated in Godot with the Glow effect.
By default, even if the effect is enabled, it will be weak or invisible. One of two conditions need to happen for it to actually show:
The light in a pixel surpasses the HDR Threshold (where 0 is all light surpasses it, and 1.0 is light over the tonemapper White value). Normally, this value is expected to be at 1.0, but it can be lowered to allow more light to bleed. There is also an extra parameter, HDR Scale, that allows scaling (making brighter or darker) the light surpassing the threshold.
The Bloom property has a value greater than
0.0. As it increases, it sends the whole screen to the glow processor at higher amounts.
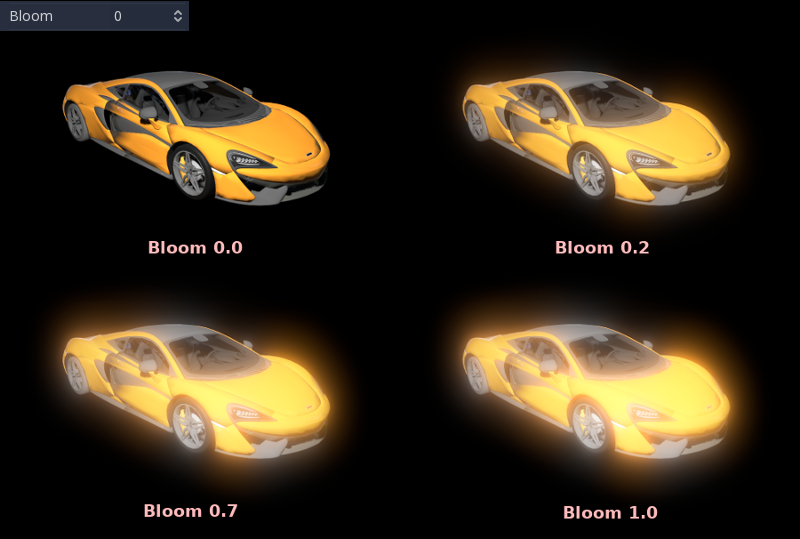
Both will cause the light to start bleeding out of the brighter areas.
Once glow is visible, it can be controlled with a few extra parameters:
Intensity is an overall scale for the effect, it can be made stronger or weaker (
0.0removes it).Strength is how strong the gaussian filter kernel is processed. Greater values make the filter saturate and expand outwards. In general, changing this is not needed, as the size can be adjusted more efficiently with the Levels.
The Blend Mode of the effect can also be changed:
Additive is the strongest one, as it only adds the glow effect over the image with no blending involved. In general, it's too strong to be used, but can look good with low-intensity Bloom (produces a dream-like effect).
Screen ensures glow never brightens more than itself and it works great as an all around.
Softlight is the default and weakest one, producing only a subtle color disturbance around the objects. This mode works best on dark scenes.
Replace can be used to blur the whole screen or debug the effect. It only shows the glow effect without the image below.
Mix mixes the glow effect with the main image. This can be used for greater artistic control. The mix factor is controlled by the Mix property which appears above the blend mode (only when the blend mode is set to Mix). High mix factor values will appear to darken the image unless Bloom is increased.
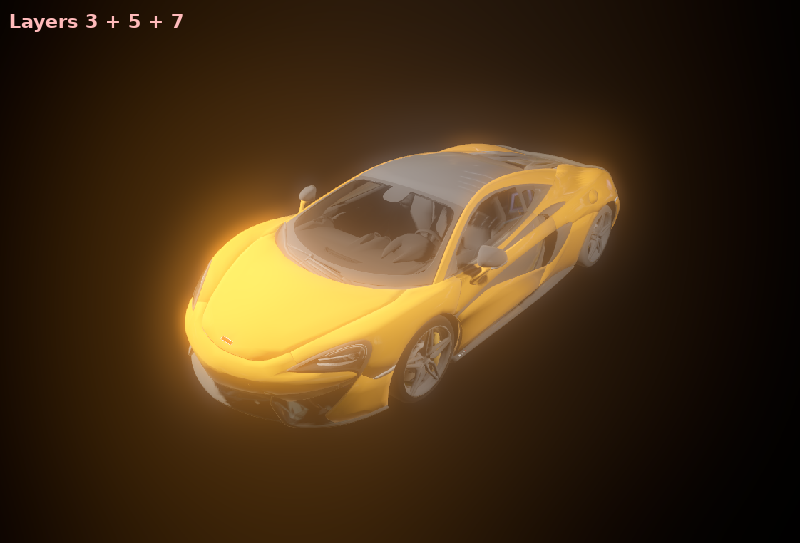
To change the glow effect size and shape, Godot provides Levels. Smaller levels are strong glows that appear around objects, while large levels are hazy glows covering the whole screen:
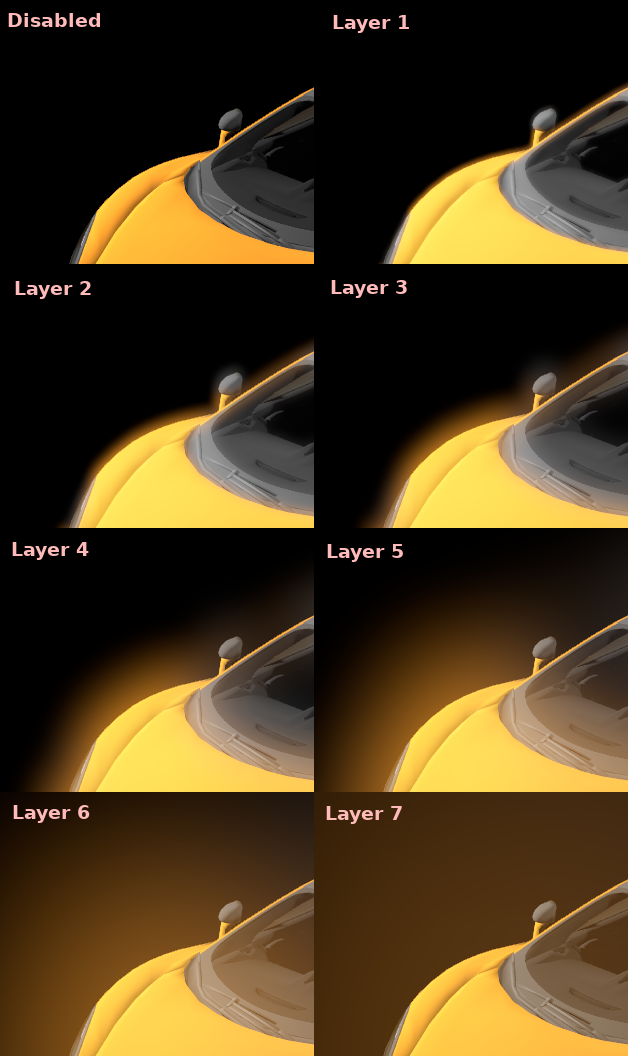
The real strength of this system, though, is to combine levels to create more interesting glow patterns:
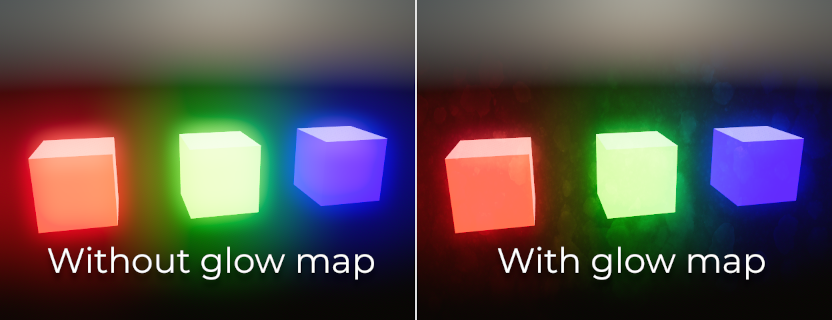
Finally, the glow effect can be controlled using a glow map, which is a texture that determines how bright glow should be on each part of the screen. This texture can optionally be colored to tint the glow effect to the glow map's color. The texture is stretched to fit the viewport, so using an aspect ratio that matches your viewport's most common aspect ratio (such as 16:9) is recommended to avoid visible distortion.
There are 2 main use cases for a glow map texture:
Create a "lens dirt" effect using a dirt pattern texture.
Make glow less strong on specific parts of the screen by using a gradient texture.
Note
Glow can be used in 2D as well. To do so, set the environment background mode to Canvas then enable glow as usual. You may have to decrease Glow HDR Threshold to see a difference.
Adjustments
At the end of processing, Godot offers the possibility to do some standard image adjustments.
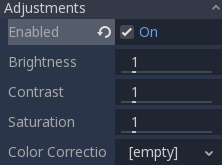
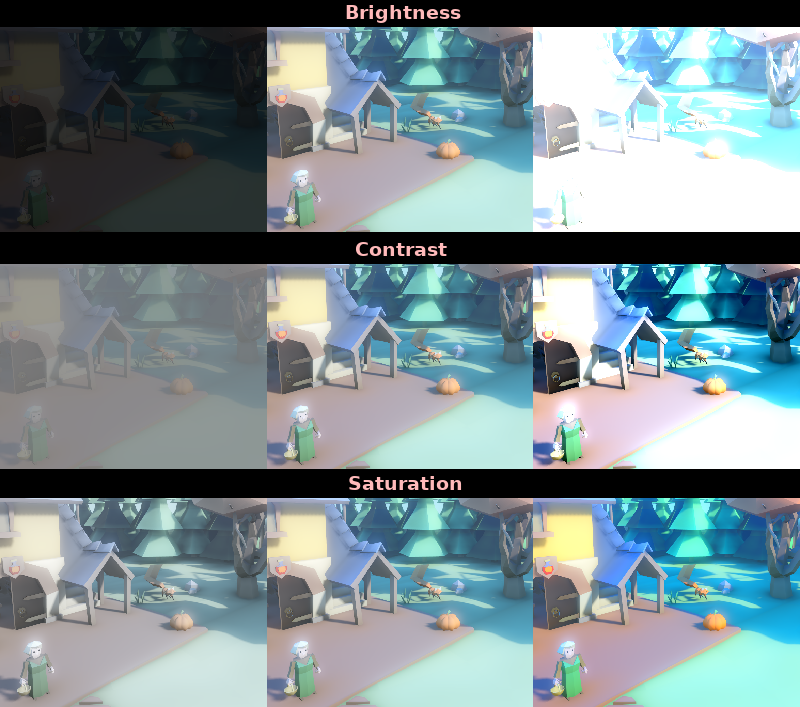
Basic BCS adjustments
The first adjustment is being able to change the typical Brightness, Contrast, and Saturation properties:
Color correction using a 1D gradient
The second adjustment is by supplying a color correction gradient. This can be done by assigning a GradientTexture1D resource to the Color Correction property, or by loading a texture containing a horizontal gradient. The leftmost part of the gradient represents black in the source image, whereas the rightmost part of the gradient represents white in the source image.
A linear black-to-white gradient like the following one will produce no effect:

But creating custom ones will allow to map each channel to a different color:

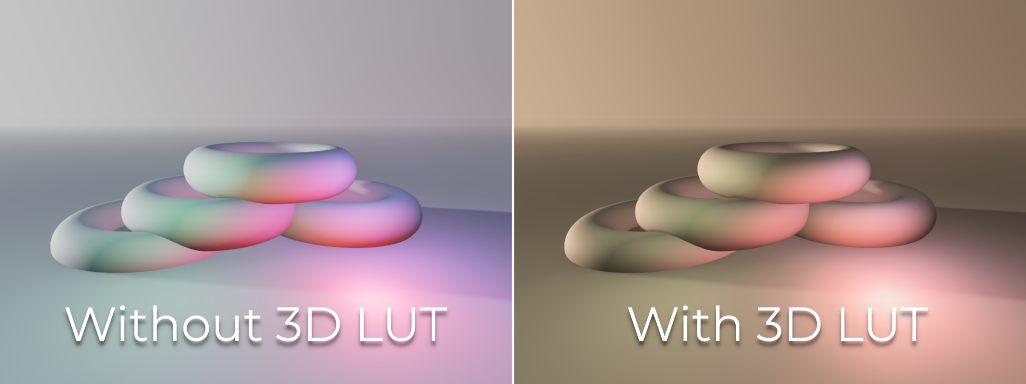
Color correction using a 3D LUT
A 3D look-up-texture (LUT) can also be used for color correction. This is a special texture used to modify each color channel separately from one another (red, green, blue). This image can be of any resolution, but since color correction is low-frequency data, sticking to low resolutions is recommended for performance reasons. A LUT texture's resolution is typically 17×17×17, 33×33×33, 51×51×51 or 65×65×65 (the odd size allows for better interpolation).
For this to work, the look-up texture's import mode must be set to Texture3D in the Import dock (instead of being imported as a regular Texture2D):
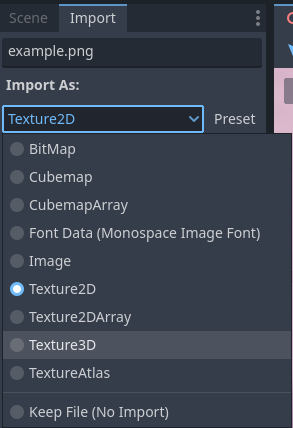
Make sure to configure the number of horizontal and vertical slices to import as well. If you don't do this, the LUT texture will not affect the viewport correctly when used. You can preview how the 3D texture was imported by double-clicking it, in the FileSystem dock, then going to the inspector to flip through the texture's layers.
You can use this neutral 33×33×33 LUT template as a base (right-click and choose Save as…):

With the above LUT template, after changing its import mode to Texture3D,
set its number of Horizontal slices to 33 in the Import dock then click
Reimport. If you load this LUT into the Color Correction property, you
won't see any visible difference for now since this texture is designed to be a
neutral starting point.
This LUT template can be modified in an image editor to provide a different mood to the image. A common workflow is to place the LUT image next to a screenshot of the project's 3D viewport, then use an image editor to modify both the LUT image and the screenshot at the same time. The LUT can then be saved and applied to the game engine to perform the same color correction in real-time.
For example, modifying the LUT template in an image editor to give it a "sepia" look results in the image on the right:
Note
Adjustments and color correction are applied after tonemapping. This means the tonemapping properties defined above still have an effect when adjustments are enabled.
Camera attribute options
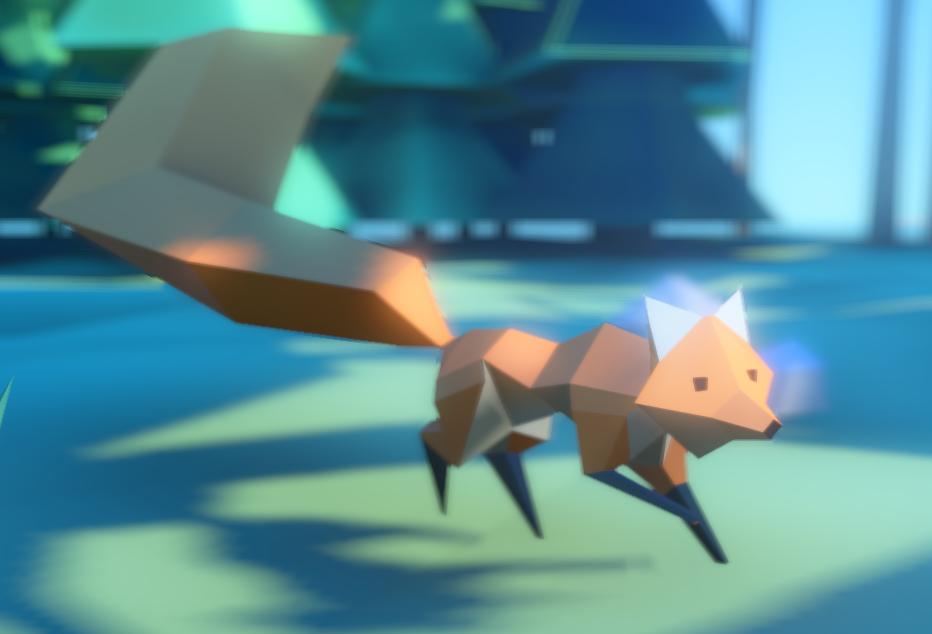
Depth of Field / Far Blur
This effect simulates focal distance on cameras. It blurs objects behind a given range. It has an initial Distance with a Transition region (in world units):
The Amount parameter controls the amount of blur. For larger blurs, tweaking the Quality may be needed in order to avoid artifacts.
Depth of Field / Near Blur
This effect simulates focal distance on cameras. It blurs objects close to the camera (acts in the opposite direction as far blur). It has an initial Distance with a Transition region (in world units):
The Amount parameter controls the amount of blur. For larger blurs, tweaking the Quality may be needed in order to avoid artifacts.
It is common to use both blurs together to focus the viewer's attention on a given object, or create a so-called "tilt shift" effect.
Note
When using CameraAttributesPhysical instead of CameraAttributesPractical, depth of field is automatically computed from the camera attributes' focus distance, focal length, and aperture.
Exposure
This multiplies the overall scene brightness visible from the camera. Higher values result in a visually brighter scene.
Auto Exposure
This feature is only available when using the Forward+ backend, not Mobile or Compatibility.
Even though, in most cases, lighting and texturing are heavily artist controlled, Godot supports a basic high dynamic range implementation with the auto exposure mechanism. This is generally used to add realism when combining interior areas with low light and bright outdoor areas. Auto exposure simulates the camera (or eye) in an effort to adapt between light and dark locations and their different amounts of light.
Note
Auto exposure needs to evaluate the scene's brightness every frame, which has a moderate performance cost. Therefore, it's recommended to leave Auto Exposure disabled if it doesn't make much of a difference in your scene.
The simplest way to use auto exposure is to make sure outdoor lights (or other strong lights) have energy beyond 1.0. This is done by tweaking their Energy multiplier (on the Light itself). To make it consistent, the Sky usually needs to use the energy multiplier too, to match with the directional light. Normally, values between 3.0 and 6.0 are enough to simulate indoor-outdoor conditions.
By combining Auto Exposure with Glow post-processing, pixels that go over the tonemap White will bleed to the glow buffer, creating the typical bloom effect in photography.
The user-controllable values in the Auto Exposure section come with sensible defaults, but you can still tweak them:
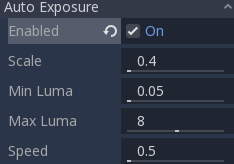
Scale: Value to scale the lighting. Higher values produce brighter images, and lower values produce darker ones.
Min Sensitivity / Min Exposure Value: Minimum luminance that auto exposure will aim to adjust for (in ISO when using CameraAttributesPractical, or in EV100 when using CameraAttributesPhysical). Luminance is the average of the light in all the pixels of the screen.
Max Sensitivity / Max Exposure Value: Maximum luminance that auto exposure will aim to adjust for (in ISO when using CameraAttributesPractical, or in EV100 when using CameraAttributesPhysical).
Speed: Speed at which luminance corrects itself. The higher the value, the faster luminance correction happens. High values may be more suited to fast-paced games, but can be distracting in some scenarios.
When using CameraAttributesPractical, exposure is set using sensitivity defined in ISO instead of an exposure value in EV100. Typical ISO values are between 50 and 3200, with higher values resulting in higher final exposure. In real life, daytime photography generally uses ISO values between 100 and 800.
See also
See Physical light and camera units if you wish to use real world units to configure your camera's exposure, field of view and depth of field.