Up to date
This page is up to date for Godot 4.0.
If you still find outdated information, please open an issue.
Importing 3D scenes
Godot scene importer
When dealing with 3D assets, Godot has a flexible and configurable importer.
Godot works with scenes. This means that the entire scene being worked on in your favorite 3D modeling software will be transferred as close as possible.
Godot supports the following 3D scene file formats:
glTF 2.0 (recommended). Godot has full support for both text (
.gltf) and binary (.glb) formats..blend(Blender). This works by calling Blender to export to glTF in a transparent manner (requires Blender to be installed).DAE (COLLADA), an older format that is fully supported.
OBJ (Wavefront) format + their MTL material files. This is also fully supported, but pretty limited given the format's limitations (no support for pivots, skeletons, animations, UV2, PBR materials, ...).
FBX, supported via FBX2glTF integration. This requires installing an external program that links against the proprietary FBX SDK, so we recommend using other formats listed above (if suitable for your workflow).
Copy the scene file together with the textures and mesh data (if separate) to the project repository, then Godot will do a full import when focusing the editor window.
3D asset direction conventions
Godot uses a right-handed, Y-is-up coordinate system, with the -Z axis as the camera's forward direction. This is the same as OpenGL. This implies that +Z is back, +X is right, and -X is left for a camera.
The convention for 3D assets is to face the opposite direction as the camera, so that characters and other assets are facing the camera by default. This convention is extremely common in 3D modeling applications, and is codified in glTF as part of the glTF 2.0 specification. This means that for oriented 3D assets (such as characters), the +Z axis is the direction of the front, so -Z is the rear, +X is the left side, and -X is the right side for a 3D asset. In Blender, this means that +Y is rear and -Y is front for an asset.
When rotating an oriented 3D asset in Godot, use the use_model_front
option on the look_at functions, and use the Vector3.MODEL_*
constants to perform calculations in the oriented asset's local space.
For assets without an intrinsic front side or forward direction, such as a game map or terrain, take note of the cardinal directions instead. The convention in Godot and the vast majority of other applications is that +X is east and -X is west. Due to Godot's right-handed Y-is-up coordinate system, this implies that +Z is south and -Z is north. In Blender, this means that +Y is north and -Y is south.
Exporting glTF 2.0 files from Blender (recommended)
There are 3 ways to export glTF files from Blender:
As a glTF binary file (
.glb).As a glTF text-based file with embedded binary data (
.gltffile)As a glTF text-based file with separate binary data and textures (
.gltffile +.binfile + textures).
glTF binary files (.glb) are the smallest of the three options. They include
the mesh and textures set up in Blender. When brought into Godot the textures
are part of the object's material file.
glTF embedded files (.gltf) function the same way as binary files. They
don't provide extra functionality in Godot, and shouldn't be used since they
have a larger file size.
There are two reasons to use glTF with the textures separate. One is to have the scene description in a text based format and the binary data in a separate binary file. This can be useful for version control if you want to review changes in a text-based format. The second is you need the texture files separate from the material file. If you don't need either of those, glTF binary files are fine.
Warning
If your model contains blend shapes (also known as "shape keys" and "morph targets"), your glTF export setting Export Deformation Bones Only needs to be configured to Enabled under the Animation export configurations.
Exporting non-deforming bones anyway will lead to incorrect shading.
Note
Blender versions older than 3.2 do not export emissive textures with the glTF file. If your model uses one and you're using an older version of Blender, it must be brought in separately.
By default, Blender has backface culling disabled on materials and will export materials to match how they render in Blender. This means that materials in Godot will have their cull mode set to Disabled. This can decrease performance since backfaces will be rendered, even when they are being culled by other faces. To resolve this, enable Backface Culling in Blender's Materials tab, then export the scene to glTF again.
Importing .blend files directly within Godot
Note
This functionality requires Blender 3.0 or later. For best results, we recommend using Blender 3.5 or later, as it includes many fixes to the glTF exporter.
From Godot 4.0 onwards, the editor can directly import .blend files by
calling Blender's glTF export functionality in a
transparent manner.
This allows you to iterate on your 3D scenes faster, as you can save the scene in Blender, alt-tab back to Godot then see your changes immediately. When working with version control, this is also more efficient as you no longer need to commit a copy of the exported glTF file to version control.
To use .blend import, you must install Blender before opening the Godot
editor (if opening a project that already contains .blend files). If you
keep Blender installed at its default location, Godot should be able to detect
its path automatically. If this isn't the case, configure the path to the
directory containing the Blender executable in the Editor Settings
(Filesystem > Import > Blender > Blender 3 Path).
If you keep .blend files within your project folder but don't want them to
be imported by Godot, disable Filesystem > Import > Blender > Enabled in the
advanced Project Settings.
Note
When working in a team, keep in mind using .blend files in your project
will require all team members to have Blender installed. While Blender is
a free download, this may add friction when working on the project.
.blend import is also not available on the Android and web editors, as
these platforms can't call external programs.
If this is problematic, consider using glTF scenes exported from Blender instead.
Exporting DAE files from Blender
Blender has built-in COLLADA support, but it does not work properly for the needs of game engines and shouldn't be used as-is. However, scenes exported with the built-in Collada support may still work for simple scenes without animation.
For complex scenes or scenes that contain animations, Godot provides a Blender plugin that will correctly export COLLADA scenes for use in Godot.
Importing OBJ files in Godot
OBJ is one of the simplest 3D formats out there, so Godot should be able to import most OBJ files successfully. However, OBJ is also a very limited format: it doesn't support skinning, animation, UV2 or PBR materials.
There are 2 ways to use OBJ meshes in Godot:
Load them directly in a MeshInstance3D node, or any other property that expects as mesh (such as GPUParticles3D). This is the default mode.
Change their import mode to OBJ as Scene in the Import dock then restart the editor. This allows you to use the same import options as glTF or Collada scenes, such as unwrapping UV2 on import (for Using Lightmap global illumination).
Note
Blender 3.4 and later can export RGB vertex colors in OBJ files (this is a nonstandard extension of the OBJ format). Godot is able to import those vertex colors since Godot 4.0, but they will not be displayed on the material unless you enable Vertex Color > Use As Albedo on the material.
Vertex colors from OBJ meshes keep their original color space once imported (sRGB/linear), but their brightness is clamped to 1.0 (they can't be overbright).
Importing FBX files in Godot
When opening a project containing FBX scenes, you will see a dialog asking you to configure FBX import. Click the link in the dialog to download a fbx2gltf binary, then extract the ZIP archive, place the binary anywhere you wish, then specify its path in the dialog.
If you keep .fbx files within your project folder but don't want them to
be imported by Godot, disable Filesystem > Import > FBX > Enabled in the
advanced Project Settings.
See also
The full installation process for using FBX in Godot is described on the FBX import page of the Godot website.
Exporting textures separately
While textures can be exported with a model in certain file formats, such as glTF 2.0, you can also export them separately. Godot uses PBR (physically based rendering) for its materials, so if a texturing program can export PBR textures they can work in Godot. This includes the Substance suite, ArmorPaint (open source), and Material Maker (open source).
Note
For more information on Godot's materials, see Standard Material 3D and ORM Material 3D.
Exporting considerations
Since GPUs can only render triangles, meshes that contain quads or N-gons have to be triangulated before they can be rendered. Godot can triangulate meshes on import, but results may be unpredictable or incorrect, especially with N-gons. Regardless of the target application, triangulating before exporting the scene will lead to more consistent results and should be done whenever possible.
To avoid issues with incorrect triangulation after importing in Godot, it is recommended to make the 3D modeling software triangulate objects on its own. In Blender, this can be done by adding a Triangulate modifier to your objects and making sure Apply Modifiers is checked in the export dialog. Alternatively, depending on the exporter, you may be able to find and enable a Triangulate Faces option in the export dialog.
To avoid issues with 3D selection in the editor, it is recommended to apply the object transform in the 3D modeling software before exporting the scene.
Note
It is important that the mesh is not deformed by bones when exporting. Make sure that the skeleton is reset to its T-pose or default rest pose before exporting with your favorite 3D editor.
Lighting considerations
While it's possible to import lights from a 3D scene using the glTF, .blend
or Collada formats, it's generally advised to design the scene's lighting in the
Godot editor after importing the scene.
This allows you to get a more accurate feel for the final result, as different engines will render lights in a different manner. This also avoids any issues with lights appearing excessively strong or faint as a result of the import process.
Import workflows
Since Godot can only save its own scene format (.tscn/.scn), Godot
cannot save over the original 3D scene file (which uses a different format).
This is also a safer approach as it avoids making accidental changes to the
source file.
To allow customizing the scene and its materials, Godot's scene importer allows for different workflows regarding how data is imported.
Import dock after selecting a 3D scene in the FileSystem dock
This import process is customizable using 3 separate interfaces, depending on your needs:
The Import dock, after selecting the 3D scene by clicking it once in the FileSystem dock.
The Advanced Import Settings dialog, which can be accessed by double-clicking the 3D scene in the FileSystem dock or by clicking the Advanced… button in the Import dock. This allows you to customize per-object options in Godot.
Import hints, which are special suffixes added to object names in the 3D modeling software. This allows you to customize per-object options in the 3D modeling software.
For basic customization, using the Import dock suffices. However, for more complex operations such as defining material overrides on a per-material basis, you'll need to use the Advanced Import Settings dialog, import hints, or possibly both.
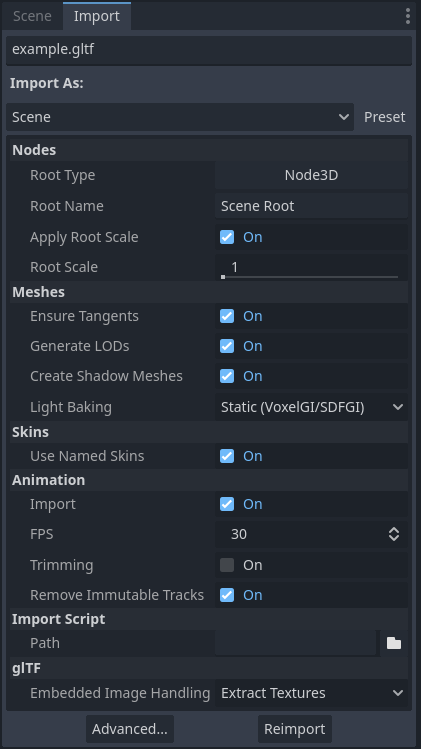
Using the Import dock
The following options can be adjusted in the Import dock after selecting a 3D scene in the FileSystem dock:
Root Type: The node type to use as a root node. Using node types that inherit from Node3D is recommended. Otherwise, you'll lose the ability to position the node directly in the 3D editor.
Root Name: The name of the root node in the imported scene. This is generally not noticeable when instancing the scene in the editor (or drag-and-dropping from the FileSystem dock), as the root node is renamed to match the filename in this case.
Apply Root Scale: If enabled, Root Scale will be applied on the meshes and animations directly, while keeping the root node's scale to the default (1, 1, 1). This means that if you add a child node later on within the imported scene, it won't be scaled. If disabled, Root Scale will multiply the scale of the root node instead.
Meshes
Ensure Tangents: If checked, generate vertex tangents using Mikktspace if the input meshes don't have tangent data. When possible, it's recommended to let the 3D modeling software generate tangents on export instead on relying on this option. Tangents are required for correct display of normal and height maps, along with any material/shader features that require tangents. If you don't need material features that require tangents, disabling this can reduce output file size and speed up importing if the source 3D file doesn't contain tangents.
Generate LODs: If checked, generates lower detail variants of the mesh which will be displayed in the distance to improve rendering performance. Not all meshes benefit from LOD, especially if they are never rendered from far away. Disabling this can reduce output file size and speed up importing. See Mesh level of detail (LOD) for more information.
Create Shadow Meshes: If checked, enables the generation of shadow meshes on import. This optimizes shadow rendering without reducing quality by welding vertices together when possible. This in turn reduces the memory bandwidth required to render shadows. Shadow mesh generation currently doesn't support using a lower detail level than the source mesh (but shadow rendering will make use of LODs when relevant).
Light Baking: Configures the meshes' global illumination mode in the 3D scene. If set to Static Lightmaps, sets the meshes' GI mode to Static and generates UV2 on import for lightmap baking.
Lightmap Texel Size: Only visible if Light Baking is set to Static Lightmaps. Controls the size of each texel on the baked lightmap. A smaller value results in more precise lightmaps, at the cost of larger lightmap sizes and longer bake times.
Skins
Use Named Skins: If checked, use named Skins for animation. The MeshInstance3D node contains 3 properties of relevance here: a skeleton NodePath pointing to the Skeleton3D node (usually
..), a mesh, and a skin:The Skeleton3D node contains a list of bones with names, their pose and rest, a name and a parent bone.
The mesh is all of the raw vertex data needed to display a mesh. In terms of the mesh, it knows how vertices are weight-painted and uses some internal numbering often imported from 3D modeling software.
The skin contains the information necessary to bind this mesh onto this Skeleton3D. For every one of the internal bone IDs chosen by the 3D modeling software, it contains two things. Firstly, a Matrix known as the Bind Pose Matrix, Inverse Bind Matrix, or IBM for short. Secondly, the Skin contains each bone's name (if Use Named Skins is enabled), or the bone's index within the Skeleton3D list (if Use Named Skins is disabled).
Together, this information is enough to tell Godot how to use the bone poses in the Skeleton3D node to render the mesh from each MeshInstance3D. Note that each MeshInstance3D may share binds, as is common in models exported from Blender, or each MeshInstance3D may use a separate Skin object, as is common in models exported from other tools such as Maya.
Animation
Import: If checked, import animations from the 3D scene.
FPS: The number of frames per second to use for baking animation curves to a series of points with linear interpolation. It's recommended to configure this value to match the value you're using as a baseline in your 3D modeling software. Higher values result in more precise animation with fast movement changes, at the cost of higher file sizes and memory usage. Thanks to interpolation, there is usually not much benefit in going above 30 FPS (as the animation will still appear smooth at higher rendering framerates).
Trimming: Trim the beginning and end of animations if there are no keyframe changes. This can reduce output file size and memory usage with certain 3D scenes, depending on the contents of their animation tracks.
Remove Immutable Tracks: Remove animation tracks that only contain default values. This can reduce output file size and memory usage with certain 3D scenes, depending on the contents of their animation tracks.
Import Script
Path: Path to an import script, which can run code after the import process has completed for custom processing. See Using import scripts for automation for more information.
glTF
Embedded Texture Handling: Controls how textures embedded within glTF scenes should be handled. Discard All Textures will not import any textures, which is useful if you wish to manually set up materials in Godot instead. Extract Textures extracts textures to external images, resulting in smaller file sizes and more control over import options. Embed as Basis Universal and Embed as Uncompressed keeps the textures embedded in the imported scene, with and without VRAM compression respectively.
Using the Advanced Import Settings dialog
The first tab you'll see is the Scene tab. The options available in the panel on the right are identical to the Import dock, but you have access to a 3D preview. The 3D preview can be rotated by holding down the left mouse button then dragging the mouse. Zoom can be adjusted using the mouse wheel.
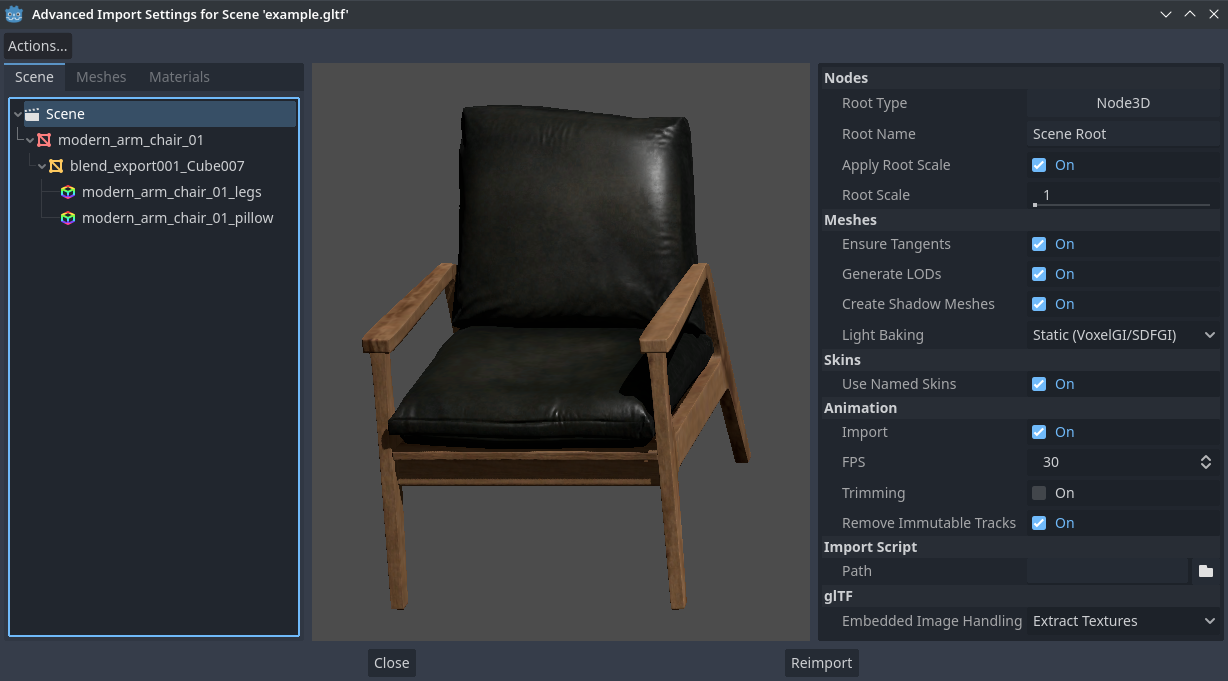
Advanced Import Settings dialog (Scene tab). Credit: Modern Arm Chair 01 - Poly Haven
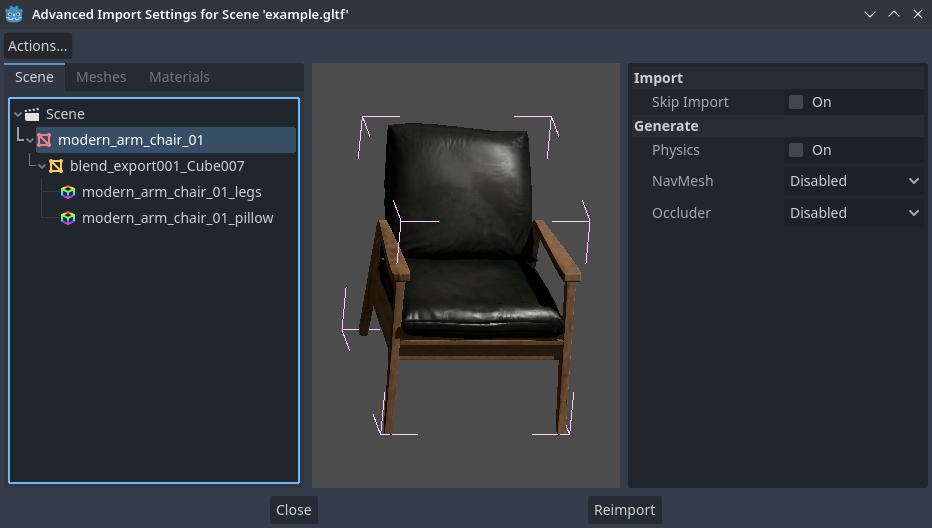
Configuring node import options
You can select individual nodes that compose the scene while in the Scene tab using the tree view at the left:
Selecting a node in the Advanced Import Settings dialog (Materials tab)
This exposes several per-node import options:
Skip Import: If checked, the node will not be present in the final imported scene. Enabling this disables all other options.
Generate > Physics: If checked, generates a PhysicsBody3D parent node with collision shapes that are siblings to the MeshInstance3D node.
Generate > NavMesh: If checked, generates a NavigationRegion3D child node for navigation. Mesh + NavMesh will keep the original mesh visible, while NavMesh Only will only import the navigation mesh (without a visual representation). NavMesh Only is meant to be used when you've manually authored a simplified mesh for navigation.
Generate > Occluder: If checked, generates an OccluderInstance3D sibling node for occlusion culling using the mesh's geometry as a basis for the occluder's shape. Mesh + Occluder will keep the original mesh visible, while Occluder Only will only import the occluder (without a visual representation). Occluder Only is meant to be used when you've manually authored a simplified mesh for occlusion culling.
These options are only visible if some of the above options are enabled:
Physics > Body Type: Only visible if Generate > Physics is enabled. Controls the PhysicsBody3D that should be created. Static creates a StaticBody3D, Dynamic creates a RigidBody3D, Area creates an Area3D.
Physics > Shape Type: Only visible if Generate > Physics is enabled. Trimesh allows for precise per-triangle collision, but it can only be used with a Static body type. Other types are less precise and may require manual configuration, but can be used with any body type. For static level geometry, use Trimesh. For dynamic geometry, use primitive shapes if possible for better performance, or use one of the convex decomposition modes if the shape is large and complex.
Decomposition > Advanced: Only visible if Physics > Shape Type is Decompose Convex. If checked, allows adjusting advanced decomposition options. If disabled, only a preset Precision can be adjusted (which is usually sufficient).
Decomposition > Precision: Only visible if Physics > Shape Type is Decompose Convex. Controls the precision to use for convex decomposition. Higher values result in more detailed collision, at the cost of slower generation and increased CPU usage during physics simulation. To improve performance, it's recommended to keep this value as low as possible for your use cases.
Occluder > Simplification Distance: Only visible if Generate > Occluder is set to Mesh + Occluder or Occluder Only. Higher values result in a occluder mesh with fewer vertices (resulting in decreased CPU utilization), at the cost of more occlusion culling issues (such as false positives or false negatives). If you run into objects disappearing when they shouldn't when the camera is near a certain mesh, try decreasing this value.
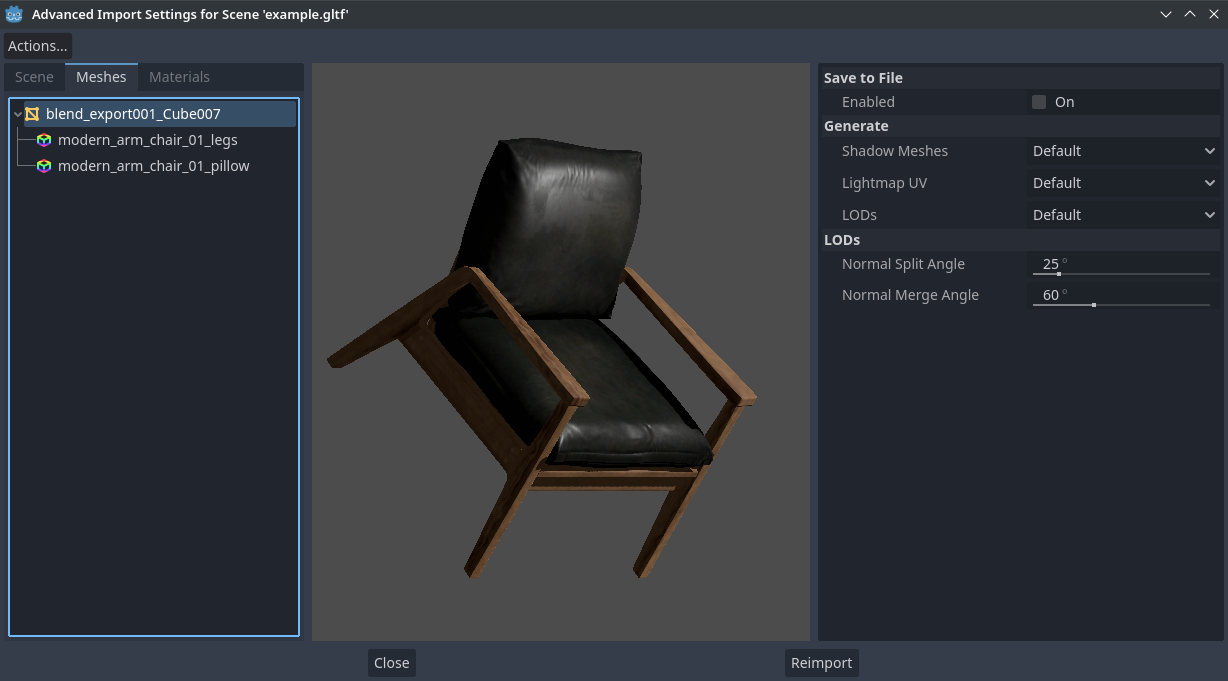
Configuring mesh and material import options
In the Advanced Import Settings dialog, there are 2 ways to select individual meshes or materials:
Switch to the Meshes or Materials tab in the top-left corner of the dialog.
Stay in the Scene tab, but unfold the options on the tree view on the left. After choosing a mesh or material, this presents the same information as the Meshes and Materials tabs, but in a tree view instead of a list.
If you select a mesh, different options will appear in the panel on the right:
Advanced Import Settings dialog (Meshes tab)
The options are as follows:
Save to File: Saves the Mesh resource to an external file (this isn't a scene file). You generally don't need to use this for placing the mesh in a 3D scene – instead, you should instance the 3D scene directly. However, having direct access to the Mesh resource is useful for specific nodes, such as MeshInstance3D, MultiMeshInstance3D, GPUParticles3D or CPUParticles3D. - You will also need to specify an output file path using the option that appears after enabling Save to File. It's recommended to use the
.resoutput file extension for smaller file sizes and faster loading speeds, as.tresis inefficient for writing large amounts of data.Generate > Shadow Meshes: Per-mesh override for the Meshes > Create Shadow Meshes scene-wide import option described in Using the Import dock. Default will use the scene-wide import option, while Enable or Disable can forcibly enable or disable this behavior on a specific mesh.
Generate > Lightmap UV: Per-mesh override for the Meshes > Light Baking scene-wide import option described in Using the Import dock. Default will use the scene-wide import option, while Enable or Disable can forcibly enable or disable this behavior on a specific mesh. - Setting this to Enable on a scene with the Static light baking mode is equivalent to configuring this mesh to use Static Lightmaps. Setting this to Disable on a scene with the Static Lightmaps light baking mode is equivalent to configuring this mesh to use Static instead.
Generate > LODs: Per-mesh override for the Meshes > Generate LODs scene-wide import option described in Using the Import dock. Default will use the scene-wide import option, while Enable or Disable can forcibly enable or disable this behavior on a specific mesh.
LODs > Normal Split Angle: The minimum angle difference between two vertices required to preserve a geometry edge in mesh LOD generation. If running into visual issues with LOD generation, decreasing this value may help (at the cost of less efficient LOD generation).
LODs > Normal Merge Angle: The minimum angle difference between two vertices required to preserve a geometry edge in mesh LOD generation. If running into visual issues with LOD generation, decreasing this value may help (at the cost of less efficient LOD generation).
If you select a material, only one option will appear in the panel on the right:

Advanced Import Settings dialog (Materials tab)
When Use External is checked and an output path is specified, this lets you use an external material instead of the material that is included in the original 3D scene file; see the section below.
Extracting materials to separate files
While Godot can import materials authored in 3D modeling software, the default configuration may not be suitable for your needs. For example:
You want to configure material features not supported by your 3D application.
You want to use a different texture filtering mode, as this option is configured in the material since Godot 4.0 (and not in the image).
You want to replace one of the materials with an entirely different material, such as a custom shader.
To be able to modify the 3D scene's materials in the Godot editor, you need to use external material resources.
In the top-left corner of the Advanced Import Settings dialog, choose Actions… > Extract Materials:
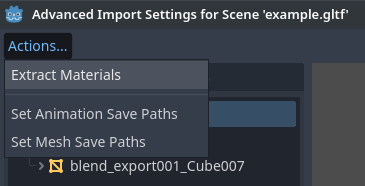
Extracting all built-in materials to external resources in the Advanced Import Settings dialog
After choosing this option, select a folder to extract material .tres files
to, then confirm the extraction:
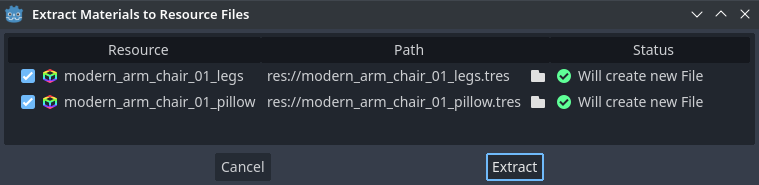
Confirming material extraction in the Advanced Import Settings subdialog
Note
After extracting materials, the 3D scene will automatically be configured to
use external material references. As a result, you don't need to manually
enable Use External on every material to make the external .tres
material effective.
When Use External is enabled, remember that the Advanced Import Settings dialog will keep displaying the mesh's original materials (the ones designed in the 3D modeling software). This means your customizations to the materials won't be visible within this dialog. To preview your modified materials, you need to place the imported 3D scene in another scene using the editor.
Godot will not overwrite changes made to extracted materials when the source 3D scene is reimported. However, if the material name is changed in the source 3D file, the link between the original material and the extracted material will be lost. As a result, you'll need to use the Advanced Import Settings dialog to associate the renamed material to the existing extracted material.
The above can be done in the dialog's Materials tab by selecting the material, enabling Save to File, then specifying the save path using the Path option that appears after enabling Save to File.
Using import scripts for automation
A special script to process the whole scene after import can be provided. This is great for post-processing, changing materials, doing funny stuff with the geometry, and more.
Create a script that is not attached to any node by right-clicking in the FileSystem dock and choosing New > Script…. In the script editor, write the following:
@tool # Needed so it runs in editor.
extends EditorScenePostImport

# This sample changes all node names.
# Called right after the scene is imported and gets the root node.
func _post_import(scene):
    # Change all node names to "modified_[oldnodename]"
    iterate(scene)
    return scene # Remember to return the imported scene

# Recursive function that is called on every node
# (for demonstration purposes; EditorScenePostImport only requires a `_post_import(scene)` function).
func iterate(node):
    if node != null:
        print_rich("Post-import: [b]%s[/b] -> [b]%s[/b]" % [node.name, "modified_" + node.name])
        node.name = "modified_" + node.name
        for child in node.get_children():
            iterate(child)
The _post_import(scene: Node) function takes the imported scene as argument
(the parameter is actually the root node of the scene). The scene that will
finally be used must be returned (even if the scene can be entirely different).
Using animation libraries
As of Godot 4.0, you can choose to import only animations from a glTF file and nothing else. This is used in some asset pipelines to distribute animations separately from models. For example, this allows you to use one set of animations for several characters, without having to duplicate animation data in every character.
To do so, select the glTF file in the FileSystem dock, then change the import mode to Animation Library in the Import dock:
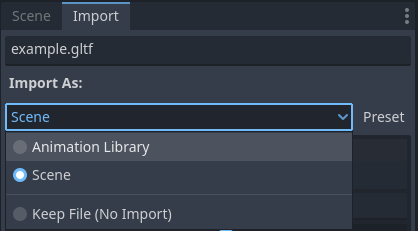
Changing the import type to Animation Library in the Import dock
Click Reimport and restart the editor when prompted. After restarting, the glTF file will be imported as an AnimationLibrary instead of a PackedScene. This animation library can then be referenced in an AnimationPlayer node.
The import options that are visible after changing the import mode to Animation Library act the same as when using the Scene import mode. See Using the Import dock for more information.
Filter script
It is possible to specify a filter script in a special syntax to decide which tracks from which animations should be kept.
The filter script is executed against each imported animation. The syntax
consists of two types of statements, the first for choosing which animations to
filter, and the second for filtering individual tracks within the matched
animation. All name patterns are performed using a case-insensitive expression
match, with support for ? and * wildcards (using
String.matchn() under the hood).
The script must start with an animation filter statement (as denoted by the line
beginning with an @). For example, if we would like to apply filters to all
imported animations which have a name ending in "_Loop":
@+*_Loop
Similarly, additional patterns can be added to the same line, separated by
commas. Here is a modified example to additionally include all animations with
names that begin with "Arm_Left", but also exclude all animations which
have names ending in "Attack":
@+*_Loop, +Arm_Left*, -*Attack
Following the animation selection filter statement, we add track filtering patterns to indicate which animation tracks should be kept or discarded. If no track filter patterns are specified, then all tracks within the matched animations will be discarded!
It's important to note that track filter statements are applied in order for each track within the animation, this means that one line may include a track, a later rule can still discard it. Similarly, a track excluded by an early rule may then be re-included once again by a filter rule further down in the filter script.
For example: include all tracks in animations with names ending in "_Loop",
but discard any tracks affecting a "Skeleton" which end in "Control",
unless they have "Arm" in their name:
@+*_Loop
+*
-Skeleton:*Control
+*Arm*
In the above example, tracks like "Skeleton:Leg_Control" would be discarded,
while tracks such as "Skeleton:Head" or "Skeleton:Arm_Left_Control"
would be retained.
Any track filter lines that do not begin with a + or - are ignored.
Storage
By default, animations are saved as built-in. It is possible to save them to a file instead. This allows adding custom tracks to the animations and keeping them after a reimport.
Optimizer
When animations are imported, an optimizer is run, which reduces the size of the animation considerably. In general, this should always be turned on unless you suspect that an animation might be broken due to it being enabled.
Clips
It is possible to specify multiple animations from a single timeline as clips.
For this to work, the model must have only one animation that is named
default. To create clips, change the clip amount to something greater than
zero. You can then name a clip, specify which frames it starts and stops on, and
choose whether the animation loops or not.
Scene inheritance
In many cases, it may be desired to make manual modifications to the imported scene. By default, this is not possible because if the source 3D asset changes, Godot will re-import the whole scene.
However, it is possible to make local modifications by using scene inheritance. If you try to open the imported scene using Scene > Open Scene… or Scene > Quick Open Scene…, the following dialog will appear:
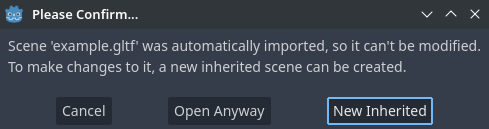
Dialog when opening an imported 3D scene in the editor
In inherited scenes, the only limitations for modification are:
Nodes from the base scene can't be removed, but additional nodes can be added anywhere.
Subresources can't be edited. Instead, you need to save them externally as described above.
Other than that, everything is allowed.
Import hints
Many times, when editing a scene, there are common tasks that need to be done after exporting:
Adding collision detection to objects.
Setting objects as navigation meshes.
Deleting nodes that are not used in the game engine (like specific lights used for modelling).
To simplify this workflow, Godot offers several suffixes that can be added to the names of the objects in your 3D modelling software. When imported, Godot will detect suffixes in object names and will perform actions automatically.
Warning
All the suffixes described below are case-sensitive.
Remove nodes (-noimp)
Objects that have the -noimp suffix will be removed at import-time no matter
what their type is. They will not appear in the imported scene.
This is equivalent to enabling Skip Import for a node in the Advanced Import Settings dialog.
Create collisions (-col, -convcol, -colonly, -convcolonly)
The option -col will work only for Mesh objects. If it is detected, a child
static collision node will be added, using the same geometry as the mesh. This
will create a triangle mesh collision shape, which is a slow, but accurate
option for collision detection. This option is usually what you want for level
geometry (but see also -colonly below).
The option -convcol will create a ConvexPolygonShape3D instead of
a ConcavePolygonShape3D. Unlike triangle meshes which can be concave,
a convex shape can only accurately represent a shape that doesn't have any
concave angles (a pyramid is convex, but a hollow box is concave). Due to this,
convex collision shapes are generally not suited for level geometry. When
representing simple enough meshes, convex collision shapes can result in better
performance compared to a triangle collision shape. This option is ideal for
simple or dynamic objects that require mostly-accurate collision detection.
However, in both cases, the visual geometry may be too complex or not smooth enough for collisions. This can create physics glitches and slow down the engine unnecessarily.
To solve this, the -colonly modifier exists. It will remove the mesh upon
importing and will create a StaticBody3D collision instead.
This helps the visual mesh and actual collision to be separated.
The option -convcolonly works in a similar way, but will create a
ConvexPolygonShape3D instead using convex decomposition.
With Collada files, the option -colonly can also be used with Blender's
empty objects. On import, it will create a StaticBody3D with a
collision node as a child. The collision node will have one of a number of
predefined shapes, depending on Blender's empty draw type:
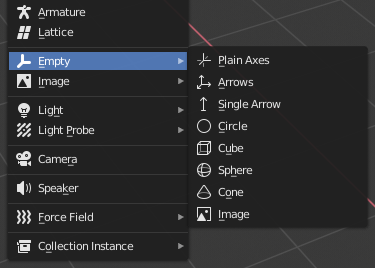
Choosing a draw type for an Empty on creation in Blender
Single arrow will create a SeparationRayShape3D.
Cube will create a BoxShape3D.
Image will create a WorldBoundaryShape3D.
Sphere (and the others not listed) will create a SphereShape3D.
When possible, try to use a few primitive collision shapes instead of triangle mesh or convex shapes. Primitive shapes often have the best performance and reliability.
Note
For better visibility on Blender's editor, you can set the "X-Ray" option on collision empties and set some distinct color for them by changing Edit > Preferences > Themes > 3D Viewport > Empty.
If using Blender 2.79 or older, follow these steps instead: User Preferences > Themes > 3D View > Empty.
See also
See Collision shapes (3D) for a comprehensive overview of collision shapes.
Create a VehicleBody (-vehicle)
A mesh node with the -vehicle suffix will be imported as a child to a
VehicleBody3D node.
Create a VehicleWheel (-wheel)
A mesh node with the -wheel suffix will be imported as a child to a
VehicleWheel3D node.
Rigid Body (-rigid)
A mesh node with the -rigid suffix will be imported as a RigidBody3D.
Animation loop (-loop, -cycle)
Animation clips in the source 3D file that start or end with the token loop or cycle
will be imported as a Godot Animation with the loop flag set.
Unlike the other suffixes described above, this does not require a hyphen.
In Blender, this requires using the NLA Editor and naming the Action with the loop or
cycle prefix or suffix.