Up to date
This page is up to date for Godot 4.1.
If you still find outdated information, please open an issue.
Physics introduction
In game development, you often need to know when two objects in the game intersect or come into contact. This is known as collision detection. When a collision is detected, you typically want something to happen. This is known as collision response.
Godot offers a number of collision objects in 2D and 3D to provide both collision detection and response. Trying to decide which one to use for your project can be confusing. You can avoid problems and simplify development if you understand how each works and what their pros and cons are.
In this guide, you will learn:
Godot's four collision object types
How each collision object works
When and why to choose one type over another
Note
This document's examples will use 2D objects. Every 2D physics object and collision shape has a direct equivalent in 3D and in most cases they work in much the same way.
Collision objects
Godot offers four kinds of collision objects which all extend CollisionObject2D. The last three listed below are physics bodies and additionally extend PhysicsBody2D.
- Area2D
Area2Dnodes provide detection and influence. They can detect when objects overlap and can emit signals when bodies enter or exit. AnArea2Dcan also be used to override physics properties, such as gravity or damping, in a defined area.
- StaticBody2D
A static body is one that is not moved by the physics engine. It participates in collision detection, but does not move in response to the collision. They are most often used for objects that are part of the environment or that do not need to have any dynamic behavior.
- RigidBody2D
This is the node that implements simulated 2D physics. You do not control a
RigidBody2Ddirectly, but instead you apply forces to it (gravity, impulses, etc.) and the physics engine calculates the resulting movement. Read more about using rigid bodies.
- CharacterBody2D
A body that provides collision detection, but no physics. All movement and collision response must be implemented in code.
Physics material
Static bodies and rigid bodies can be configured to use a PhysicsMaterial. This allows adjusting the friction and bounce of an object, and set if it's absorbent and/or rough.
Collision shapes
A physics body can hold any number of Shape2D objects as children. These shapes are used to define the object's collision bounds and to detect contact with other objects.
Note
In order to detect collisions, at least one Shape2D must be
assigned to the object.
The most common way to assign a shape is by adding a CollisionShape2D or CollisionPolygon2D as a child of the object. These nodes allow you to draw the shape directly in the editor workspace.
Important
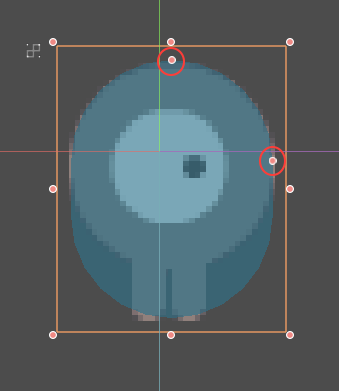
Be careful to never scale your collision shapes in the editor.
The "Scale" property in the Inspector should remain (1, 1). When changing
the size of the collision shape, you should always use the size handles, not
the Node2D scale handles. Scaling a shape can result in unexpected
collision behavior.
Physics process callback
The physics engine runs at a fixed rate (a default of 60 iterations per second). This rate is typically different from the frame rate which fluctuates based on what is rendered and available resources.
It is important that all physics related code runs at this fixed rate. Therefore Godot differentiates between physics and idle processing. Code that runs each frame is called idle processing and code that runs on each physics tick is called physics processing. Godot provides two different callbacks, one for each of those processing rates.
The physics callback, Node._physics_process(),
is called before each physics step. Any code that needs to access a body's properties should
be run in here. This method will be passed a delta
parameter, which is a floating-point number equal to the time passed in
seconds since the last step. When using the default 60 Hz physics update rate,
it will typically be equal to 0.01666... (but not always, see below).
Note
It's recommended to always use the delta parameter when relevant in your
physics calculations, so that the game behaves correctly if you change the
physics update rate or if the player's device can't keep up.
Collision layers and masks
One of the most powerful, but frequently misunderstood, collision features
is the collision layer system. This system allows you to build up complex
interactions between a variety of objects. The key concepts are layers
and masks. Each CollisionObject2D has 32 different physics layers
it can interact with.
Let's look at each of the properties in turn:
- collision_layer
This describes the layers that the object appears in. By default, all bodies are on layer
1.
- collision_mask
This describes what layers the body will scan for collisions. If an object isn't in one of the mask layers, the body will ignore it. By default, all bodies scan layer
1.
These properties can be configured via code, or by editing them in the Inspector.
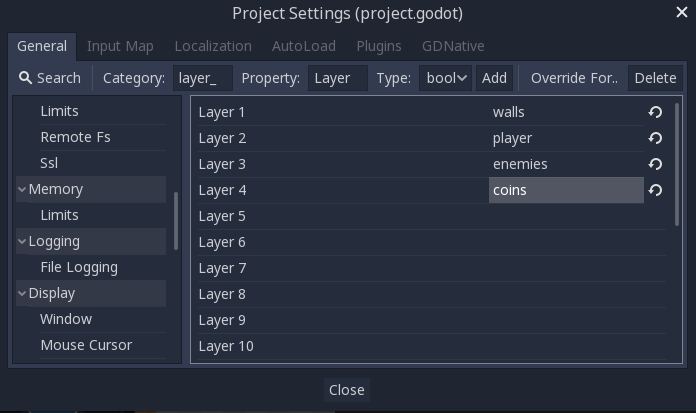
Keeping track of what you're using each layer for can be difficult, so you may find it useful to assign names to the layers you're using. Names can be assigned in Project Settings -> Layer Names.
GUI example
You have four node types in your game: Walls, Player, Enemy, and Coin. Both Player and Enemy should collide with Walls. The Player node should detect collisions with both Enemy and Coin, but Enemy and Coin should ignore each other.
Start by naming layers 1-4 "walls", "player", "enemies", and "coins" and place each node type in its respective layer using the "Layer" property. Then set each node's "Mask" property by selecting the layers it should interact with. For example, the Player's settings would look like this:


Code example
In function calls, layers are specified as a bitmask. Where a function enables
all layers by default, the layer mask will be given as 0xffffffff. Your code
can use binary, hexadecimal, or decimal notation for layer masks, depending
on your preference.
The code equivalent of the above example where layers 1, 3 and 4 were enabled would be as follows:
# Example: Setting mask value for enabling layers 1, 3 and 4

# Binary - set the bit corresponding to the layers you want to enable (1, 3, and 4) to 1, set all other bits to 0.
# Note: Layer 32 is the first bit, layer 1 is the last. The mask for layers 4,3 and 1 is therefore
0b00000000_00000000_00000000_00001101
# (This can be shortened to 0b1101)

# Hexadecimal equivalent (1101 binary converted to hexadecimal)
0x000d
# (This value can be shortened to 0xd)

# Decimal - Add the results of 2 to the power of (layer to be enabled - 1).
# (2^(1-1)) + (2^(3-1)) + (2^(4-1)) = 1 + 4 + 8 = 13
pow(2, 1-1) + pow(2, 3-1) + pow(2, 4-1)
Area2D
Area nodes provide detection and influence. They can detect when objects overlap and emit signals when bodies enter or exit. Areas can also be used to override physics properties, such as gravity or damping, in a defined area.
There are three main uses for Area2D:
Overriding physics parameters (such as gravity) in a given region.
Detecting when other bodies enter or exit a region or what bodies are currently in a region.
Checking other areas for overlap.
By default, areas also receive mouse and touchscreen input.
StaticBody2D
A static body is one that is not moved by the physics engine. It participates
in collision detection, but does not move in response to the collision. However,
it can impart motion or rotation to a colliding body as if it were moving,
using its constant_linear_velocity and constant_angular_velocity properties.
StaticBody2D nodes are most often used for objects that are part of the environment
or that do not need to have any dynamic behavior.
Example uses for StaticBody2D:
Platforms (including moving platforms)
Conveyor belts
Walls and other obstacles
RigidBody2D
This is the node that implements simulated 2D physics. You do not control a RigidBody2D directly. Instead, you apply forces to it and the physics engine calculates the resulting movement, including collisions with other bodies, and collision responses, such as bouncing, rotating, etc.
You can modify a rigid body's behavior via properties such as "Mass", "Friction", or "Bounce", which can be set in the Inspector.
The body's behavior is also affected by the world's properties, as set in Project Settings -> Physics, or by entering an Area2D that is overriding the global physics properties.
When a rigid body is at rest and hasn't moved for a while, it goes to sleep. A sleeping body acts like a static body, and its forces are not calculated by the physics engine. The body will wake up when forces are applied, either by a collision or via code.
Using RigidBody2D
One of the benefits of using a rigid body is that a lot of behavior can be had "for free" without writing any code. For example, if you were making an "Angry Birds"-style game with falling blocks, you would only need to create RigidBody2Ds and adjust their properties. Stacking, falling, and bouncing would automatically be calculated by the physics engine.
However, if you do wish to have some control over the body, you should take
care - altering the position, linear_velocity, or other physics properties
of a rigid body can result in unexpected behavior. If you need to alter any
of the physics-related properties, you should use the _integrate_forces()
callback instead of _physics_process(). In this callback, you have access
to the body's PhysicsDirectBodyState2D,
which allows for safely changing properties and synchronizing them with
the physics engine.
For example, here is the code for an "Asteroids" style spaceship:
extends RigidBody2D

var thrust = Vector2(0, -250)
var torque = 20000

func _integrate_forces(state):
    if Input.is_action_pressed("ui_up"):
        state.apply_force(thrust.rotated(rotation))
    else:
        state.apply_force(Vector2())
    var rotation_direction = 0
    if Input.is_action_pressed("ui_right"):
        rotation_direction += 1
    if Input.is_action_pressed("ui_left"):
        rotation_direction -= 1
    state.apply_torque(rotation_direction * torque)
using Godot;

public partial class Spaceship : RigidBody2D
{
    private Vector2 _thrust = new Vector2(0, -250);
    private float _torque = 20000;

    public override void _IntegrateForces(PhysicsDirectBodyState2D state)
    {
        if (Input.IsActionPressed("ui_up"))
            state.ApplyForce(_thrust.Rotated(Rotation));
        else
            state.ApplyForce(new Vector2());

        var rotationDir = 0;
        if (Input.IsActionPressed("ui_right"))
            rotationDir += 1;
        if (Input.IsActionPressed("ui_left"))
            rotationDir -= 1;
        state.ApplyTorque(rotationDir * _torque);
    }
}
Note that we are not setting the linear_velocity or angular_velocity
properties directly, but rather applying forces (thrust and torque) to
the body and letting the physics engine calculate the resulting movement.
Note
When a rigid body goes to sleep, the _integrate_forces()
function will not be called. To override this behavior, you will
need to keep the body awake by creating a collision, applying a
force to it, or by disabling the can_sleep
property. Be aware that this can have a negative effect on performance.
Contact reporting
By default, rigid bodies do not keep track of contacts, because this can require a huge amount of memory if many bodies are in the scene. To enable contact reporting, set the max_contacts_reported property to a non-zero value. The contacts can then be obtained via PhysicsDirectBodyState2D.get_contact_count() and related functions.
Contact monitoring via signals can be enabled via the contact_monitor property. See RigidBody2D for the list of available signals.
CharacterBody2D
CharacterBody2D bodies detect collisions with other bodies, but are not affected by physics properties like gravity or friction. Instead, they must be controlled by the user via code. The physics engine will not move a character body.
When moving a character body, you should not set its position directly.
Instead, you use the move_and_collide() or move_and_slide() methods.
These methods move the body along a given vector, and it will instantly stop
if a collision is detected with another body. After the body has collided,
any collision response must be coded manually.
Character collision response
After a collision, you may want the body to bounce, to slide along a wall, or to alter the properties of the object it hit. The way you handle collision response depends on which method you used to move the CharacterBody2D.
move_and_collide
When using move_and_collide(), the function returns a
KinematicCollision2D object, which contains
information about the collision and the colliding body. You can use this
information to determine the response.
For example, if you want to find the point in space where the collision occurred:
extends PhysicsBody2D

var velocity = Vector2(250, 250)

func _physics_process(delta):
    var collision_info = move_and_collide(velocity * delta)
    if collision_info:
        var collision_point = collision_info.get_position()
using Godot;

public partial class Body : PhysicsBody2D
{
    private Vector2 _velocity = new Vector2(250, 250);

    public override void _PhysicsProcess(double delta)
    {
        var collisionInfo = MoveAndCollide(_velocity * (float)delta);
        if (collisionInfo != null)
        {
            var collisionPoint = collisionInfo.GetPosition();
        }
    }
}
Or to bounce off of the colliding object:
extends PhysicsBody2D

var velocity = Vector2(250, 250)

func _physics_process(delta):
    var collision_info = move_and_collide(velocity * delta)
    if collision_info:
        velocity = velocity.bounce(collision_info.get_normal())
using Godot;

public partial class Body : PhysicsBody2D
{
    private Vector2 _velocity = new Vector2(250, 250);

    public override void _PhysicsProcess(double delta)
    {
        var collisionInfo = MoveAndCollide(_velocity * (float)delta);
        if (collisionInfo != null)
            _velocity = _velocity.Bounce(collisionInfo.GetNormal());
    }
}
move_and_slide
Sliding is a common collision response; imagine a player moving along walls
in a top-down game or running up and down slopes in a platformer. While it's
possible to code this response yourself after using move_and_collide(),
move_and_slide() provides a convenient way to implement sliding movement
without writing much code.
Warning
move_and_slide() automatically includes the timestep in its
calculation, so you should not multiply the velocity vector
by delta.
For example, use the following code to make a character that can walk along the ground (including slopes) and jump when standing on the ground:
extends CharacterBody2D

var run_speed = 350
var jump_speed = -1000
var gravity = 2500

func get_input():
    velocity.x = 0
    var right = Input.is_action_pressed('ui_right')
    var left = Input.is_action_pressed('ui_left')
    var jump = Input.is_action_just_pressed('ui_select')

    if is_on_floor() and jump:
        velocity.y = jump_speed
    if right:
        velocity.x += run_speed
    if left:
        velocity.x -= run_speed

func _physics_process(delta):
    velocity.y += gravity * delta
    get_input()
    move_and_slide()
using Godot;

public partial class Body : CharacterBody2D
{
    private float _runSpeed = 350;
    private float _jumpSpeed = -1000;
    private float _gravity = 2500;

    private void GetInput()
    {
        var velocity = Velocity;
        velocity.X = 0;

        var right = Input.IsActionPressed("ui_right");
        var left = Input.IsActionPressed("ui_left");
        var jump = Input.IsActionPressed("ui_select");

        if (IsOnFloor() && jump)
            velocity.Y = _jumpSpeed;
        if (right)
            velocity.X += _runSpeed;
        if (left)
            velocity.X -= _runSpeed;

        Velocity = velocity;
    }

    public override void _PhysicsProcess(double delta)
    {
        var velocity = Velocity;
        velocity.Y += _gravity * (float)delta;
        Velocity = velocity;
        GetInput();
        MoveAndSlide();
    }
}
See Kinematic character (2D) for more details on using move_and_slide(),
including a demo project with detailed code.