Attention: Here be dragons
This is the latest
(unstable) version of this documentation, which may document features
not available in or compatible with released stable versions of Godot.
Checking the stable version of the documentation...
インポートの構成
Godot には、インポート ドック、高度なインポート設定ダイアログ、継承されたシーンなど、インポートされたデータをカスタマイズするいくつかの方法が用意されています。これらを使用して、メッシュの調整、物理情報の追加、新しいノードの追加など、インポートされたシーンにさらに変更を加えることができます。またインポートプロセスの最後にコードを実行するスクリプトを記述して、任意のカスタマイズを行うこともできます。
該当する場合は、インポート後にシーンを構成するよりも、元のデータを変更することを優先してください。これにより3Dモデリングアプリケーションとインポートされたシーンの違いを最小限に抑えることができます。詳細については、モデルのエクスポートに関する考慮事項 および 名前にサフィックスを使用したノードタイプのカスタマイズ の記事を参照してください。
ワークフローのインポート
Godot は独自のシーン形式 (.tscn/.scn) のみを保存できるため、Godot は元の3Dシーンファイル (異なる形式を使用) を上書き保存することはできません。これはソースファイルに誤って変更を加えるのを防ぐための、より安全なアプローチでもあります。
シーンとそのマテリアルをカスタマイズできるようにするために、Godot のシーンインポーターでは、データのインポート方法に関するさまざまなワークフローが許可されています。
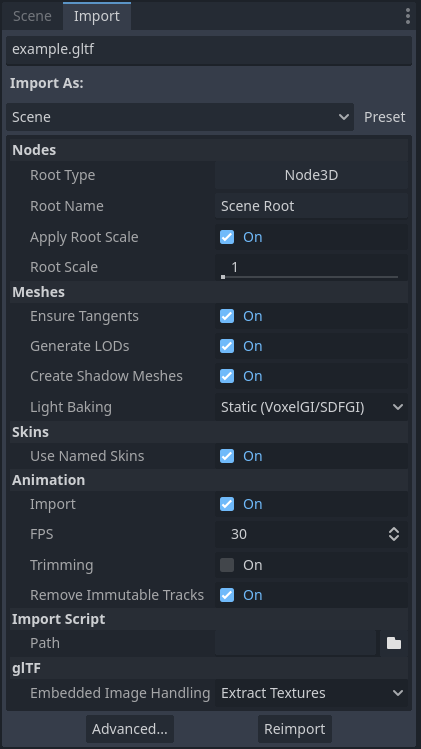
ファイルシステムドックで3Dシーンを選択した時のインポートドック
このインポートプロセスは、ニーズに応じて3つの個別のインターフェイスを使用してカスタマイズできます。
インポート ドック。ファイルシステムドックで3Dシーンを選択する。
The Advanced Import Settings dialog, which can be accessed by double-clicking the 3D scene in the FileSystem dock or by clicking the Advanced… button in the Import dock. This allows you to customize per-object options in Godot, and preview models and animations. please see the Advanced Import Settings page for more information.
インポートヒント 。3Dモデリングソフトウェアのオブジェクト名に追加される特別なサフィックスです。これは3Dモデリングソフトウェアでオブジェクトごとのオプションをカスタマイズできます。
基本的なカスタマイズには、インポートドックを使用するだけで十分です。ただしマテリアルごとにマテリアルオーバーライドを定義するなど、より複雑な操作の場合は、高度なインポート設定ダイアログ、インポートヒント、またはその両方を使用する必要があります。
インポートドックの使用
ファイルシステムドックで3Dシーンを選択した後、インポートドックで次のオプションを調整できます:
ルートの型: ルートノードとして使用するノードタイプ。Node3D から継承するノードタイプを使用することをお勧めします。そうしないと、3D エディターでノードを直接配置できなくなります。
ルートの名前: インポートされたシーンのルートノードの名前。エディターでシーンをインスタンス化する場合 (または、ファイルシステムドックからドラッグ&ドロップする場合)、ルートノードの名前はファイル名に合わせて変更されるため、通常は目立ちません。
ルートスケールを適用: 有効にすると、ルートスケール がメッシュとアニメーションに直接 適用 され、ルートノードのスケールはデフォルトの (1, 1, 1) に維持されます。つまりインポートしたシーン内で後で子ノードを追加しても、その子ノードはスケールされません。無効にすると ルート スケール は代わりにルートノードのスケールを乗算します。
メッシュ
接線の確保: オンにすると、入力メッシュに接線データがない場合に、Mikktspace を使用して頂点接線を生成します。可能な場合は、このオプションに頼るのではなく、エクスポート時に3Dモデリングソフトウェアで接線を生成することをお勧めします。接線は法線マップと高さマップ、および接線を必要とするマテリアル/シェーダ機能を正しく表示するために必要です。接線を必要とするマテリアル機能が必要ない場合、これを無効にすると、ソースの3Dファイルに接線が含まれていなければ、出力ファイルのサイズが小さくなりインポートが高速化されます。
LODを生成: チェックすると、レンダリンパフォーマンスを向上させるために、遠くに表示される用の詳細度が低いメッシュを生成します。特に遠くからレンダリングされないメッシュは、LODの恩恵を受けられません。これを無効にすると、出力ファイルのサイズが小さくなりインポートが高速化されます。詳細については、Mesh level of detail (LOD) を参照してください。
シャドウメッシュの作成: チェックすると、インポート時にシャドウメッシュの生成が有効になります。これは可能な場合は頂点を結合して、品質を低下させることなくシャドウレンダリングを最適化します。これによりシャドウのレンダリングに必要なメモリ帯域幅が削減されます。シャドウメッシュの生成では、現在ソースメッシュよりも低いLODの使用はサポートされていません (ただし、シャドウレンダリングでは、関連する場合はLODが使用されます)。
ライト焼き込み: 3D シーン内のメッシュの グローバル イルミネーション モード を設定します。 静的ライトマップ に設定すると、メッシュのGIモードが 静的 に設定され、ライトマップベイク のインポート時に UV2 が生成されます。
ライトマップのテクセルサイズ: ライト焼き込み が Static Lightmaps に設定されている場合にのみ表示されます。ベイクされたライトマップ上の各テクセルのサイズを制御します。値が小さいほどライトマップの精度は高くなりますが、ライトマップのサイズが大きくなり、ベイク時間が長くなります。
スキン
名前付きスキンを使用: チェックされている場合、アニメーションに名前付き Skins を使用します。 MeshInstance3D ノードには、Skeleton3D ノードを指すスケルトン NodePath (通常は
..)、メッシュ、スキンの 3 つの関連プロパティが含まれています。Skeleton3D ノードには名前付きボーン、ポーズとレスト、親ボーンのリストが含まれています。
メッシュはメッシュを表示するために必要なすべての生の頂点データです。メッシュに関しては、頂点がどのようにウェイトペイントされるかを認識しており、多くの場合3Dモデリングソフトウェアからインポートされる内部番号を使用します。
スキンにはこのメッシュをこの Skeleton3D にバインドするために必要な情報が含まれています。3Dモデリングソフトウェアによって選択された内部ボーンIDごとに、スキンには2つのものが含まれています。1つ目はバインド ポーズマトリックス、逆バインドマトリックス、または略して IBM と呼ばれるマトリックスです。2つ目はスキンには各ボーンの名前 (Use Named Skins が有効になっている場合)、または Skeleton3D リスト内のボーンのインデックス (Use Named Skins が無効になっている場合) が含まれています。
これらの情報を組み合わせると、Godot に Skeleton3D ノードのボーンポーズを使用して各 MeshInstance3D からメッシュをレンダリングする方法を伝えるのに十分です。各 MeshInstance3D は Blender からエクスポートされたモデルでよくあるようにバインドを共有する場合や、Maya などの他のツールからエクスポートされたモデルでよくあるように、各 MeshInstance3D が個別のスキンオブジェクトを使用する場合があることに注意してください。
アニメーション
インポート: チェックすると、3Dシーンからアニメーションをインポートします。
フレームレート(FPS): 線形補間を使用してアニメーションカーブを一連のポイントにベイク処理するために使用される1秒あたりのフレーム数。この値は3Dモデリングソフトウェアでベースラインとして使用している値と一致するように設定することをお勧めします。値が高いほど動きの変化が速く、アニメーションの精度が高くなりますが、ファイルサイズとメモリ使用量が増加します。補間されるため、通常は30FPSを超えてもあまりメリットはありません (レンダリングフレームレートが高いほどアニメーションは滑らかに見えるため)。
前後のトリミング: キーフレームの変更がない場合は、アニメーションの先頭と末尾をトリミングします。これによりアニメーショントラックの内容に応じて、特定の3Dシーンで出力ファイルのサイズとメモリ使用量を削減できます。
不変トラックを削除: デフォルト値のみを含むアニメーショントラックを削除します。これによりアニメーショントラックの内容に応じて、特定の3Dシーンでの出力ファイルサイズとメモリ使用量を削減できます。
インポートスクリプト
パス: インポートスクリプトへのパス。インポートプロセスが完了した後に、カスタム処理のためのコードを実行できます。詳細については 自動化のためのインポートスクリプトの使用 を参照してください。
glTF
埋め込みテクスチャ処理: glTF シーン内に埋め込まれたテクスチャの処理方法を制御します。Discard All Textures はテクスチャをインポートしません。これは代わりに Godot でマテリアルを手動で設定する場合に使用します。Extract Textures はテクスチャを外部画像に抽出し、ファイル サイズを小さくし、インポートオプションをより細かく制御できるようにします。Embed as Basis Universal と Embed as Uncompressed は、それぞれVRAM圧縮有りと無しで、インポートされたシーンにテクスチャを埋め込んだままにします。
FBX
Importer Which import method is used. ubfx handles fbx files as fbx files. FBX2glTF converts FBX files to glTF on import and requires additional setup. FBX2glTF is not recommended unless you have a specific reason to use it over ufbx or working with a different file format.
Allow Geometry Helper Nodes はジオメトリヘルパーノードを有効または無効にします
Embedded Texture Handling: fbxシーン内に埋め込まれたテクスチャの処理方法を制御します。Discard All Textures はテクスチャをインポートしません。これは、代わりに Godot でマテリアルを手動で設定する場合に便利です。Extract Textures はテクスチャを外部画像に抽出し、ファイル サイズを小さくし、インポート オプションをより細かく制御できるようにします。Embed as Basis Universal と Embed as Uncompressed は、それぞれVRAM圧縮有りと無しで、インポートされたシーンにテクスチャを埋め込んだままにします。
Blender-specific options
Only visible for .blend files.
Nodes
Visible: All imports everything, even invisible objects. Visible Only only imports visible objects. Renderable only imports objects that are marked as renderable in Blender, regardless of whether they are actually visible. In Blender, renderability is toggled by clicking the camera icon next to each object in the Outliner, while visibility is toggled by the eye icon.
Active Collection Only: If checked, only imports nodes that are in the active collection in Blender.
Punctual Lights: If checked, imports lights (directional, omni, and spot) from Blender. "Punctual" is not to be confused with "positional", which is why directional lights are also included.
Cameras: If checked, imports cameras from Blender.
Custom Properties: If checked, imports custom properties from Blender as glTF extras. This data can then be used from an editor plugin that uses GLTFDocument.register_gltf_document_extension(), which can set node metadata on import (among other use cases).
Modifiers: If set to No Modifiers, object modifiers are ignored on import. If set to All Modifiers, applies modifiers to objects on import.
メッシュ
Colors: If checked, imports vertex colors from Blender.
UVs: If checked, imports vertex UV1 and UV2 from Blender.
Normals: If checked, imports vertex normals from Blender.
Export Geometry Nodes Instances: If checked, imports geometry node instances from Blender.
GPU Instances If checked, imports instances and particle systems as GLTF's buffer/accessor data instead of numerous singular Mesh3D object. This does not include Geometry Nodes instancing.
Tangents: If checked, imports vertex tangents from Blender.
Skins: None skips skeleton skin data import from Blender. 4 Influences (Compatible) imports skin data to be compatible with all renderers, at the cost of lower precision for certain rigs. All Influences imports skin data with all influences (up to 8 in Godot), which is more precise but may not be compatible with all renderers.
Export Bones Deforming Mesh Only: If checked, only imports bones that deform the mesh from Blender.
Materials
Unpack Enabled: If checked, unpacks the original images to the Godot filesystem and uses them. This allows changing image import settings like VRAM compression. If unchecked, allows Blender to convert the original images, such as repacking roughness and metallic into one roughness + metallic texture. In most cases, this option should be left checked, but if the
.blendfile's images aren't in the correct format, this must be disabled for correct behavior.Export Materials: If set to Placeholder, does not import materials, but keeps surface slots so that separate materials can be assigned to different surfaces. If set to Export, imports materials as-is (note that procedural Blender materials may not work correctly). If set to Named Placeholder, imports materials, but doesn't import images that are packed into the
.blendfile. Textures will have to be reassigned manually in the imported materials.
アニメーション
Limit Playback: If checked, limits animation import to the playback range defined in Blender (the Start and End options at the right of the animation timeline in Blender). This can avoid including unused animation data, making the imported scene smaller and faster to load. However, this can also result in missing animation data if the playback range is not set correctly in Blender.
Always Sample: If checked, forces animation sampling on import to ensure consistency between how Blender and glTF perform animation interpolation, at the cost of larger file sizes. If unchecked, there may be differences in how animations are interpolated between what you see in Blender and the imported scene in Godot, due to different interpolation semantics between both.
Group Tracks: If checked, imports animations (actives and on NLA tracks) as separate tracks. If unchecked, all the currently assigned actions become one glTF animation.
自動化のためのインポートスクリプトの使用
インポート後にシーン全体を処理する特別なスクリプトを提供できます。これは、後処理、マテリアルの変更、ジオメトリを使った面白い処理などに最適です。
ファイルシステムドックを右クリックし、新規作成 > スクリプト... を選択して、どのノードにも接続されていないスクリプトを作成します。スクリプトエディターで、次のように記述します。
@tool # Needed so it runs in editor.
extends EditorScenePostImport

# This sample changes all node names.
# Called right after the scene is imported and gets the root node.
func _post_import(scene):
    # Change all node names to "modified_[oldnodename]"
    iterate(scene)
    return scene # Remember to return the imported scene

# Recursive function that is called on every node
# (for demonstration purposes; EditorScenePostImport only requires a `_post_import(scene)` function).
func iterate(node):
    if node != null:
        print_rich("Post-import: [b]%s[/b] -> [b]%s[/b]" % [node.name, "modified_" + node.name])
        node.name = "modified_" + node.name
        for child in node.get_children():
            iterate(child)
_post_import(scene: Node) 関数はインポートされたシーンを引数として受け取ります(パラメーターは実際にはシーンのルートノードです)。最終的に使用されるシーンを返す必要があります。別のものでもかまいません。
スクリプトを使用するには、インポートタブの「インポートスクリプト」カテゴリの「パス」オプションにスクリプトを指定します。
アニメーションライブラリの使用
You can also choose to import only animations from a glTF file and nothing else. This is used in some asset pipelines to distribute animations separately from models. For example, this allows you to use one set of animations for several characters, without having to duplicate animation data in every character.
これを行うには、ファイルシステムドックで glTF ファイルを選択し、インポートドックでインポートモードをアニメーションライブラリに変更します。
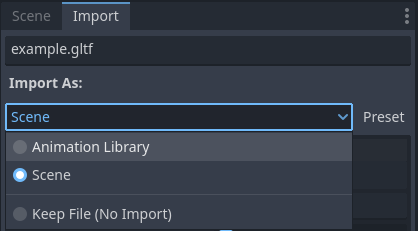
インポートドックでインポートタイプをアニメーションライブラリに変更する
再インポート をクリックし、プロンプトが表示されたらエディターを再起動します。再起動後 glTF ファイルは PackedScene ではなく AnimationLibrary としてインポートされます。このアニメーションライブラリは AnimationPlayer ノードで参照できます。
インポートモードをアニメーションライブラリに変更した後に表示されるインポートオプションは、シーンインポート モードを使用する場合と同じように動作します。詳細については インポートドックの使用 を参照してください。
フィルタースクリプト
特別な構文でフィルタースクリプトを指定して、どのアニメーションのどのトラックを保持するかを決定することができます。
フィルタスクリプトは、インポートされた各アニメーションに対して実行されます。構文は2種類のステートメントで構成されます。1つ目は、フィルタリングするアニメーションを選択するためのもので、2つ目は、一致するアニメーション内の個々のトラックをフィルタリングするためのものです。すべての名前パターンは、大文字と小文字を区別しないマッチパターンを使用して実行され、? および * ワイルドカードを使用します(String.matchn() を内部で使用しています)。
The script must start with an animation filter statement (as denoted by the line
beginning with an @). For example, if we would like to apply filters to all
imported animations which have a name ending in "_Loop":
@+*_Loop
Similarly, additional patterns can be added to the same line, separated by
commas. Here is a modified example to additionally include all animations with
names that begin with "Arm_Left", but also exclude all animations which
have names ending in "Attack":
@+*_Loop, +Arm_Left*, -*Attack
アニメーション選択用のフィルタステートメントに続いて、トラック・フィルタリング・パターンを追加して、どのアニメーショントラックを保持または破棄するかを示します。トラック・フィルタ・パターンが指定されていない場合、一致するアニメーション内のすべてのトラックは破棄されます!
トラック・フィルタ・ステートメントは、アニメーション内の各トラックに順番に適用されることに注意することが重要です。これは、ある行のルールでトラックが追加されても、後のルールでそれを破棄できることを意味します。同様に、始めの方のルールによって除外されたトラックが、フィルタ・スクリプトのさらに下のルールによって再度追加される場合もあります。
For example: include all tracks in animations with names ending in "_Loop",
but discard any tracks affecting a "Skeleton" which end in "Control",
unless they have "Arm" in their name:
@+*_Loop
+*
-Skeleton:*Control
+*Arm*
上記の例では、"Skeleton:Leg_Control" のようなトラックは破棄されますが、"Skeleton:Head" や Skeleton:Arm_Left_Control などのトラックは保持されます。
+ または - で始まらないトラック・フィルタ行は無視されます。
シーンの継承
多くの場合、インポートされたシーンに変更を加えることが望ましい場合があります。デフォルトでは、ソースアセットが変更されると Godot はシーン全体を再インポートする必要があるため、変更は出来ません。
ただし、シーン継承*を使用してローカルに変更を加えることは可能です。**シーン > シーンを開く…* または シーン > クイックオープン… を使用してインポートしたシーンを開こうとすると、次のダイアログが表示されます。
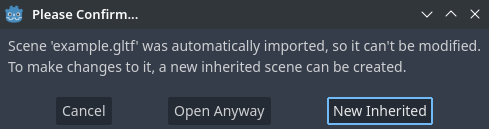
インポートした3Dシーンをエディターで開くときのダイアログ
継承されたシーンの変更に対する制限は次のとおりです。
ベースシーンのノードは削除できませんが、ノードはどこにでも追加できます。
サブリソースは編集できません。代わりに上記のように外部に保存する必要があります。
それ以外はすべてが許可されています。