Attention: Here be dragons
This is the latest
(unstable) version of this documentation, which may document features
not available in or compatible with released stable versions of Godot.
Checking the stable version of the documentation...
RichTextLabelのBBCode
はじめに
Label ノードは基本的なテキストの表示には適していますが、制限があります。テキストの色または配置を変更する場合、その変更はラベルノード内のすべてのテキストに影響します。テキストの一部のみを別の色にしたり、テキストの一部のみを中央に配置したりすることはできません。この制限を回避するには、RichTextLabel を使用します。
RichTextLabel を使用すると、マークアップ構文または組み込みAPIを使用してテキストの複雑な書式設定が可能になります。マークアップ構文には BBCode を使用します。BBCode はテキストの一部の書式設定ルールを指定するタグのシステムです。掲示板 (英語で"bulletin boards"とも呼ばれるため、"BBCode"の"BB"はその略) を使用したことがある方はよくご存じかもしれません。
Label とは異なり、RichTextLabel には独自の垂直スクロールバーも付属しています。このスクロールバーはテキストがコントロールのサイズに収まらない場合に自動的に表示されます。スクロールバーを無効にするには RichTextLabel のインスペクタの Scroll Active プロパティのチェックを外します。
Note that the BBCode tags can also be used to some extent for other use cases:
BBCode can be used to format comments in the XML source of the class reference.
BBCode can be used in GDScript documentation comments.
BBCode can be used when printing rich text to the Output bottom panel.
参考
デモプロジェクトは `こちら<https://github.com/godotengine/godot-demo-projects/tree/master/gui/rich_text_bbcode>`__ 。RichTextLabel の BBCode が実際にどのように動作するかを確認できます。
BBCodeを使用する
By default, RichTextLabel functions like a normal Label. It has the text property, which you can edit to have uniformly formatted text. To be able to use BBCode for rich text formatting, you need to turn on the BBCode mode by setting bbcode_enabled. After that, you can edit the text property using available tags. Both properties are located at the top of the inspector after selecting a RichTextLabel node.
たとえば BBCode [color=green]test[/color] は、単語 "test" を緑色で描画します。

ほとんどの BBCode は、開始タグ、コンテンツ、終了タグの3つの部分で構成されます。開始タグはフォーマットされた部分の始まりを表します。またいくつかの構成オプションを含めることもできます。上記の color タグなど、一部の開始タグも機能するために値を必要とします。他の開始タグでは複数のオプションを含めることができます (開始タグ内はスペースで区切られます)。終了タグはフォーマットされた部分の終わりを表します。場合によっては終了タグとコンテンツの両方を省略できます。
HTML の BBCode とは異なり、先頭/末尾の空白は表示時に RichTextLabel によって削除されません。重複したスペースも最終出力ではそのまま表示されます。これは RichTextLabel でコード ブロックを表示するときに、事前にフォーマットされたテキストタグを使用する必要がないことを意味します。
[tag]content[/tag]
[tag=value]content[/tag]
[tag option1=value1 option2=value2]content[/tag]
[tag][/tag]
[tag]
注釈
RichTextLabel は絡まった BBCode タグをサポートしていません。たとえば次のようなコード:
[b]bold[i]bold italic[/b]italic[/i]
代わりにこのようなコードを使います:
[b]bold[i]bold italic[/i][/b][i]italic[/i]
ユーザー入力を安全に処理する
ユーザーが自由にテキストを入力できるシナリオ (マルチプレイヤーゲームでのチャットなど) では、RichTextLabel によって解析される任意の BBCode タグをユーザーが使用できないようにする必要があります。これは書式構文の不適切な使用を避けるためです。書式構文の不適切な使用は [url] タグが RichTextLabel によって処理される場合に問題となる可能性があります (プレーヤーがフィッシングサイトなどへのクリック可能なリンクを作成できる可能性があるため)。
RichTextLabel の [lb] タグや [rb] タグを使用すると、メッセージ内の BBCode タグの開始括弧および終了括弧、あるいはその両方をエスケープされたタグで置き換えることができます。これによりユーザーはタグとして解析される BBCode を使用できなくなり、代わりに BBCode がテキストとして表示されます。

BBCode インジェクションを引き起こすエスケープされていないユーザー入力の例 (2行目) と、エスケープされたユーザー入力の例 (3行目)
上の画像は次のスクリプトを使用して作成されました。
extends RichTextLabel

func _ready():
    append_chat_line("Player 1", "Hello world!")
    append_chat_line("Player 2", "Hello [color=red]BBCode injection[/color] (no escaping)!")
    append_chat_line_escaped("Player 2", "Hello [color=red]BBCode injection[/color] (with escaping)!")


# Returns escaped BBCode that won't be parsed by RichTextLabel as tags.
func escape_bbcode(bbcode_text):
    # We only need to replace opening brackets to prevent tags from being parsed.
    return bbcode_text.replace("[", "[lb]")


# Appends the user's message as-is, without escaping. This is dangerous!
func append_chat_line(username, message):
    append_text("%s: [color=green]%s[/color]\n" % [username, message])


# Appends the user's message with escaping.
# Remember to escape both the player name and message contents.
func append_chat_line_escaped(username, message):
    append_text("%s: [color=green]%s[/color]\n" % [escape_bbcode(username), escape_bbcode(message)])
パフォーマンス
テキストの書式設定が重いタスクになることはほとんどないため、ほとんどのケースでBBCodeはそのまま使用できます。ただし RichTextLabel で大量のテキスト (数千行にわたるコンソールログなど) が更新されるときにはゲームプレイ中に途切れが発生する可能性があります。
この負荷を軽減するにはいくつかの方法があります:
textプロパティに追加する代わりにappend_text()関数を使用します。この関数はtextプロパティ全体の BBCode を解析するのではなく、追加されたテキストの BBCode のみを解析します。RichTextLabel にタグを追加するとき、BBCode を使用する代わりに
push_[tag]()関数とpop()関数を使用します。RichTextLabel の Threading > Threaded プロパティを有効にします。これは処理は高速化されませんが、メインスレッドのブロックが防止され、ゲームプレイ中の途切れが回避されます。スレッドにはオーバーヘッドがあるため、プロジェクトで実際に必要な場合にのみスレッドを有効にしてください。
BBCodeの代わりにpush_[tag]()関数とpop()関数を使用する
パフォーマンス上の理由から BBCode を使用したくないときは、RichTextLabel が提供する関数を使用して、テキストに BBCode を記述せずに書式設定タグを作成できます。
すべての BBCode タグ (エフェクトを含む) には push_[tag]() 関数があります ([tag] はタグの名前)。また push_bold() と push_italics() の両方を単一のタグに結合する push_bold_italics() など、便利な関数もいくつか利用できます。 push_[tag]() 関数の一覧については、RichTextLabel クラスリファレンス を参照してください。
pop() 関数は 任意の タグを終了するために使用されます。 BBCode のタグは スタック 方式であるため、 pop() を使用すると最後に追加されたタグが閉じられます。
次のスクリプトは BBCode [color=green]test [i]example[/i][/color] を使用した場合と同じ見た目になります。
extends RichTextLabel

func _ready():
    append_text("BBCode ")  # Trailing space separates words from each other.
    push_color(Color.GREEN)
    append_text("test ")  # Trailing space separates words from each other.
    push_italics()
    append_text("example")
    pop()  # Ends the tag opened by `push_italics()`.
    pop()  # Ends the tag opened by `push_color()`.
警告
書式設定関数を使用するときは text プロパティを**直接設定しないでください**。 text プロパティに追加すると、 append_text() 、 push_[tag]() 、 pop() 関数を使用して RichTextLabel に加えられたすべての変更が消去されます。
リファレンス
参考
これらの BBCode タグの 一部 は、クラス参照の XML ソースだけでなく、 @export スクリプト変数のツールチップでも使用できます。詳細については、クラスリファレンス BBCode を参照してください。
タグ |
サンプル |
b
{text} に RichTextLabel の太字 (または太字斜体) フォントを適用します。 |
|
i
{text} に RichTextLabel の斜体 (または太字斜体) フォントを適用します。 |
|
u
{text} に下線を付けます。 |
|
s
{text} に取り消し線を付けます。 |
|
code
{text} に RichTextLabel の等幅フォントを適用します。 |
|
char
16進数のUTF-32
{codepoint} を持つUnicode文字を追加します。 |
|
p
{text} を含む新しい段落を追加します。設定オプションをサポートしています。段落オプション を参照してください。 |
[p]{text}[/p][p {options}]{text}[/p] |
br
Adds line break in a text, without adding a new paragraph.
If used within a list, this won't create a new list item,
but will add a line break within the current item instead.
|
|
hr
Adds new a horizontal rule to separate content. Supports configuration options,
see Horizontal rule options.
|
[hr][hr {options}] |
center
{text} を水平方向の中央揃えにします。[p align=center] と同じです。 |
|
left
{text} を水平方向に左揃えにします。[p align=left] と同じです。 |
|
right
{text} を水平方向に右揃えにします。[p align=right] と同じです。 |
|
fill
{text} を RichTextLabel の幅いっぱいに広げます。[p align=fill] と同じです。 |
|
indent
{text} を1回インデントします。インデント幅は [ul] または [ol] と同じですが、箇条書きではありません。 |
|
url
Creates a hyperlink (underlined and clickable text). Can contain optional
{text} or display {link} as is. Supports configuration options,
see URL options.効果を発揮するには"meta_clicked"シグナルで処理する必要があります。 [url] タグのクリックの処理 を参照してください。
|
[url]{link}[/url][url={link}]{text}[/url][url {options}]{text}[/url] |
hint
Creates a tooltip hint that is displayed when hovering the text with the mouse.
While not required, it's recommended to put tooltip text between double or single quotes.
Note that it is not possible to escape quotes using
\" or \'. To use
single quotes for apostrophes in the hint string, you must use double quotes
to surround the string. |
[hint="{tooltip text displayed on hover}"]{text}[/hint] |
img
{path} (任意の有効な Texture2D リソース) の画像を挿入します。{width} が指定されている場合、画像はアスペクト比を維持しながらその幅に合わせようとします。{width} と {height} の両方が指定された場合、画像はそのサイズに合わせて拡大縮小されます。ピクセルではなく比率として指定するには、
{width} または {height} 値の末尾に % を追加します。Add
em to the end of {width} or {height} value to specify it as a ratio of the current font size. For example, height=1em will make the image as tall as the surrounding text.{valign} 設定が提供されている場合、画像は周囲のテキストに合わせて整列しようとします。 画像と表の垂直方向の配置 を参照してください。設定オプションをサポートしています。画像オプション を参照してください。
|
[img]{path}[/img][img={width}]{path}[/img][img={width}x{height}]{path}[/img][img={valign}]{path}[/img][img {options}]{path}[/img] |
[font={path}]{text}[/font][font {options}]{text}[/font] |
|
font_size
{text} にカスタムフォントサイズを適用します。 |
|
dropcap
{text} に異なるフォントサイズと色を使用します。その際タグの内容が大きい場合は複数行にまたがるようにします。A drop cap is typically one
uppercase character, but
[dropcap] supports containing multiple characters.
margins values are comma-separated and can be positive, zero or negative.
Values must not be separated by spaces; otherwise, the values won't be parsed correctly.
Negative top and bottom margins are particularly useful to allow the rest of
the paragraph to display below the dropcap. |
|
opentype_features
Enables custom OpenType font features for
{text}. Features must be provided as
a comma-separated {list}. Values must not be separated by spaces;
otherwise, the list won't be parsed correctly. |
[opentype_features={list}]{text}[/opentype_features] |
lang
RichTextLabel の BiDi > Language プロパティによって設定された
{text} の言語をオーバーライドします。 {code} は ISO 言語コード でなければなりません。これを使用すると、新しい段落を開始せずに、言語の特定のスクリプトの使用を強制することができます。一部のフォントファイルにはスクリプト固有の代替文字が含まれている場合があり、その場合はそれらが使用されます。 |
|
|
|
bgcolor
Draws the color behind
{text}. This can be used to highlight text.
Accepts same values as the color tag.
By default, there is a slight padding which is controlled by the
text_highlight_h_padding and text_highlight_v_padding theme items
in the RichTextLabel node. Set padding to 0 to avoid potential overlapping
issues when there are background colors on neighboring lines/columns. |
|
fgcolor
Draws the color in front of
{text}. This can be used to "redact" text by using
an opaque foreground color. Accepts same values as the color tag.
By default, there is a slight padding which is controlled by the
text_highlight_h_padding and text_highlight_v_padding theme items
in the RichTextLabel node. Set padding to 0 to avoid potential overlapping
issues when there are foreground colors on neighboring lines/columns. |
|
outline_size
{text} にカスタムのフォントアウトラインサイズを適用します。 |
[outline_size={size}]{text}[/outline_size] |
outline_color
{text} にカスタムのアウトライン色を使用します。 color タグと同じ値を設定します。 |
[outline_color={code/name}]{text}[/outline_color] |
table
{number} の列を持つ表を作成します。表のセルを定義するには cell タグを使用します。{valign} 設定が提供されている場合、表は周囲のテキストに合わせて整列しようとします。 画像と表の垂直方向の配置 を参照してください。ベースライン配置が使用されている場合、表はインデックス
{alignment_row} (ゼロベース) を持つ行のベースラインに合わせて配置されます。{name} is a table name for assistive apps (screen reader). |
[table={number}]{cells}[/table][table={number},{valign}]{cells}[/table][table={number},{valign},{alignment_row}]{cells}[/table][table={number},{valign},{alignment_row} name={name}]{cells}[/table] |
cell
{text} を持つセルを表に追加します。{ratio} が指定されている場合、セルは他のセルとその比率の値に比例してその値まで拡張しようとします。設定オプションをサポートしています。セルのオプション を参照してください。
|
[cell]{text}[/cell][cell]{text}[/cell][cell {options}]{text}[/cell] |
ul
順序なしリストを追加します。リスト
{items} は、テキスト1行に1つの項目を入力して指定する必要があります。箇条書きは
{bullet} パラメータを使用してカスタマイズできます。 doc_bbcode_in_richtextlabel_unowned_list_bullet を参照してください。 |
[ul]{items}[/ul][ul bullet={bullet}]{items}[/ul] |
ol
|
|
lb, rb
それぞれ
[ と ] を追加します。 BBCodeマークアップをエスケープできるようにします。これらは自己終了タグで、閉じる必要はありません (また
[/lb] や [/rb] の終了タグはありません)。 |
[lb]b[rb]text[lb]/b[rb] は [b]text[/b] と表示されます。 |
独自の自己終了タグを使用して、いくつかのUnicode制御文字を追加できます。
貼り付けるよりもメンテナンスが容易になります
テキスト内に直接文字を制御します。
|
[lrm] (左から右のマーク)、 [rlm] (右から左のマーク)、 [lre] (左から右の埋め込み)、[rle] (右から左への埋め込み)、[lro] (左から右へのオーバーライド)、[rlo] (右から左へのオーバーライド)、[pdf] (ポップ方向の書式設定)、 [alm] (アラビア文字マーク)、 [lri] (左から右への分離)、[rli] (右から左への分離)、 [fsi] (最初の強い分離)、 [pdi] (ポップ方向の分離)、[zwj] (ゼロ幅結合子)、 [zwnj] (ゼロ幅非結合子)、 [wj] (単語結合子)、[shy] (ソフトハイフン) |
注釈
太字 ([b]) および斜体 ([i]) の書式設定のタグは、RichTextLabel のテーマのオーバーライドで適切なカスタムフォントが設定されている場合に最適に機能します。カスタムの太字または斜体フォントが定義されていない場合、 `疑似太字および斜体フォント<https://fonts.google.com/knowledge/glossary/faux_fake_pseudo_synthesize>`__ がGodotによって生成されます。これらのフォントは、手作りの太字/斜体フォントと比較して見栄えはあまり良くないです。
等幅 ([code]) タグは、RichTextLabel ノードのテーマのオーバーライドでカスタムフォントが設定されている場合にのみ機能します。それ以外の場合、等幅テキストには通常のフォントが使用されます。
テキストの垂直方向の中央揃えを制御する BBCode タグはまだありません。
すべてのタグのオプションは省略できます。
段落オプション
align
パラメータ
left(orl),center(orc),right(orr),fill(orf)デフォルト
leftテキストの水平方向の配置。
bidi_override, st
パラメータ
default(ofd),uri(oru),file(orf),email(ore),list(orl),none(orn),custom(orc)デフォルト
default構造テキストの上書き。
justification_flags, jst
パラメータ
Comma-separated list of the following values (no space after each comma):
kashida(ork),word(orw),trim(ortr),after_last_tab(orlt),skip_last(orsl),skip_last_with_chars(orsv),do_not_skip_single(orns).デフォルト
word,kashida,skip_last,do_not_skip_single位置揃え (塗りつぶし配置) オプション。詳細については TextServer を参照してください。
direction, dir
パラメータ
ltr(orl),rtl(orr),auto(ora)デフォルト
継承
ベースのBiDi方向。
language, lang
パラメータ
ISO言語コード。 Locale codes を参照してください
デフォルト
継承
ロケールのオーバーライド。一部のフォントファイルにはスクリプト固有の代替文字が含まれている場合があり、その場合はそれらが使用されます。
tab_stops
パラメータ
浮動小数点数のリスト。例:
10.0,30.0デフォルト
フォント内のスペース文字の幅
各タブ文字の水平オフセットをオーバーライドします。リストの最後に到達すると、タブストップがループオーバーします。たとえば、「tab_stops」を「10.0,30.0」に設定すると、最初のタブは
10ピクセル、2番目のタブは10 + 30 = 40ピクセルになります。3番目のタブは、RichTextLabel の原点から10 + 30 + 10 = 50ピクセルの位置にあります。
[url] タグのクリックの処理
デフォルトでは [url] タグをクリックしても何も起こりません。これはWebブラウザでURLを開くことに限定するのではなく、 [url] タグを柔軟に使用できるようにするためです。
クリックされた [url] タグを処理するには、 RichTextLabel ノードの meta_clicked シグナルをスクリプト関数に接続します。
For example, the following method can be connected to meta_clicked to open
clicked URLs using the user's default web browser:
# This assumes RichTextLabel's `meta_clicked` signal was connected to
# the function below using the signal connection dialog.
func _richtextlabel_on_meta_clicked(meta):
    # `meta` is not guaranteed to be a String, so convert it to a String
    # to avoid script errors at runtime.
    OS.shell_open(str(meta))
For more advanced use cases, it's also possible to store JSON in a [url]
tag's option and parse it in the function that handles the meta_clicked signal.
For example:
[url={"example": "value"}]JSON[/url]
Horizontal rule options
color
パラメータ
色の名前またはHEX形式の色
デフォルト
Color(1, 1, 1, 1)Color tint of the rule (modulation).
height
パラメータ
整数
デフォルト
2Target height of the rule in pixels, add
%to the end of value to specify it as percentages of the control width instead of pixels.width
パラメータ
整数
デフォルト
90%Target width of the rule in pixels, add
%to the end of value to specify it as percentages of the control width instead of pixels.align
パラメータ
left(orl),center(orc),right(orr)デフォルト
leftHorizontal alignment.
URL options
underline
パラメータ
always,never,hoverデフォルト
alwaysURL underlining mode.
tooltip
パラメータ
String.
デフォルト
URL tooltip.
href
パラメータ
String.
デフォルト
URL target address.
画像オプション
color
パラメータ
色の名前またはHEX形式の色
デフォルト
継承
画像の色合い (modulation)。
height
パラメータ
Floating-point number
デフォルト
継承
Target height of the image in pixels.
Alternative units to pixels can be specified:
Add
%to the end of the value to specify it as a percentage of the control width instead of pixels. For example,height=50%will make the image half as tall as the control is wide.Add
emto the end of the value to specify it as a ratio of the surrounding font size instead of pixels. For example,height=1emwill make the image as tall as the surrounding text.
width
パラメータ
Floating-point number
デフォルト
継承
Target width of the image in pixels.
Alternative units to pixels can be specified:
Add
%to the end of the value to specify it as a percentage of the control width instead of pixels. For example,width=50%will make the image take up half of the control width.Add
emto the end of the value to specify it as a ratio of the surrounding font size instead of pixels. For example,width=1emwill make the image as wide as the surrounding text is tall.
region
パラメータ
x,y,width,height (ピクセル単位)
デフォルト
継承
画像の領域矩形。これを使用すると、スプライトシートから画像を切り出して表示できます。
pad
パラメータ
false,trueデフォルト
falsetrueに設定され、画像がwidthとheightで指定されたサイズより小さい場合、画像のパディングはアップスケーリングではなく、サイズに一致するように調整されます。tooltip
パラメータ
文字列
デフォルト
画像のツールチップ。
align
パラメータ
see 画像と表の垂直方向の配置
デフォルト
center,centerImage alignment to the surrounding text.
alt
パラメータ
文字列
デフォルト
Image description for assistive apps (screen reader).
画像と表の垂直方向の配置
When a vertical alignment value is provided with the [img] or [table] tag
the image/table will try to align itself against the surrounding text. Alignment is
performed using a vertical point of the image and a vertical point of the text.
There are 3 possible points on the image (top, center, and bottom) and 4
possible points on the text and table (top, center, baseline, and bottom),
which can be used in any combination.
両方のポイントを指定するには、image/table タグの値として完全名または短縮名を使用します:
text [img=top,bottom]...[/img] text
text [img=center,center]...[/img] text

text [table=3,center]...[/table] text  # Center to center.
text [table=3,top,bottom]...[/table] text # Top of the table to the bottom of text.
text [table=3,baseline,baseline,1]...[/table] text # Baseline of the second row (rows use zero-based indexing) to the baseline of text.

1つの値 (top 、 center 、 bottom) だけを指定して、対応するプリセットをそれぞれ (top-top 、 center-center 、 bottom-bottom) を使用することもできます。
値の短縮名は t (top)、 c (center)、 l (baseline)、 b (bottom) です。
フォントオプション
name, n
パラメータ
有効なフォントリソースのパス。
デフォルト
継承
フォントリソースパス。
size, s
パラメータ
ピクセル単位の数値。
デフォルト
継承
カスタムフォントサイズ。
glyph_spacing, gl
パラメータ
ピクセル単位の数値。
デフォルト
継承
各グリフの余白。
space_spacing, sp
パラメータ
ピクセル単位の数値。
デフォルト
継承
スペース文字の余白。
top_spacing, top
パラメータ
ピクセル単位の数値。
デフォルト
継承
行の上部に余白を追加します。
bottom_spacing, bt
パラメータ
ピクセル単位の数値。
デフォルト
継承
行の下部に余白を追加します。
embolden, emb
パラメータ
浮動小数点数 (実数)。
デフォルト
0.0フォントの太字強度がゼロより大きくすると、フォントの輪郭が太くなります。マイナスの値を指定すると、フォントの輪郭が細くなります。
face_index, fi
パラメータ
整数。
デフォルト
0TrueType / OpenType コレクションのアクティブなフェイスインデックス。
slant, sln
パラメータ
浮動小数点数 (実数)。
デフォルト
0.0フォントの傾きの強さ。ゼロより大きくするとグリフが右に傾きます。マイナスの値は左側に傾きます。
opentype_variation, otv
パラメータ
Comma-separated list of the OpenType variation tags (no space after each comma).
デフォルト
OpenTypeバリエーションの座標。 OpenType variation tags を参照してください。
※値の中で
=を使用できるようにするには、値を"で囲む必要があります。
[font otv="wght=200,wdth=400"] # Sets variable font weight and width.
opentype_features, otf
パラメータ
Comma-separated list of the OpenType feature tags (no space after each comma).
デフォルト
OpenTypeの機能。 OpenType features tags を参照してください。
※値の中で
=を使用できるようにするには、値を"で囲む必要があります。
[font otf="calt=0,zero=1"] # Disable contextual alternates, enable slashed zero.
カラーの名前
For tags that allow specifying a color by name, you can use names of the constants from
the built-in Color class. Named classes can be specified in a number of
styles using different casings: DARK_RED, DarkRed, and darkred will give
the same exact result.
See this image for a list of color constants:

16進カラーコード
不透明なRGBカラーの場合は、有効な6桁の16進コードがサポートされます。 [color=#ffffff]白[/color] 。 #6f2 (#66ff22 に相当) などの短縮形のRGBカラーコードもサポートされています。
透明を含むRGBカラーの場合は、任意のRGBA 8桁の16進コードを使用できます。 [color=#ffffff88]半透明の白[/color] 。アルファチャネルはカラー コードの最初のコンポーネントではなく、最後の コンポーネントであることに注意してください。 #6f28 (#66ff2288 に相当)などの短いRGBAカラーコードもサポートされています。
セルのオプション
shrink
パラメータ
false,trueデフォルト
trueIf
true, cell can shrink to its contents.expand
パラメータ
整数
デフォルト
1
セルの拡張率。どのセルが他のセルに比例して拡張しようとするかの比率を指定します。
border
パラメータ
色の名前またはHEX形式の色
デフォルト
継承
セルの境界線の色。
bg
パラメータ
色の名前またはHEX形式の色
デフォルト
継承
セルの背景色。奇数行と偶数行の背景を交互にするには
bg=odd_color,even_colorを使用します。padding
パラメータ
4 comma-separated floating-point numbers (no space after each comma)
デフォルト
0,0,0,0左、上、右、下のセルのパディング。
番号なしリストの箇条書き
By default, the [ul] tag uses the U+2022 "Bullet" Unicode glyph as the
bullet character. This behavior is similar to web browsers. The bullet character
can be customized using [ul bullet={bullet}]. If provided, this {bullet}
parameter must be a string with no enclosing quotes (for example,
[bullet=*]). You can add trailing spaces after the bullet character
to increase the spacing between the bullet and the list item text.
bullet パラメータに直接貼り付けることができる一般的な箇条書きマークのリストについては、Wikipedia の ブレット (記号) を参照してください。
順序付きリストの種類
順序付きリストを使用すると、項目を自動的に昇順の数字または文字でマークすることができます。このタグは、次の種類オプションをサポートします。
1- 数字。可能であれば言語固有の番号付けシステムを使用します。a,A- ラテン文字の小文字と大文字。i,I- ローマ数字の小文字と大文字。
テキストエフェクト
BBCode can also be used to create different text effects that can optionally be animated. Several customizable effects are provided out of the box, and you can easily create your own. By default, animated effects will pause when the SceneTree is paused. You can change this behavior by adjusting the RichTextLabel's Process > Mode property.
以下のすべての例では、タグのオプションのデフォルト値について言及しています。
注釈
Text effects that move characters' positions may result in characters being clipped by the RichTextLabel node bounds.
この問題は RichTextLabel ノードを選択した後、インスペクターで Control > Layout > Clip Contents を無効にするか、エフェクトを使用して行の上下に改行を使用してテキストの周囲に十分な余白を追加することで解決できます。
Pulse (点滅)
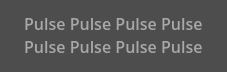
Pulse は各文字の不透明値とカラー値を増幅するアニメーションのパルス効果を作成します。特定のテキストに注目を集めるために使用できます。タグの形式は [pulse freq=1.0 color=#ffffff40 ease=-2.0]{text}[/pulse] です。
freq は半パルスサイクルの周波数を制御します (高いほど速くなります)。全パルスサイクルには 2 * (1.0 / freq) 秒かかります。 color は、点滅のターゲットカラーの乗数です。デフォルトではテキストの大部分がフェードアウトされますが、完全にフェードアウトされるわけではありません。 ease は使用するイージング関数の指数です。負の値なのはインアウトイージングを計算するためで、デフォルトは -2.0 です。
Wave (波)
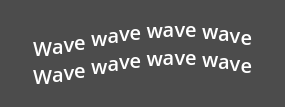
Waveはテキストを上下に動かします。タグの形式は [wave amp=50.0 freq=5.0 connected=1]{text}[/wave] です。
amp はテキストが上下する幅を制御し、 freq はテキストの上下する速さを制御します。 freq 値が 0 の場合は波は表示されず、負の freq 値も波は表示されません。 connected が 1 (デフォルト)の場合、合字のあるグリフは一緒に移動されます。 connected が 0 の場合、各グリフは合字で結合されている場合でも個別に移動されます。これにより、フォントの合字に関する特定のレンダリングの問題を回避できます。
Tornado (竜巻)

Tornado はテキストを円を描くように動き回らせます。タグの形式は [tornado radius=10.0 freq=1.0 connected=1]{text}[/tornado] です。
radius はテキストが移動する円の半径で、 freq はテキストが移動する速度です。 freq の値が 0 の場合はアニメーションが一時停止され、 freq が負の値の場合はアニメーションが逆再生されます。 connected が 1 (デフォルト)の場合、合字のあるグリフは一緒に移動されます。 connected が 0 の場合、各グリフは合字で結合されている場合でも個別に移動されます。これによりフォントの合字に関する特定のレンダリングの問題を回避できます。
Shake (シェイク)
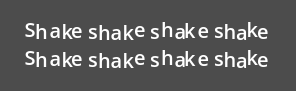
Shakeはテキストが揺らします。タグの形式は [shake rate=20.0 level=5 connected=1]{text}[/shake]` です。
rate はテキストが揺れる速度を制御し、 level はテキストが原点からどれだけ移動するかを制御します。 connected が 1 (デフォルト)の場合、合字のあるグリフは一緒に移動されます。 connected が 0 の場合、各グリフは合字で結合されている場合でも個別に移動されます。これによりフォントの合字に関する特定のレンダリングの問題を回避できます。
Fade (フェード)

Fadeは各文字の不透明値を制御するフェード効果を作成します。タグの形式は [fade start=4 length=14]{text}[/fade] です。
start はフェードコマンドが挿入される位置に対するフォールオフの開始位置を制御し、 length はフェードアウトが行われる文字数を制御します。
Rainbow (虹)
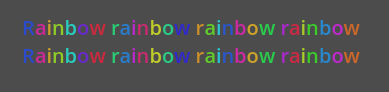
Rainbow gives the text a rainbow color that changes over time. Its tag format is
[rainbow freq=1.0 sat=0.8 val=0.8 speed=1.0]{text}[/rainbow].
freq determines how many letters the rainbow extends over before it repeats itself,
sat is the saturation of the rainbow, val is the value of the rainbow. speed
is the number of full rainbow cycles per second. A positive speed value will play
the animation forwards, a value of 0 will pause the animation, and a negative
speed value will play the animation backwards.
フォントのアウトラインは虹エフェクトの影響を*受けません*(元の色が維持されます)。既存のフォントの色は虹エフェクトによって上書きされます。ただし CanvasItem の Modulate プロパティと Self Modulate プロパティは、変調により最終的な色が乗算されるため、虹エフェクトの見た目に影響します。
カスタムBBCodeタグとテキストエフェクト
RichTextEffect リソース タイプを拡張して、独自のカスタム BBCode タグを作成できます。 RichTextEffect リソースタイプを拡張する新しいスクリプトファイルを作成し、インスペクタでエフェクトを選択できるようにスクリプトに class_name を与えます。これらのカスタム効果をエディタ自体内で実行したい場合は、GDScript ファイルに @tool アノテーションを追加します。 RichTextLabel にはスクリプトを添付する必要な「ツール」モードで実行する必要もありません。新しいエフェクトは、マークアップ > カスタム エフェクト 配列に追加することでインスペクターに登録するか、コード内で install_effect() メソッドを使用して登録できます。
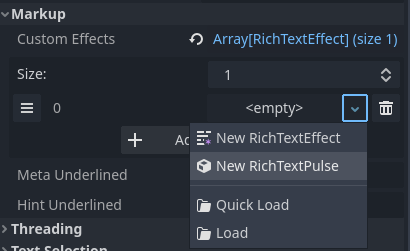
class_name を使用して RichTextEffect を継承するスクリプトを保存した後、カスタムした RichTextEffect を選択する
警告
カスタムエフェクトが RichTextLabel の Markup > Custom Effects プロパティ内に登録されていない場合、エフェクトは表示されず、元のタグはそのまま残されます。
There is only one function that you need to extend: _process_custom_fx(char_fx).
Optionally, you can also provide a custom BBCode identifier by adding a member
name bbcode. The code will check the bbcode property automatically or will
use the name of the file to determine what the BBCode tag should be.
_process_custom_fx
これは、各エフェクトのロジックが発生する場所であり、テキストレンダリングの描画段階で文字ごとに1回呼び出されます。これは関連するグリフのレンダリング方法を制御するいくつかの変数を保持する CharFXTransform オブジェクトを渡します。
outlineは、テキストのアウトラインを描画するために呼び出された場合、trueになります。rangeは、指定されたカスタムエフェクトブロックの範囲をインデックスとして指定します。elapsed_timeは、テキストエフェクトが実行されている合計時間です。visibleは、グリフが表示されているかどうかを示し、テキストの特定の部分を非表示にすることもできます。offsetは、通常の状況下で指定されたグリフがレンダリングされる位置に対する相対的なオフセット位置です。colorは、指定されたグリフの色です。glyph_indexとfontは描画されるグリフと、それを描画するために使用されるフォントデータリソースです。最後に
envは、特定のカスタムエフェクトに割り当てられたパラメータの Dictionary です。ユーザーが指定した場合は、 get() をオプションのデフォルト値とともに使用して、各パラメータを取得できます。たとえば[custom_fx Spread=0.5 color=#FFFF00]test[/custom_fx]は、そのenv辞書にspreadおよびcolorパラメータを持ちます。その他の使用例については、以下を参照してください。
この関数について最後に注意すべきことは、エフェクトが正しく処理されたことを確認するにはブール値 true を返す必要があるということです。これにより、特定のグリフのレンダリングに問題が発生した場合、ユーザーがカスタムエフェクトロジックで発生したエラーを修正するまで、カスタム エフェクトのレンダリングが完全に中止されます。
カスタムエフェクトの例を次に示します:
Ghost
@tool
extends RichTextEffect
class_name RichTextGhost

# Syntax: [ghost freq=5.0 span=10.0][/ghost]

# Define the tag name.
var bbcode = "ghost"

func _process_custom_fx(char_fx):
    # Get parameters, or use the provided default value if missing.
    var speed = char_fx.env.get("freq", 5.0)
    var span = char_fx.env.get("span", 10.0)

    var alpha = sin(char_fx.elapsed_time * speed + (char_fx.range.x / span)) * 0.5 + 0.5
    char_fx.color.a = alpha
    return true
Matrix
@tool
extends RichTextEffect
class_name RichTextMatrix

# Syntax: [matrix clean=2.0 dirty=1.0 span=50][/matrix]

# Define the tag name.
var bbcode = "matrix"

# Gets TextServer for retrieving font information.
func get_text_server():
    return TextServerManager.get_primary_interface()

func _process_custom_fx(char_fx):
    # Get parameters, or use the provided default value if missing.
    var clear_time = char_fx.env.get("clean", 2.0)
    var dirty_time = char_fx.env.get("dirty", 1.0)
    var text_span = char_fx.env.get("span", 50)

    var value = get_text_server().font_get_char_from_glyph_index(char_fx.font, 1, char_fx.glyph_index)

    var matrix_time = fmod(char_fx.elapsed_time + (char_fx.range.x / float(text_span)), \
                           clear_time + dirty_time)

    matrix_time = 0.0 if matrix_time < clear_time else \
                  (matrix_time - clear_time) / dirty_time

    if matrix_time > 0.0:
        value = int(1 * matrix_time * (126 - 65))
        value %= (126 - 65)
        value += 65
    char_fx.glyph_index = get_text_server().font_get_glyph_index(char_fx.font, 1, value, 0)
    return true
これにより、次のように使用できる新しいBBCodeコマンドが追加されます:
[center][ghost]This is a custom [matrix]effect[/matrix][/ghost] made in
[pulse freq=5.0 height=2.0][pulse color=#00FFAA freq=2.0]GDScript[/pulse][/pulse].[/center]