Up to date
This page is up to date for Godot 4.2.
If you still find outdated information, please open an issue.
物理の紹介
ゲーム開発では、多くの場合、ゲーム内の2つのオブジェクトが交差または接触するタイミングを知る必要があります。これは衝突検出として知られています。衝突が検出された場合、通常は何かが発生します。これは衝突応答として知られています。
Godotは、衝突の検出と応答の両方を提供するために、2Dおよび3Dで多数のコリジョン(衝突)オブジェクトを提供します。プロジェクトに使用するものを決定しようとすると、混乱する可能性があります。それぞれがどのように機能し、その長所と短所が何であるかを理解すれば、問題を回避して開発を簡素化できます。
このガイドでは、次の内容について学習します:
Godotの4つのコリジョンオブジェクトタイプ
各コリジョンオブジェクトの仕組み
別のタイプよりもあるタイプを選択するべきタイミングと理由
注釈
このドキュメントの例では、2Dオブジェクトを使用します。すべての2D物理オブジェクトとコリジョン形状は3Dでもまったく同等であり、ほとんどの場合、ほぼ同じように機能します。
オブジェクトのコリジョン
Godot offers four kinds of collision objects which all extend CollisionObject2D. The last three listed below are physics bodies and additionally extend PhysicsBody2D.
- Area2D
Area2Dノードは 検出 と 影響 を提供します。オブジェクトの重なり合いを検出し、物体が出入りするときにシグナルを発することができます。`` Area2D`` を使用して、定義された領域で重力や減衰などの物理特性をオーバーライドすることもできます。
- StaticBody2D
静的ボディとは、物理エンジンによって動かされないものです。コリジョン検出に参加しますが、衝突に応じて移動しません。これらは、環境の一部であるオブジェクトや動的な動作を必要としないオブジェクトに最もよく使用されます。
- RigidBody2D
これは、シミュレートされた2D物理を実装するノードです。
RigidBody2Dを直接制御するのではなく、それに力(重力、衝撃など)を適用し、物理エンジンが結果の動きを計算します。:ref:`リジッドボディの使用に関する詳細をお読みください。 <doc_rigid_body> `
- CharacterBody2D
コリジョン検出を提供しますが、物理は提供しません。すべての移動および衝突応答はコードで実装する必要があります。
Physics material
Static bodies and rigid bodies can be configured to use a PhysicsMaterial. This allows adjusting the friction and bounce of an object, and set if it's absorbent and/or rough.
コリジョン形状
物理ボディは、任意の数の Shape2D オブジェクトを子として保持できます。これらの形状は、オブジェクトのコリジョン境界を定義し、他のオブジェクトとの接触を検出するために使用されます。
注釈
コリジョンを検出するには、少なくとも1つの Shape2D をオブジェクトに割り当てる必要があります。
シェイプを割り当てる最も一般的な方法は、CollisionShape2D または CollisionPolygon2D をオブジェクトの子として追加することです。これらのノードを使用すると、エディタのワークスペースでシェイプを直接描画できます。
重要
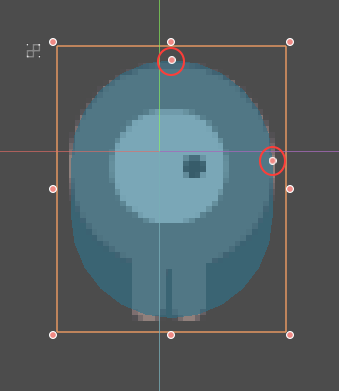
エディタでコリジョン形状をスケーリングしないように注意してください。インスペクタの”Scale”プロパティは (1, 1) `` のままにしてください。コリジョン形状のサイズを変更するときは、\ ``Node2D スケールハンドルではなく、常にサイズハンドルを使用する必要があります。シェイプをスケーリングすると、予期しない衝突が発生する場合があります。

物理プロセスのコールバック
The physics engine runs at a fixed rate (a default of 60 iterations per second). This rate is typically different from the frame rate which fluctuates based on what is rendered and available resources.
It is important that all physics related code runs at this fixed rate. Therefore Godot differentiates between physics and idle processing. Code that runs each frame is called idle processing and code that runs on each physics tick is called physics processing. Godot provides two different callbacks, one for each of those processing rates.
The physics callback, Node._physics_process(),
is called before each physics step. Any code that needs to access a body's properties should
be run in here. This method will be passed a delta
parameter, which is a floating-point number equal to the time passed in
seconds since the last step. When using the default 60 Hz physics update rate,
it will typically be equal to 0.01666... (but not always, see below).
注釈
プレーヤーのデバイスが更新レートを維持できない場合でも状態の変更が適切に物理計算に反映されるように、常に delta パラメーターを使うことを推奨します。
コリジョンレイヤーとマスク
One of the most powerful, but frequently misunderstood, collision features
is the collision layer system. This system allows you to build up complex
interactions between a variety of objects. The key concepts are layers
and masks. Each CollisionObject2D has 32 different physics layers
it can interact with.
各プロパティを順番に見てみましょう:
- collision_layer
これは、オブジェクトが **in ** で表示されるレイヤーを記述します。デフォルトでは、すべてのボディはレイヤー
1上にあります。
- collision_mask
これは、ボディが衝突を スキャン するレイヤーを記述します。オブジェクトがマスクレイヤーのいずれかにない場合、ボディはそれを無視します。デフォルトでは、すべてのボディがレイヤー
1をスキャンします。
これらのプロパティは、コードを介して、またはインスペクタで編集して構成できます。
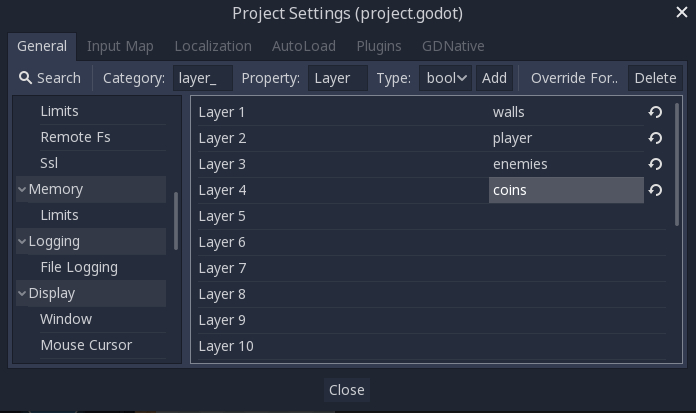
各レイヤーの使用目的を追跡するのは難しい場合があるため、使用しているレイヤーに名前を付けると便利な場合があります。プロジェクト設定 → Layer Names で名前を割り当てることができます。

GUI example
ゲームには、Walls、Player、Enemy、およびCoinの4つのノードタイプがあります。 PlayerとEnemyの両方がWallsと衝突するはずです。 PlayerノードはEnemyとCoinの両方との衝突を検出する必要がありますが、EnemyとCoinは互いに無視する必要があります。
レイヤー1〜4に"walls"、"player"、"enemies"、"coins"という名前を付けて開始し、"Layer" プロパティを使用して各ノードタイプをそれぞれのレイヤーに配置します。次に、相互作用するレイヤーを選択して、各ノードの"Mask"プロパティを設定します。たとえば、プレイヤーの設定は次のようになります:


Code example
In function calls, layers are specified as a bitmask. Where a function enables
all layers by default, the layer mask will be given as 0xffffffff. Your code
can use binary, hexadecimal, or decimal notation for layer masks, depending
on your preference.
上記の1,3,4番目のレイヤーが有効な場合の、同等なコード例は次のようになります:
# Example: Setting mask value for enabling layers 1, 3 and 4

# Binary - set the bit corresponding to the layers you want to enable (1, 3, and 4) to 1, set all other bits to 0.
# Note: Layer 32 is the first bit, layer 1 is the last. The mask for layers 4,3 and 1 is therefore
0b00000000_00000000_00000000_00001101
# (This can be shortened to 0b1101)

# Hexadecimal equivalent (1101 binary converted to hexadecimal)
0x000d
# (This value can be shortened to 0xd)

# Decimal - Add the results of 2 to the power of (layer to be enabled - 1).
# (2^(1-1)) + (2^(3-1)) + (2^(4-1)) = 1 + 4 + 8 = 13
pow(2, 1-1) + pow(2, 3-1) + pow(2, 4-1)
Area2D
エリア(Area)ノードは 検出 および 影響 を提供します。オブジェクトの重なり合いを検出し、物体が出入りするときにsシグナルを発します。エリアは、定義されたエリアで重力や減衰などの物理特性をオーバーライドするためにも使用できます。
Area2D には主に3つの用途があります:
特定の領域での物理パラメーター(重力など)のオーバーライド。
他のボディが領域に出入りするとき、または現在どのボディが領域にあるかを検出します。
他の領域のオーバーラップを確認します。
デフォルトでは、エリアはマウスとタッチスクリーンの入力も受け取ります。
StaticBody2D
静的(Static)ボディとは、物理エンジンによって動かされないものです。コリジョン検出に参加しますが、衝突に応じて移動しません。ただし、constant_linear_velocity および constant_angular_velocity プロパティを使用して、衝突している物体に動きや回転をあたかも移動しているかのように伝えることができます。
StaticBody2D ノードは、環境の一部であるか、動的な動作を必要としないオブジェクトに最もよく使用されます。
StaticBody2D の使用例:
プラットフォーム(移動プラットフォームを含む)
コンベヤベルト
壁やその他の障害物
RigidBody2D
これは、シミュレートされた2D物理を実装するノードです。RigidBody2D を直接制御することはできません。代わりに、それに力を適用し、物理エンジンは、他のボディとの衝突、跳ね返り、回転などの衝突応答を含む結果の動きを計算します。
You can modify a rigid body's behavior via properties such as "Mass", "Friction", or "Bounce", which can be set in the Inspector.
ボディの動作は、プロジェクト設定 → Physics で設定された世界のプロパティ、またはグローバルな物理学プロパティをオーバーライドする Area2D を入力することによっても影響を受けます。
リジッドボディが静止していて、しばらく動かない場合、スリープ状態になります。眠っている体は静的な体のように動作し、その力は物理エンジンによって計算されません。衝突またはコードを介して力が加えられると、ボディが起動します。
RigidBody2Dを使用する
リジッドボディを使用する利点の1つは、コードを記述せずに多くの動作を「無料」で行えることです。たとえば、落下するブロックを持つ「Angry Birds」スタイルのゲームを作成している場合、RigidBody2Dを作成してプロパティを調整するだけで済みます。スタッキング、落下、および跳ね返りは、物理エンジンによって自動的に計算されます。
However, if you do wish to have some control over the body, you should take
care - altering the position, linear_velocity, or other physics properties
of a rigid body can result in unexpected behavior. If you need to alter any
of the physics-related properties, you should use the _integrate_forces()
callback instead of _physics_process(). In this callback, you have access
to the body's PhysicsDirectBodyState2D,
which allows for safely changing properties and synchronizing them with
the physics engine.
たとえば、"Asteroids(Atariのゲーム)"スタイルの宇宙船のコードは次のとおりです:
extends RigidBody2D

var thrust = Vector2(0, -250)
var torque = 20000

func _integrate_forces(state):
    if Input.is_action_pressed("ui_up"):
        state.apply_force(thrust.rotated(rotation))
    else:
        state.apply_force(Vector2())
    var rotation_direction = 0
    if Input.is_action_pressed("ui_right"):
        rotation_direction += 1
    if Input.is_action_pressed("ui_left"):
        rotation_direction -= 1
    state.apply_torque(rotation_direction * torque)
using Godot;

public partial class Spaceship : RigidBody2D
{
    private Vector2 _thrust = new Vector2(0, -250);
    private float _torque = 20000;

    public override void _IntegrateForces(PhysicsDirectBodyState2D state)
    {
        if (Input.IsActionPressed("ui_up"))
            state.ApplyForce(_thrust.Rotated(Rotation));
        else
            state.ApplyForce(new Vector2());

        var rotationDir = 0;
        if (Input.IsActionPressed("ui_right"))
            rotationDir += 1;
        if (Input.IsActionPressed("ui_left"))
            rotationDir -= 1;
        state.ApplyTorque(rotationDir * _torque);
    }
}
linear_velocity または angular_velocity プロパティを直接設定するのではなく、力(`` thrust`` および torque)をボディに適用し、物理エンジンに結果の動きを計算させることに注意してください。
注釈
リジッドボディがスリープ状態になると、_integrate_forces() 関数は呼び出されません。この振る舞いをオーバーライドするには、コリジョンを作成するか、それに力を加えるか、can_sleep プロパティを無効にすることで、ボディを起こしたままにする必要があります。これはパフォーマンスに悪影響を及ぼす可能性があることに注意してください。
接触のレポート
By default, rigid bodies do not keep track of contacts, because this can require a huge amount of memory if many bodies are in the scene. To enable contact reporting, set the max_contacts_reported property to a non-zero value. The contacts can then be obtained via PhysicsDirectBodyState2D.get_contact_count() and related functions.
シグナルによる接触の監視は、contact_monitor プロパティを使用して有効にできます。使用可能なシグナルのリストについては、RigidBody2D を参照してください。
CharacterBody2D
CharacterBody2D bodies detect collisions with other bodies, but are not affected by physics properties like gravity or friction. Instead, they must be controlled by the user via code. The physics engine will not move a character body.
When moving a character body, you should not set its position directly.
Instead, you use the move_and_collide() or move_and_slide() methods.
These methods move the body along a given vector, and it will instantly stop
if a collision is detected with another body. After the body has collided,
any collision response must be coded manually.
Character collision response
After a collision, you may want the body to bounce, to slide along a wall, or to alter the properties of the object it hit. The way you handle collision response depends on which method you used to move the CharacterBody2D.
move_and_collide
move_and_collide() を使用すると、関数は KinematicCollision2D オブジェクトを返します。このオブジェクトには、コリジョンと衝突するボディに関する情報が含まれます。この情報を使用して、応答を判別できます。
たとえば、衝突が発生した空間内のポイントを検索する場合:
extends PhysicsBody2D

var velocity = Vector2(250, 250)

func _physics_process(delta):
    var collision_info = move_and_collide(velocity * delta)
    if collision_info:
        var collision_point = collision_info.get_position()
using Godot;

public partial class Body : PhysicsBody2D
{
    private Vector2 _velocity = new Vector2(250, 250);

    public override void _PhysicsProcess(double delta)
    {
        var collisionInfo = MoveAndCollide(_velocity * (float)delta);
        if (collisionInfo != null)
        {
            var collisionPoint = collisionInfo.GetPosition();
        }
    }
}
または、衝突するオブジェクトから跳ね返るには:
extends PhysicsBody2D

var velocity = Vector2(250, 250)

func _physics_process(delta):
    var collision_info = move_and_collide(velocity * delta)
    if collision_info:
        velocity = velocity.bounce(collision_info.get_normal())
using Godot;

public partial class Body : PhysicsBody2D
{
    private Vector2 _velocity = new Vector2(250, 250);

    public override void _PhysicsProcess(double delta)
    {
        var collisionInfo = MoveAndCollide(_velocity * (float)delta);
        if (collisionInfo != null)
            _velocity = _velocity.Bounce(collisionInfo.GetNormal());
    }
}
move_and_slide
スライディングは一般的な衝突応答です。トップダウンゲームで壁に沿って移動するプレイヤー、またはプラットフォーマーで坂を上下に走るプレイヤーを想像してください。move_and_collide() を使用した後、この応答を自分でコーディングすることは可能ですが、move_and_slide() は、多くのコードを書かずにスライド移動を実装する便利な方法を提供します。
警告
move_and_slide() は計算にタイムステップを自動的に含めるため、速度ベクトルに delta を掛けないでください。
たとえば、次のコードを使用して、地面(坂を含む)に沿って歩き、地面に立っているときにジャンプできるキャラクターを作成します:
extends CharacterBody2D

var run_speed = 350
var jump_speed = -1000
var gravity = 2500

func get_input():
    velocity.x = 0
    var right = Input.is_action_pressed('ui_right')
    var left = Input.is_action_pressed('ui_left')
    var jump = Input.is_action_just_pressed('ui_select')

    if is_on_floor() and jump:
        velocity.y = jump_speed
    if right:
        velocity.x += run_speed
    if left:
        velocity.x -= run_speed

func _physics_process(delta):
    velocity.y += gravity * delta
    get_input()
    move_and_slide()
using Godot;

public partial class Body : CharacterBody2D
{
    private float _runSpeed = 350;
    private float _jumpSpeed = -1000;
    private float _gravity = 2500;

    private void GetInput()
    {
        var velocity = Velocity;
        velocity.X = 0;

        var right = Input.IsActionPressed("ui_right");
        var left = Input.IsActionPressed("ui_left");
        var jump = Input.IsActionPressed("ui_select");

        if (IsOnFloor() && jump)
            velocity.Y = _jumpSpeed;
        if (right)
            velocity.X += _runSpeed;
        if (left)
            velocity.X -= _runSpeed;

        Velocity = velocity;
    }

    public override void _PhysicsProcess(double delta)
    {
        var velocity = Velocity;
        velocity.Y += _gravity * (float)delta;
        Velocity = velocity;
        GetInput();
        MoveAndSlide();
    }
}
move_and_slide() の使い方に関する詳細については、詳細なコードを含むデモプロジェクトを含んだ キネマティックキャラクター(2D) を参照してください。