Attention: Here be dragons
This is the latest
(unstable) version of this documentation, which may document features
not available in or compatible with released stable versions of Godot.
Checking the stable version of the documentation...
プラグインのインポート
注釈
このチュートリアルでは、汎用プラグインの作成方法を理解していることを前提としています。よく理解していない場合は、プラグインの作成ページを参照してください。また、Godotのインポートシステムに精通していることを前提としています。
はじめに
インポートプラグインは、カスタムリソースをGodotによってインポートし、ファーストクラスのリソースとして扱うことができる特別なタイプのエディタツールです。エディタ自体には、PNG画像、ColladaおよびglTFモデル、Ogg Vorbisサウンドなどの一般的なリソースを処理するための多くのインポートプラグインがバンドルされています。
This tutorial shows how to create an import plugin to load a custom text file as a material resource. This text file will contain three numeric values separated by comma, which represents the three channels of a color, and the resulting color will be used as the albedo (main color) of the imported material. In this example it contains the pure blue color (zero red, zero green, and full blue):
0,0,255
構成
まず、インポートプラグインの初期化と破棄を処理する汎用プラグインが必要です。最初に plugin.cfg ファイルを追加してみましょう:
[plugin]

name="Silly Material Importer"
description="Imports a 3D Material from an external text file."
author="Yours Truly"
version="1.0"
script="material_import.gd"
次に、必要に応じてインポート プラグインを追加および削除する material_import.gd ファイルが必要です:
# material_import.gd
@tool
extends EditorPlugin


var import_plugin


func _enter_tree():
    import_plugin = preload("import_plugin.gd").new()
    add_import_plugin(import_plugin)


func _exit_tree():
    remove_import_plugin(import_plugin)
    import_plugin = null
このプラグインがアクティブになると、インポートプラグインの新しいインスタンス(間もなく作成します)が作成され、add_import_plugin() メソッドを使用してエディタに追加されます。クラスメンバー import_plugin に参照を保存し、後で削除するときに参照できるようにします。remove_import_plugin() メソッドは、メモリをクリーンアップするためにプラグインが非アクティブ化されたときに呼び出され、インポートプラグインが利用できなくなったことをエディタに知らせます。
インポートプラグインは参照型なので、 free() 関数を使用してメモリから明示的に解放する必要はありません。スコープ外になると、エンジンによって自動的に解放されます。
エディタインポートプラグイン クラス
ショーの主役は EditorImportPluginクラス です。ファイルの処理方法を知る必要がある場合にGodotによって呼び出されるメソッドの実装を担当します。
プラグインのコーディングを始めましょう:
# import_plugin.gd
@tool
extends EditorImportPlugin


func _get_importer_name():
    return "demos.sillymaterial"
The first method is the _get_importer_name(). This is a unique name for your plugin that is used by Godot to know which import was used in a certain file. When the files needs to be reimported, the editor will know which plugin to call.
func _get_visible_name():
    return "Silly Material"
The _get_visible_name() method is responsible for returning the name of the type it imports and it will be shown to the user in the Import dock.
この名前は、「名前を付けてインポート」の続きとして選択する必要があります。 例えば、 「愚かな素材としてインポート」。 好きな名前を付けることができますが、プラグインにはわかりやすい名前を付けることをお勧めします。
func _get_recognized_extensions():
    return ["mtxt"]
Godot's import system detects file types by their extension. In the _get_recognized_extensions() method you return an array of strings to represent each extension that this plugin can understand. If an extension is recognized by more than one plugin, the user can select which one to use when importing the files.
Tip
.json や .txt などの一般的な拡張機能は、多くのプラグインで使用される場合があります。また、プロジェクト内には、ゲームのデータにすぎず、インポートしてはならないファイルが存在する可能性もあります。データを検証するには、インポート時に注意が必要です。ファイルが整形式であることを期待しないでください。
func _get_save_extension():
    return "material"
インポートされたファイルは、プロジェクトのルートにある .import フォルダに保存されます。それらの拡張子は、インポートするリソースの種類と一致する必要がありますが、Godotは何を使用するのかを知ることができないため(同じリソースに対して複数の有効な拡張機能が存在する可能性があるため)、インポートで使用される内容を宣言する必要があります。
マテリアルを読み込むので、このようなリソースタイプには特別な拡張子を使用します。シーンをインポートする場合は、scn を使うことができます。汎用リソースは res 拡張子を使用できます。ただし、これはエンジンによって強制されません。
func _get_resource_type():
    return "StandardMaterial3D"
インポートされたリソースには特定のタイプがあるため、エディタはリソースがどのプロパティスロットに属しているかを知ることができます。これにより、 「ファイルシステム」 ドックから 「インスペクタ」 のプロパティーにドラッグ&ドロップできます。
In our case it's a StandardMaterial3D, which can be applied to 3D objects.
注釈
同じ拡張子から異なるタイプをインポートする必要がある場合は、複数のインポートプラグインを作成する必要があります。インポートコードを別のファイルに抽象化して、重複を避けることができます。
オプションとプリセット
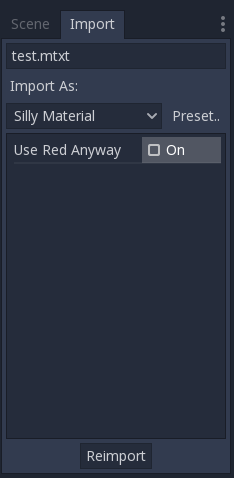
プラグインは、ユーザーがリソースのインポート方法を制御できるように、さまざまなオプションを提供できます。選択したオプションのセットが一般的な場合は、異なるプリセットを作成して、ユーザーが簡単に使用できるようにすることもできます。次の図は、エディタでオプションがどのように表示されるかを示しています:
プリセットが多く、数値で識別される可能性があるため、名前を使用して参照できるように列挙型を使用することをお知めします。
@tool
extends EditorImportPlugin


enum Presets { DEFAULT }


...
列挙型が定義されたので、インポート プラグインのメソッドを見てみましょう:
func _get_preset_count():
    return Presets.size()
The _get_preset_count() method
returns the amount of presets that this plugins defines. We only have one preset
now, but we can make this method future-proof by returning the size of our
Presets enumeration.
func _get_preset_name(preset_index):
    match preset_index:
        Presets.DEFAULT:
            return "Default"
        _:
            return "Unknown"
Here we have the _get_preset_name() method, which gives names to the presets as they will be presented to the user, so be sure to use short and clear names.
ここで match ステートメントを使用して、コードをより構造化できます。 これにより、将来的に新しいプリセットを簡単に追加できます。catch allも何かを返す時に使います。Godotでは、定義したプリセット数を超えるプリセットは要求されませんが、常に安全側にあることをお勧めします。
プリセットが1つしかない場合は、名前を直接返すだけですが、これを行う場合は、プリセットを追加するときに注意する必要があります。
func _get_import_options(path, preset_index):
    match preset_index:
        Presets.DEFAULT:
            return [{
                       "name": "use_red_anyway",
                       "default_value": false
                    }]
        _:
            return []
This is the method which defines the available options. _get_import_options() returns an array of dictionaries, and each dictionary contains a few keys that are checked to customize the option as it's shown to the user. The following table shows the possible keys:
キー |
タイプ(型) |
説明 |
|---|---|---|
|
文字列 |
オプションの名前。表示すると、アンダースコアはスペースになり、最初の文字は大文字になります。 |
|
任意 |
このプリセットのオプションの既定値。 |
|
列挙値 |
ヒントとして使用する PropertyHint 値の1つ。 |
|
文字列 |
プロパティのヒントテキスト。GDScriptの |
|
列挙値 |
使用法を定義する PropertyUsageFlags 値の1つ。 |
name キーと default_value キーは必須で、残りは省略可能です。
Note that the _get_import_options method receives the preset number, so you
can configure the options for each different preset (especially the default
value). In this example we use the match statement, but if you have lots of
options and the presets only change the value you may want to create the array
of options first and then change it based on the preset.
警告
The _get_import_options method is called even if you don't
define presets (by making _get_preset_count return zero). You
have to return an array even it's empty, otherwise you can get
errors.
func _get_option_visibility(path, option_name, options):
    return true
For the
_get_option_visibility()
method, we simply return true because all of our options (i.e. the single
one we defined) are visible all the time.
特定のオプションを表示する必要がある場合は、別のオプションが特定の値で設定されている場合にのみ、このメソッドにロジックを追加できます。
import メソッド
The heavy part of the process, responsible for converting the files into resources, is covered by the _import() method. Our sample code is a bit long, so let's split in a few parts:
func _import(source_file, save_path, options, r_platform_variants, r_gen_files):
    var file = FileAccess.open(source_file, FileAccess.READ)
    if file == null:
        return FileAccess.get_open_error()

    var line = file.get_line()
The first part of our import method opens and reads the source file. We use the
FileAccess class to do that, passing the source_file
parameter which is provided by the editor.
ファイルを開くときにエラーが発生した場合は、それを返して、インポートが失敗したことをエディタに知らせます。
var channels = line.split(",")
if channels.size() != 3:
    return ERR_PARSE_ERROR

var color
if options.use_red_anyway:
    color = Color.from_rgba8(255, 0, 0)
else:
    color = Color.from_rgba8(int(channels[0]), int(channels[1]), int(channels[2]))
このコードは、前に読み込んだファイルの行を取得し、コンマで区切られた断片に分割します。 3つよりも多いまたは少ない場合、ファイルは無効であると見なされ、エラーが報告されます。
次に、新しい Color 変数を作成し、入力ファイルに従ってその値を設定します。use_red_anyway オプションが有効な場合、代わりに色を純粋な赤に設定します。
var material = StandardMaterial3D.new()
material.albedo_color = color
This part makes a new StandardMaterial3D that is the imported resource. We create a new instance of it and then set its albedo color as the value we got before.
return ResourceSaver.save(material, "%s.%s" % [save_path, _get_save_extension()])
This is the last part and quite an important one, because here we save the made
resource to the disk. The path of the saved file is generated and informed by
the editor via the save_path parameter. Note that this comes without the
extension, so we add it using string formatting. For
this we call the _get_save_extension method that we defined earlier, so we
can be sure that they won't get out of sync.
また、ResourceSaver.save() メソッドから結果を返すため、このステップでエラーが発生した場合、エディタはそれを認識します。
プラットフォームバリアントと生成されたファイル
お気付きかもしれませんが、このプラグインは import メソッドの2つの引数を無視しています。これらは戻り引数(したがって、名前の先頭に r があります)で、これはエディタがimportメソッドを呼び出した後にこれらの引数から読み込むことを意味します。どちらも情報を格納できる配列です。
ターゲットプラットフォームに応じて異なる方法でリソースをインポートする必要がある場合、r_platform_variants 引数が使用されます。platform バリアントと呼ばれますが、feature tags の存在に基づいているため、同じプラットフォームでも設定に応じて複数のバリアントを使用できます。
プラットフォームバリアントをインポートするには、拡張機能の前に機能タグを付けて保存してから、タグを r_platform_variants 配列にプッシュして、エディタがそれを認識できるようにする必要があります。
たとえば、モバイルプラットフォーム用に別のマテリアルを保存したとします。次のような処理を行う必要があります:
r_platform_variants.push_back("mobile")
return ResourceSaver.save(mobile_material, "%s.%s.%s" % [save_path, "mobile", _get_save_extension()])
r_gen_files 引数は、インポートプロセス中に生成され、保持する必要がある追加のファイル用です。 エディタはこれを見て依存関係を理解し、余分なファイルが誤って削除されないようにします。
これは配列でもあるので、保存するファイルの完全なパスで埋められます。たとえば、次のパス用に別のマテリアルを作成し、別のファイルに保存してみましょう:
var next_pass = StandardMaterial3D.new()
next_pass.albedo_color = color.inverted()
var next_pass_path = "%s.next_pass.%s" % [save_path, _get_save_extension()]

err = ResourceSaver.save(next_pass, next_pass_path)
if err != OK:
    return err
r_gen_files.push_back(next_pass_path)
プラグインを試す
これは理論的なものですが、インポートプラグインが完了したので、テストしてみましょう。(紹介セクションで説明した内容を含む)サンプルファイルを作成し、test.mtxt として保存してください。次に、プロジェクト設定でプラグインを有効にします。
すべてがうまくいけば、インポートプラグインがエディタに追加され、ファイルシステムがスキャンされ、カスタムリソースがファイルシステムドックに表示されます。選択して[インポート]ドックにフォーカスを合わせると、選択する唯一のオプションが表示されます。
Create a MeshInstance3D node in the scene, and for its Mesh property set up a new SphereMesh. Unfold the Material section in the Inspector and then drag the file from the FileSystem dock to the material property. The object will update in the viewport with the blue color of the imported material.
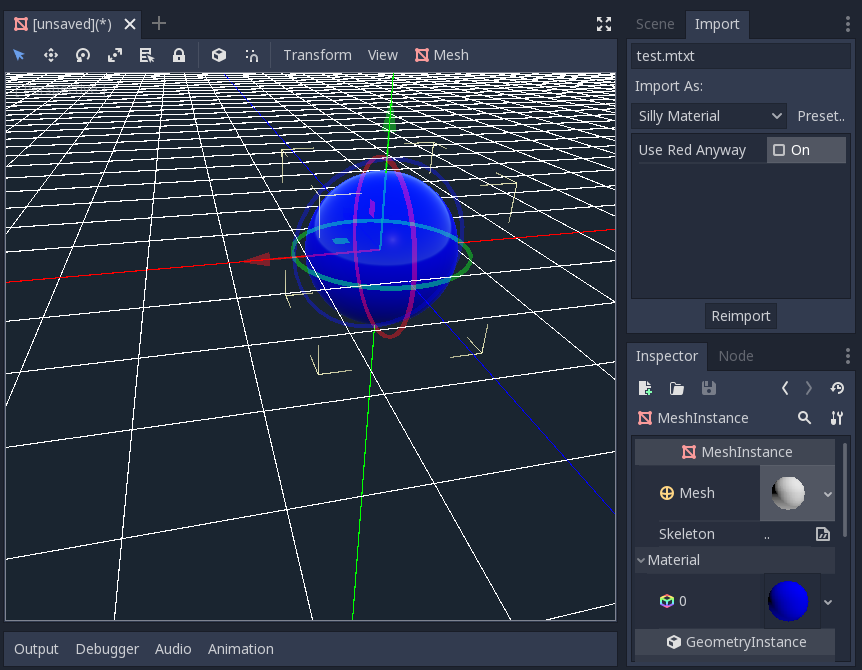
[インポートドック]に移動し、"Use Red Anyway"オプションを有効にし、[再インポート]をクリックします。これにより、読み込まれたマテリアルが更新され、代わりに赤い色を示すビューが自動的に更新されます。
以上です!最初のインポートプラグインが完了しました。自分の好きなフォーマットのプラグインを作ってみましょう。これは、カスタム・フォーマットでデータを作成し、それをあたかもネイティブ・リソースであるかのようにGodotで使用する場合に非常に便利です。これは、インポート・システムがいかに強力で拡張可能であるかを示しています。