Attention: Here be dragons
This is the latest
(unstable) version of this documentation, which may document features
not available in or compatible with released stable versions of Godot.
Checking the stable version of the documentation...
複数の解像度
複数の解像度の問題
開発者は、ゲームで複数の解像度を最適にサポートする方法を理解するのに苦労することがよくあります。デスクトップおよびコンソールゲームの場合、ほとんどの画面アスペクト比は16:9であり、解像度は標準化(720p、1080p、1440p、4Kなど)されているので、多かれ少なかれこれは簡単です。
モバイルゲームの場合、最初は簡単でした。長年、iPhoneとiPadは同じ解像度を使用していました。そして Retina を実装すると、ピクセル密度が2倍になりました。ほとんどの開発者は、デフォルトおよび二重解像度でアセットを提供する必要がありました。
現在では、さまざまな画面サイズ、密度、アスペクト比が存在するため、これはもはや当てはまりません。超ワイドディスプレイなど、従来とは異なるサイズも人気が高まっています。
3Dレンダリングにおいては、複数の解像度をサポートする必要性はあまりありません。ベクター形式ベースの性質のおかげで、3Dジオメトリがビューポートのサイズに合わせて画面を埋めるだけだからです。一方2DおよびゲームUIでは、Photoshop、GIMP、Kritaなどのソフトウェアで特定のピクセルサイズを使用してアートを作成する必要があるため、事情が異なります。
レイアウト、アスペクト比、解像度、ピクセル密度は大きく変化する可能性があるため、特定の画面ごとにUIを設計することはできなくなりました。別の方法を使用する必要があります。
ワンサイズですべてに対応
最も一般的なアプローチは、単一の base 解像度を使用し、それを他のすべてに適合させることです。この解像度は、ほとんどのプレイヤーがこれでゲームをプレイすることが期待されます(特定のハードウェアが与えられた場合)。モバイルの場合、Googleには便利な stats があり、デスクトップの場合、Steamには https://store.steampowered.com/hwsurvey/ もあります。
例として、Steamは最も一般的な プライマリディスプレイ解像度 が1920×1080であることを示しているため、賢明なアプローチはこの解像度のゲームを開発し、異なるサイズとアスペクト比にスケーリング処理をすることです。
Godotには、これを簡単に行うための便利なツールがいくつか用意されています。
参考
Godotで複数の解像度をサポートする例として、デモプロジェクトは こちら で確認できます。
ベースサイズ
ウィンドウの基本サイズは、[プロジェクト設定]の Display → Window で指定できます。

ただし、それが何をするのかは完全には明らかではありません。エンジンは、モニターをこの解像度に切り替えようとはしません。むしろ、この設定を「設計サイズ」、つまりエディタで作業する領域のサイズと考えてください。この設定は、2Dエディタの青い長方形のサイズに直接対応しています。
多くの場合、画面とウィンドウのサイズがこの基本サイズと異なるデバイスをサポートする必要があります。Godotには、さまざまな画面サイズに合わせてビューポートのサイズを変更および拡大する方法を制御する多くの方法があります。
注釈
このページでは、 ウィンドウ はシステムによってゲームに割り当てられた画面領域を指し、 ビューポート はゲームがこの画面領域を埋めるために制御するルートオブジェクト( get_tree().root でアクセス可能)を指します。このビューポートは Window のインスタンスです。 導入 で述べたように、すべての Window オブジェクトはビューポートです。
実行時の伸縮ベースサイズをスクリプトから設定するには、 get_tree().root.content_scale_size プロパティを使用します( Window.content_scale_size を参照)。この値を変更すると、間接的に2D要素のサイズを変更することができます。ただし、ユーザーがアクセス可能なスケーリングオプションを提供する場合は、調整が容易な ストレッチスケール(Stretch Scale) の使用が推奨されます。
注釈
Godotは、複数の解像度に対する最新のアプローチに従っています。エンジンが勝手にモニターの解像度を変更することはありません。モニターの解像度を変更するのは最も効率的なアプローチですが、ゲームがクラッシュしたときにモニターが低解像度で止まってしまう可能性があるため、最も信頼性の低いアプローチでもあります。これは、Windowsほど解像度の変更をうまく処理できないmacOSやLinuxで特によくあることです。
また、モニターの解像度を変更すると、ピクセルアートゲームを正しく表示するために重要なフィルタリングやアスペクト比の伸縮を、ゲーム開発者が制御できなくなります。
その上、モニターの解像度を変更すると、その都度モニターが解像度を変更しなければならないため、Alt+Tabでのゲームへの出入りが非常に遅くなるのです。
サイズ変更
デバイスには様々な種類があり、様々な画面があり、それらは異なるピクセル密度と解像度を持っています。それらすべてを処理するのは大変な作業になる可能性があるため、Godotは開発者の生活を少し楽にするように努めています。 Viewport ノードにはサイズ変更を扱う機能がいくつかあり、シーンツリーのルートノードは常にビューポートです(読み込まれたシーンはその子としてインスタンス化され、get_tree().get_root() または get_node("/root") を呼び出すことでいつでもアクセスできます)。
いずれにせよ、ルートビューポートのパラメーターを変更することがおそらく最も柔軟な解決策ですが、多くの作業、コード、推測が必要になる可能性があるため、Godotはプロジェクト設定において、複数の解像度に対応するためのパラメーターのシンプルなセットを提供します。
Tip
3D要素を2D要素よりも低い解像度で(別々のビューポートを利用せずに)レンダリングする場合、Godotの 解像度スケーリング 機能を利用できます。GPUがボトルネックとなる状況において、これはパフォーマンスを大幅に向上させる有効な手段となります。あらゆるストレッチモードとアスペクト比の組み合わせで動作します。
ストレッチ設定
注釈
When testing different stretch modes and stretch aspect settings, make sure game embedding is configured to use the Stretch to Fit scaling option:

This ensures the viewport size always matches the window size, like when game embedding is disabled.
ストレッチ設定はプロジェクト設定の中にあり、いくつかのオプションが用意されています:

ストレッチモード(Stretch Mode)
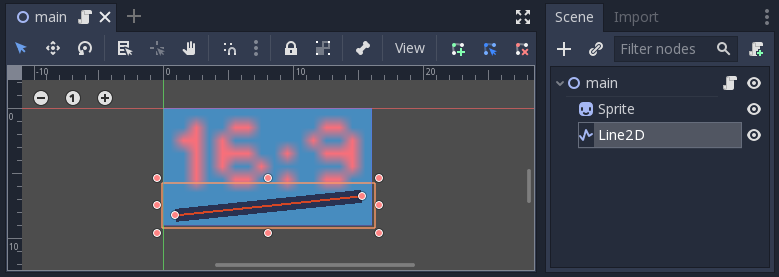
**Stretch Mode**設定は、ベースサイズがウィンドウや画面の解像度に合わせる際にどのように引き伸ばされるかを定義します。以下のアニメーションでは、さまざまなストレッチモードの効果を示すために、わずか16×9ピクセルの「ベースサイズ」を使用しています。同じくサイズが16×9ピクセルの単一のスプライトがビューポート全体をカバーし、その上に対角線 Line2D が追加されます:
Stretch Mode = Disabled (デフォルト): ストレッチは行われません。シーン内の1単位は、画面上の1ピクセルに対応します。このモードでは、Stretch Aspect 設定は効果がありません。
Stretch Mode = Canvas Items: このモードでは、プロジェクト設定の display/width および display/height で指定されたサイズが、画面全体をカバーするようにストレッチされます(Stretch Aspect 設定を考慮します)。これは、すべてがターゲット解像度で直接レンダリングされることを意味します。 3Dはほとんど影響を受けませんが、2Dでは、スプライトピクセルとスクリーンピクセルが1対1で対応しなくなり、スケーリングのアーティファクトが発生する可能性があります。
Stretch Mode = Viewport: ビューポートのスケーリングは、ルート Viewport のサイズがプロジェクト設定の Display セクションで指定されたベースサイズに正確に設定されることを意味します。シーンは最初にこのビューポートにレンダリングされます。最後に、このビューポートは画面に収まるように拡大縮小されます(Stretch Aspect 設定を考慮します)。

実行時にスクリプトからストレッチを設定するには、get_tree().root.content_scale_mode プロパティを使用します(Window.content_scale_mode および ContentScaleMode を参照)。
ストレッチアスペクト(Stretch Aspect)
2番目の設定は Stretch Aspect です。これは、Stretch Mode が Disable 以外に設定されている場合にのみ有効であることに注意してください。
以下のアニメーションでは、灰色と黒の領域に気づくでしょう。黒い領域はエンジンによって追加され、描画できません。灰色の領域はシーンの一部であり、描画できます。灰色の領域は、2Dエディタに表示される青いフレームの外側の領域に対応しています。
Stretch Aspect = Ignore: 画面をストレッチするときにアスペクト比を無視します。これは、幅が広くても狭くても、元の解像度が拡大されて画面全体に表示されることを意味します。これにより、不均一なストレッチが発生する可能性があります。物体が設計よりも幅が広い、または背が高く見えます。

Stretch Aspect = Keep: 画面をストレッチするときにアスペクト比を維持します。つまり、ビューポートは画面の解像度に関係なく元のサイズを保持し、画面の上部/下部(「レターボックス化」)または側面(「ピラーボックス化」)に黒いバーが追加されます。
これは、ターゲットデバイスのアスペクト比を事前に知っている場合、または異なるアスペクト比を処理したくない場合に適したオプションです。
Stretch Aspect = Keep Width: 画面をストレッチするときにアスペクト比を維持します。画面が基本サイズよりも広い場合、黒いバーが左右に追加されます(ピラーボックス化)。ただし、画面が基本解像度よりも高い場合、ビューポートは垂直方向に拡大されます(そして、より多くのコンテンツが下部に表示されます)。これを「垂直方向に拡張」と考えることもできます。
これは通常、スケーリングするGUIまたはHUDを作成するのに最適なオプションです。そのため、一部のコントロールを下部に固定できます(サイズとアンカー)。

Stretch Aspect = Keep Height: 画面を伸ばすときにアスペクト比を保ちます。画面が基本サイズよりも高い場合、黒いバーが上部と下部に追加されます(レターボックス化)。ただし、画面が基本解像度よりも広い場合、ビューポートは水平方向に拡大されます(さらに多くのコンテンツが右側に表示されます)。これを「水平方向に拡張」と考えることもできます。
これは通常、水平にスクロールする2Dゲーム(ランナーやプラットフォーマーなど)に最適なオプションです。

Stretch Aspect = Expand: 画面をストレッチするときはアスペクト比を維持しますが、ベースの幅も高さも維持しません。画面の縦横比に応じて、ビューポートは水平方向(画面が基本サイズよりも広い場合)または垂直方向(画面が元のサイズよりも高い場合)に大きくなります。
Tip
ポートレート(縦長)とランドスケープ(横長)の両方に対応したい場合は、プロジェクトの基本解像度を長方形ではなく*正方形*(縦横比1:1)に設定します。例えば、1280×720を基本解像度としてポートレートとランドスケープの両方のモードに対応したい場合は、プロジェクト設定で720×720をプロジェクトのベースウィンドウサイズとして設定します。
実行時にユーザーが好きな画面の向きを選択できるようにするには、Display > Window > Handheld > Orientation を sensor に設定することを忘れないようにしてください。
実行時にスクリプトからストレッチを設定するには、get_tree().root.content_scale_aspect プロパティを使用します( Window.content_scale_aspect および ContentScaleAspect を参照)。
ストレッチスケール(Stretch Scale)
Scale 設定では、上記の Stretch オプションが既に提供しているものに加えて、さらにスケーリング係数を追加できます。 デフォルト値の 1.0 は、追加のスケーリングが発生しないことを意味します。
たとえば、Scaleを 2.0 に設定し、Stretch Mode を Disabled のままにすると、シーンの各ユニットは画面上の2×2ピクセルに対応します。これはゲームでないアプリケーションにスケーリング設定を提供するのに適しています。
Stretch Mode が canvas_items に設定されている場合、2D要素はベースウィンドウサイズに伴ってスケーリングされ、その後 Scale 設定値が乗算されます。これによりプレイヤーは自動決定されたスケールを好みで調整できるようになり、アクセシビリティが向上します。
Stretch Mode が viewport に設定されている場合、ビューポートの解像度は Scale で除算されます。これによりピクセルが大きく見え、(ウィンドウサイズが一定ならば)レンダリング解像度は低下します。これによりパフォーマンスが向上する可能性があります。
実行時にスクリプトからストレッチを設定するには、get_tree().root.content_scale_factor プロパティを使用します( Window.content_scale_factor を参照)。
プロジェクト設定の GUI > テーマ > デフォルトのテーマスケール を変更することで、デフォルトのプロジェクトテーマのスケールを調整可能です。これにより、デフォルトから大幅に高いまたは低い解像度においても、より理に適ったサイズのUIを作成できます。ただし、このプロジェクト設定は実行中に変更できません。この値はプロジェクト起動時に一度だけ読み込まれるためです。
ストレッチスケールモード(Stretch Scale Mode)
Since Godot 4.2, the Stretch Scale Mode setting allows you to constrain the
automatically determined scale factor (as well as the manually specified
Stretch Scale setting) to integer values. By default, this setting is set to
fractional, which allows any scale factor to be applied (including fractional
values such as 2.5). When set to integer, the value is rounded down to
the nearest integer. For example, instead of using a scale factor of 2.5, it
would be rounded down to 2.0. This is useful to prevent distortion when
displaying pixel art.
Compare this pixel art which is displayed with the viewport stretch mode,
with the stretch scale mode set to fractional:
Checkerboard doesn't look "even". Line widths in the logo and text varies wildly.
This pixel art is also displayed with the viewport stretch mode, but the
stretch scale mode is set to integer this time:
Checkerboard looks perfectly even. Line widths are consistent.
For example, if your viewport base size is 640×360 and the window size is 1366×768:
When using
fractional, the viewport is displayed at a resolution of 1366×768 (scale factor is roughly 2.133×). The entire window space is used. Each pixel in the viewport corresponds to 2.133×2.133 pixels in the displayed area. However, since displays can only display "whole" pixels, this will lead to uneven pixel scaling which results in incorrect appearance of pixel art.When using
integer, the viewport is displayed at a resolution of 1280×720 (scale factor is 2×). The remaining space is filled with black bars on all four sides, so that each pixel in the viewport corresponds to 2×2 pixels in the displayed area.
This setting is effective with any stretch mode. However, when using the
disabled stretch mode, it will only affect the Stretch Scale setting by
rounding it down to the nearest integer value. This can be used for 3D games
that have a pixel art UI, so that the visible area in the 3D viewport doesn't
reduce in size (which occurs when using canvas_items or viewport stretch
mode with the integer scale mode).
Tip
Games should use the Exclusive Fullscreen window mode, as opposed to Fullscreen which is designed to prevent Windows from automatically treating the window as if it was exclusive fullscreen.
Fullscreen is meant to be used by GUI applications that want to use per-pixel transparency without a risk of having it disabled by the OS. It achieves this by leaving a 1-pixel line at the bottom of the screen. By contrast, Exclusive Fullscreen uses the actual screen size and allows Windows to reduce jitter and input lag for fullscreen games.
When using integer scaling, this is particularly important as the 1-pixel height reduction from the Fullscreen mode can cause integer scaling to use a smaller scale factor than expected.
Common use case scenarios
複数の解像度やアスペクト比を適切にサポートするには、次の設定をお勧めします。
デスクトップゲーム
Non-pixel art:
Set the base window width to
1920and window height to1080. If you have a display smaller than 1920×1080, set Window Width Override and Window Height Override to lower values to make the window smaller when the project starts.Alternatively, if you're targeting high-end devices primarily, set the base window width to
3840and window height to2160. This allows you to provide higher resolution 2D assets, resulting in crisper visuals at the cost of higher memory usage and file sizes. You'll also want to increase GUI > Theme > Default Theme Scale to a value between2.0and3.0to ensure UI elements remain readable.Note that this will make non-mipmapped textures grainy on low resolution devices, so make sure to follow the instructions described in ダウンサンプリングでのエイリアスの削減.
Set the stretch mode to
canvas_items.Set the stretch aspect to
expand. This allows for supporting multiple aspect ratios and makes better use of tall smartphone displays (such as 18:9 or 19:9 aspect ratios).Configure Control nodes' anchors to snap to the correct corners using the Layout menu.
For 3D games, consider exposing Resolution scaling in the game's options menu to allow players to adjust the 3D rendering resolution separately from UI elements. This is useful for performance tuning, especially on lower-end hardware.
Pixel art:
Set the base window size to the viewport size you intend to use. Most pixel art games use viewport sizes between 256×224 and 640×480. 640×360 is a good baseline, as it scales to 1280×720, 1920×1080, 2560×1440, and 3840×2160 without any black bars when using integer scaling. Higher viewport sizes will require using higher resolution artwork, unless you intend to show more of the game world at a given time.
Set the stretch mode to
viewport.Set the stretch aspect to
keepto enforce a single aspect ratio (with black bars). As an alternative, you can set the stretch aspect toexpandto support multiple aspect ratios.If using the
expandstretch aspect, Configure Control nodes' anchors to snap to the correct corners using the Layout menu.Set the stretch scale mode to
integer. This prevents uneven pixel scaling from occurring, which makes pixel art not display as intended.
注釈
The viewport stretch mode provides low-resolution rendering that is then
stretched to the final window size. If you are OK with sprites being able to
move or rotate in "sub-pixel" positions or wish to have a high resolution 3D
viewport, you should use the canvas_items stretch mode instead of the viewport
stretch mode.
Mobile game in landscape mode
Godot is configured to use landscape mode by default. This means you don't need to change the display orientation project setting.
Set the base window width to
1280and window height to720.Alternatively, if you're targeting high-end devices primarily, set the base window width to
1920and window height to1080. This allows you to provide higher resolution 2D assets, resulting in crisper visuals at the cost of higher memory usage and file sizes. Many devices have even higher resolution displays (1440p), but the difference with 1080p is barely visible given the small size of smartphone displays. You'll also want to increase GUI > Theme > Default Theme Scale to a value between1.5and2.0to ensure UI elements remain readable.Note that this will make non-mipmapped textures grainy on low resolution devices, so make sure to follow the instructions described in ダウンサンプリングでのエイリアスの削減.
Set the stretch mode to
canvas_items.Set the stretch aspect to
expand. This allows for supporting multiple aspect ratios and makes better use of tall smartphone displays (such as 18:9 or 19:9 aspect ratios).Configure Control nodes' anchors to snap to the correct corners using the Layout menu.
Tip
To better support tablets and foldable phones (which frequently feature
displays with aspect ratios close to 4:3), consider using a base resolution
that has a 4:3 aspect ratio while following the rest of the instructions
here. For instance, you can set the base window width to 1280 and the
base window height to 960.
縦向き表示のモバイルゲーム
Set the base window width to
720and window height to1280.Alternatively, if you're targeting high-end devices primarily, set the base window width to
1080and window height to1920. This allows you to provide higher resolution 2D assets, resulting in crisper visuals at the cost of higher memory usage and file sizes. Many devices have even higher resolution displays (1440p), but the difference with 1080p is barely visible given the small size of smartphone displays. You'll also want to increase GUI > Theme > Default Theme Scale to a value between1.5and2.0to ensure UI elements remain readable.Note that this will make non-mipmapped textures grainy on low resolution devices, so make sure to follow the instructions described in ダウンサンプリングでのエイリアスの削減.
Set Display > Window > Handheld > Orientation to
portrait.Set the stretch mode to
canvas_items.Set the stretch aspect to
expand. This allows for supporting multiple aspect ratios and makes better use of tall smartphone displays (such as 18:9 or 19:9 aspect ratios).Configure Control nodes' anchors to snap to the correct corners using the Layout menu.
Tip
To better support tablets and foldable phones (which frequently feature
displays with aspect ratios close to 4:3), consider using a base resolution
that has a 3:4 aspect ratio while following the rest of the instructions
here. For instance, you can set the base window width to 960 and the
base window height to 1280.
ゲーム以外のアプリケーション
Set the base window width and height to the smallest window size that you intend to target. This is not required, but this ensures that you design your UI with small window sizes in mind.
Keep the stretch mode to its default value,
disabled.Keep the stretch aspect to its default value,
keep(its value won't be used since the stretch mode isdisabled).You can define a minimum window size by setting
get_window().min_sizein a script's_ready()function. This prevents the user from resizing the application below a certain size, which could break the UI layout.Add a setting in the application's settings to change the root viewport's stretch scale, so that the UI can be made larger to account for hiDPI displays. See also the section on hiDPI support below.
hiDPI support
By default, Godot projects are considered DPI-aware by the operating system. This is controlled by the Display > Window > DPI > Allow hiDPI project setting, which should be left enabled whenever possible. Disabling DPI awareness can break fullscreen behavior on Windows.
Since Godot projects are DPI-aware, they may appear at a very small window size
when launching on an hiDPI display (proportionally to the screen resolution).
For a game, the most common way to work around this issue is to make them
fullscreen by default. Alternatively, you could set the window size in an
autoload's _ready() function according to
the screen size.
To ensure 2D elements don't appear too small on hiDPI displays:
For games, use the
canvas_itemsorviewportstretch modes so that 2D elements are automatically resized according to the current window size.For non-game applications, use the
disabledstretch mode and set the stretch scale to a value corresponding to the display scale factor in an autoload's_ready()function. The display scale factor is set in the operating system's settings and can be queried using screen_get_scale. This method is currently implemented on Android, iOS, Linux (Wayland only), macOS and Web. On other platforms, you'll have to implement a method to guess the display scale factor based on the screen resolution (with a setting to let the user override this if needed). This is the approach currently used by the Godot editor.
The Allow hiDPI setting is only effective on Windows and macOS. It's ignored on all other platforms.
注釈
The Godot editor itself is always marked as DPI-aware. Running the project from the editor will only be DPI-aware if Allow hiDPI is enabled in the Project Settings.
Font and image oversampling
Godot supports a process called oversampling, which refers to automatically re-rendering textures from their original vector source when the viewport scale factor changes. This ensures font and image textures remain crisp at any resolution.
Font oversampling is enabled by default, but it can be disabled by unchecking GUI > Fonts > Dynamic Fonts > Use Oversampling in the Project Settings.
Image oversampling is disabled by default, and can be enabled for specific images in SVG format by changing their import type to DPITexture in the Import dock. Other image formats do not support oversampling, as they store bitmap data instead of vectors.
The editor automatically performs oversampling when zooming in the 2D editor, which allows you to preview how oversampling will look at specific scale factors. This can be disabled by unchecking View > Auto Resample CanvasItems at the top of the 2D editor viewport.
Oversampling can also be applied according to the Node2D or Control's Scale property. This scale-based oversampling behavior is disabled by default, but it can be enabled by setting Oversampling with Scale in the inspector to Enabled on the desired node. This is useful for nodes that may have their scale changed at runtime, such as custom scale factors for certain UI elements like crosshairs. However, keep in mind this can be demanding on the CPU if the scale changes frequently, as the texture has to be re-rendered each time.
For best results, the node should use uniform scaling. Non-uniform scaling will work, but may result in aliasing on the shorter axis as oversampling is always applied uniformly.
注釈
Control's offset_transform_enabled property is taken into account by scale-based oversampling, but only if offset_transform_visual_only is disabled. When offset_transform_visual_only is enabled, it does not affect the node's actual scale (as used for input coordinates), but only its visual representation. Therefore, it is ignored by oversampling.
ダウンサンプリングでのエイリアスの削減
ゲームの基本解像度が非常に高い場合(3840 x 2160など)、1280 x 720などのかなり低い値にダウンサンプリングすると、エイリアスが現れる場合があります。
To resolve this, you can enable mipmaps on all your 2D textures. However, enabling mipmaps will increase memory usage which can be an issue on low-end mobile devices.
For SVG images, you can also change their import type to DPITexture in the Import dock to benefit from automatic oversampling as described above. This avoids aliasing by re-rasterizing the texture when the scale factor changes.
アスペクト比の処理
さまざまな解像度のスケーリングが考慮されたら、ユーザーインターフェイスもさまざまなアスペクト比に合わせてスケーリングするようにしてください。 これは anchors および/または containers を使用して実行できます。
視野のスケーリング
3Dカメラノードの Keep Aspect プロパティは、デフォルトで Keep Height スケーリングモード(Hor+ とも呼ばれます)になります。 ワイドスクリーンディスプレイは自動的に広い視野を使用するため、これは通常、デスクトップモードや横長モードのモバイルゲームに最適な値です。
ただし、3Dゲームをポートレートモードでプレイする場合は、代わりに Keep Width (Vert- とも呼ばれます)を使用する方が合理的です。 このように、アスペクト比が16:9(例: 19:9)よりも高いスマートフォンは、taller の視野を使用しますが、これはここではより論理的です。
Scaling 2D and 3D elements differently
To render 3D at a different resolution from 2D elements (such as the UI), use Godot's resolution scaling functionality. This allows you to control the resolution scale factor used for 3D without needing to use a separate Viewport node. This can either be used to improve performance by rendering 3D at a lower resolution, or improve quality via supersampling.