Attention: Here be dragons
This is the latest
(unstable) version of this documentation, which may document features
not available in or compatible with released stable versions of Godot.
Checking the stable version of the documentation...
playerシーンの作成
プロジェクト設定が完了したので、操作できるキャラクターを作成しましょう。
最初のシーンでは、 Player オブジェクトを定義します。Player シーンを独立して作成する利点の 1 つは、たとえゲームの他の部分を作成する前であっても、個別にテストができることです。
ノード構成
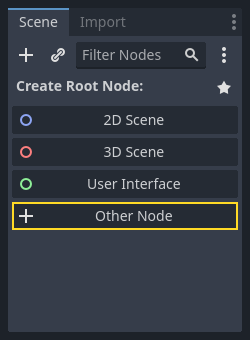
はじめに、プレイヤーオブジェクトのルートノードを選択する必要があります。原則として、シーンのルートノードはオブジェクトに望まれる機能 (オブジェクトが 何であるか ) を反映する必要があります。左上隅の [シーン] タブで、「その他のノード」のボタンをクリックして、シーンに Area2D ノードを追加します。
注釈
Godot also provides the CharacterBody2D node, specifically designed for 2D characters, which includes built-in support for some of the processes explained in this tutorial. In many real world projects, CharacterBody2D would be a better choice for players and enemies. However, this tutorial focuses on core concepts that apply to a wider range of nodes and use cases.
Area2D ノードを追加すると、Godotはシーンツリー内に次の 警告アイコン を表示します。

この警告は、 Area2D ノードが衝突や重なりを検出するために形状を必要とすることを示しています。プレイヤーのビジュアル(アニメーションスプライトを使用)を最初に設定するため、警告は 一時的に無視しても構いません 。ビジュアルが準備できたら、衝突形状を子ノードとして追加します。これにより、スプライトの外観に基づいて形状のサイズと位置を正確に設定できます。
Area2D を使用すると、プレイヤーに重なり合ったり、プレイヤーに衝突したりするオブジェクトを検出できます。ノードの名前をダブルクリックして、名前を Player に変更します。シーンのルートノードを決めたので、これにノードを追加して機能を追加できます。
Player ノードに子を追加する前に、それらを誤ってクリックしてしまうことで移動したりサイズを変更したりすることがないようにしておきます。ノードを選択し、鍵アイコンの右側にあるアイコンをクリックします。ツールチップには「選択したノードを子でグループ化します。これにより、子ノードが2Dと3Dビューでクリックされたときに親が選択されるようになります」と書いてあります。

シーンを player.tscn として保存します。シーン > 保存 をクリックするか、Windows/Linux では Ctrl + S、macOS では Cmd + S を押します。
注釈
このプロジェクトでは、Godotの命名規則に従います。
GDScript: クラス(ノード)はPascalCaseを使用し、変数と関数はsnake_caseを使用し、定数はALL_CAPSを使用します(GDScriptスタイルガイドを参照)。
C#: クラス、export変数、メソッドはPascalCaseを使用し、プライベートフィールドは _camelCase を使用し、ローカル変数とパラメーターは camelCase を使用します(C# スタイルガイドを参照)。シグナルを接続するときは、メソッド名を正確に入力してください。
スプライトアニメーション
Player ノードをクリックし、 AnimatedSprite2D ノードを子として追加します (Windows/Linuxでは Ctrl + A 、 macOSでは Cmd + A ) 。 AnimatedSprite2D は、プレーヤーの外観とアニメーションを処理します。ノードの横に警告マークがあることに注意してください。 AnimatedSprite2D には、表示可能なアニメーションのリストである SpriteFrames リソースが必要です。作成するには、インスペクタの Animation タブ内にある Sprite Frames プロパティを探して、「[空]」→「新規 SpriteFrames」をクリックします。更にもう一度クリックすることで、スプライトフレームパネルが開きます:
作成した SpriteFrames をクリックして SpriteFrames パネルを開きます:
左側にはアニメーションのリストがあります。 default をクリックして、 walk に名前を変更します。次に、 Add Animation ボタンをクリックして、 up という名前の2番目のアニメーションを作成します。
プレイヤー画像は、ファイルシステムドックで見つけます。これは先ほど解凍した art フォルダにあります。各アニメーションの 2 つの画像を、対応するアニメーションパネルの アニメーションフレーム 側にドラッグします。
playerGrey_walk1とplayerGrey_walk2はwalkアニメーション用ですplayerGrey_up1とplayerGrey_up2のupアニメーション
プレーヤーの画像はゲーム ウィンドウに対して少し大きすぎるため、縮小する必要があります。 AnimatedSprite2D ノードをクリックし、 Scale プロパティを (0.5, 0.5) に設定します。 これは、インスペクターの Node2D ヘッダの下にあります。

最後に、 CollisionShape2D を Player の子として追加します。 これにより、プレイヤーの「ヒットボックス」、つまり衝突領域の境界が決まります。 このキャラクターの場合、 CapsuleShape2D ノードが最適なフィット感を与えるので、インスペクターの「Shape」項目の横にある「<空>」をクリックし「新規 CapsuleShape2D」を選択します。 2 つのサイズ ハンドルを使用して、スプライトを覆うようにシェイプのサイズを変更します。

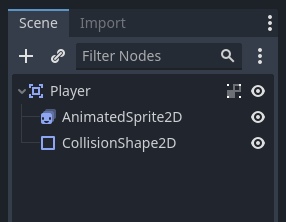
完了すると、 Player シーンは次のようになります:
これが完了すると、 Area2D ノードの警告は消え、形状が割り当てられ、他のオブジェクトと相互作用できるようになります。
これらの変更後は、必ずシーンを再度保存してください。
次のパートでは、動かしたりアニメーションさせるためのスクリプトをplayerノードに追加します。それから、playerがなにかにあたった事がわかるよう、衝突判定を設定します。