Attention: Here be dragons
This is the latest
(unstable) version of this documentation, which may document features
not available in or compatible with released stable versions of Godot.
Checking the stable version of the documentation...
初めての2Dシェーダー
はじめに
シェーダーはGPUで実行される特殊なプログラムで、グラフィックスのレンダリングに使用されます。 最近のレンダリングはすべてシェーダーを使用して行われます。 シェーダーの詳細については、What are shaders を参照してください。
このチュートリアルでは、頂点関数とフラグメント関数の両方を使用してシェーダーを作成するプロセスを順を追って説明し、シェーダープログラムを作成する実用的な側面に焦点を当てます。 このチュートリアルは、シェーダーの初心者を対象にしています。
注釈
シェーダーの作成経験があり、Godotでのシェーダーの動作の概要を探しているだけの場合は、シェーディングリファレンス を参照してください。
セットアップ
CanvasItem シェーダー は Godot ですべての2Dオブジェクトを描画するために使用され、 Spatialシェーダー はすべての3Dオブジェクトを描画するために使用されます。
シェーダーを使用するには、オブジェクトにアタッチする必要がある Material 内にシェーダーをアタッチする必要があります。マテリアルは Resource の一種です。同じマテリアルで複数のオブジェクトを描画するには、各オブジェクトにマテリアルをアタッチする必要があります。
CanvasItem から派生したすべてのオブジェクトにはマテリアル プロパティがあります。これには GUI要素 、 Sprite2D 、 TileMapLayers 、 MeshInstance2Ds などがすべて含まれます。これらにはオプションもあります。親のマテリアルを継承します。これは同じマテリアルを使用するノードが多数ある場合に便利です。
まずSprite2Dノードを作成します。 キャンバスに描画している限り、 任意のCanvasItem を使用できます。そのため、このチュートリアルでは、描画を開始するのに最も簡単なCanvasItemであるSprite2Dを使用します。
インスペクタで、"Texture"の横にある[空]をクリックして[読込み]を選択し、”Icon.svg"を選択します。 新しいプロジェクトの場合、これはGodotアイコンです。 ビューポートにアイコンが表示されます。
次に、インスペクタのCanvasItemセクションの下を見て、「Material」の横をクリックし、「新規 ShaderMaterial」を選択します。 これにより、新しいマテリアルリソースが作成されます。 表示される球をクリックします。 Godotは現在、CanvasItemシェーダーとSpatialシェーダーのどちらを記述しているかを認識せず、Spatialシェーダーの出力をプレビューします。 したがって、表示されているのは、デフォルトのSpatialシェーダーの出力です。
注釈
Material リソースを継承するマテリアル(StandardMaterial3D や ParticleProcessMaterial など)は、ShaderMaterial に変換できます。その場合、既存のプロパティは対応するテキストシェーダーに変換されます。変換するには、ファイルシステムドックでマテリアルを右クリックし、「ShaderMaterialに変換」を選択します。また、インスペクターでマテリアルへの参照を持つプロパティを右クリックして変換することもできます。
"Shader"の横をクリックし、"新規シェーダー"を選択します。最後に、作成したシェーダーをクリックすると、シェーダーエディターが開きます。これで最初のシェーダーの作成を始める準備が整いました。
初めてのCanvasItemシェーダー
Godotでは、すべてのシェーダーは、シェーダーのタイプを指定する行で始まります。 次の形式を使用します:
shader_type canvas_item;
CanvasItemシェーダーを記述しているため、最初の行で canvas_item を指定します。 すべてのコードは、この宣言の下に配置されます。
この行は、どのビルトイン変数と関数を提供するかをエンジンに伝えます。
Godotでは、3つの関数をオーバーライドして、シェーダーの動作を制御できます。vertex、fragment、および light。 このチュートリアルでは、頂点(vertex)関数とフラグメント(fragment)関数の両方を使用してシェーダーを作成する方法を説明します。 ライト(light)関数は、頂点関数やフラグメント関数よりもかなり複雑なので、ここでは説明しません。
初めてのフラグメント関数
フラグメント関数はSprite2D内のすべてのピクセルに対して実行され、そのピクセルが何色であるべきかを決定します。
これらはSprite2Dでカバーされるピクセルに制限されているため、Sprite2Dの周囲にアウトラインを作成する場合などは使用できません。
最も基本的なフラグメント関数は、すべてのピクセルに単一の色を割り当てること以外は何もしません。
そのためには、ビルトイン変数 COLOR に vec4 を書き込みます。vec4 は、4つの数値を含むベクトルを構築するための省略表現です。 ベクトルの詳細については、 ベクトル演算チュートリアル を参照してください。COLOR はフラグメント関数への入力変数であり、フラグメント関数からの最終出力でもあります。
void fragment(){
  COLOR = vec4(0.4, 0.6, 0.9, 1.0);
}

おめでとう! できました。 Godotで初めてのシェーダーの作成に成功しました。
それでは、もっと複雑にしましょう。
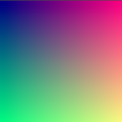
COLOR の計算に使用できるフラグメント関数には多くの入力があります。UV もその1つです。 UV座標は(知らないうちに)スプライトで指定され、メッシュの各部分のテクスチャからどこを読み取るかをシェーダーに指示します。
フラグメント関数では UV からしか読み取ることができませんが、他の関数で使用したり、値を COLOR に直接割り当てることができます。
UV は、左から右、上から下で0~1の間で変化します。
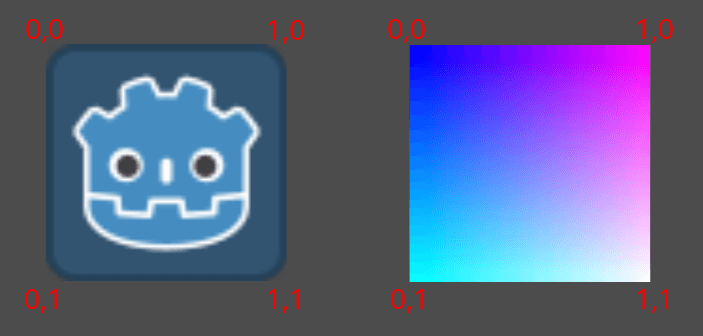
void fragment() {
  COLOR = vec4(UV, 0.5, 1.0);
}
TEXTURE ビルトインを使用する
デフォルトのフラグメント関数は、設定されているSprite2Dテクスチャを読み込んで表示します。
Sprite2Dの色を調整したい場合は、以下のコードのようにテクスチャから手動で色を調整できます。
void fragment(){
  // This shader will result in a blue-tinted icon
  COLOR.b = 1.0;
}
Sprite2Dなどの特定のノードには、シェーダー内で TEXTURE を使用してアクセスできる専用のテクスチャ変数があります。 Sprite2Dテクスチャを他の色と組み合わせるために使用したい場合は、 UV と texture 関数を使用してこの変数にアクセスできます。これらを使用してSprite2Dをテクスチャで再描画します。
void fragment(){
  COLOR = texture(TEXTURE, UV); // Read from texture again.
  COLOR.b = 1.0; //set blue channel to 1.0
}

Uniform入力
Uniform入力は、シェーダー全体で同一のデータを、シェーダーに渡すために使用されます。
Uniformを使用するには、シェーダーの上部で次のように定義します:
uniform float size;
使用法の詳細については、シェーディング言語ドキュメント を参照してください。
uniformを追加して、Sprite2Dの青の量を変更します。
uniform float blue = 1.0; // you can assign a default value to uniforms

void fragment(){
  COLOR = texture(TEXTURE, UV); // Read from texture
  COLOR.b = blue;
}
これで、エディタからSprite2Dの青の量を変更できます。シェーダーを作成した場所のインスペクタを再確認すると、Shader Param というセクションが表示されるはずです。そのセクションを展開すると、宣言したuniformが表示されます。エディタで値を変更すると、シェーダーで指定したデフォルト値が上書きされます。
スクリプトからシェーダーを操作する
ノードのマテリアルリソースで呼び出される set_shader_param() 関数を使用して、コードからuniformを変更できます。 Sprite2Dノードでは、次のコードを使用して blue uniformを設定できます。
var blue_value = 1.0
material.set_shader_parameter("blue", blue_value)
var blueValue = 1.0;
((ShaderMaterial)Material).SetShaderParameter("blue", blueValue);
uniformの名前は文字列であることに注意してください。文字列は、スペルや大文字小文字を含め、シェーダーでの記述方法と正確に一致する必要があります。
初めての頂点関数
フラグメント関数ができたので、頂点関数を書きましょう。
頂点関数を使用して、各頂点が画面のどこに出現するかを計算します。
頂点関数の最も重要な変数は VERTEX です。最初はモデルの頂点座標を指定しますが、実際にそれらの頂点を描画する場所を決定するために書き込むこともできます。VERTEX は、ローカル空間で最初に表示される vec2 です(つまり、カメラ、ビューポート、または親ノードに関連しません)。
VERTEX に直接追加することにより、頂点をオフセットできます。
void vertex() {
  VERTEX += vec2(10.0, 0.0);
}
TIME ビルトイン変数と組み合わせると、基本的なアニメーションを行うことができます。
void vertex() {
  // Animate Sprite2D moving in big circle around its location
  VERTEX += vec2(cos(TIME)*100.0, sin(TIME)*100.0);
}
結論
シェーダーとはこれまで見てきたことを実行し、VERTEX と COLOR を計算する仕組みです。これらの変数に値を割り当てるための、より複雑な数学的戦略を考え出すのはあなた次第です。
インスピレーションを得るには、Shadertoy や The Book of Shaders などのより高度なシェーダーチュートリアルをいくつか見てください。