Attention: Here be dragons
This is the latest
(unstable) version of this documentation, which may document features
not available in or compatible with released stable versions of Godot.
Checking the stable version of the documentation...
GDScriptリファレンス
GDScript は高レベルの オブジェクト指向 、命令型 、および 漸進的型付け プログラミング言語であり、Godot用に構築されました。これは Python のような言語に似たインデントベースの構文を使用します。その目標は Godot Engine 向けに最適化され、Godot Engine と緊密に統合され、コンテンツの作成と統合に大きな柔軟性をもたらすことです。
GDScript は Python から完全に独立しており、Python に基づいていません。
履歴
注釈
GDScriptの歴史についてのドキュメントはよくある質問に移動しました。
GDScriptの例
構文を見たほうがよくわかる人もいるかもしれないので、ここではGDScriptがどのように見えるかの例を示します。
# Everything after "#" is a comment.
# A file is a class!

# (optional) icon to show in the editor dialogs:
@icon("res://path/to/optional/icon.svg")

# (optional) class definition:
class_name MyClass

# Inheritance:
extends BaseClass


# Member variables.
var a = 5
var s = "Hello"
var arr = [1, 2, 3]
var dict = {"key": "value", 2: 3}
var other_dict = {key = "value", other_key = 2}
var typed_var: int
var inferred_type := "String"

# Constants.
const ANSWER = 42
const THE_NAME = "Charly"

# Enums.
enum {UNIT_NEUTRAL, UNIT_ENEMY, UNIT_ALLY}
enum Named {THING_1, THING_2, ANOTHER_THING = -1}

# Built-in vector types.
var v2 = Vector2(1, 2)
var v3 = Vector3(1, 2, 3)


# Function, with a default value for the last parameter.
func some_function(param1, param2, param3 = 123):
    const local_const = 5

    if param1 < local_const:
        print(param1)
    elif param2 > 5:
        print(param2)
    else:
        print("Fail!")

    for i in range(20):
        print(i)

    while param2 != 0:
        param2 -= 1

    match param3:
        3:
            print("param3 is 3!")
        _:
            print("param3 is not 3!")

    var local_var = param1 + 3
    return local_var


# Functions override functions with the same name on the base/super class.
# If you still want to call them, use "super":
func something(p1, p2):
    super(p1, p2)


# It's also possible to call another function in the super class:
func other_something(p1, p2):
    super.something(p1, p2)


# Inner class
class Something:
    var a = 10


# Constructor
func _init():
    print("Constructed!")
    var lv = Something.new()
    print(lv.a)
C、C++、C#などの静的型付き言語の経験があるが、これまでに動的型付き言語を使用したことがない場合は、以下のチュートリアルを読むことをお勧めします。GDScript: 動的言語の紹介。
識別子
アルファベット文字( a から z および A から Z )、数字( 0 から 9 )、 _ が識別子として修飾される文字列です。また、識別子は数字で始まってはいけません。識別子では大文字と小文字が区別されます( foo が FOO と異なる)。
識別子には UAX#31 のほとんどの Unicode 文字部分が含まれる場合もあります。これにより、英語以外の言語で書かれた識別子名を使用できるようになります。 ASCII 文字や絵文字と"混同しやすい"と考えられるUnicode文字は、識別子には使用できません。
キーワード
言語でサポートされているキーワードのリストを次に示します。キーワードは予約語(トークン)であるため、識別子として使用することはできません。次のセクションに示す演算子( in 、 not 、 and 、 or など)と組み込み型の名前も予約されています。
キーワードは GDScriptのトークナイザーで定義されているので、内部を調べたい場合に便利です。
キーワード |
説明 |
|---|---|
if |
if/else/elif を参照して下さい。 |
elif |
if/else/elif を参照して下さい。 |
else |
if/else/elif を参照して下さい。 |
for |
forを参照して下さい。 |
while |
whileを参照して下さい。 |
match |
matchを参照して下さい。 |
when |
|
break |
現在の |
continue |
|
pass |
ステートメントが構文的には必要だが、コードの実行が望ましくない場合 (空の関数など) に使用されます。 |
return |
関数から値を返します。 |
class |
内部クラスを定義します。 Inner classes を参照してください。 |
class_name |
スクリプトを名前を持つグローバルにアクセス可能なクラスとして定義します。 Registering named classes を参照。 |
extends |
現在のクラスで拡張するクラスを定義します。 |
is |
変数が特定のクラスを拡張するのか、それとも特定の組み込み型のものかをテストします。 |
in |
値が文字列、配列、範囲、辞書、またはノード内に存在するかどうかをテストします。 |
as |
可能であれば、指定した型に値をキャストします。 |
self |
現在のクラスインスタンスを参照します。 self を参照してください。 |
super |
親メソッドのスコープを解決します。 Inheritance を参照。 |
signal |
シグナルを定義します。 Signals を参照してください。 |
func |
関数を定義します。 Functions を参照してください。 |
static |
静的関数または静的メンバー変数を定義します。 |
const |
定数を定義します。 Constants を参照してください。 |
enum |
列挙型を定義します。 Enums を参照してください。 |
var |
変数を定義します。 Variables を参照してください。 |
breakpoint |
デバッガーブレークポイントのエディタヘルパー。ガター内をクリックして作成されたブレークポイントとは異なり、 |
preload |
クラスまたは変数をプリロードします。Classes as resources を参照してください。 |
await |
シグナルまたはコルーチンが終了するのを待ちます。 Awaiting signals or coroutines を参照。 |
yield |
以前はコルーチンに使用されていました。トランジションのキーワードとして保持します。 |
assert |
条件を表明し、失敗時にエラーをログに記録します。 デバッグ以外のビルドでは無視されます。Assert keyword を参照してください。 |
void |
関数が値を返さないことを表すために使用されます。 |
PI |
PI定数。 |
TAU |
TAU定数。 |
INF |
Infinity定数。比較や計算の結果として使用されます。 |
NAN |
NAN (not a number)定数。計算上の不可能な結果として使用されます。 |
オペレーター
以下はサポートされている演算子とその優先順位のリストです。 ** 演算子を含め、すべての二項演算子は 左結合 です。これは 2 ** 2 ** 3 は (2 ** 2) ** 3 と等しいことを意味します。必要な優先順位を明示的に指定するには、括弧を使用します (例: 2 ** (2 ** 3))。三項演算子 (if/else) は右結合です。
演算子 |
説明 |
|---|---|
|
グループ化 (最優先) 括弧は実際には演算子ではありませんが、演算の優先順位を明示的に指定できます。 |
|
添字指定 |
|
要素参照 |
|
関数呼び出し |
|
|
x is Nodex is not Node |
型チェック is_instance_of() 関数も参照してください。 |
|
累乗 pow() 関数を呼び出すのと同様に、 |
|
ビット単位のNOT |
+x-x |
正数/負数 |
x * yx / yx % y |
乗算/除算/剰余
注意: これらの演算子は C++ と同じ動作をしますが、Python、JavaScript などを使用しているユーザーにとっては予期しない動作である可能性があります。表の後の詳細な注意を参照してください。 |
x + yx - y |
加算 (もしくは配列の連結) / 減算 |
x << yx >> y |
ビットシフト |
|
ビットAND |
|
ビットXOR |
|
ビットOR |
x == yx != yx < yx > yx <= yx >= y |
比較 表の後の詳細注記を参照してください。 |
x in yx not in y |
包含チェック
|
not x!x |
ブール演算NOT とその 非推奨のエイリアス |
x and yx && y |
ブール演算ANDとその 非推奨のエイリアス |
x or yx || y |
ブール演算ORとその 非推奨のエイリアス |
|
三項演算子の if/else |
|
|
x = yx += yx -= yx *= yx /= yx **= yx %= yx &= yx |= yx ^= yx <<= yx >>= y |
代入 (優先度は最低) 式の中で代入演算子を使用することはできません。 |
注釈
一部の演算子の動作は、期待とは異なる場合があります。
/演算子の両オペランドが int の場合、整数の除算が実行されます。たとえば5 / 2 == 2となり、結果は2.5ではありません。これが望ましくない場合は、少なくとも1つのリテラルを float にする (例:x / 2.0)か、片方をキャストする (float(x) / y)か、片方を1.0で乗算する (例:x * 1.0 / y)を行うようにしてください。%演算子は int に対してのみ使用でき、float に対しては fmod() 関数を使用します。負の値の場合
%演算子とfmod()は、負の無限大に向かって丸める代わりに truncation を使用します。これは、余りに符号があることを意味します。数学的な意味で剰余が必要な場合は、代わりに posmod() 関数と fposmod() 関数を使用してください。==および!=演算子を使用すると、異なる型の値を比較できる場合があります (たとえば1 == 1.0は true)。ただし、それ以外の場合は実行時エラーが発生する可能性があります。オペランドの型がわからない場合は、 is_same() 関数を安全に使用できます (ただし型と参照に関しては、より厳密な判定が行われることに注意してください)。浮動小数点数を比較するには、代わりに is_equal_approx() 関数と is_zero_approx() 関数を使用します。
リテラル
例 |
説明 |
|
null値 |
|
ブール値 |
|
10進整数 |
|
16進整数 |
|
2進整数 |
|
浮動小数点数(実数) |
|
通常の文字列 |
|
三重引用符で囲まれた通常の文字列 |
|
raw文字列 |
|
三重引用符で囲まれたraw文字列 |
|
|
|
リテラルのように見えるが、実際にはそうではない2つの短縮構文もあります。
例 |
説明 |
|
|
|
|
Integers and floats can have their numbers separated with _ to make them more readable.
The following ways to write numbers are all valid:
12_345_678  # Equal to 12345678.
3.141_592_7  # Equal to 3.1415927.
0x8080_0000_ffff  # Equal to 0x80800000ffff.
0b11_00_11_00  # Equal to 0b11001100.
通常の文字列リテラル には、次のエスケープシーケンスを含めることができます:
エスケープシーケンス |
に展開します |
|
改行 (line feed) |
|
水平タブ文字 |
|
リターン |
|
アラート (ビープ/ベル) |
|
バックスペース |
|
フォームフィードの改ページ |
|
垂直タブ文字 |
|
二重引用符 |
|
一重引用符 |
|
バックスラッシュ |
|
UTF-16 Unicodeコードポイント |
|
UTF-32 Unicodeコードポイント |
0xFFFF より大きいエスケープされたUnicode文字を表す方法は 2 つあります。
UTF-16サロゲートペア として
\uXXXX\uXXXX。単一のUTF-32コードポイントとして
\UXXXXXX。
また文字列内で \ の後に改行を使用すると、文字列内に改行文字を挿入せずに次の行に続けることができます。
あるタイプの引用符で囲まれた文字列 (例: ") には、エスケープせずに別のタイプの引用符 (たとえば ') を含めることができます。また三重引用符で囲まれた文字列では、同じタイプでも連続する2つの引用符までのエスケープを回避できます (文字列の端に隣接している場合を除く)。
raw文字列リテラル は常にソース コードに表示されるとおりに文字列をエンコードします。これは正規表現で特に役立ちます。raw文字列リテラルはエスケープシーケンスを処理しませんが、 \\ と \" (\') は認識して、それら自体に置き換えます。したがって文字列には引用符を含めることができます。これは先頭のものと一致しますが、前にバックスラッシュがある場合に限ります。
print("\tchar=\"\\t\"")  # Prints `    char="\t"`.
print(r"\tchar=\"\\t\"") # Prints `\tchar=\"\\t\"`.
注釈
一部の文字列はraw文字列リテラルを使用して表すことができません。文字列の末尾に奇数のバックスラッシュを使用したり、文字列内にエスケープされていない開始引用符を使用したりすることはできません。ただし実際には、別の引用符の種類を使用したり、通常の文字列リテラルとの連結を使用したりできるため、これは問題にはなりません。
GDScriptは フォーマット文字列 もサポートしています。
アノテーション
Annotations are special tokens in GDScript that act as modifiers to an entire script, a declaration, a statement, or a location in the source code. Annotations may affect how the script is treated by the Godot editor and the GDScript compiler.
全てのアノテーションは @ 文字で始まり、名前によって指定されます。各アノテーションの詳細な説明と例は、GDScriptクラスリファレンス 内にあります。
For instance, you can use it to export a value to the editor:
@export_range(1, 100, 1, "or_greater")
var ranged_var: int = 50
プロパティのエクスポートの詳細については、GDScriptエクスポート の記事を参照してください。
Any constant expression compatible with the required argument type can be passed as an annotation argument value:
const MAX_SPEED = 120.0

@export_range(0.0, 0.5 * MAX_SPEED)
var initial_speed: float = 0.25 * MAX_SPEED
アノテーションは1行に1つ指定することも、同じ行にすべて指定することもできます。これらはアノテーションではない次のステートメントに影響します。アノテーションには括弧で囲み、カンマで区切って指定する引数を含めることができます。
Both of these are the same:
@annotation_a
@annotation_b
var variable

@annotation_a @annotation_b var variable
@onready アノテーション
ノードを使用する場合、シーンの一部への参照を変数に保持することが一般的です。シーンはアクティブなシーンツリーに入ったときにのみ設定されるので、サブノードは Node._ready() への呼び出しが行われた時にのみ取得できます。
var my_label


func _ready():
    my_label = get_node("MyLabel")
This can get a little cumbersome, especially when nodes and external
references pile up. For this, GDScript has the @onready annotation, that
defers initialization of a member variable until _ready() is called. It
can replace the above code with a single line:
@onready var my_label = get_node("MyLabel")
警告
Applying @onready and any @export annotation to the same variable
doesn't work as you might expect. The @onready annotation will cause
the default value to be set after the @export takes effect and will
override it:
@export var a = "init_value_a"
@onready @export var b = "init_value_b"

func _init():
    prints(a, b) # init_value_a <null>

func _notification(what):
    if what == NOTIFICATION_SCENE_INSTANTIATED:
        prints(a, b) # exported_value_a exported_value_b

func _ready():
    prints(a, b) # exported_value_a init_value_b
したがってデフォルトではエラーとして扱われる ONREADY_WITH_EXPORT 警告が生成されます。これを無効にしたり無視したりすることはお勧めしません。
コード領域
コード領域はスクリプトエディタが 折りたたみ可能な領域 として認識する特別なタイプのコメントです。これはコード領域のコメントを記述した後、コメントの左側に表示される矢印をクリックすることで、領域を折りたたんだり展開したりできることを意味します。この矢印は標準のコード折りたたみと区別できるように、紫色の四角形の中に表示されます。
コード領域の構文は次のとおりです。
# Important: There must be *no* space between the `#` and `region` or `endregion`.

# Region without a description:
#region
...
#endregion

# Region with a description:
#region Some description that is displayed even when collapsed
...
#endregion
Tip
コード領域をすばやく作成するには、スクリプトエディタで複数の行を選択し、選択部分を右クリックして コード領域の作成 を選択します。領域の説明は自動的に選択されます。
コード領域を他のコード領域内にネストすることができます。
コード領域の具体的な使用例を次に示します:
# This comment is outside the code region. It will be visible when collapsed.
#region Terrain generation
# This comment is inside the code region. It won't be visible when collapsed.
func generate_lakes():
    pass

func generate_hills():
    pass
#endregion

#region Terrain population
func place_vegetation():
    pass

func place_roads():
    pass
#endregion
これはコードの大きな塊を理解しやすいセクションに整理するのに役立ちます。ただし外部エディタはこの機能をサポートしていないことがあることに注意してください。そのため折りたたみコード領域に依存しない場合でも、コードが理解しやすいものになるよう気を付けてください。
注釈
個々の関数とインデントされたセクション (if や for など) は、スクリプトエディタで*常に*折りたたむことができます。つまりコード領域に単一の関数やインデントされたセクションを含めるのは、あまりメリットがないため使用しないでください。コード領域は複数の要素をグループ化するために使用される場合に最も効果的に機能します。
行の継続
GDScriptのコード行はバックスラッシュ (\) を使用して次の行に続けることができます。行の最後に1つ追加すると、次の行のコードはバックスラッシュがある場所であるかのように動作します。以下に例を示します。
var a = 1 + \
2
次のように行を複数回続けることができます。
var a = 1 + \
4 + \
10 + \
4
組み込み型
組み込み型はスタック割り当てられます。これらは値として渡されます。つまり割り当てごとに、または関数に引数として渡すときにコピーが作成されます。例外は Object と Array と Dictionary およびパック配列 (PackedByteArray など) で、これらは参照によって渡され共有されます。すべての配列、 Dictionary 、および一部のオブジェクト (Node 、 Resource) には、コピーを作成できる duplicate() メソッドがあります。
組み込み型ベース
GDScriptの変数は、いくつかの組み込み型に割り当てることができます。
null
null は、情報を含まない空のデータ型であり、他の値を割り当てることはできません。
Only types that inherit from Object can have a null value
(Object is therefore called a "nullable" type).
Variant types must have a valid value at all times,
and therefore cannot have a null value.
bool
Booleanデータ型には、 true または false のみを含めることができます。
int
"integer" の略で、整数(正と負)を格納します。64ビット値で格納し、C++の int64_t と同等です。
float
浮動小数点値を使用して、小数を含む実数を格納します。 64ビット値で格納し、C++の double と同等です。注: 現在 Vector2 、 Vector3 、 PackedFloat32Array などのデータ構造には32ビット単精度の float 値が格納されています。
String
Unicode 形式 の文字のシーケンス。
StringName
名前のインスタンスを1つだけ許可する不変の文字列。これは作成に時間がかかり、マルチスレッド時にロックで待機する可能性があります。その代わりに比較が非常に高速であるため、辞書キーとして適しています。
NodePath
ノードまたはノードプロパティへ事前に解析されたパス。 文字列への割り当て、または文字列からの割り当てを簡単に行うことができます。これらはツリーと対話してノードを取得したり、 Tweens などに指定するプロパティで使用するのに便利です。
組み込み型ベクトル
Vector2
x と y を含む2Dベクトルタイプ。配列としてアクセスすることもできます。
Vector2i
Vector2と同じですが、コンポーネントは整数です。 2Dグリッドで項目を表現する場合に便利です。
Rect2
position と size の2つのベクトルフィールドを含む2D矩形タイプ。または、 position+size である end フィールドを含みます。
Vector3
x、 y 、 z フィールドを含む3Dベクトルタイプ。配列としてアクセスすることもできます。
Vector3i
Vector3と同じですが、コンポーネントは整数です。 3D グリッド内の項目のインデックス付けに使用できます。
Transform2D
2次元の幾何学変換に使用される3x2行列です。
Plane
normal ベクトルフィールドと d スカラー距離を含む正規化形式の3D平面型です。
Quaternion
四元数は3D回転を表すために使用されるデータ型です。 回転を補間するのに便利です。
AABB
座標軸に平行な直方体(または3Dボックス)には、 position と size の2つのベクトルフィールドがあります。または、 position+size である end フィールドを含みます。
Basis
3Dの回転と拡大縮小に使用される3x3の行列。これには3つのベクトルフィールド(x、y、z)が含まれ、3Dベクトルの配列としてアクセスすることもできます。
Transform3D
3DTransformには、基底(基準軸)フィールド basis とVector3フィールド origin が含まれています。
エンジン組み込み型
Color
カラーデータ型は、 r 、 g 、 b,および a フィールドを含みます。色相/彩度/明度の h 、 s 、 v としてアクセスすることもできます。
RID
リソースID(RID)。サーバーは汎用RIDを使用して不透明なデータを参照します。
Object
組み込み型でないものすべての基本クラス。
組み込み型コンテナ
配列
他の配列や辞書(下記参照)を含む、任意のオブジェクトタイプの一般的なシーケンス、他の配列や辞書を含みます。(下を見てください)。配列のサイズは動的に変更できます。配列にはインデックス 0 から始まるインデックスが付けられます。マイナスのインデックスは最後から数えます。
var arr = []
arr = [1, 2, 3]
var b = arr[1] # This is 2.
var c = arr[arr.size() - 1] # This is 3.
var d = arr[-1] # Same as the previous line, but shorter.
arr[0] = "Hi!" # Replacing value 1 with "Hi!".
arr.append(4) # Array is now ["Hi!", 2, 3, 4].
型付き配列 (Typed arrays)
Godot also features support for typed arrays. On write operations, Godot checks that
element values match the specified type, so the array cannot contain invalid values.
The GDScript static analyzer takes typed arrays into account, however array methods like
front() and back() still have the Variant return type.
型付き配列には Array[Type] という構文があり、 Type は任意の Variant 型、ネイティブクラス、ユーザクラス、あるいは列挙型になります。入れ子になった配列型 (Array[Array[int]] など) はサポートされていません。
var a: Array[int]
var b: Array[Node]
var c: Array[MyClass]
var d: Array[MyEnum]
var e: Array[Variant]
Array と Array[Variant] は同じです。
注釈
配列は参照によって渡されるため、配列要素の型は実行時に参照されるメモリ内構造の属性でもあります。変数の静的型は参照できる値やクラスを制限します。したがって指定された型がその型のサブクラスであっても、異なる要素型の配列を代入することは**できません**。
If you want to convert a typed array, you can create a new array and use the Array.assign() method:
var a: Array[Node2D] = [Node2D.new()]

# (OK) You can add the value to the array because `Node2D` extends `Node`.
var b: Array[Node] = [a[0]]

# (Error) You cannot assign an `Array[Node2D]` to an `Array[Node]` variable.
b = a

# (OK) But you can use the `assign()` method instead. Unlike the `=` operator,
# the `assign()` method copies the contents of the array, not the reference.
b.assign(a)
ユーザーの利便性と古いコードとの互換性のために、 Array (Array[Variant]) 型については唯一の例外が設けられています。ただし型なし配列に対する操作は安全ではないと考えられます。
パック配列 (Packed arrays)
PackedArrays are generally faster to iterate on and modify compared to a typed Array of the same type (e.g. PackedInt64Array versus Array[int]) and consume less memory. In the worst case, they are expected to be as fast as an untyped Array. Conversely, non-Packed Arrays (typed or not) have extra convenience methods such as Array.map that PackedArrays lack. Consult the class reference for details on the methods available. Typed Arrays are generally faster to iterate on and modify than untyped Arrays.
While all Arrays can cause memory fragmentation when they become large enough,
if memory usage and performance (iteration and modification speed) is a concern
and the type of data you're storing is compatible with one of the Packed
Array types, then using those may yield improvements. However, if you do not
have such concerns (e.g. the size of your array does not reach the tens of
thousands of elements) it is likely more helpful to use regular or typed
Arrays, as they provide convenience methods that can make your code easier to
write and maintain (and potentially faster if your data requires such
operations a lot). If the data you will store is of a known type (including
your own defined classes), prefer to use a typed Array as it may yield better
performance in iteration and modification compared to an untyped Array.
PackedByteArray: バイト型の配列(0~255の整数)。
PackedInt32Array: 32ビット整数型の配列。
PackedInt64Array: 64ビット整数型の配列。
PackedFloat32Array: 32ビット浮動小数点型の配列。
PackedFloat64Array: 64ビット浮動小数点型の配列。
PackedStringArray: 文字列型の配列。
PackedVector2Array: Vector2 の配列。
PackedVector3Array: Vector3 の配列。
PackedVector4Array: An array of Vector4 values.
PackedColorArray: Color の配列。
Dictionary
一意のキーによって参照される値を含む連想コンテナです。
var d = {4: 5, "A key": "A value", 28: [1, 2, 3]}
d["Hi!"] = 0
d = {
    22: "value",
    "some_key": 2,
    "other_key": [2, 3, 4],
    "more_key": "Hello"
}
Luaスタイルのテーブル構文もサポートされています。 Luaスタイルでは、 : の代わりに = を使用し、文字列のキーをマークするために引用符を使用しません(記述するのがやや少なくなります)。ただし、この形式で記述されたキーは (GDScript 識別子と同様に) 数字で始めることはできず、文字列リテラルである必要があります。
var d = {
    test22 = "value",
    some_key = 2,
    other_key = [2, 3, 4],
    more_key = "Hello"
}
To add a key to an existing dictionary, access it like an existing key and assign to it:
var d = {} # Create an empty Dictionary.
d.waiting = 14 # Add String "waiting" as a key and assign the value 14 to it.
d[4] = "hello" # Add integer 4 as a key and assign the String "hello" as its value.
d["Godot"] = 3.01 # Add String "Godot" as a key and assign the value 3.01 to it.

var test = 4
# Prints "hello" by indexing the dictionary with a dynamic key.
# This is not the same as `d.test`. The bracket syntax equivalent to
# `d.test` is `d["test"]`.
print(d[test])
注釈
ブラケット構文は、辞書だけでなく、任意の Object のプロパティにアクセスするために使用することができます。存在しないプロパティを添え字にすると、スクリプトエラーが発生するので注意してください。これを避けるには、代わりに Object.get() や Object.set() メソッドを使用します。
Typed dictionaries
Godot 4.4 added support for typed dictionaries. On write operations, Godot checks that
element keys and values match the specified type, so the dictionary cannot contain invalid
keys or values. The GDScript static analyzer takes typed dictionaries into account. However,
dictionary methods that return values still have the Variant return type.
Typed dictionaries have the syntax Dictionary[KeyType, ValueType], where KeyType and ValueType
can be any Variant type, native or user class, or enum. Both the key and value type must be specified,
but you can use Variant to make either of them untyped.
Nested typed collections (like Dictionary[String, Dictionary[String, int]])
are not supported.
var a: Dictionary[String, int]
var b: Dictionary[String, Node]
var c: Dictionary[Vector2i, MyClass]
var d: Dictionary[MyEnum, float]
# String keys, values can be any type.
var e: Dictionary[String, Variant]
# Keys can be any type, boolean values.
var f: Dictionary[Variant, bool]
Dictionary and Dictionary[Variant, Variant] are the same thing.
Signal
Signalはオブジェクトがリスナーへ発することができるメッセージです。 Signal型は発信元を渡すために使用できます。
シグナルは実際のオブジェクトから取得することでより効果的に使用できます。例: $Button.button_up 。
Callable
Callableはオブジェクトと関数が含まれており、関数を値として渡す場合に便利です (シグナルに接続する場合など)。
メソッドをメンバーとして取得すると、Callableが返されます。 var x = $Sprite2D.rotate は x の値をオブジェクトとして $Sprite2D 、メソッドとして rotate を使用してCallableに設定します。
call メソッドを使用して呼び出すことができます。 例: x.call(PI) 。
変数
変数はクラスメンバーとして存在することも、関数に対してローカルに存在することもできます。これらは var キーワードを使用して作成され、必要に応じて初期化時に値が割り当てられます。
var a # Data type is 'null' by default.
var b = 5
var c = 3.8
var d = b + c # Variables are always initialized in direct order (see below).
変数にはオプションで型指定を指定できます。型を指定すると、変数は常に同じ型を持つように強制され、互換性のない値を割り当てようとするとエラーが発生します。
型は、変数名の後に : (コロン)記号を使用して変数宣言内で指定され、その後に型が続きます。
var my_vector2: Vector2
var my_node: Node = Sprite2D.new()
If the variable is initialized within the declaration, the type can be inferred, so it's possible to omit the type name:
var my_vector2 := Vector2() # 'my_vector2' is of type 'Vector2'.
var my_node := Sprite2D.new() # 'my_node' is of type 'Sprite2D'.
型推論が可能なのは、割り当てられた値に型が定義されている場合だけです。定義されていない場合は、エラーが発生します。
有効なタイプは以下のとおりです:
組み込み型(Array、Vector2、int、Stringなど)。
Engine classes (Node, Resource, RefCounted, etc.).
スクリプトリソースを含む場合は定数名(
const MyScript = preload("res://my_script.gd")を宣言した場合はMyScript)。同じスクリプト内の他のクラス、スコープを尊重します(
InnerClass.NestedClassもしclass InnerClass内でclass NestedClassを宣言した場合は は同じスコープです)。class_nameキーワードで宣言されたスクリプトクラス。シングルトンとして登録されたオートロードオブジェクト。
注釈
Variant は有効な型指定ですが、実際の型ではありません。これは設定された型がないことを意味するだけであり、静的型がまったくないことと同じです。したがって Variant については間違いである可能性が高いため、デフォルトでは推論は許可されません。
プロジェクト設定で変更することで、このチェックをオフにしたり警告のみにすることができます。詳細については、GDScript警告システム を参照してください。
初期化の順序
メンバー変数は次の順序で初期化されます:
変数の静的型に応じて、変数は
null(型指定されていない変数およびオブジェクト) であるか、その型のデフォルト値 (intの場合は0、 bool の場合はfalse) であるもの。The specified values are assigned in the order of the variables in the script, from top to bottom.
(Only for
Node-derived classes) If the@onreadyannotation is applied to a variable, its initialization is deferred to step 5.
_init()メソッドが定義されている場合は呼び出されます。シーンとリソースをインスタンス化するとき、エクスポートされた値が代入されます。
(Only for
Node-derived classes)@onreadyvariables are initialized.(Only for
Node-derived classes) If defined, the_ready()method is called.
警告
You can specify a complex expression as a variable initializer, including function calls. Make sure the variables are initialized in the correct order, otherwise your values may be overwritten. For example:
var a: int = proxy("a", 1)
var b: int = proxy("b", 2)
var _data: Dictionary = {}

func proxy(key: String, value: int):
    _data[key] = value
    print(_data)
    return value

func _init() -> void:
    print(_data)
Will print:
{ "a": 1 }
{ "a": 1, "b": 2 }
{  }
これを修正するには _data 変数定義を a 定義の上に移動するか、空の辞書割り当て (= {}) を削除します。
静的変数
A class member variable can be declared static:
static var a
静的変数はインスタンスではなくクラスに属します。これは通常のメンバー変数とは異なり、静的変数は複数のインスタンス間で値を共有することを意味します。
クラス内からは静的関数および非静的関数の両方から静的変数にアクセスできます。クラスの外からはクラスまたはインスタンスを使用して静的変数にアクセスできます (後者は可読性が低いためお勧めしません)。
注釈
@export および @onready アノテーションは静的変数には適用できません。ローカル変数をstaticにすることはできません。
次の例では max_id という名前の静的変数を使用して Person クラスを定義します。 _init() 関数で max_id をインクリメントします。これによりゲーム内の person インスタンスの数を簡単に追跡できるようになります。
# person.gd
class_name Person

static var max_id = 0

var id
var name

func _init(p_name):
    max_id += 1
    id = max_id
    name = p_name
このコードでは Person クラスから2つのインスタンスを作成します。クラスとすべてのインスタンスから静的変数にアクセスできるため、同じ max_id 値を持つことを確認します。
# test.gd
extends Node

func _ready():
    var person1 = Person.new("John Doe")
    var person2 = Person.new("Jane Doe")

    print(person1.id) # 1
    print(person2.id) # 2

    print(Person.max_id)  # 2
    print(person1.max_id) # 2
    print(person2.max_id) # 2
Static variables can have type hints, setters and getters:
static var balance: int = 0

static var debt: int:
    get:
        return -balance
    set(value):
        balance = -value
A base class static variable can also be accessed via a child class:
class A:
    static var x = 1

class B extends A:
    pass

func _ready():
    prints(A.x, B.x) # 1 1
    A.x = 2
    prints(A.x, B.x) # 2 2
    B.x = 3
    prints(A.x, B.x) # 3 3
注釈
When referencing a static variable from a tool script, the other script containing the static variable must also be a tool script. See Running code in the editor for details.
@static_unload アノテーション
Since GDScript classes are resources, having static variables in a script prevents it from being unloaded even if there are no more instances of that class and no other references left. This can be important if static variables store large amounts of data or hold references to other project resources, such as scenes. You should clean up this data manually, or use the @static_unload annotation if static variables don't store important data and can be reset.
警告
Currently, due to a bug, scripts are never freed, even if @static_unload annotation is used.
Note that @static_unload applies to the entire script (including inner classes)
and must be placed at the top of the script, before class_name and extends:
@static_unload
class_name MyNode
extends Node
See also Static functions and Static constructor.
キャスト
型付き変数に割り当てられた値は、互換性のある型を持つ必要があります。特定の型、特にオブジェクト型に対して値を強制する必要がある場合は、キャスト演算子を as として使用できます。
値が同じ型またはキャスト型のサブタイプの場合、オブジェクト型間でキャストすると同じオブジェクトになります。
var my_node2D: Node2D
my_node2D = $Sprite2D as Node2D # Works since Sprite2D is a subtype of Node2D.
値がサブタイプではない場合、キャスト操作は null 値になります。
var my_node2D: Node2D
my_node2D = $Button as Node2D # Results in 'null' since a Button is not a subtype of Node2D.
組み込み型の場合、可能であれば強制的に変換されますが、それ以外の場合はエラーが発生します。
var my_int: int
my_int = "123" as int # The string can be converted to int.
my_int = Vector2() as int # A Vector2 can't be converted to int, this will cause an error.
Casting is also useful to have better type-safe variables when interacting with the scene tree:
# Will infer the variable to be of type Sprite2D.
var my_sprite := $Character as Sprite2D

# Will fail if $AnimPlayer is not an AnimationPlayer, even if it has the method 'play()'.
($AnimPlayer as AnimationPlayer).play("walk")
定数
定数はゲームの実行中に変更することができない値のことです。これらの値はコンパイル時に確定している必要があります。 const キーワードを使うことで定数に名前を付けることができます。定数を宣言したよりも後に値を代入しようとすると、エラーが発生します。
値を変更するつもりがないのなら、定数を用いることを推奨します。
const A = 5
const B = Vector2(20, 20)
const C = 10 + 20 # Constant expression.
const D = Vector2(20, 30).x # Constant expression: 20.
const E = [1, 2, 3, 4][0] # Constant expression: 1.
const F = sin(20) # 'sin()' can be used in constant expressions.
const G = x + 20 # Invalid; this is not a constant expression!
const H = A + 20 # Constant expression: 25 (`A` is a constant).
Although the type of constants is inferred from the assigned value, it's also possible to add explicit type specification:
const A: int = 5
const B: Vector2 = Vector2()
互換性のないタイプの値を割り当てると、エラーが発生します。
関数内で定数を作成することもできます。これはローカルのマジックナンバーに名前を付けるのに役立ちます。
列挙型
列挙型は基本的に定数の省略形であり、連続した整数をある定数に割り当てたい場合には非常に便利です。
enum {TILE_BRICK, TILE_FLOOR, TILE_SPIKE, TILE_TELEPORT}

# Is the same as:
const TILE_BRICK = 0
const TILE_FLOOR = 1
const TILE_SPIKE = 2
const TILE_TELEPORT = 3
If you pass a name to the enum, it will put all the keys inside a constant Dictionary of that name. This means all constant methods of a dictionary can also be used with a named enum. This only works for GDScript enums, not for enums from built-in classes.
重要
名前の付いた列挙型のキーはグローバル定数としては登録されません。これらには列挙型の名前 (Name.KEY) を接頭辞として付けてアクセスする必要があります。
enum State {STATE_IDLE, STATE_JUMP = 5, STATE_SHOOT}

# Is the same as:
const State = {STATE_IDLE = 0, STATE_JUMP = 5, STATE_SHOOT = 6}
# Access values with State.STATE_IDLE, etc.

func _ready():
    # Access values with Name.KEY, prints '5'
    print(State.STATE_JUMP)
    # Use dictionary methods:
    # prints '["STATE_IDLE", "STATE_JUMP", "STATE_SHOOT"]'
    print(State.keys())
    # prints '{ "STATE_IDLE": 0, "STATE_JUMP": 5, "STATE_SHOOT": 6 }'
    print(State)
    # prints '[0, 5, 6]'
    print(State.values())
If not assigning a value to a key of an enum it will be assigned the previous value plus one,
or 0 if it is the first entry in the enum. Multiple keys with the same value are allowed.
関数
Functions always belong to a class. The scope priority for
variable look-up is: local → class member → global. The self variable is
always available and is provided as an option for accessing class members
(see self), but is not always required (and should not be sent as the
function's first argument, unlike Python).
func my_function(a, b):
    print(a)
    print(b)
    return a + b  # Return is optional; without it 'null' is returned.
関数は任意の時点で return することができます。デフォルトの戻り値は``null`` です。
By default, all function parameters are required. You can make one or more parameters at the end optional by assigning a default value to them:
# Since the last two parameters are optional, all these calls are valid:
# - my_function(1)
# - my_function(1, 20)
# - my_function(1, 20, 100)
func my_function(a_required, b_optional = 10, c_optional = 42):
    print(a_required)
    print(b_optional)
    print(c_optional)
If a function contains only one line of code, it can be written on one line:
func square(a): return a * a

func hello_world(): print("Hello World")

func empty_function(): pass
Functions can also have type specification for the arguments and for the return value. Types for arguments can be added in a similar way to variables:
func my_function(a: int, b: String):
    pass
If a function argument has a default value, it's possible to infer the type:
func my_function(int_arg := 42, String_arg := "string"):
    pass
The return type of the function can be specified after the arguments list using
the arrow token (->):
func my_int_function() -> int:
    return 0
戻り型を持つ関数は、適切な値を返す必要があります。型を void に設定すると、関数は何も返しません。Void関数は return キーワードを使用して早期に戻ることができますが、値を返すことはできません。
func void_function() -> void:
    return # Can't return a value.
注釈
void関数でない場合は常に値を返す必要があるため、コードに分岐文( if/else 構造など)がある場合は、考えられるすべてのパスに戻り値が必要です。たとえば、 if ブロックの内側に戻り値があってもその後に戻り値がない場合、エディタはエラーを発生させます。 if 内のブロックが実行されない場合、関数には有効な戻り値がないからです。
関数の参照
関数は Callable に関しては第一級オブジェクトです。関数を呼び出さずに名前で参照すると、適切なCallableオブジェクトが自動的に生成されます。これを使用して関数を引数として渡すことができます。
func map(arr: Array, function: Callable) -> Array:
    var result = []
    for item in arr:
        result.push_back(function.call(item))
    return result

func add1(value: int) -> int:
    return value + 1;

func _ready() -> void:
    var my_array = [1, 2, 3]
    var plus_one = map(my_array, add1)
    print(plus_one) # Prints `[2, 3, 4]`.
注釈
Callableは call() メソッドを使用して呼び出す**必要**があります。 () 演算子を直接使用することはできません。この動作は直接の関数呼び出しでのパフォーマンスの問題を回避するために実装されています。
ラムダ関数
ラムダ関数を使用するとクラスに属さない関数を宣言できます。その代わりに Callable オブジェクトが作成され、変数に直接割り当てられます。これはクラス スコープを汚さずに渡すCallableオブジェクトを作成する場合に便利です。
var lambda = func (x):
    print(x)
To call the created lambda you can use the call() method:
lambda.call(42) # Prints `42`.
Lambda functions can be named for debugging purposes (the name is displayed in the Debugger):
var lambda = func my_lambda(x):
    print(x)
You can specify type hints for lambda functions in the same way as for regular ones:
var lambda := func (x: int) -> void:
    print(x)
Note that if you want to return a value from a lambda function, an explicit return
is required (you can't omit return):
var lambda = func (x): return x ** 2
print(lambda.call(2)) # Prints `4`.
Lambda functions capture the local environment:
var x = 42
var lambda = func ():
    print(x) # Prints `42`.
lambda.call()
警告
Local variables are captured by value once, when the lambda is created. So they won't be updated in the lambda if reassigned in the outer function:
var x = 42
var lambda = func (): print(x)
lambda.call() # Prints `42`.
x = "Hello"
lambda.call() # Prints `42`.
Also, a lambda cannot reassign an outer local variable. After exiting the lambda, the variable will be unchanged, because the lambda capture implicitly shadows it:
var x = 42
var lambda = func ():
    print(x) # Prints `42`.
    x = "Hello" # Produces the `CONFUSABLE_CAPTURE_REASSIGNMENT` warning.
    print(x) # Prints `Hello`.
lambda.call()
print(x) # Prints `42`.
However, if you use pass-by-reference data types (arrays, dictionaries, and objects), then the content changes are shared until you reassign the variable:
var a = []
var lambda = func ():
    a.append(1)
    print(a) # Prints `[1]`.
    a = [2] # Produces the `CONFUSABLE_CAPTURE_REASSIGNMENT` warning.
    print(a) # Prints `[2]`.
lambda.call()
print(a) # Prints `[1]`.
静的関数
A function can be declared static. When a function is static, it has no access to the instance member variables or self.
A static function has access to static variables. Also static functions are useful to make libraries of helper functions:
static func sum2(a, b):
    return a + b
ラムダ関数は静的(static)に宣言できません。
Variadic functions
A variadic function is a function that can take a variable number of arguments. Since Godot 4.5, GDScript supports variadic functions. To declare a variadic function, you need to use the rest parameter, which collects all the excess arguments into an array.
func my_func(a, b = 0, ...args):
    prints(a, b, args)

func _ready():
    my_func(1)             # 1 0 []
    my_func(1, 2)          # 1 2 []
    my_func(1, 2, 3)       # 1 2 [3]
    my_func(1, 2, 3, 4)    # 1 2 [3, 4]
    my_func(1, 2, 3, 4, 5) # 1 2 [3, 4, 5]
A function can have at most one rest parameter, which must be the last one in the parameter list. The rest parameter cannot have a default value. Static and lambda functions can also be variadic.
Static typing works for variadic functions too. However, typed arrays are currently not supported as a static type of the rest parameter:
# You cannot specify `...values: Array[int]`.
func sum(...values: Array) -> int:
    var result := 0
    for value in values:
        assert(value is int)
        result += value
    return result
注釈
Although you can declare functions as variadic using the rest parameter, unpacking parameters
when calling a function using spread syntax that exists in some languages (JavaScript, PHP)
is currently not supported in GDScript. However, you can use callv() to call a function
with an array of arguments:
func test_func(...args):
    #log_data(...args) # This won't work.
    log_data.callv(args) # This will work.

func log_data(...values):
    # You should use `callv()` if you want to pass `values` as the argument list,
    # rather than passing the array as the first argument.
    prints.callv(values)
    # You can use array concatenation to prepend/append the argument list.
    write_data.callv(["user://log.txt"] + values)

func write_data(path, ...values):
    # ...
Abstract functions
ステートメントと制御フロー
文は標準的なもので、代入、関数呼び出し、制御フロー構造などです(下記参照)。 ; は文の区切り文字としては完全にオプションです。
式
式は演算子とそのオペランドを順序立てて並べたものです。式自体をステートメントにすることもできますが、他の式には副作用がないため、呼び出しのみをステートメントとして使用するのが合理的です。
式は有効なターゲットに代入することができる値を返します。一部の演算子のオペランドは別の式にすることができます。代入は式ではないため値を返しません。
Here are some examples of expressions:
2 + 2 # Binary operation.
-5 # Unary operation.
"okay" if x > 4 else "not okay" # Ternary operation.
x # Identifier representing variable or constant.
x.a # Attribute access.
x[4] # Subscript access.
x > 2 or x < 5 # Comparisons and logic operators.
x == y + 2 # Equality test.
do_something() # Function call.
[1, 2, 3] # Array definition.
{A = 1, B = 2} # Dictionary definition.
preload("res://icon.svg") # Preload builtin function.
self # Reference to current instance.
識別子、属性、添字は有効な代入ターゲットです。他の式を代入の左側に置くことはできません。
self
self can be used to refer to the current instance and is often equivalent to
directly referring to symbols available in the current script. However, self
also allows you to access properties, methods, and other names that are defined
dynamically (i.e. are expected to exist in subtypes of the current class, or are
provided using _set() and/or
_get()).
extends Node

func _ready():
    # Compile time error, as `my_var` is not defined in the current class or its ancestors.
    print(my_var)
    # Checked at runtime, thus may work for dynamic properties or descendant classes.
    print(self.my_var)

    # Compile time error, as `my_func()` is not defined in the current class or its ancestors.
    my_func()
    # Checked at runtime, thus may work for descendant classes.
    self.my_func()
警告
Beware that accessing members of child classes in the base class is often considered a bad practice, because this blurs the area of responsibility of any given piece of code, making the overall relationship between parts of your game harder to reason about. Besides that, one can simply forget that the parent class had some expectations about it's descendants.
if/else/elif
単純な条件は、 if/else/elif 構文を使用して作成します。条件をかっこで囲むことはできますが、必須ではありません。タブベースのインデントの性質から、インデントのレベルを維持するために elif を else/if の代わりに使用できます。
if (expression):
    statement(s)
elif (expression):
    statement(s)
else:
    statement(s)
Short statements can be written on the same line as the condition:
if 1 + 1 == 2: return 2 + 2
else:
    var x = 3 + 3
    return x
Sometimes, you might want to assign a different initial value based on a boolean expression. In this case, ternary-if expressions come in handy:
var x = (value) if (expression) else (value)
y += 3 if y < 10 else -1
Ternary-if expressions can be nested to handle more than 2 cases. When nesting ternary-if expressions, it is recommended to wrap the complete expression over multiple lines to preserve readability:
var count = 0

var fruit = (
        "apple" if count == 2
        else "pear" if count == 1
        else "banana" if count == 0
        else "orange"
)
print(fruit)  # banana

# Alternative syntax with backslashes instead of parentheses (for multi-line expressions).
# Less lines required, but harder to refactor.
var fruit_alt = \
        "apple" if count == 2 \
        else "pear" if count == 1 \
        else "banana" if count == 0 \
        else "orange"
print(fruit_alt)  # banana
You may also wish to check if a value is contained within something. You can
use an if statement combined with the in operator to accomplish this:
# Check if a letter is in a string.
var text = "abc"
if 'b' in text: print("The string contains b")

# Check if a variable is contained within a node.
if "varName" in get_parent(): print("varName is defined in parent!")
while
単純なループは while 構文を使用して作成されます。ループは break を使って中断することも、 continue を使って続けることもできます (continueは現在の反復で以降のコードを実行せずに、ループの次の反復にスキップします)。
while (expression):
    statement(s)
for
配列やテーブルなどの範囲を反復するには、 for ループが使用されます。配列を反復処理する時には、現在の配列要素がループ変数に格納されます。 辞書を反復処理するとき、 key はループ変数に格納されます。
for x in [5, 7, 11]:
    statement # Loop iterates 3 times with 'x' as 5, then 7 and finally 11.

var names = ["John", "Marta", "Samantha", "Jimmy"]
for name: String in names: # Typed loop variable.
    print(name) # Prints name's content.

var dict = {"a": 0, "b": 1, "c": 2}
for i in dict:
    print(dict[i]) # Prints 0, then 1, then 2.

for i in range(3):
    statement # Similar to [0, 1, 2] but does not allocate an array.

for i in range(1, 3):
    statement # Similar to [1, 2] but does not allocate an array.

for i in range(2, 8, 2):
    statement # Similar to [2, 4, 6] but does not allocate an array.

for i in range(8, 2, -2):
    statement # Similar to [8, 6, 4] but does not allocate an array.

for c in "Hello":
    print(c) # Iterate through all characters in a String, print every letter on new line.

for i in 3:
    statement # Similar to range(3).

for i in 2.2:
    statement # Similar to range(ceil(2.2)).
反復処理中に配列に値を代入したい場合は、 for i in array.size() を使用するのが最善です。
for i in array.size():
    array[i] = "Hello World"
ループ変数は for ループに対してローカルであり、それに代入しても配列の値は変更されません。参照によって渡されたオブジェクト (ノードなど) は、ループ変数のメソッドを呼び出すことで引き続き操作できます。
for string in string_array:
    string = "Hello World" # This has no effect

for node in node_array:
    node.add_to_group("Cool_Group") # This has an effect
match
match 文はプログラムの実行を分岐するために使用されます。他の多くの言語で見られる switch 文と同等ですが、いくつかの追加機能を提供します。
警告
match は == 演算子よりも厳密な型です。たとえば 1 は 1.0 と**一致しません**。唯一の例外は、 String と StringName の一致です。たとえば、Stringの "hello" は StringNameの &"hello" と等しいとみなされます。
基本の構文
match <test value>:
    <pattern(s)>:
        <block>
    <pattern(s)> when <pattern guard>:
        <block>
    <...>
switchステートメントに精通している人向けの短期集中コース
matchするswitchを置換します。caseを削除します。breakを削除します。defaultをアンダースコア1つに変更します。
制御フロー
パターンは上から下に一致します。パターンが一致すると、最初に対応するブロックが実行されます。その後、実行は match ステートメントの下で続行されます。
注釈
3.x でサポートされていた match の特別な continue 動作は Godot 4.0 で削除されました。
以下のパターンが使用できます。
- リテラルパターン
Matches a literal:
match x:
    1:
        print("We are number one!")
    2:
        print("Two are better than one!")
    "test":
        print("Oh snap! It's a string!")
- 式パターン
Matches a constant expression, an identifier, or an attribute access (
A.B):match typeof(x): TYPE_FLOAT: print("float") TYPE_STRING: print("text") TYPE_ARRAY: print("array")
- ワイルドカードパターン
このパターンはすべてにマッチします。 単一のアンダースコアとして書かれています。
It can be used as the equivalent of the
defaultin aswitchstatement in other languages:match x: 1: print("It's one!") 2: print("It's one times two!") _: print("It's not 1 or 2. I don't care to be honest.")
- バインディングパターン
A binding pattern introduces a new variable. Like the wildcard pattern, it matches everything - and also gives that value a name. It's especially useful in array and dictionary patterns:
match x:
    1:
        print("It's one!")
    2:
        print("It's one times two!")
    var new_var:
        print("It's not 1 or 2, it's ", new_var)
- 配列パターン
配列と一致します。 配列パターンの各要素はパターンそのものなので、それらをネストすることができます。
配列の長さが最初にテストされ、それはパターンと同じサイズでなければなりません、そうでなければパターンは一致しません。
オープンエンド配列: 最後のサブパターンを `` ..`` にすることで配列をパターンよりも大きくすることができます。
各サブパターンはカンマで区切る必要があります。
match x:
    []:
        print("Empty array")
    [1, 3, "test", null]:
        print("Very specific array")
    [var start, _, "test"]:
        print("First element is ", start, ", and the last is \"test\"")
    [42, ..]:
        print("Open ended array")
- 辞書パターン
配列パターンと同じように機能します。 すべてのキーは定数パターンでなければなりません。
辞書のサイズが最初にテストされ、それはパターンと同じサイズでなければなりません、そうでなければパターンは一致しません。
オープンエンド辞書: 最後のサブパターンを `` ..`` にすることで辞書をパターンよりも大きくすることができます。
各サブパターンはカンマで区切る必要があります。
値を指定しないと、キーの存在のみがチェックされます。
値パターンは、キーパターンとは
:で区別されます:。match x: {}: print("Empty dict") {"name": "Dennis"}: print("The name is Dennis") {"name": "Dennis", "age": var age}: print("Dennis is ", age, " years old.") {"name", "age"}: print("Has a name and an age, but it's not Dennis :(") {"key": "godotisawesome", ..}: print("I only checked for one entry and ignored the rest")
- 組み合わせパターン
複数のパターンをカンマで区切って指定することもできます。 これらのパターンには、バインディングを含めることはできません。
match x:
    1, 2, 3:
        print("It's 1 - 3")
    "Sword", "Splash potion", "Fist":
        print("Yep, you've taken damage")
パターンガード
A pattern guard is an optional condition that follows the pattern list
and allows you to make additional checks before choosing a match branch.
Unlike a pattern, a pattern guard can be an arbitrary expression.
Only one branch can be executed per match. Once a branch is chosen, the rest are not checked.
If you want to use the same pattern for multiple branches or to prevent choosing a branch with too general pattern,
you can specify a pattern guard after the list of patterns with the when keyword:
match point:
    [0, 0]:
        print("Origin")
    [_, 0]:
        print("Point on X-axis")
    [0, _]:
        print("Point on Y-axis")
    [var x, var y] when y == x:
        print("Point on line y = x")
    [var x, var y] when y == -x:
        print("Point on line y = -x")
    [var x, var y]:
        print("Point (%s, %s)" % [x, y])
If there is no matching pattern for the current branch, the pattern guard is not evaluated and the patterns of the next branch are checked.
If a matching pattern is found, the pattern guard is evaluated.
trueの場合は分岐の本体が実行され、
matchは終了します。falseの場合は次の分岐のパターンがチェックされます。
クラス
By default, all script files are unnamed classes. In this case, you can only
reference them using the file's path, using either a relative or an absolute
path. For example, if you name a script file character.gd:
# Inherit from 'character.gd'.

extends "res://path/to/character.gd"

# Load character.gd and create a new node instance from it.

var Character = load("res://path/to/character.gd")
var character_node = Character.new()
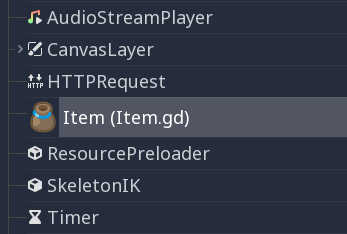
クラスに名前を付けて登録する
You can give your class a name to register it as a new type in Godot's
editor. For that, you use the class_name keyword. You can optionally use
the @icon annotation with a path to an image, to use it as an icon. Your
class will then appear with its new icon in the editor:
# item.gd

@icon("res://interface/icons/item.png")
class_name Item
extends Node
Tip
カスタムノード アイコンとして使用されるSVG画像は、エディタ > エディタ スケールで拡大縮小 および エディタ > エディタ テーマでアイコンを変換 インポートオプション が有効になっている必要があります。これによりアイコンがGodot自身のアイコンと同じカラー パレットでデザインされている場合、アイコンはエディタのスケールとテーマ設定に従うことができます。
クラスファイルの例を次に示します:
# Saved as a file named 'character.gd'.

class_name Character


var health = 5


func print_health():
    print(health)


func print_this_script_three_times():
    print(get_script())
    print(ResourceLoader.load("res://character.gd"))
    print(Character)
If you want to use extends too, you can keep both on the same line:
class_name MyNode extends Node
Named classes are globally registered, which means they become available to use
in other scripts without the need to load or preload them:
var player

func _ready():
    player = Character.new()
注釈
Godotはインスタンスを作成するたびに非静的変数を初期化します。これには配列や辞書も含まれます。これはスレッドセーフの精神に基づいており、ユーザーが知らないうちにスクリプトが別スレッドで初期化される可能性があるためです。
警告
The Godot editor will hide these custom classes with names that begin with the prefix "Editor" in the 'Create New Node' or 'Create New Scene' dialog windows. The classes are available for instantiation at runtime via their class names, but are automatically hidden by the editor windows along with the built-in editor nodes used by the Godot editor.
Abstract classes and methods
Since Godot 4.5, you can define abstract classes and methods using
the @abstract annotation.
An abstract class is a class that cannot be instantiated directly. Instead, it is meant to be inherited by other classes. Attempting to instantiate an abstract class will result in an error.
An abstract method is a method that has no implementation. Therefore, a newline or a semicolon is expected after the function header. This defines a contract that inheriting classes must conform to, because the method signature must be compatible when overriding.
Inheriting classes must either provide implementations for all abstract methods, or the inheriting class must be marked as abstract. If a class has at least one abstract method (either its own or an unimplemented inherited one), then it must also be marked as abstract. However, the reverse is not true: an abstract class is allowed to have no abstract methods.
Tip
If you want to declare a method as optional to be overridden, you should use a non-abstract method and provide a default implementation.
For example, you could have an abstract class called Shape that defines
an abstract method called draw(). You can then create subclasses like Circle
and Square that implement the draw() method in their own way.
This allows you to define a common interface for all shapes without
having to implement all the details in the abstract class itself:
@abstract class Shape:
    @abstract func draw()

# This is a concrete (non-abstract) subclass of Shape.
# You **must** implement all abstract methods in concrete classes.
class Circle extends Shape:
    func draw():
        print("Drawing a circle.")

class Square extends Shape:
    func draw():
        print("Drawing a square.")
Both inner classes and classes created using class_name can be abstract.
This example creates two abstract classes, one of which is a subclass of another
abstract class:
@abstract
class_name AbstractClass
extends Node

@abstract class AbstractInnerClass:
    func _ready():
        pass

# This is an example of a concrete subclass of `AbstractInnerClass`.
# This class can be instantiated using `AbstractClass.ConcreteInnerClass.new()`
# in other scripts, even though it's part of an abstract `class_name` script.
class ConcreteInnerClass extends AbstractInnerClass:
    func _ready():
        print("Concrete class ready.")
警告
Since an abstract class cannot be instantiated, it is not possible to attach an abstract class to a node. If you attempt to do so, the engine will print an error when running the scene:
Cannot set object script. Script '<path to script>' should not be abstract.
Unnamed classes can also be defined as abstract, the @abstract annotation
must precede extends:
@abstract
extends Node
継承
クラス(ファイルとして格納されている)は以下から継承することができます:
グローバルクラス。
他のクラスファイル。
別のクラスファイル内の内部クラス。
多重継承はできません。
Inheritance uses the extends keyword:
# Inherit/extend a globally available class.
extends SomeClass

# Inherit/extend a named class file.
extends "somefile.gd"

# Inherit/extend an inner class in another file.
extends "somefile.gd".SomeInnerClass
注釈
継承が明示的に定義されていない場合、クラスはデフォルトで RefCounted を継承します。
To check if a given instance inherits from a given class,
the is keyword can be used:
# Cache the enemy class.
const Enemy = preload("enemy.gd")

# [...]

# Use 'is' to check inheritance.
if entity is Enemy:
    entity.apply_damage()
To call a function in a super class (i.e. one extend-ed in your current
class), use the super keyword:
super(args)
This is especially useful because functions in extending classes replace
functions with the same name in their super classes. If you still want to
call them, you can use super:
func some_func(x):
    super(x) # Calls the same function on the super class.
If you need to call a different function from the super class, you can specify the function name with the attribute operator:
func overriding():
    return 0 # This overrides the method in the base class.

func dont_override():
    return super.overriding() # This calls the method as defined in the base class.
警告
よくある間違いに get_class() 、 queue_free() などの 非仮想 なエンジンメソッドをオーバーライドしようとすることがあります。これは技術的な理由によりサポートされていません。
Godot 3ではGDScriptでエンジンメソッドを シャドウ することができ、GDScriptでこのメソッドを呼び出すと機能します。ただし、何らかのイベントでエンジン内でメソッドが呼び出された場合、エンジンはコードを**実行しなくなります**。
Godot 4ではGDScriptがネイティブメソッド呼び出しを最適化するため、シャドウイングさえ常に機能するとは限りません。したがって、デフォルトでエラーとして扱われる NATIVE_METHOD_OVERRIDE 警告を追加しました。警告を無効にしたり無視したりしないことを強くお勧めします。
これは _ready() 、 _process() などの仮想メソッド (ドキュメントでは virtual 修飾子でマークされており、名前はアンダースコアで始まります) には適用されないことに注意してください。これらのメソッドはエンジンの動作をカスタマイズするためのもので、GDScriptでオーバーライドすることができます。シグナルと通知もこれらの目的に役立ちます。
クラスコンストラクター
The class constructor, called on class instantiation, is named _init. If you
want to call the base class constructor, you can also use the super syntax.
Note that every class has an implicit constructor that is always called
(defining the default values of class variables). super is used to call the
explicit constructor:
func _init(arg):
   super("some_default", arg) # Call the custom base constructor.
This is better explained through examples. Consider this scenario:
# state.gd (inherited class).
var entity = null
var message = null


func _init(e = null):
    entity = e


func enter(m):
    message = m


# idle.gd (inheriting class).
extends "state.gd"


func _init(e = null, m = null):
    super(e)
    # Do something with 'e'.
    message = m
留意すべきことがいくつかあります:
If the inherited class (
state.gd) defines an_initconstructor that takes arguments (ein this case), then the inheriting class (idle.gd) must define_initas well and pass appropriate parameters to_initfromstate.gd.idle.gdは、親クラスstate.gdと異なる数の引数を持つことができます。上の例では、
state.gdコンストラクターに渡されるeは、idle.gdに渡されるのと同じeです。If
idle.gd's_initconstructor takes 0 arguments, it still needs to pass some value to thestate.gdbase class, even if it does nothing. This brings us to the fact that you can pass expressions to the base constructor as well, not just variables, e.g.:
# idle.gd

func _init():
    super(5)
静的コンストラクター
A static constructor is a static function _static_init that is called automatically
when the class is loaded, after the static variables have been initialized:
static var my_static_var = 1

static func _static_init():
    my_static_var = 2
静的コンストラクターは引数を取ることができず、値を返すこともできません。
内部クラス
クラスファイルには内部クラスを含めることができます。内部クラスは、 class キーワードを使用して定義されます。 ClassName.new() 関数を使用してインスタンス化されます。
# Inside a class file.

# An inner class in this class file.
class SomeInnerClass:
    var a = 5


    func print_value_of_a():
        print(a)


# This is the constructor of the class file's main class.
func _init():
    var c = SomeInnerClass.new()
    c.print_value_of_a()
リソースとしてのクラス
Classes stored as files are treated as GDScripts. They
must be loaded from disk to access them in other classes. This is done using
either the load or preload functions (see below). Instancing of a loaded
class resource is done by calling the new function on the class object:
# Load the class resource when calling load().
var MyClass = load("myclass.gd")

# Preload the class only once at compile time.
const MyClass = preload("myclass.gd")


func _init():
    var a = MyClass.new()
    a.some_function()
エクスポート
注釈
エクスポートについてのドキュメントは GDScriptプロパティのエクスポート に移動しました。
プロパティ (セッターとゲッター)
クラスのメンバ変数にデータを保持するだけでなく、その値が変更されるたびに実際に何らかの検証や計算を実行したい場合があります。また何らかの方法でそのアクセスをカプセル化することが望ましい場合もあります。
そのためにGDScriptは、変数宣言の後に set および get キーワードを使用してプロパティを定義するための特別な構文を提供します。そして変数が取得または代入されたときに実行されるコードブロックを定義できます。
例:
var milliseconds: int = 0
var seconds: int:
    get:
        return milliseconds / 1000
    set(value):
        milliseconds = value * 1000
注釈
以前のGodotバージョンの setget とは異なり、 set メソッドと get メソッドは同じクラス内でアクセスされた場合でも 常に 呼び出されます (selfの有無にかかわらず)。これにより動作に一貫性が生まれます。値に直接アクセスする必要がある場合は、直接アクセス用に別の変数を使用し、プロパティ内のコードでその変数を使用するようにします。
代替の構文
Also there is another notation to use existing class functions if you want to split the code from the variable declaration or you need to reuse the code across multiple properties (but you can't distinguish which property the setter/getter is being called for):
var my_prop:
    get = get_my_prop, set = set_my_prop
This can also be done in the same line:
var my_prop: get = get_my_prop, set = set_my_prop
セッターとゲッターは同じ表記法を使用する必要があり、変数のスタイルを混合することは許可されません。
注釈
inline セッターおよびゲッターには型ヒントを指定できません。これは定型文を減らすために意図的に行われます。変数が型指定されている場合、セッターの引数は自動的に同じ型になり、ゲッターの戻り値はそれと一致する必要があります。分離された セッター/ゲッター関数には型ヒントを含めることができ、その型は変数の型と一致するか、より幅広い型である必要があります。
セッター/ゲッターが呼び出されない場合
変数が初期化されると、イニシャライザの値が変数に直接書き込まれます。 @onready アノテーションが変数に適用されているかどうかを含みます。
Using the variable's name to set it inside its own setter or to get it inside its own getter will directly access the underlying member, so it won't generate infinite recursion and saves you from explicitly declaring another variable:
signal changed(new_value)
var warns_when_changed = "some value":
    get:
        return warns_when_changed
    set(value):
        changed.emit(value)
        warns_when_changed = value
This also applies to the alternative syntax:
var my_prop: set = set_my_prop

func set_my_prop(value):
    my_prop = value # No infinite recursion.
警告
The exception does not propagate to other functions called in the setter/getter. For example, the following code will cause an infinite recursion:
var my_prop:
    set(value):
        set_my_prop(value)

func set_my_prop(value):
    my_prop = value # Infinite recursion, since `set_my_prop()` is not the setter.
ツールモード
By default, scripts don't run inside the editor and only the exported
properties can be changed. In some cases, it is desired that they do run
inside the editor (as long as they don't execute game code or manually
avoid doing so). For this, the @tool annotation exists and must be
placed at the top of the file:
@tool
extends Button

func _ready():
    print("Hello")
詳細については、エディタでコードを実行する を参照してください。
警告
ツールスクリプトでノードをqueue_free()あるいはfree()で開放するときは注意してください(特にノードがそのスクリプトのオーナーである場合)。ツールスクリプトはエディタ内で実行されるので、間違って使うとエディタがクラッシュするかもしれません。
メモリ管理
Godotは使用されなくなった特定のインスタンスを解放するためにガベージコレクタの代わりに参照カウンタが使われるか、または純粋に手動による管理が必要です。 RefCounted クラスのインスタンス (または Resource などを継承するクラス) は、使用されなくなったときに自動的に解放されます。 RefCounted ではないクラスのインスタンス (Node や基本の Object 型など) は free (ノードの場合は queue_free()) で削除されるまでメモリ内に残ります。
注釈
Node が free() または queue_free() によって削除される場合、その子もすべて再帰的に削除されます。
参照カウンタで解放できない循環参照を回避するため、弱い参照を作成するための WeakRef が提供されています。これにより、 RefCounted の解放を妨げることなくオブジェクトへのアクセスが可能になります。以下に例を示します。
extends Node

var my_file_ref

func _ready():
    var f = FileAccess.open("user://example_file.json", FileAccess.READ)
    my_file_ref = weakref(f)
    # the FileAccess class inherits RefCounted, so it will be freed when not in use

    # the WeakRef will not prevent f from being freed when other_node is finished
    other_node.use_file(f)

func _this_is_called_later():
    var my_file = my_file_ref.get_ref()
    if my_file:
        my_file.close()
あるいは、参照を使用しない場合は、 is_instance_valid(instance) を使用してオブジェクトが解放されたかどうかを確認できます。
シグナル
シグナルはオブジェクトから通知メッセージを送信する手段で、他のオブジェクトはそれを受信することが出来ます。 クラスのカスタムシグナルを作るには``signal`` キーワードを使用します。
extends Node


# A signal named health_depleted.
signal health_depleted
注釈
シグナルはコールバック機構です。これはオブザーバーとしても振る舞う、一般的なプログラミングパターンです。より多くの情報を得るにはGame Programming Patterns ebookの Observer tutorial をお読みください(英語)。
Button や RigidBody3D の様なノードの組み込みシグナルを接続するのと同じ方法で、これらのシグナルをメソッドに接続できます。
In the example below, we connect the health_depleted signal from a
Character node to a Game node. When the Character node emits the
signal, the game node's _on_character_health_depleted is called:
# game.gd

func _ready():
    var character_node = get_node('Character')
    character_node.health_depleted.connect(_on_character_health_depleted)


func _on_character_health_depleted():
    get_tree().reload_current_scene()
あなたが望むシグナルと一緒に多くの引数を発信することができます。
ここに有用な例を示します。アニメーションを伴った、体力の変化を受信するライフバーをスクリーン上に配置しようとしますが、シーンツリー上にあるプレイヤーからはそのユーザーインターフェースを分けたいとします。
In our character.gd script, we define a health_changed signal and emit
it with Signal.emit(), and from
a Game node higher up our scene tree, we connect it to the Lifebar using
the Signal.connect() method:
# character.gd

...
signal health_changed


func take_damage(amount):
    var old_health = health
    health -= amount

    # We emit the health_changed signal every time the
    # character takes damage.
    health_changed.emit(old_health, health)
...
# lifebar.gd

# Here, we define a function to use as a callback when the
# character's health_changed signal is emitted.

...
func _on_Character_health_changed(old_value, new_value):
    if old_value > new_value:
        progress_bar.modulate = Color.RED
    else:
        progress_bar.modulate = Color.GREEN

    # Imagine that `animate` is a user-defined function that animates the
    # bar filling up or emptying itself.
    progress_bar.animate(old_value, new_value)
...
Game ノード内で Character ノードと Lifebar ノードを取得し、そして character と受信者を接続し 、 character にシグナルを受信者へ送信させます、受信者はこのケースでは Lifebar ノードです。
# game.gd

func _ready():
    var character_node = get_node('Character')
    var lifebar_node = get_node('UserInterface/Lifebar')

    character_node.health_changed.connect(lifebar_node._on_Character_health_changed)
これは Character ノードとのカップリングをせずに Lifebar に体力の変化を受信することを可能にします。
You can write optional argument names in parentheses after the signal's definition:
# Defining a signal that forwards two arguments.
signal health_changed(old_value, new_value)
These arguments show up in the editor's Signals dock, and Godot can use them to generate callback functions for you. However, you can still emit any number of arguments when you emit signals; it's up to you to emit the correct values.

You can also create copies of GDScript Callable objects which accept additional arguments using Callable.bind(). This allows you to add extra information to the connection if the emitted signal itself doesn't give you access to all the data that you need.
When the signal is emitted, the callback method receives the bound values, in addition to those provided by the signal.
Building on the example above, let's say we want to display a log of the damage
taken by each character on the screen, like Player1 took 22 damage.. The
health_changed signal doesn't give us the name of the character that took
damage. So when we connect the signal to the in-game console, we can add the
character's name using the bind method:
# game.gd

func _ready():
    var character_node = get_node('Character')
    var battle_log_node = get_node('UserInterface/BattleLog')

    character_node.health_changed.connect(battle_log_node._on_Character_health_changed.bind(character_node.name))
Our BattleLog node receives each bound element as an extra argument:
# battle_log.gd

func _on_Character_health_changed(old_value, new_value, character_name):
    if not new_value <= old_value:
        return

    var damage = old_value - new_value
    label.text += character_name + " took " + str(damage) + " damage."
シグナルまたはコルーチンを待つ
await キーワードを使用すると、実行を続行する前にシグナルが発行されるまで待機する コルーチン を作成できます。シグナルまたはコルーチンでもある関数の呼び出しで await キーワードを使用すると、制御が直ちに呼び出し元に返されます。シグナルが発行されると (または呼び出されたコルーチンが終了すると)、停止した時点から実行が再開されます。
For example, to stop execution until the user presses a button, you can do something like this:
func wait_confirmation():
    print("Prompting user")
    await $Button.button_up # Waits for the button_up signal from Button node.
    print("User confirmed")
    return true
In this case, the wait_confirmation becomes a coroutine, which means that the caller also needs to await it:
func request_confirmation():
    print("Will ask the user")
    var confirmed = await wait_confirmation()
    if confirmed:
        print("User confirmed")
    else:
        print("User cancelled")
Note that requesting a coroutine's return value without await will trigger an error:
func wrong():
    var confirmed = wait_confirmation() # Will give an error.
However, if you don't depend on the result, you can just call it asynchronously, which won't stop execution and won't make the current function a coroutine:
func okay():
    wait_confirmation()
    print("This will be printed immediately, before the user press the button.")
If you use await with an expression that isn't a signal nor a coroutine, the value will be returned immediately and the function won't give the control back to the caller:
func no_wait():
    var x = await get_five()
    print("This doesn't make this function a coroutine.")

func get_five():
    return 5
This also means that returning a signal from a function that isn't a coroutine will make the caller await that signal:
func get_signal():
    return $Button.button_up

func wait_button():
    await get_signal()
    print("Button was pressed")
注釈
以前の Godot バージョンの yield とは異なり、関数のステートオブジェクトを取得することはできません。これは型の安全性を確保するために行われます。この型安全性が確保されていると、関数は実行時に実際に関数のステートオブジェクトを返す一方で、関数は int を返すとは言えなくなります。
You can store the arguments passed to the signal's parameters. If there is only one parameter, the awaited value will have the same type as the argument:
func toggled():
    var signal_args = await $Button.toggled
    assert(typeof(signal_args) == TYPE_BOOL)
If there is more than one parameter, the awaited value will be of type Array:
func request_completed():
    var signal_args = await $HTTPRequest.request_completed
    assert(typeof(signal_args) == TYPE_ARRAY)
Otherwise, the awaited value will be null:
func button_up():
    var signal_args = await $Button.button_up
    assert(signal_args == null)
Assertキーワード
assert キーワードはデバックビルド内で状態をチェックする為に使う事が出来ます。これらの assert は非デバッグビルドでは無視されます。これはリリースモードでのプロジェクトのエクスポートでは引数として渡された式が評価されない事を意味します。
# Check that 'i' is 0. If 'i' is not 0, an assertion error will occur.
assert(i == 0)
エディタ上でプロジェクトが実行されている時に、assertion エラーが発生した場合プロジェクトは停止します。
You can optionally pass a custom error message to be shown if the assertion fails:
assert(enemy_power < 256, "Enemy is too powerful!")
コメント
#から行末までは無視され、コメントと見なされます。# This is a comment.Tip
Godotスクリプト エディタではユーザーの注意を特定のコメントに向けるために、コメント内の特別なキーワードが強調表示されます。
致命的 (赤色で表示):
ALERT,ATTENTION,CAUTION,CRITICAL,DANGER,SECURITY警告 (黄色で表示):
BUG,DEPRECATED,FIXME,HACK,TASK,TBD,TODO,WARNING情報 (緑色で表示):
INFO,NOTE,NOTICE,TEST,TESTINGこれらのキーワードは大文字と小文字が区別されるため、認識されるには大文字で記述する必要があります。
ハイライトされたキーワードのリストとその色は、エディター設定の テキスト エディター > テーマ > コメントマーカー セクションで変更できます。
Use two hash symbols (
##) instead of one (#) to add a documentation comment, which will appear in the script documentation and in the inspector description of an exported variable. Documentation comments must be placed directly above a documentable item (such as a member variable), or at the top of a file. Dedicated formatting options are also available. See GDScriptドキュメントコメント for details.