Attention: Here be dragons
This is the latest
(unstable) version of this documentation, which may document features
not available in or compatible with released stable versions of Godot.
Checking the stable version of the documentation...
初めてのスクリプト作成
In this lesson, you will code your first script to make the Godot icon turn in circles. As we mentioned in the introduction, we assume you have programming foundations.
このチュートリアルはGDScript用に書かれており、便宜上、各コードブロックの別のタブには同等のC#コードが含まれています。

参考
To learn more about GDScript, its keywords, and its syntax, head to the GDScript section. To learn more about C#, head to the C#/.NET section.
プロジェクトの設定
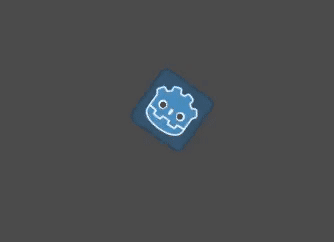
では白紙の状態から始めるために、 新規プロジェクトの作成 をおこなって下さい、。プロジェクトには1つの画像ファイルが含まれている必要があります。今回は我々のコミュニティでのプロトタイピングによく使用されるGodotアイコンを使います。
We need to create a Sprite2D node to display it in the game. In the Scene dock, click the button.
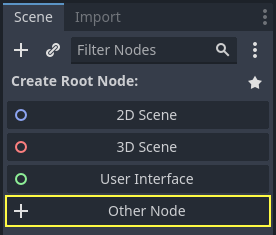
検索バーに「Sprite2D」と入力してノードをフィルタリングし、Sprite2Dをダブルクリックしてノードを作成します。
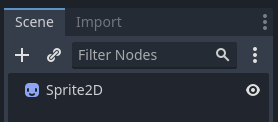
Your Scene tab should now only have a Sprite2D node.
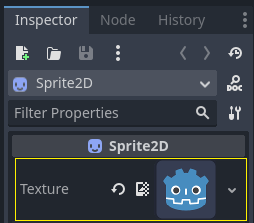
A Sprite2D node needs a texture to display. In the Inspector on the right, you
can see that the Texture property says <empty>. To display the
Godot icon, click and drag the file icon.svg from the FileSystem dock onto the
Texture slot.
注釈
また ビューポートに画像をドラッグアンドドロップすることで、Sprite2Dノードを自動的に作成することもできます。
次に、ビューポートの Godotアイコン をドラッグし、ゲームビューの中央に配置します。
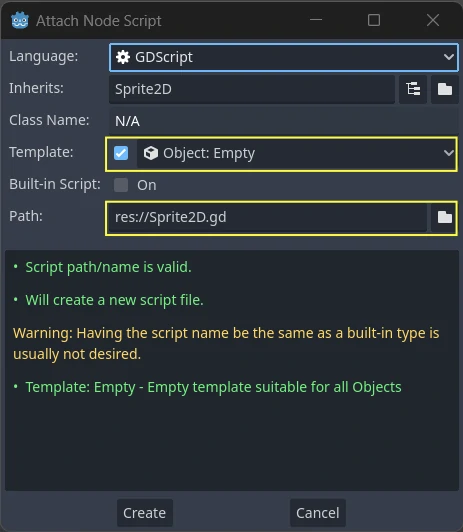
新規スクリプトの作成
To create and attach a new script to our node, right-click on Sprite2D in the Scene dock and select .
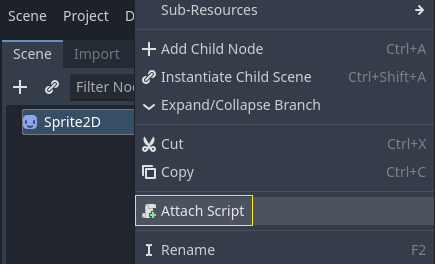
The Attach Node Script window appears. It allows you to select the script's language and file path, among other options.
Change the Template field from Node: Default to Object: Empty to
start with a clean file. Leave the other options set to their default values and
click the button to create the script.
注釈
C#スクリプトの名前は、そのクラス名に一致する必要があります。この場合では、ファイル名を MySprite2D.cs とします。
The Script workspace should appear with your new sprite_2d.gd file open and
the following line of code:
extends Sprite2D
using Godot;
using System;

public partial class MySprite2D : Sprite2D
{
}
すべてのGDScriptファイルは暗黙的なクラスです。 extends キーワードは、このスクリプトが継承または拡張クラスであることを定義します。この場合、 Sprite2D は、 Sprite2Dノード( Node2D 、 CanvasItem 、 Node などの拡張クラスを含む)のすべてのプロパティと関数にアクセスできます。
注釈
GDScriptでは、 extends キーワードの行を省略した場合は、 クラスは暗黙的に RefCounted を拡張します。これはGodotがアプリケーションのメモリを管理するのに用いられます。
Inherited properties include the ones you can see in the Inspector dock, like
our node's texture.
注釈
By default, the Inspector displays a node's properties in "Title Case", with capitalized words separated by a space. In GDScript code, these properties are in "snake_case", which is lowercase with each word separated by an underscore.
You can hover over any property's name in the Inspector to see a description and its identifier in code.
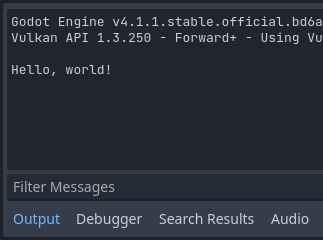
ハロー、ワールド!
現在、スクリプトは何もしません。 手始めに「Hello、world!」というテキストを下部[出力]パネルに表示させましょう。
スクリプトに次のコードを追加します。
func _init():
    print("Hello, world!")
public MySprite2D()
{
    GD.Print("Hello, world!");
}
こまかく見てみましょう。 func キーワードは、 _init という名前の新しい関数を定義します。これは、クラスのコンストラクターの特別な名前です。この関数を定義すると、エンジンがメモリ内にオブジェクトまたはノードを作成すると _init() が初期化のため呼ばれます。
注釈
GDScriptはインデントベースの言語です。コードが機能するには、 print() という行の先頭にあるタブが必要です。これを省略したり、行を正しくインデントしなかったりすると、エディターはそれを赤で強調表示し、"Unexpected indentation(予期しないインデント)" というエラーメッセージを表示します。
Save the scene as sprite_2d.tscn if you haven't already, then press F6 (Cmd + R on macOS)
to run it. Look at the Output bottom panel that expands.
It should display "Hello, world!".
次に _init() 関数を削除して、 extends Sprite2D という行だけを残します。
回転させるには
It's time to make our node move and rotate. To do so, we're going to add two
member variables to our script: the movement speed in pixels per second and the
angular speed in radians per second. Add the following after the extends Sprite2D line.
var speed = 400
var angular_speed = PI
private int _speed = 400;
private float _angularSpeed = Mathf.Pi;
メンバー変数は、スクリプトの先頭付近、"extends" 行の後、関数の前に置かれます。このスクリプトがアタッチされているすべてのノードインスタンスは、 speed (速度)プロパティと angular_speed (角速度)プロパティの独自のコピーを持つことになります。
注釈
Godotの角度はデフォルトではラジアン単位で計算されますが、度単位で角度を計算したい場合に使える組み込み関数やプロパティも用意されています。
アイコンを移動するには、ゲームループ内のフレームごとにアイコンの位置と回転を更新する必要があります。 Node クラスの _process() 仮想関数を使用できます。 Sprite2DなどのNodeクラスの拡張クラス内で定義すると、Godotはフレームごとに関数を呼び出し、最後のフレームからの経過時間である delta という名前の引数を渡します。
注釈
ゲームは、1秒あたりに数多くの画像をレンダリングすることで機能します。各画像はフレームと呼ばれ、ループしてレンダリングされます。ゲームが画像を生成する速度をフレーム/秒(FPS)で測定します。ほとんどのゲームは60FPSを目指していますが、低速のモバイルデバイスでは30 FPS、バーチャルリアリティゲームでは90〜240のような数値が見られる場合があります。
エンジンとゲームの開発者は、一定の時間でゲームの世界を更新しレンダリングするために最善を尽くしますが、フレームのレンダリング時間には常に小さな変動があります。これはエンジンがフレームレートに依存しないモーションを作成するため提供するデルタタイムです。
スクリプトの最後に、関数を定義します。
func _process(delta):
    rotation += angular_speed * delta
public override void _Process(double delta)
{
    Rotation += _angularSpeed * (float)delta;
}
func キーワードは新しい関数を定義します。その後、関数名と引数を括弧で囲んで記述する必要があります。コロンで定義を終了し、それに続くインデントされたブロックが関数のコンテンツまたは命令になります。
注釈
_init() や _process() のように関数の先頭がアンダースコアで始まることに注意してください。慣例により、Godotの仮想関数、つまり、エンジンとやりとりするため オーバーライドされる組み込み関数は、アンダースコアから始まります。
関数内の行 rotation += angular_speed * delta は、フレームごとにスプライトの回転角を増やします。ここで、 rotation は、 Sprite2D が拡張する Node2D クラスから継承されたプロパティです。これはノードの回転を制御し、ラジアン単位で指定します。
Tip
In the code editor, you can Ctrl + Click (Cmd + Click on
macOS) on any built-in property or function like position,
rotation, or _process to open the corresponding documentation
in a new tab.
シーンを実行して、Godot アイコンがその場で回転することを確認します。
注釈
C#では、 _Process() が受け取る delta 引数は double である点に注意して下さい。このため回転に適用する際には、その値を float に変換する必要があります。
前進させるには
ノードを動かしてみましょう。次の2行を _process()関数に追加し、前の行の rotation += angular_speed * delta と同様にインデントします。
var velocity = Vector2.UP.rotated(rotation) * speed

position += velocity * delta
var velocity = Vector2.Up.Rotated(Rotation) * _speed;

Position += velocity * (float)delta;
すでに見たように、 var キーワードは新しい変数を定義します。スクリプトの先頭に配置すると、クラスのプロパティとして定義されます。関数内で定義されたものはローカル変数となり、関数のスコープ内でのみ参照されます。
velocity という名前のローカル変数を定義します。これは方向と速度の両方を表す2Dベクトルです。ノードを前進させるには、Vector2クラスの定数 Vector2.UP (上向きのベクトル)を用いて、回転は Vector2の rotated() メソッドを呼び出します。この Vector2.UP.rotated(rotation) という式は、アイコンに対して前方を示すベクトルです。これに speed プロパティを掛けることで、ノードを前方に移動するための速度が得られます。
ノードのpositionに velocity * deltaを追加して移動しています。このposition自体は Vector2 というタイプで、2次元ベクトルを表すGodotの組み込み型です。
シーンを実行してGodotの頭がぐるぐる回るのを確認してください。
注釈
このようなノードの移動では、壁や床との衝突は考慮されません。 最初の2Dゲーム では、衝突を検出しながらオブジェクトを移動させる別のアプローチを学びます。
このノードは現在、ノード自身で移動します。次のパート プレイヤーの入力に対応する では、プレイヤーの入力を使ってノードをコントロールします。
完全なスクリプト
参考までに、sprite_2d.gdファイル全体は次のようになります。
extends Sprite2D

var speed = 400
var angular_speed = PI


func _process(delta):
    rotation += angular_speed * delta

    var velocity = Vector2.UP.rotated(rotation) * speed

    position += velocity * delta
using Godot;
using System;

public partial class MySprite2D : Sprite2D
{
    private int _speed = 400;
    private float _angularSpeed = Mathf.Pi;

    public override void _Process(double delta)
    {
        Rotation += _angularSpeed * (float)delta;
        var velocity = Vector2.Up.Rotated(Rotation) * _speed;

        Position += velocity * (float)delta;
    }
}