Attention: Here be dragons
This is the latest
(unstable) version of this documentation, which may document features
not available in or compatible with released stable versions of Godot.
Checking the stable version of the documentation...
2D移動の概要
はじめに
初心者はみんな、こう考えます: 「どうやってキャラクターを動かすの?」作成しているゲームのスタイルによっては、特別な要件がある場合がありますが、一般的に、ほとんどの2Dゲームの動きは少数のデザインに基づいています。
We'll use CharacterBody2D for these examples, but the principles will apply to other node types (Area2D, RigidBody2D) as well.
セットアップ
Each example below uses the same scene setup. Start with a CharacterBody2D with two
children: Sprite2D and CollisionShape2D. You can use the Godot icon (icon.svg)
for the Sprite2D's texture or use any other 2D image you have.
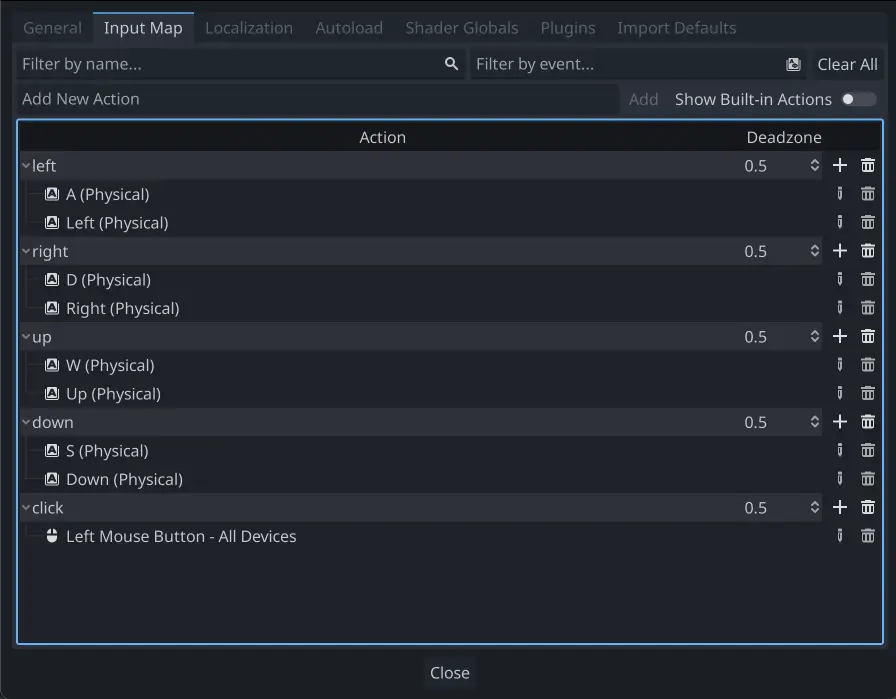
プロジェクト → プロジェクト設定 を開き、[入力マップ]タブを選択します。次の入力アクションを追加します(詳細については、InputEvent を参照してください):
8方向移動
このシナリオでは、ユーザが8方向キー(上/左/下/右またはW/A/S/D)を押して、選択した方向に移動するようにします。「8方向移動」という名称は、2つのキーを同時に押すことでプレイヤーが斜めに移動できることに由来しています。
Add a script to the character body and add the following code:
extends CharacterBody2D

@export var speed = 400

func get_input():
    var input_direction = Input.get_vector("left", "right", "up", "down")
    velocity = input_direction * speed

func _physics_process(delta):
    get_input()
    move_and_slide()
using Godot;

public partial class Movement : CharacterBody2D
{
    [Export]
    public int Speed { get; set; } = 400;

    public void GetInput()
    {

        Vector2 inputDirection = Input.GetVector("left", "right", "up", "down");
        Velocity = inputDirection * Speed;
    }

    public override void _PhysicsProcess(double delta)
    {
        GetInput();
        MoveAndSlide();
    }
}
In the get_input() function, we use Input get_vector() to check for the
four key events and sum return a direction vector.
We can then set our velocity by multiplying this direction vector, which has a
length of 1, by our desired speed.
Tip
以前にベクトル演算を使用したことがない場合、あるいは忘れてしまった場合は、ベクトル演算 でGodotのベクトル使用の説明をみることができます。
注釈
If the code above does nothing when you press the keys, double-check that you've set up input actions correctly as described in the セットアップ part of this tutorial.
回転+移動
このタイプの動きは、昔ながらのアーケードゲームの仕組みに似ているため、 "Asteroids-style" と呼ばれることもあります。左/右を押すとキャラクタが回転し、上/下を押すとキャラクタの向きに関係なく前後に移動します。
extends CharacterBody2D

@export var speed = 400
@export var rotation_speed = 1.5

var rotation_direction = 0

func get_input():
    rotation_direction = Input.get_axis("left", "right")
    velocity = transform.x * Input.get_axis("down", "up") * speed

func _physics_process(delta):
    get_input()
    rotation += rotation_direction * rotation_speed * delta
    move_and_slide()
using Godot;

public partial class Movement : CharacterBody2D
{
    [Export]
    public int Speed { get; set; } = 400;

    [Export]
    public float RotationSpeed { get; set; } = 1.5f;

    private float _rotationDirection;

    public void GetInput()
    {
        _rotationDirection = Input.GetAxis("left", "right");
        Velocity = Transform.X * Input.GetAxis("down", "up") * Speed;
    }

    public override void _PhysicsProcess(double delta)
    {
        GetInput();
        Rotation += _rotationDirection * RotationSpeed * (float)delta;
        MoveAndSlide();
    }
}
Here we've added two variables to track our rotation direction and speed.
The rotation is applied directly to the body's rotation property.
To set the velocity, we use the body's transform.x which is a vector pointing
in the body's "forward" direction, and multiply that by the speed.
回転+移動(マウス)
この動作スタイルは、前の動作スタイルのバリエーションです。 今回は、キーボードの代わりにマウスの位置によって方向が設定されます。 キャラクタは常にマウスポインタを "見ます" 。ただし、フォワード/バック入力は同じままです。
extends CharacterBody2D

@export var speed = 400

func get_input():
    look_at(get_global_mouse_position())
    velocity = transform.x * Input.get_axis("down", "up") * speed

func _physics_process(delta):
    get_input()
    move_and_slide()
using Godot;

public partial class Movement : CharacterBody2D
{
    [Export]
    public int Speed { get; set; } = 400;

    public void GetInput()
    {
        LookAt(GetGlobalMousePosition());
        Velocity = Transform.X * Input.GetAxis("down", "up") * Speed;
    }

    public override void _PhysicsProcess(double delta)
    {
        GetInput();
        MoveAndSlide();
    }
}
ここでは、 Node2D look_at() メソッドを使用して、プレイヤーをマウスの位置に向けます。この関数を使用しない場合は、次のように角度を設定しても同じ効果が得られます:
rotation = get_global_mouse_position().angle_to_point(position)
var rotation = GetGlobalMousePosition().AngleToPoint(Position);
クリックと移動
この最後の例では、マウスのみを使用してキャラクタを制御します。画面上でクリックすると、プレイヤーが目的の場所に移動します。
extends CharacterBody2D

@export var speed = 400

var target = position

func _input(event):
    # Use is_action_pressed to only accept single taps as input instead of mouse drags.
    if event.is_action_pressed(&"click"):
        target = get_global_mouse_position()

func _physics_process(delta):
    velocity = position.direction_to(target) * speed
    # look_at(target)
    if position.distance_to(target) > 10:
        move_and_slide()
using Godot;

public partial class Movement : CharacterBody2D
{
    [Export]
    public int Speed { get; set; } = 400;

    private Vector2 _target;

    public override void _Input(InputEvent @event)
    {
        // Use IsActionPressed to only accept single taps as input instead of mouse drags.
        if (@event.IsActionPressed("click"))
        {
            _target = GetGlobalMousePosition();
        }
    }

    public override void _PhysicsProcess(double delta)
    {
        Velocity = Position.DirectionTo(_target) * Speed;
        // LookAt(_target);
        if (Position.DistanceTo(_target) > 10)
        {
            MoveAndSlide();
        }
    }
}
移動前に行う distance_to() チェックに注意してください。このテストを行わないと、身体は目標位置に到達すると、位置をわずかに越えて前後に移動しようとするので、動き過ぎを繰り返す「ジッタ」を起こします。
好みに応じて look_at() 行のコメントを外すと、ボディが動きの方向を指すように回転します。
Tip
このテクニックは、 "following" キャラクタの基礎としても使用できます。target 位置には、移動先の任意のオブジェクトの位置を指定できます。
要約
これらのコードサンプルは、独自のプロジェクトの開始点として便利です。ご自由に使って、どんなものが作れるか試してみてください。
You can download this sample project here: 2d_movement_starter.zip