Attention: Here be dragons
This is the latest
(unstable) version of this documentation, which may document features
not available in or compatible with released stable versions of Godot.
Checking the stable version of the documentation...
初めての3Dシェーダー
あなたは独自のカスタムSpatialシェーダーの作成を開始することにしました。たぶんシェーダーを使って行われたクールなトリックをオンラインで見たか、あるいは、StandardMaterial3D が自分のニーズを十分に満たしていないことに気づいたかもしれません。いずれにしても、あなたは独自のコードを作成することに決めたので、どこから始めればいいかを理解する必要があります。
このチュートリアルでは、Spatialシェーダーの作成方法を説明し、CanvasItem チュートリアルよりも多くのトピックを扱います。
Spatialシェーダーには、CanvasItemシェーダーよりも多くの機能が組み込まれています。Spatialシェーダーで期待されるのは、Godotが一般的なユースケースの機能をすでに提供しており、シェーダーでユーザーが行う必要があるのは、適切なパラメーターを設定することだけです。これは、特にPBR(物理ベースのレンダリング)ワークフローに当てはまります。
これは2部構成のチュートリアルです。この最初のパートでは、頂点関数のハイトマップからの頂点変位を使用して、簡単な地形を作成する方法を説明します。第2部 では、このチュートリアルの概念を取り入れ、水面シェーダーを作成してフラグメントシェーダーでカスタムマテリアルを設定する方法を説明します。
注釈
このチュートリアルでは、タイプ(vec2、float、sampler2D)、関数などのシェーダーの基本的な知識を前提としています。これらの概念に不安がある場合は、このチュートリアルを完了する前に、The Book of Shaders のやさしい紹介を読むことをお勧めします。
マテリアルを割り当てる場所
3Dでは、オブジェクトは メッシュ を使用して描画されます。メッシュは、「サーフェス」と呼ばれる単位でジオメトリ(オブジェクトの形状)とマテリアル(色とオブジェクトが光に反応する方法)を格納するリソースタイプです。メッシュには、複数のサーフェス、または1つのサーフェスを含めることができます。通常、別のプログラム(Blenderなど)からメッシュをインポートします。しかし、Godotには、メッシュをインポートせずにシーンに基本的なジオメトリを追加できる PrimitiveMeshes もいくつかあります。
メッシュの描画に使用できるノードタイプは複数あります。主なものは MeshInstance3D ですが、GPUParticles3D、MultiMeshes を使用することもできます)、またはその他です。
通常、マテリアルはメッシュ内の特定のサーフェスに関連付けられていますが、MeshInstance3Dなどの一部のノードでは、特定のサーフェスまたはすべてのサーフェスのマテリアルをオーバーライドできます。
サーフェスまたはメッシュ自体にマテリアルを設定すると、そのメッシュを共有するすべてのMeshInstance3Dはそのマテリアルを共有します。ただし、複数のメッシュインスタンスで同じメッシュを再利用したいが、インスタンスごとに異なるマテリアルを使用する場合は、MeshInstance3Dでマテリアルを設定する必要があります。
このチュートリアルでは、MeshInstance3Dのマテリアルをオーバーライドする機能を利用するのではなく、メッシュ自体にマテリアルを設定します。
セットアップ
新しい MeshInstance3D ノードをシーンに追加します。
インスペクタータブで MeshInstance3D の Mesh プロパティに新しい PlaneMesh リソースを設定します。そのためには <空> をクリックし、 新規 PlaneMesh を選択します。次に表示される平面の画像をクリックしてリソースを展開します。
これで、シーンに平面のメッシュが追加されます。
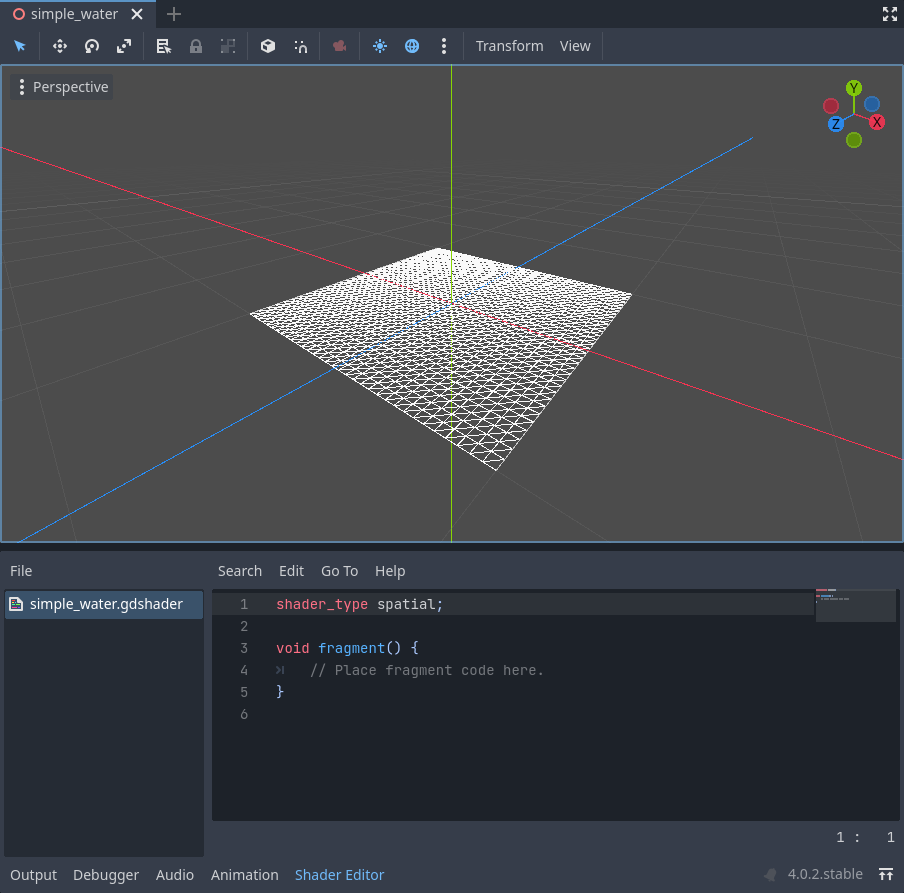
次に、ビューポートの左上隅にある 透視投影 ボタンをクリックします。表示されるメニューで ワイヤーフレーム表示 を選択します。
これにより、平面を構成する三角形を見ることができます。

次に PlaneMesh の Subdivide Width と Subdivide Depth を 32 に設定します。
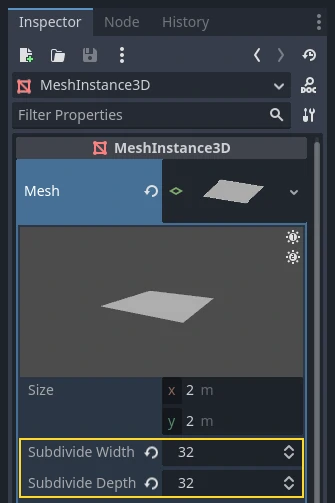
MeshInstance3D には、さらに多くの三角形があることがわかります。これにより多くの頂点を操作できるようになり、さらに詳細を追加できるようになります。

PrimitiveMeshes は PlaneMesh と同様に、1つのサーフェスしか持たないため、マテリアルは配列ではなく 1 つだけ存在します。Material に新しい ShaderMaterial に設定し、表示される球体をクリックしてマテリアルを展開します。
注釈
Material リソースを継承するマテリアル(StandardMaterial3D や ParticleProcessMaterial など)は、ShaderMaterial に変換できます。その場合、既存のプロパティは対応するテキストシェーダーに変換されます。変換するには、ファイルシステムドックでマテリアルを右クリックし、「ShaderMaterialに変換」を選択します。また、インスペクターでマテリアルへの参照を持つプロパティを右クリックして変換することもできます。
Now set the material's Shader to a new Shader by clicking <empty> and
select New Shader.... Leave the default settings, give your shader a name,
and click Create.
Click on the shader in the inspector, and the shader editor should now pop up. You are ready to begin writing your first Spatial shader!
シェーダーマジック
The new shader is already generated with a shader_type variable, the
vertex() function, and the fragment() function. The first thing Godot
shaders need is a declaration of what type of shader they are. In this case the
shader_type is set to spatial because this is a spatial shader.
shader_type spatial;
The vertex() function determines where the vertices of your MeshInstance3D
appear in the final scene. We will be using it to offset the height of each vertex
and make our flat plane appear like a little terrain.
With nothing in the vertex() function, Godot will use its default vertex
shader. We can start to make changes by adding a single line:
void vertex() {
  VERTEX.y += cos(VERTEX.x) * sin(VERTEX.z);
}
この行を追加すると、次のような画像が表示されます。

Okay, let's unpack this. The y value of the VERTEX is being increased.
And we are passing the x and z components of the VERTEX as arguments
to cos() and sin(); that gives
us a wave-like appearance across the x and z axes.
What we want to achieve is the look of little hills; after all. cos() and
sin() already look kind of like hills. We do so by scaling the inputs to the
cos() and sin() functions.
void vertex() {
  VERTEX.y += cos(VERTEX.x * 4.0) * sin(VERTEX.z * 4.0);
}

これは良い感じですが、それでもまだとがりすぎて反復的です。もう少し面白くしましょう。
ノイズハイトマップ
ノイズは、地形の外観を模倣するための非常に人気のあるツールです。これは、各丘の高さが異なることを除いて、丘が繰り返されるコサイン関数に似ていると考えてください。
Godotはシェーダーからアクセスできるノイズテクスチャを生成するための NoiseTexture2D リソースを提供します。
シェーダーのテクスチャにアクセスするには、シェーダーの上部近くの vertex() 関数の外側に次のコードを追加します。
uniform sampler2D noise;
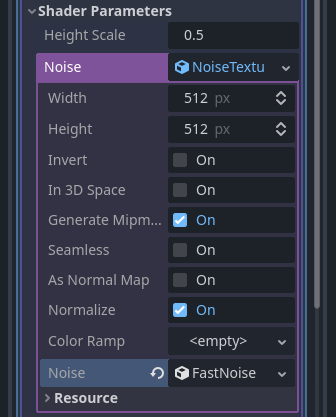
This will allow you to send a noise texture to the shader. Now look in the inspector under your material. You should see a section called Shader Parameters. If you open it up, you'll see a parameter called "Noise".
Set this Noise parameter to a new NoiseTexture2D. Then in your NoiseTexture2D, set its Noise property to a new FastNoiseLite. The FastNoiseLite class is used by the NoiseTexture2D to generate a heightmap.
設定すると、次のようになります。
Now, access the noise texture using the texture() function:
void vertex() {
  float height = texture(noise, VERTEX.xz / 2.0 + 0.5).x;
  VERTEX.y += height;
}
texture() takes a texture as the first argument and
a vec2 for the position on the texture as the second argument. We use the
x and z channels of VERTEX to determine where on the texture to look
up.
Since the PlaneMesh coordinates are within the [-1.0, 1.0] range (for a size
of 2.0), while the texture coordinates are within [0.0, 1.0], to remap
the coordinates we divide by the size of the PlaneMesh by 2.0 and add
0.5 .
texture() returns a vec4 of the r, g, b, a channels at the position.
Since the noise texture is grayscale, all of the values are the same, so we can
use any one of the channels as the height. In this case we'll use the r, or
x channel.
注釈
xyzw is the same as rgba in GLSL, so instead of texture().x
above, we could use texture().r. See the OpenGL documentation for more
details.
このコードを使用すると、テクスチャがランダムに見える丘を作成することがわかります。

現時点では尖りすぎているので、丘を少し柔らかくしたいと考えています。そのためにUniformを使います。ノイズテクスチャを渡すために上記のUniformをすでに使用しました。次にそれらがどのように機能するかを学びましょう。
Uniform(ユニフォーム)
Uniform variables allow you to pass data
from the game into the shader. They are
very useful for controlling shader effects. Uniforms can be almost any datatype
that can be used in the shader. To use a uniform, you declare it in your
Shader using the keyword uniform.
地形の高さを変えるユニフォームを作りましょう。
uniform float height_scale = 0.5;
Godot lets you initialize a uniform with a value; here, height_scale is set
to 0.5. You can set uniforms from GDScript by calling the function
set_shader_parameter()
on the material corresponding to the shader. The value passed from GDScript
takes precedence over the value used to initialize it in the shader.
# called from the MeshInstance3D
mesh.material.set_shader_parameter("height_scale", 0.5)
注釈
SpatialベースのノードでUniformを変更することは、CanvasItemベースのノードとは異なります。ここではPlaneMeshリソース内にマテリアルを設定します。他のメッシュリソースでは、最初に surface_get_material() を呼び出してマテリアルにアクセスする必要があります。 MeshInstance3Dで get_surface_material() または material_override を使用してマテリアルにアクセスします。
Remember that the string passed into set_shader_parameter() must match the name
of the uniform variable in the shader. You can use the
uniform variable anywhere inside your shader. Here, we will
use it to set the height value instead of arbitrarily multiplying by 0.5.
VERTEX.y += height * height_scale;
今度はずっと良くなりました。

Uniformを使用すると、フレームごとに値を変更して、地形の高さをアニメーション化することもできます。Tween と組み合わせると、アニメーションに特に役立ちます。
ライトとの相互作用
First, turn wireframe off. To do so, open the Perspective menu in the upper-left of the viewport again, and select Display Normal. Additionally in the 3D scene toolbar, turn off preview sunlight.

メッシュの色が平坦になることに注意してください。これは、照明が平坦だからです。ライトを追加しましょう!
First, we will add an OmniLight3D to the scene, and drag it up so it is above the terrain.

ライトが地形に与える影響を見ることができますが、奇妙な見た目です。問題は、ライトが平面であるかのように地形に影響していることです。これは、ライトシェーダーが Mesh の法線を使用してライトを計算するためです。
法線はメッシュに保存されますが、シェーダーでメッシュの形状を変更しているため、法線は正しくありません。これを修正するには、シェーダーで法線を再計算するか、ノイズに対応する法線テクスチャを使用します。 Godotは両方を簡単におこなえます。
頂点関数で新しい法線を手動で計算し、NORMAL に設定することができます。NORMAL に設定すると、Godotは面倒な照明計算をすべて行います。この方法については、このチュートリアルの次の部分で説明しますが、今はテクスチャから法線を読み取ります。
その代わりに、再びNoiseTextureを利用して法線を計算します。これを行うために、2番目のノイズテクスチャで値を渡します。
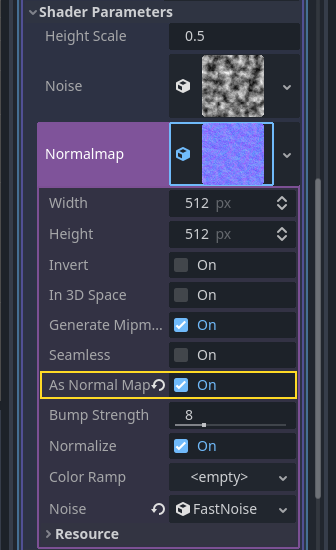
uniform sampler2D normalmap;
Set this second uniform texture to another NoiseTexture2D with another FastNoiseLite. But this time, check As Normal Map.
When we have normals that correspond to a specific vertex we set NORMAL, but
if you have a normalmap that comes from a texture, set the normal using
NORMAL_MAP in the fragment() function. This way Godot will handle
wrapping the texture around the mesh automatically.
Lastly, in order to ensure that we are reading from the same places on the noise
texture and the normalmap texture, we are going to pass the VERTEX.xz
position from the vertex() function to the fragment() function. We do
that using a varying.
Above the vertex() define a varying vec2 called tex_position. And
inside the vertex() function assign VERTEX.xz to tex_position.
varying vec2 tex_position;

void vertex() {
  tex_position = VERTEX.xz / 2.0 + 0.5;
  float height = texture(noise, tex_position).x;
  VERTEX.y += height * height_scale;
}
そして、fragment() 関数から tex_position にアクセスできるようになりました。
void fragment() {
  NORMAL_MAP = texture(normalmap, tex_position).xyz;
}
法線を設定すると、ライトはメッシュの高さに動的に反応します。

ライトをドラッグすることもでき、照明の状態が自動的に更新されます。

Full code
このチュートリアルの完全なコードは次のとおりです。 Godotが面倒な部分のほとんどを処理するので、それほど長くないことがわかります。
shader_type spatial;

uniform float height_scale = 0.5;
uniform sampler2D noise;
uniform sampler2D normalmap;

varying vec2 tex_position;

void vertex() {
  tex_position = VERTEX.xz / 2.0 + 0.5;
  float height = texture(noise, tex_position).x;
  VERTEX.y += height * height_scale;
}

void fragment() {
  NORMAL_MAP = texture(normalmap, tex_position).xyz;
}
これがこの部分のすべてです。 Godotの頂点シェーダーの基本を理解できたと思います。このチュートリアルの次の部分では、この頂点関数に付随するフラグメント関数を作成し、この地形を動く波の海に変えるためのより高度なテクニックをカバーします。