Up to date
This page is up to date for Godot 4.2.
If you still find outdated information, please open an issue.
Using AnimationTree
はじめに
With AnimationPlayer, Godot has one of the most flexible animation systems that you can find in any game engine. The ability to animate almost any property in any node or resource, as well as having dedicated transform, bezier, function calling, audio and sub-animation tracks, is pretty much unique.
ただし、それらのアニメーションをブレンドするには、AnimationPlayerでは固定のクロスフェード遷移のみなので、比較的制限されています。
AnimationTreeは、高度な遷移をするためにGodot 3.1で導入されたノードです。これは古いAnimationTreePlayerを置き換えるもので、膨大な量の機能と柔軟性を加えています。
AnimationTreeの作成
始める前にまず明らかにすべきは、AnimationTreeノードは自身のアニメーションは含みません。代わりにそれは、別にあるAnimationPlayerノードが持つアニメーションを利用します。これにより、従来通りアニメーションを編集(あるいは他の3Dシーンからインポート)でき、さらに再生をコントロールしたいときにこのノードを追加するのです。
AnimationTreeの最も一般的な使い道は3Dシーンです。シーンを3D交換フォーマットからインポートすると、通常はアニメーションはそのまま同梱されています(複数のものや、大きなものがインポートの際に分割されていても)。インポートされたGodotシーンでは最終的に、アニメーションはすべて一つのAnimationPlayerノードに格納されます。
Godotでは、インポートされたシーンを (インスタンス化あるいは継承せずに) 直接使うことは珍しいので、インポートされたシーンのための新しいシーンにAnimationTreeを追加することにします。そのあとAnimationTreeノードにて、インポートされたシーンの中に作られたAnimationPlayerを割り当ててください。
参考例として、三人称視点シューターデモ(英語) もそうなっています。
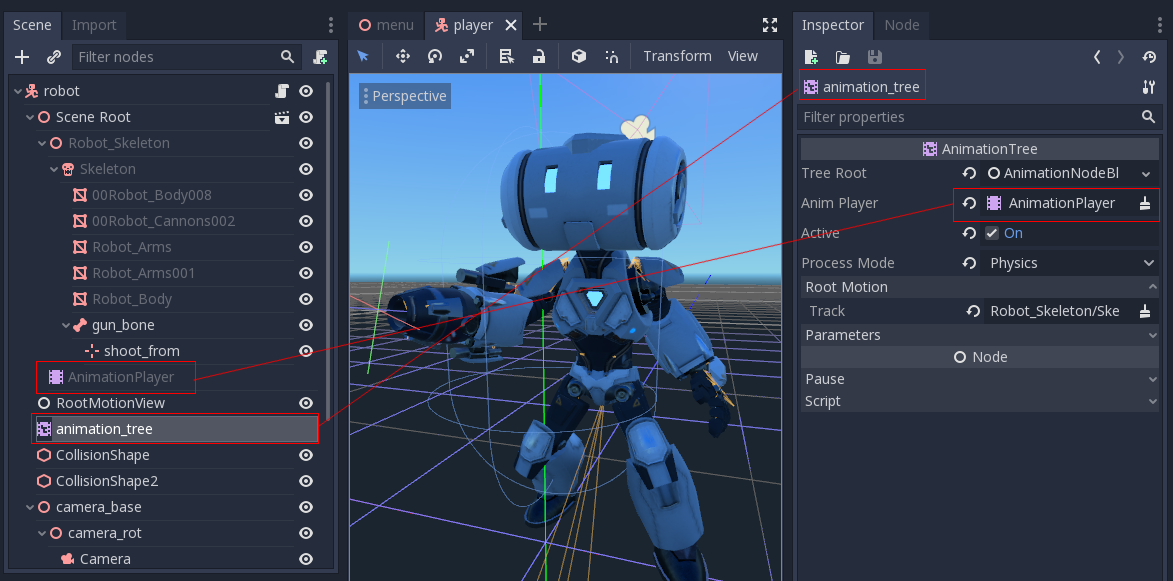
A new scene was created for the player with a CharacterBody3D as root. Inside this scene, the original .dae (Collada) file was instantiated
and an AnimationTree node was created.
ツリーの作成
AnimationTreeでは主に3種類のノードが使えます:
Animation nodes, which reference an animation from the linked
AnimationPlayer.アニメーションルート・ノード。副ノードとのブレンドに使われます。
アニメーションブレンド・ノード。
AnimationNodeBlendTreeの中で使用され、複数のインプットポートを持ち、一つのグラフでブレンドします。
AnimationTreeのルートノードを設定するには、いくつかの型が用意されています:
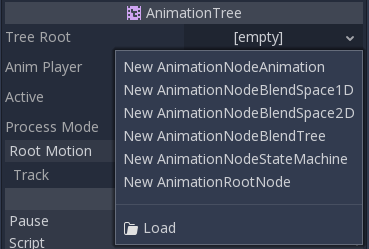
AnimationNodeAnimation: リストから選択したアニメーションを再生します。これは一番シンプルなルートノードで、通常は直接のルートとしては使用されません。AnimationNodeBlendTree: mix、blend2、blend3、one shotなどのような、多くのブレンド型のノードを含んでいます。これはルートとしてよく使われるものの一つです。AnimationNodeStateMachine: 一つのグラフに、複数のルートノードを子に持ちます。それぞれのノードはステートとして扱われ、ステートを切り替えるための機能をいくつも備えています。AnimationNodeBlendSpace2D: ルートノードを2Dブレンドスペースに置けるようになります。二次元空間でブレンド位置をコントロールし、複数のアニメーションのミックスします。AnimationNodeBlendSpace1D: 上記の簡略版です (一次元)。
ブレンド・ツリー
AnimationNodeBlendTreeはブレンド用で、ルートまたは通常のノードを含むことができます。ノードはメニューからグラフに追加します。
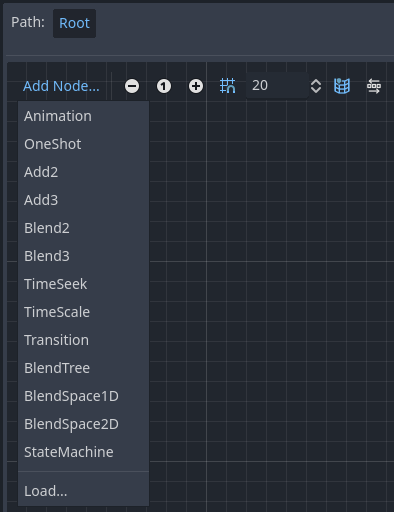
すべてのブレンドツリーには、標準でOutputノードが入っていて、アニメーションを再生するにはそこに何かをつなげる必要があります。
この機能を確認する一番簡単な方法は、Animationノードを直接つなげることです:
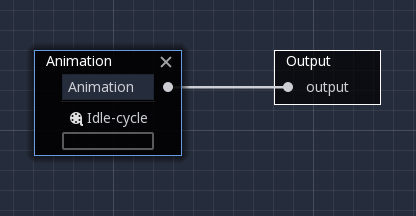
これは単純にアニメーションを再生します。実行する前にまずAnimationTreeがアクティブであることを確認してください。
下記は利用可能なノードの短い説明です:
Blend2 / Blend3
これらのノードは、2つあるいは3つのインプットをユーザー指定の値でブレンドします:
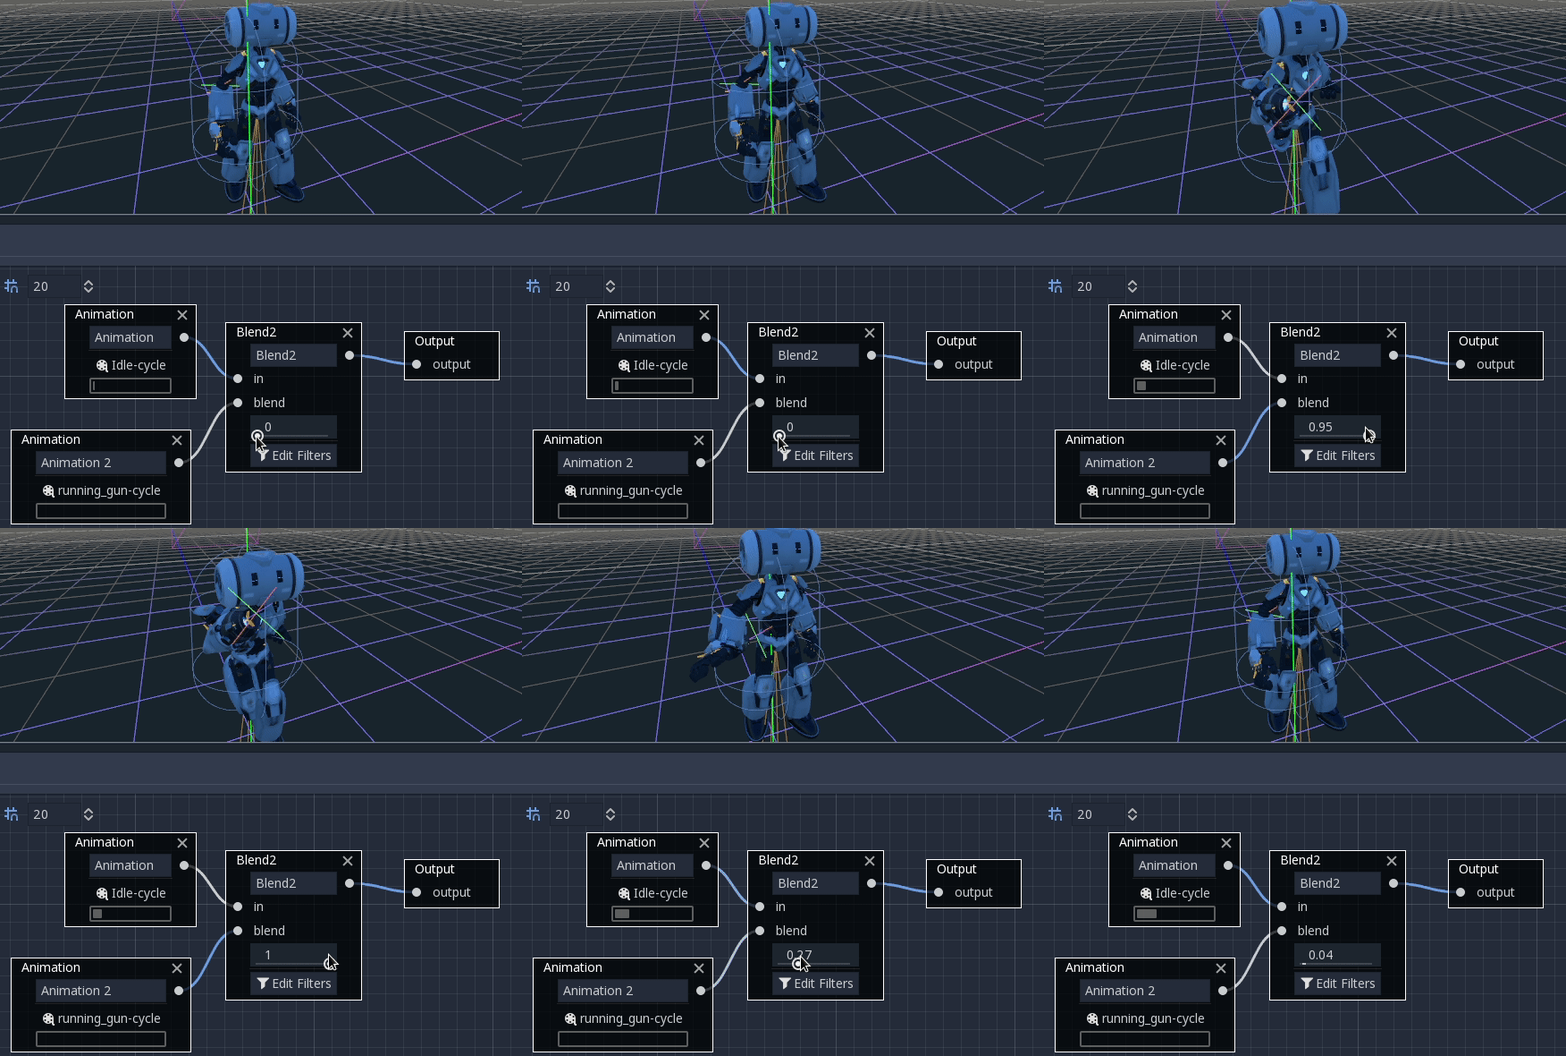
より複雑なブレンドには、代わりにブレンドスペースを使うことをおすすめします。
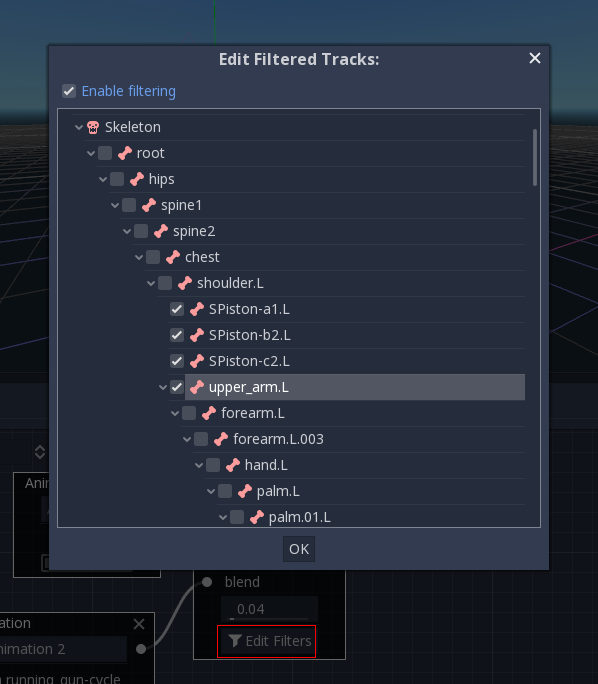
ブレンドにはフィルターを使うこともでき、どのトラックをブレンド関数に渡すかどうかをコントロールできます。これはアニメーションをレイヤーに分けて重ね合わせるのに有用です。
OneShot
このノードは、副アニメーションを実行し、完了すると元に戻ります。フィルターだけでなく、フェードインとフェードアウトのブレンド時間もカスタマイズできます。

After setting the request and changing the animation playback, the one-shot node automatically clears the request on the next process frame by setting its request value to AnimationNodeOneShot.ONE_SHOT_REQUEST_NONE.
# Play child animation connected to "shot" port.
animation_tree.set("parameters/OneShot/request", AnimationNodeOneShot.ONE_SHOT_REQUEST_FIRE)
# Alternative syntax (same result as above).
animation_tree["parameters/OneShot/request"] = AnimationNodeOneShot.ONE_SHOT_REQUEST_FIRE

# Abort child animation connected to "shot" port.
animation_tree.set("parameters/OneShot/request", AnimationNodeOneShot.ONE_SHOT_REQUEST_ABORT)
# Alternative syntax (same result as above).
animation_tree["parameters/OneShot/request"] = AnimationNodeOneShot.ONE_SHOT_REQUEST_ABORT

# Get current state (read-only).
animation_tree.get("parameters/OneShot/active"))
# Alternative syntax (same result as above).
animation_tree["parameters/OneShot/active"]
// Play child animation connected to "shot" port.
animationTree.Set("parameters/OneShot/request", (int)AnimationNodeOneShot.OneShotRequest.Fire);

// Abort child animation connected to "shot" port.
animationTree.Set("parameters/OneShot/request", (int)AnimationNodeOneShot.OneShotRequest.Abort);

// Get current state (read-only).
animationTree.Get("parameters/OneShot/active");
TimeSeek
This node can be used to cause a seek command to happen to any sub-children of the animation graph. Use this node type to play an Animation from the start or a certain playback position inside the AnimationNodeBlendTree.
After setting the time and changing the animation playback, the seek node automatically goes into sleep mode on the next process frame by setting its seek_request value to -1.0.
# Play child animation from the start.
animation_tree.set("parameters/TimeSeek/seek_request", 0.0)
# Alternative syntax (same result as above).
animation_tree["parameters/TimeSeek/seek_request"] = 0.0

# Play child animation from 12 second timestamp.
animation_tree.set("parameters/TimeSeek/seek_request", 12.0)
# Alternative syntax (same result as above).
animation_tree["parameters/TimeSeek/seek_request"] = 12.0
// Play child animation from the start.
animationTree.Set("parameters/TimeSeek/seek_request", 0.0);

// Play child animation from 12 second timestamp.
animationTree.Set("parameters/TimeSeek/seek_request", 12.0);
TimeScale
Allows scaling the speed of the animation (or reverse it) connected to the in input via the scale parameter. Setting the scale to 0 will pause the animation.
トランジション
Very simple state machine (when you don't want to cope with a StateMachine node). Animations can be connected to the outputs and transition times can be specified.
After setting the request and changing the animation playback, the transition node automatically clears the request on the next process frame by setting its transition_request value to an empty string ("").
# Play child animation connected to "state_2" port.
animation_tree.set("parameters/Transition/transition_request", "state_2")
# Alternative syntax (same result as above).
animation_tree["parameters/Transition/transition_request"] = "state_2"

# Get current state name (read-only).
animation_tree.get("parameters/Transition/current_state")
# Alternative syntax (same result as above).
animation_tree["parameters/Transition/current_state"]

# Get current state index (read-only).
animation_tree.get("parameters/Transition/current_index"))
# Alternative syntax (same result as above).
animation_tree["parameters/Transition/current_index"]
// Play child animation connected to "state_2" port.
animationTree.Set("parameters/Transition/transition_request", "state_2");

// Get current state name (read-only).
animationTree.Get("parameters/Transition/current_state");

// Get current state index (read-only).
animationTree.Get("parameters/Transition/current_index");
BlendSpace2D
BlendSpace2D is a node to do advanced blending in two dimensions. Points are added to a two-dimensional space and then a position
can be controlled to determine blending:
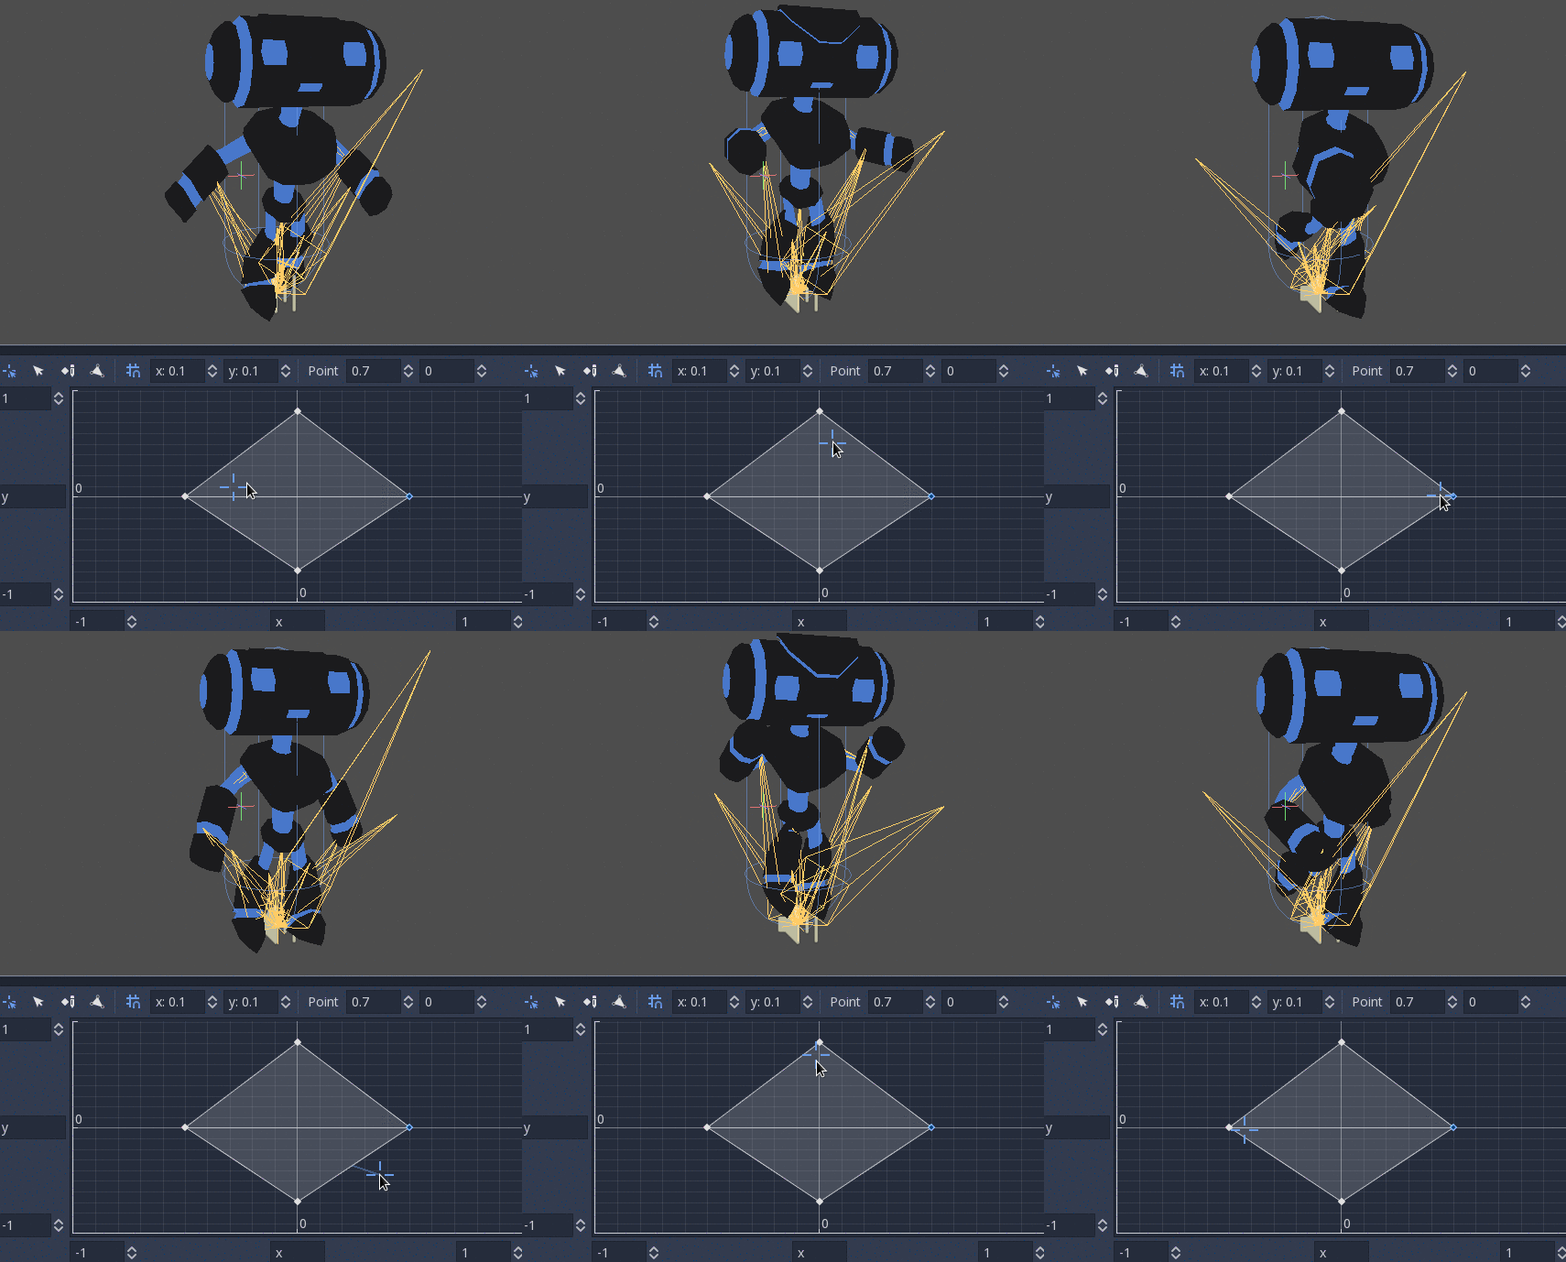
The ranges in X and Y can be controlled (and labeled for convenience). By default, points can be placed anywhere (right-click on the coordinate system or use the add point button) and triangles will be generated automatically using Delaunay.
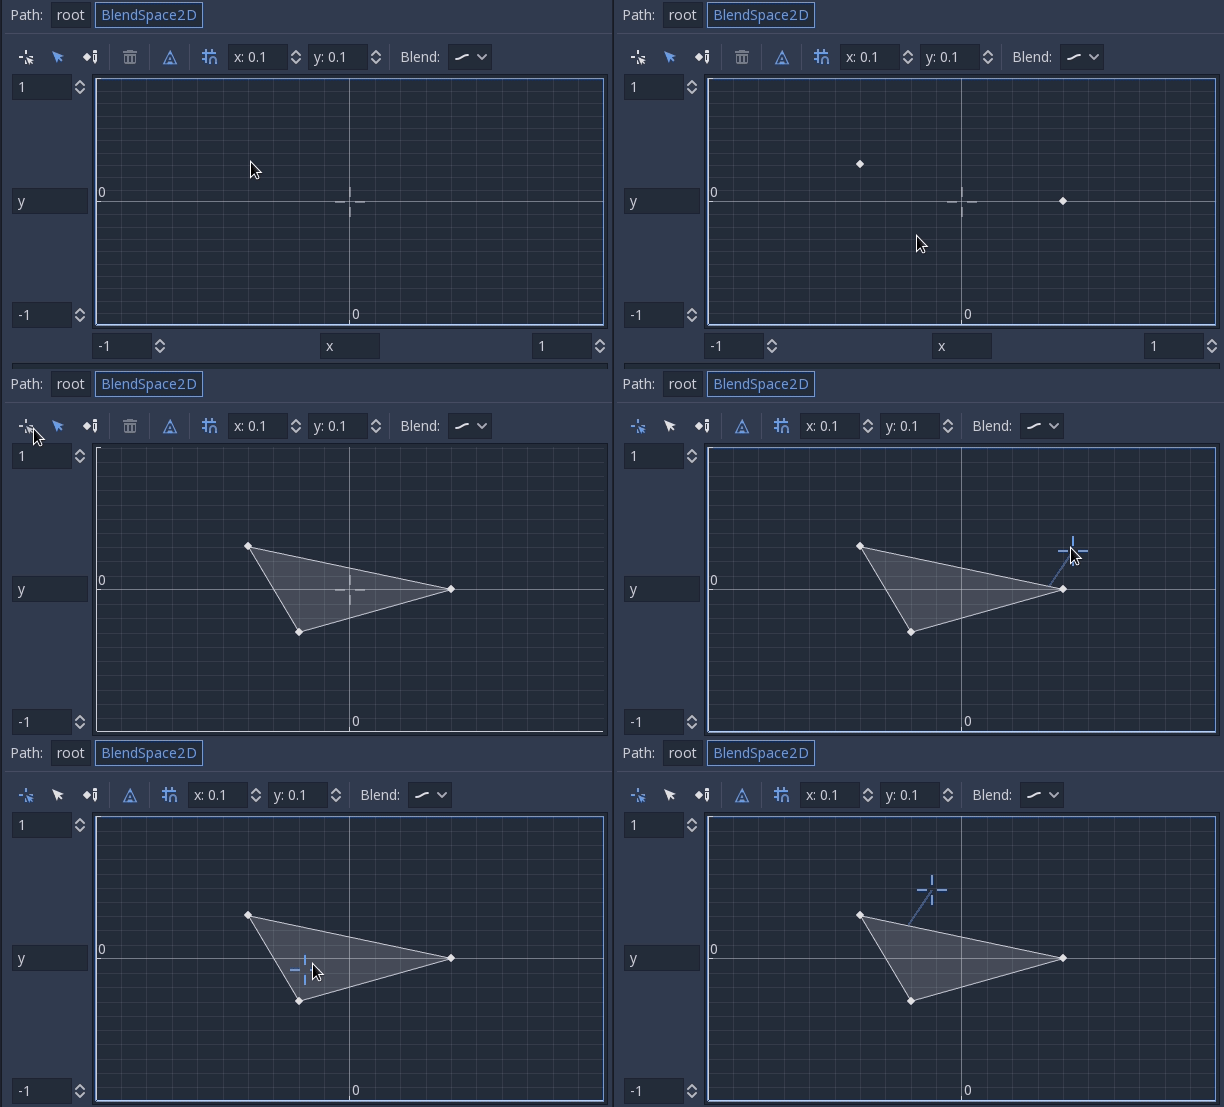
三角形の自動作成をオフにすれば、三角形を手動で作成することもできますが、必要になることはあまり無いでしょう:

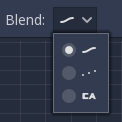
最後に、ブレンドモードは変更することができます。標準状態では、一番近い三角形の中で補完された点によってブレンドされますが、もし対象が(フレームごとに動かす)2Dアニメーションなら、離散モードに切り替えてもよいでしょう。あるいは、離散アニメーション間においても現在の再生位置を維持したい場合のために、キャリーモードもあります。モードはブレンドメニューから変更できます。
BlendSpace1D
これは2Dブレンドスペースと同様ですが、一次元のみです (そのため三角形は不要)。
StateMachine
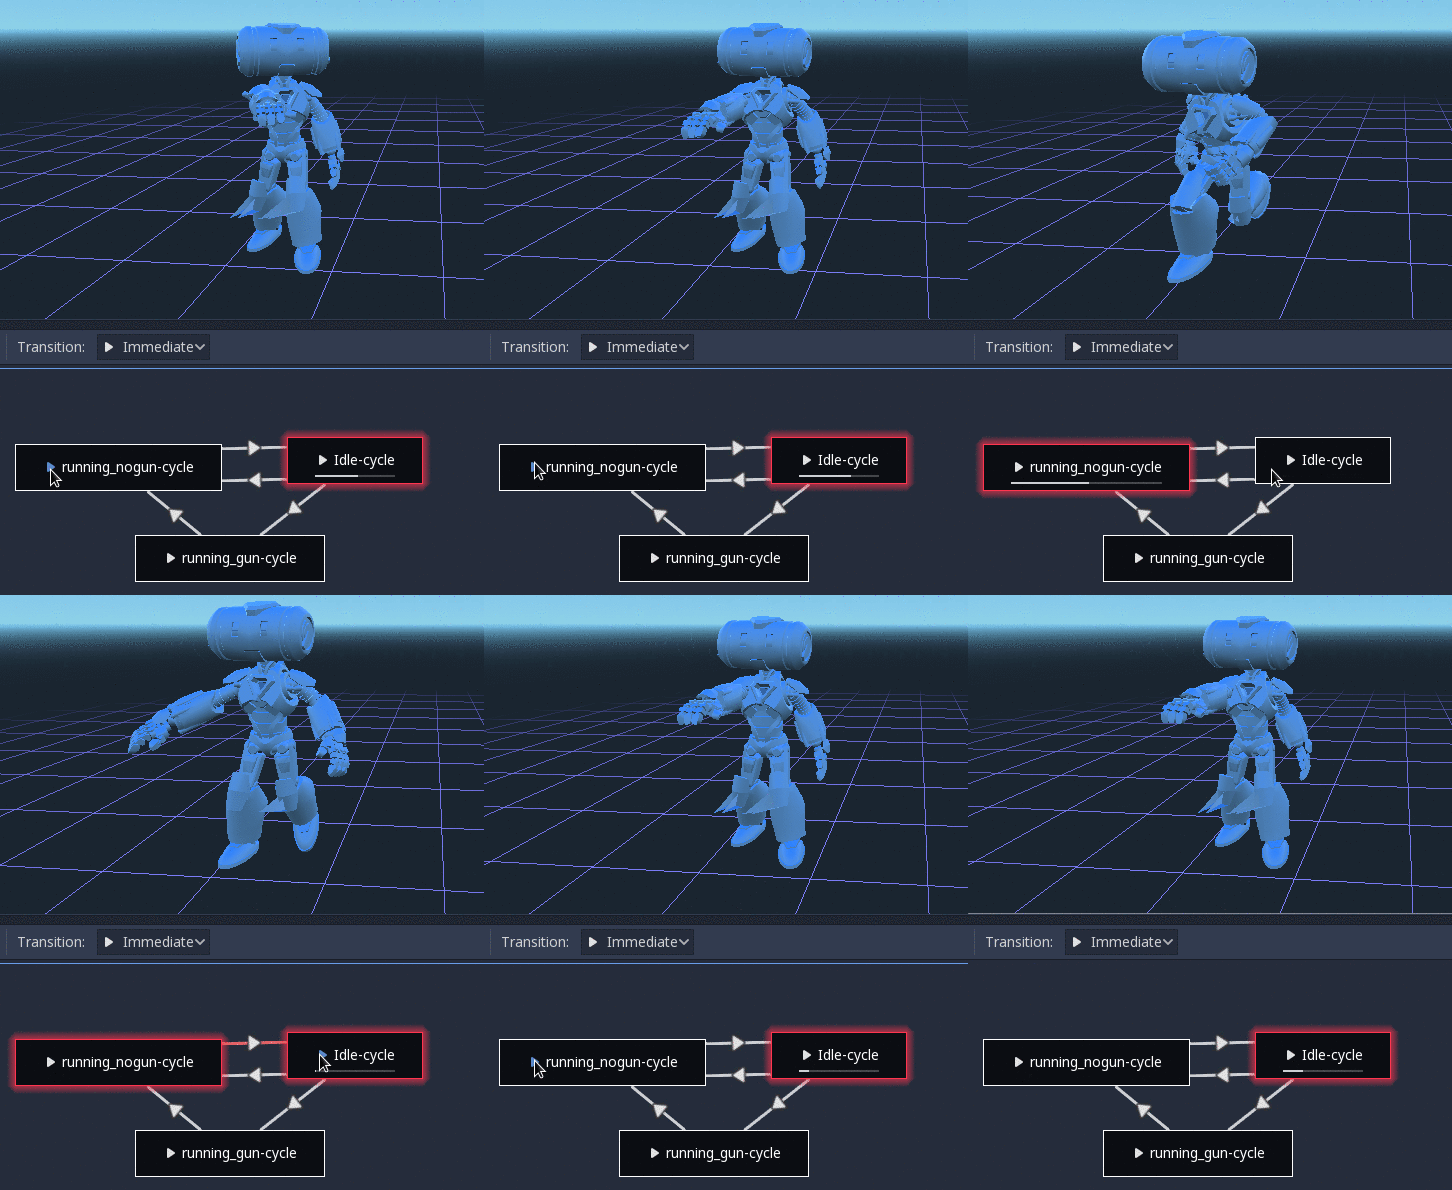
This node acts as a state machine with root nodes as states. Root nodes can be created and connected via lines. States are connected via Transitions, which are connections with special properties. Transitions are uni-directional, but two can be used to connect in both directions.
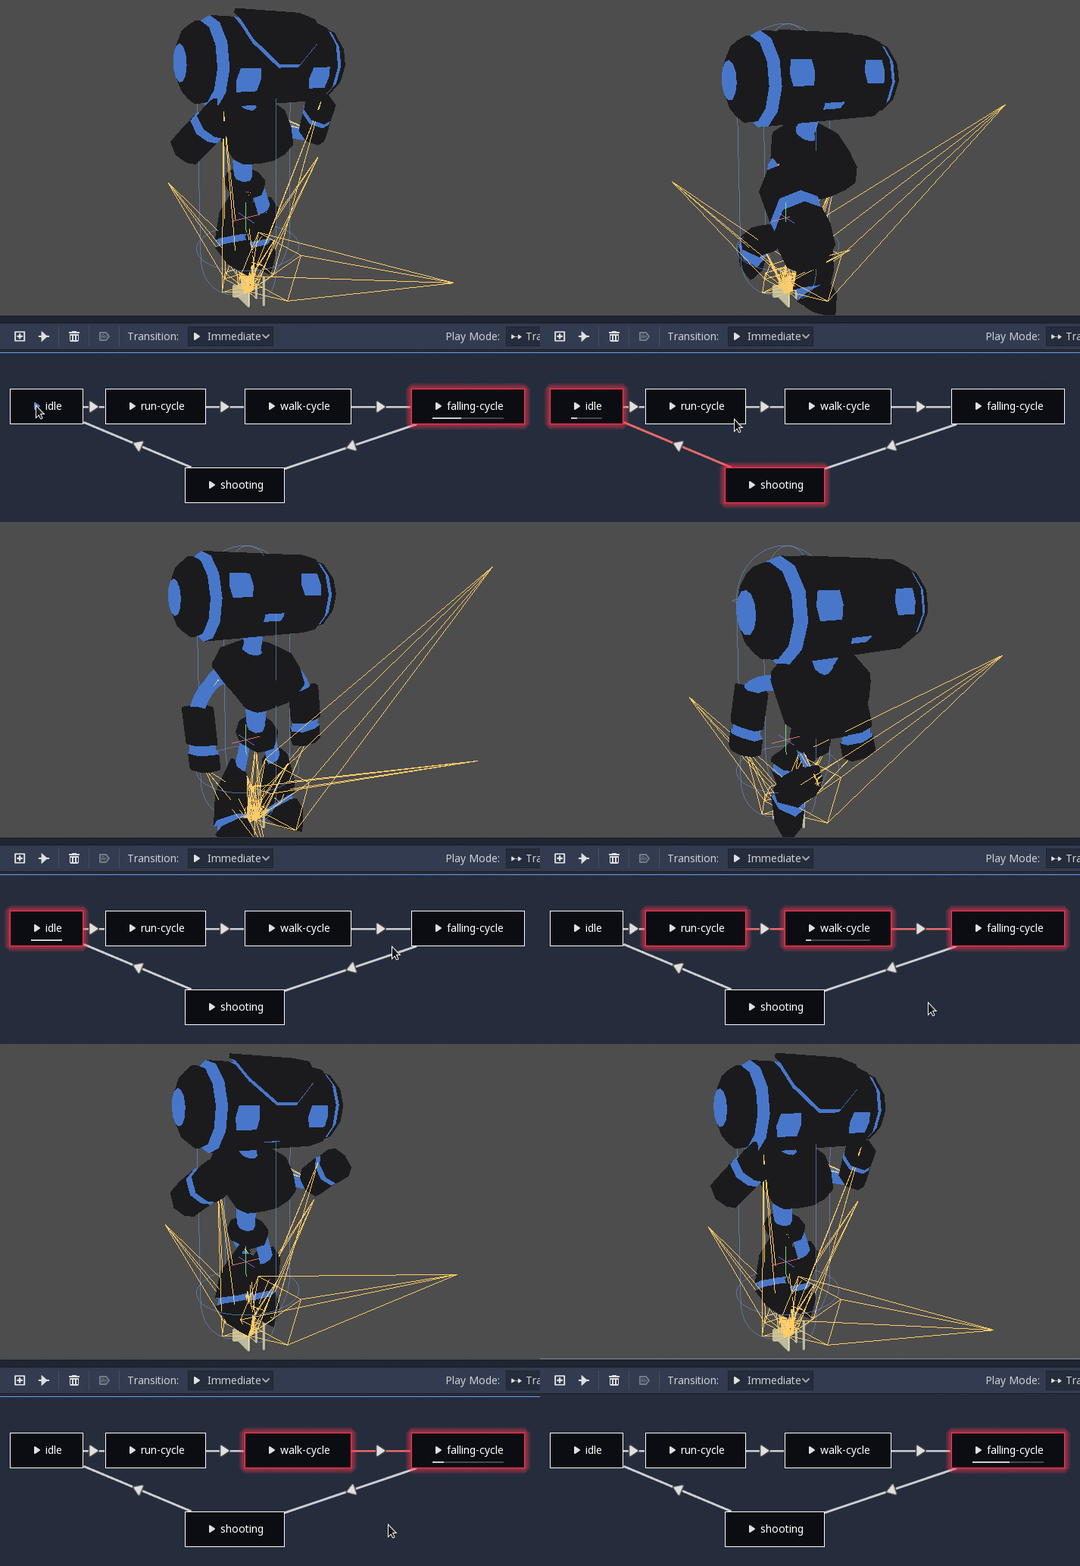
There are many types of transition:
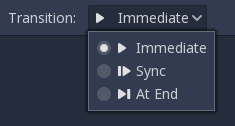
即座 (Immediate): 次のステートへと即座に切り替わります。現在のステートが終わると、新しいほうの先頭から始まります。
同期 (Sync): 次のステートへと即座に切り替わりますが、新しいステートでも古いステートと同じ再生位置になります。
終わりに (At End): 現在のステートの再生位置が最後になるまで待ち、それから次のステートの先頭に切り替わります。
トランジションはまた、いくつかのプロパティを持ちます。トランジションをクリックすると、インスペクタ ドックに表示されます:
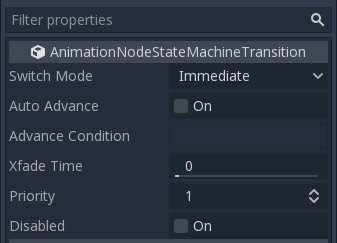
Switch Mode はトランジションの種類です (上記参照)。作成した後でもここで変更できます。
Auto Advance (自動移行)は、このステートに到達したらすぐにトランジションがオンになります。これは At End スイッチモードと合わせるのが最適です。
Advance Condition (移行条件) は、この条件が満たされた場合に自動移行させます。テキストフィールドには変数名を入れます。この変数はコードから変更することができます (詳しくは後述)。
Xfade Time は、このステートと次との間でのクロスフェードにかかる時間です。
Priority is used together with the
travel()function from code (more on this later). Lower priority transitions are preferred when travelling through the tree.Disabled toggles disabling this transition (when disabled, it will not be used during travel or auto advance).
For better blending
In Godot 4.0+, in order for the blending results to be deterministic (reproducible and always consistent), the blended property values must have a specific initial value. For example, in the case of two animations to be blended, if one animation has a property track and the other does not, the blended animation is calculated as if the latter animation had a property track with the initial value.
When using Position/Rotation/Scale 3D tracks for Skeleton3D bones, the initial value is Bone Rest.
For other properties, the initial value is 0 and if the track is present in the RESET animation,
the value of its first keyframe is used instead.
For example, the following AnimationPlayer has two animations, but one of them lacks a Property track for Position.
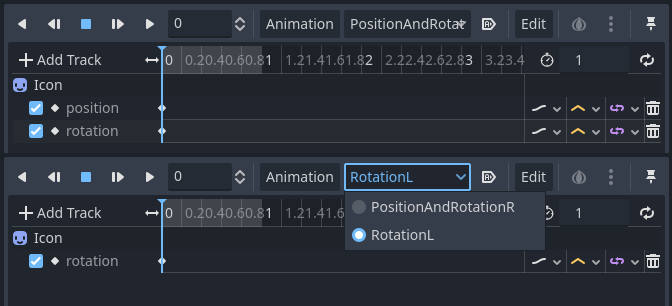
This means that the animation lacking that will treat those Positions as Vector2(0, 0).
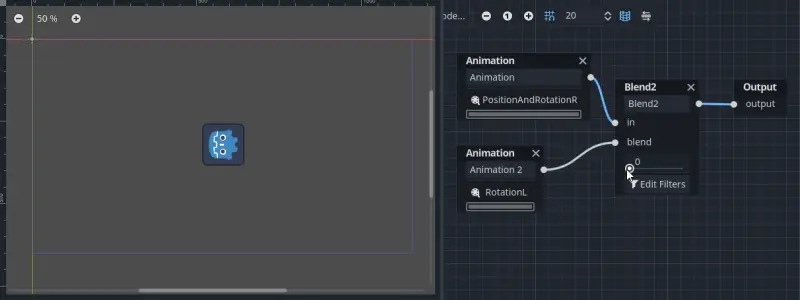
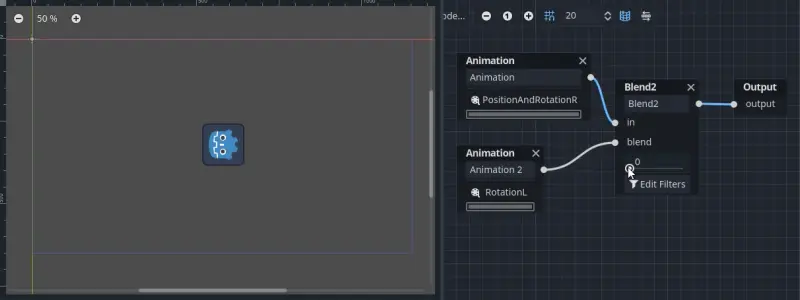
This problem can be solved by adding a Property track for Position as an initial value to the RESET animation.

注釈
Be aware that the RESET animation exists to define the default pose when loading an object originally.
It is assumed to have only one frame and is not expected to be played back using the timeline.
Also keep in mind that the Rotation 3D tracks and the Property tracks for 2D rotation with Interpolation Type set to Linear Angle or Cubic Angle will prevent rotation of more than 180 degrees from the initial value as blended animation.
This can be useful for Skeleton3Ds to prevent the bones penetrating the body when blending animations. Therefore, Skeleton3D's Bone Rest values should be as close to the midpoint of the movable range as possible. This means that for humanoid models, it is preferable to import them in a T-pose.
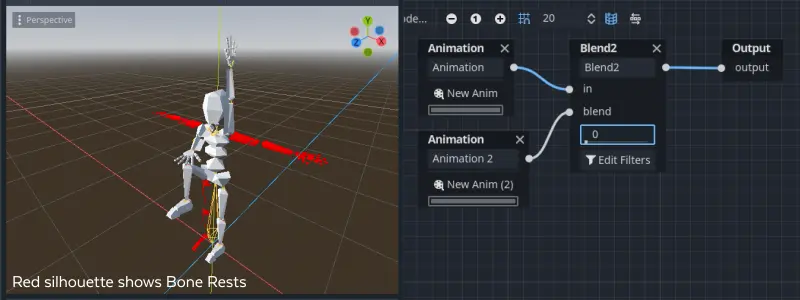
You can see that the shortest rotation path from Bone Rests is prioritized rather than the shortest rotation path between animations.
If you need to rotate Skeleton3D itself more than 180 degrees by blend animations for movement, you can use Root Motion.
ルート モーション
3Dアニメーションの作業では、スケルトンを動かすためにルート・スケルトン ボーンを用意するのが一般的なテクニックです。これにより、キャラクターを床に合わせて歩かせることが可能になります。また、ムービー場面においても、正確に物体に触れさせられるようになります。
Godot内でアニメーションを再生するときは、このボーンを ルート・モーション トラック に指定することができます。そうすると、そのボーンの見た目の変化は打ち消されます (アニメーションはそのまま)。
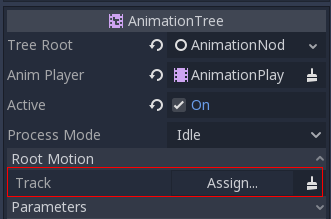
そのあと、実際のモーションはAnimationTree APIからトランスフォームとして取得します:
# Get the motion delta.
animation_tree.get_root_motion_position()
animation_tree.get_root_motion_rotation()
animation_tree.get_root_motion_scale()

# Get the actual blended value of the animation.
animation_tree.get_root_motion_position_accumulator()
animation_tree.get_root_motion_rotation_accumulator()
animation_tree.get_root_motion_scale_accumulator()
// Get the motion delta.
animationTree.GetRootMotionPosition();
animationTree.GetRootMotionRotation();
animationTree.GetRootMotionScale();

// Get the actual blended value of the animation.
animationTree.GetRootMotionPositionAccumulator();
animationTree.GetRootMotionRotationAccumulator();
animationTree.GetRootMotionScaleAccumulator();
This can be fed to functions such as CharacterBody3D.move_and_slide to control the character movement.
There is also a tool node, RootMotionView, that can be placed in a scene and will act as a custom floor for your
character and animations (this node is disabled by default during the game).
コードからコントロールする
ツリーを作成してプレビューしたら、最後に残る質問は「これを全部コードからコントロールする方法は?」です。
Keep in mind that the animation nodes are just resources and, as such, they are shared between all instances using them.
Setting values in the nodes directly will affect all instances of the scene that uses this AnimationTree.
This is generally undesirable, but does have some cool use cases, e.g. you can copy and paste parts of your animation tree,
or reuse nodes with a complex layout (such as a state machine or blend space) in different animation trees.
実際のアニメーション データはAnimationTreeノードに格納されており、プロパティを通じてアクセスします。AnimationTreeの Parameters セクションに、リアルタイムで変更できるパラメーターが全てあるので確認してみてください:
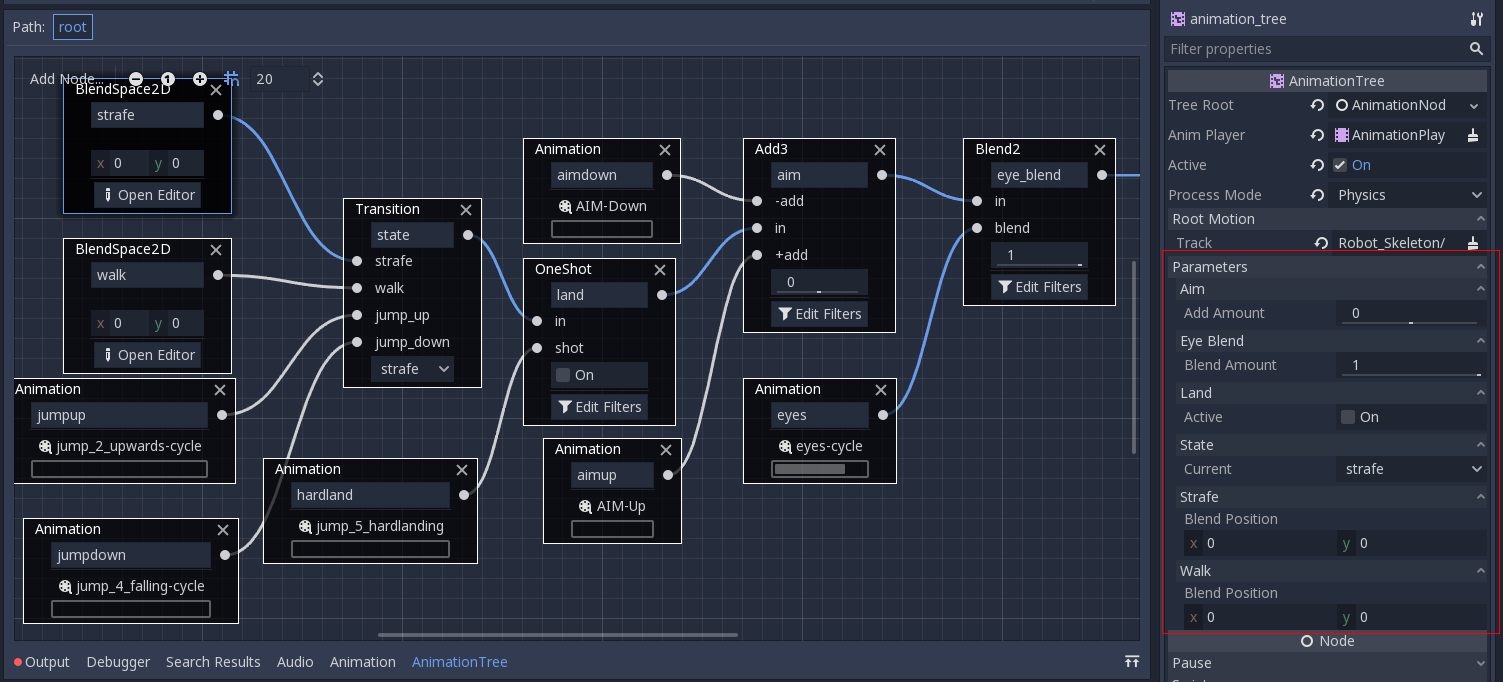
This is handy because it makes it possible to animate them from an AnimationPlayer, or even the AnimationTree itself,
allowing the realization of very complex animation logic.
これらの値をコードから変更する場合は、プロパティ パスを知る必要があります。それには、パラメーターの上にマウスをホバーするだけです。
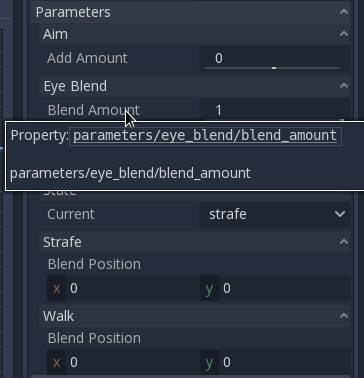
そうすれば、それらを設定したり読み込めます:
animation_tree.set("parameters/eye_blend/blend_amount", 1.0)
# Simpler alternative form:
animation_tree["parameters/eye_blend/blend_amount"] = 1.0
animationTree.Set("parameters/eye_blend/blend_amount", 1.0);
ステートマシン travel
One of the nice features in Godot's StateMachine implementation is the ability to travel. The graph can be instructed to go from the
current state to another one, while visiting all the intermediate ones. This is done via the A* algorithm.
If there is no path of transitions starting at the current state and finishing at the destination state, the graph teleports to the destination state.
travel機能を使うには、まずAnimationTreeノードからAnimationNodeStateMachinePlayback オブジェクトを取得します (プロパティのひとつ)。
var state_machine = animation_tree["parameters/playback"]
AnimationNodeStateMachinePlayback stateMachine = (AnimationNodeStateMachinePlayback)animationTree.Get("parameters/playback");
取得したら、その多くの関数の中からひとつ呼び出せば使えます:
state_machine.travel("SomeState")
stateMachine.Travel("SomeState");
The state machine must be running before you can travel. Make sure to either call start() or choose a node to Autoplay on Load.
