Attention: Here be dragons
This is the latest
(unstable) version of this documentation, which may document features
not available in or compatible with released stable versions of Godot.
Checking the stable version of the documentation...
WebRTC
HTML5、WebSocket、WebRTC
Godotの優れた機能の1つは、HTML5/WebAssemblyプラットフォームにエクスポートできることです。これにより、ユーザーがWebページにアクセスしたときに、ブラウザでゲームを直接実行できます。
これはデモと完全なゲームの両方にとって素晴らしい機会ですが、以前はいくつかの制限がありました。ネットワークの分野では、ブラウザは最近まで、最初にWebSocket、次にWebRTCが標準として提案されるまではHTTPRequestsのみをサポートしていました。
WebSocket
When the WebSocket protocol was standardized in December 2011, it allowed browsers to create stable and bidirectional connections to a WebSocket server. The protocol is a very powerful tool to send push notifications to browsers, and has been used to implement chats, turn-based games, etc.
ただし、WebSocketは依然としてTCP接続を使用します。TCP接続は信頼性には優れていますが、低遅延には適していません。したがって、VoIPやテンポの速いゲームなどのリアルタイムアプリケーションには適していません。
WebRTC
このため、2010年以降、GoogleはWebRTCと呼ばれる新しいテクノロジーの開発に着手しました。WebRTCは、2017年にW3Cの推奨候補になりました。 WebRTCは、はるかに複雑な仕様のセットであり、2つのピア間で高速でリアルタイムの安全な通信を提供するために、舞台裏にある他の多くのテクノロジー(ICE、DTLS、SDP)に依存しています。
このアイデアは、2つのピア間の最速のルートを見つけて、可能な限り直接通信を確立することです(つまり、中継サーバーを回避しようとします)。
ただし、これには代償が伴います。つまり、通信を開始する前に、2つのピア間で一部のメディア情報を交換する必要があります(セッション記述プロトコル - SDP文字列の形式)。これは通常、いわゆるWebRTC Signaling Serverの形式を取ります。
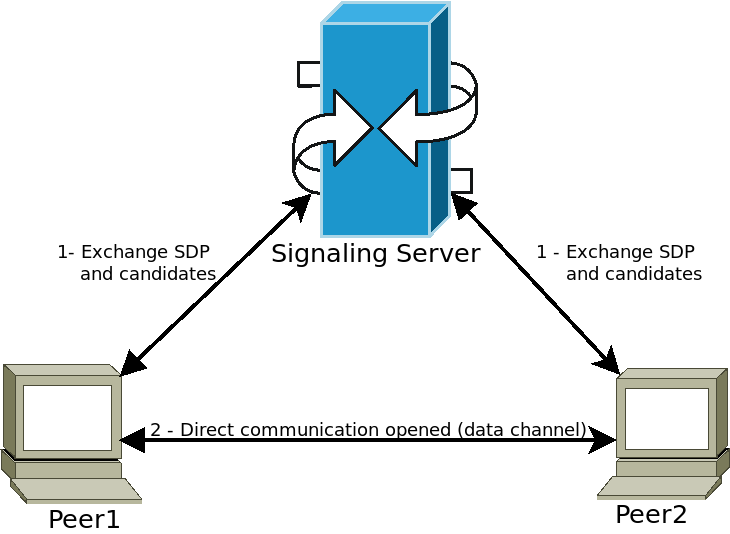
ピアはシグナリングサーバー(WebSocketサーバーなど)に接続し、メディア情報を送信します。サーバーはこの情報を他のピアに中継し、ピアが目的の直接通信を確立できるようにします。このステップが完了すると、ピアはシグナリングサーバーから切断し、直接ピアツーピア(P2P)接続を開いたままにすることができます。
GodotでWebRTCを使用する
WebRTC is implemented in Godot via two main classes WebRTCPeerConnection and WebRTCDataChannel, plus the multiplayer API implementation WebRTCMultiplayerPeer. See section on high-level multiplayer for more details.
注釈
These classes are available automatically in HTML5, but require an external GDExtension plugin on native (non-HTML5) platforms. Check out the webrtc-native plugin repository for instructions and to get the latest release.
警告
When exporting to Android, make sure to enable the INTERNET
permission in the Android export preset before exporting the project or
using one-click deploy. Otherwise, network communication of any kind will be
blocked by Android.
最小限の接続例
この例では、同じアプリケーション内の2つのピア間にWebRTC接続を作成する方法を示します。これは実際にはあまり有用ではありませんが、WebRTC接続がどのように設定されるかについての概要を説明します。
extends Node

# Create the two peers
var p1 = WebRTCPeerConnection.new()
var p2 = WebRTCPeerConnection.new()
# And a negotiated channel for each each peer
var ch1 = p1.create_data_channel("chat", {"id": 1, "negotiated": true})
var ch2 = p2.create_data_channel("chat", {"id": 1, "negotiated": true})

func _ready():
    # Connect P1 session created to itself to set local description.
    p1.session_description_created.connect(p1.set_local_description)
    # Connect P1 session and ICE created to p2 set remote description and candidates.
    p1.session_description_created.connect(p2.set_remote_description)
    p1.ice_candidate_created.connect(p2.add_ice_candidate)

    # Same for P2
    p2.session_description_created.connect(p2.set_local_description)
    p2.session_description_created.connect(p1.set_remote_description)
    p2.ice_candidate_created.connect(p1.add_ice_candidate)

    # Let P1 create the offer
    p1.create_offer()

    # Wait a second and send message from P1.
    await get_tree().create_timer(1).timeout
    ch1.put_packet("Hi from P1".to_utf8_buffer())

    # Wait a second and send message from P2.
    await get_tree().create_timer(1).timeout
    ch2.put_packet("Hi from P2".to_utf8_buffer())

func _process(_delta):
    # Poll connections
    p1.poll()
    p2.poll()

    # Check for messages
    if ch1.get_ready_state() == ch1.STATE_OPEN and ch1.get_available_packet_count() > 0:
        print("P1 received: ", ch1.get_packet().get_string_from_utf8())
    if ch2.get_ready_state() == ch2.STATE_OPEN and ch2.get_available_packet_count() > 0:
        print("P2 received: ", ch2.get_packet().get_string_from_utf8())
これは次のように出力されます:
P1 received: Hi from P1
P2 received: Hi from P2
ローカルシグナリングの例
この例は前の例を拡張し、2つの異なるシーンでピアを分離し、シグナリングサーバーとして singleton を使用します。
extends Node
# An example p2p chat client.

var peer = WebRTCPeerConnection.new()

# Create negotiated data channel.
var channel = peer.create_data_channel("chat", {"negotiated": true, "id": 1})

func _ready():
    # Connect all functions.
    peer.ice_candidate_created.connect(self._on_ice_candidate)
    peer.session_description_created.connect(self._on_session)

    # Register to the local signaling server (see below for the implementation).
    Signaling.register(String(get_path()))


func _on_ice_candidate(mid, index, sdp):
    # Send the ICE candidate to the other peer via signaling server.
    Signaling.send_candidate(String(get_path()), mid, index, sdp)


func _on_session(type, sdp):
    # Send the session to other peer via signaling server.
    Signaling.send_session(String(get_path()), type, sdp)
    # Set generated description as local.
    peer.set_local_description(type, sdp)


func _process(delta):
    # Always poll the connection frequently.
    peer.poll()
    if channel.get_ready_state() == WebRTCDataChannel.STATE_OPEN:
        while channel.get_available_packet_count() > 0:
            print(String(get_path()), " received: ", channel.get_packet().get_string_from_utf8())


func send_message(message):
    channel.put_packet(message.to_utf8_buffer())
そして、ローカルシグナリングサーバーの場合:
注釈
このローカルシグナリングサーバーは、同じシーン内の2つのピアを接続するための singleton として使用されることになっています。
# A local signaling server. Add this to autoloads with name "Signaling" (/root/Signaling)
extends Node

# We will store the two peers here
var peers = []

func register(path):
    assert(peers.size() < 2)
    peers.append(path)
    if peers.size() == 2:
        get_node(peers[0]).peer.create_offer()


func _find_other(path):
    # Find the other registered peer.
    for p in peers:
        if p != path:
            return p
    return ""


func send_session(path, type, sdp):
    var other = _find_other(path)
    assert(other != "")
    get_node(other).peer.set_remote_description(type, sdp)


func send_candidate(path, mid, index, sdp):
    var other = _find_other(path)
    assert(other != "")
    get_node(other).peer.add_ice_candidate(mid, index, sdp)
その後、次のように使用できます:
# Main scene (main.gd)
extends Node

const Chat = preload("res://chat.gd")

func _ready():
    var p1 = Chat.new()
    var p2 = Chat.new()
    add_child(p1)
    add_child(p2)

    # Wait a second and send message from P1
    await get_tree().create_timer(1).timeout
    p1.send_message("Hi from %s" % String(p1.get_path()))

    # Wait a second and send message from P2
    await get_tree().create_timer(1).timeout
    p2.send_message("Hi from %s" % String(p2.get_path()))
これはこれに類似した何かを出力します:
/root/main/@@3 received: Hi from /root/main/@@2
/root/main/@@2 received: Hi from /root/main/@@3
WebSocketを使用したリモートシグナリング
ピアのシグナリングにWebSocketを使用し、 WebRTCMultiplayerPeer を使用したより高度なデモは、 networking/webrtc_signaling 内の Godot デモプロジェクト にあります。