Attention: Here be dragons
This is the latest
(unstable) version of this documentation, which may document features
not available in or compatible with released stable versions of Godot.
Checking the stable version of the documentation...
2Dスプライトアニメーション
はじめに
このチュートリアルでは、AnimatedSprite2DクラスとAnimationPlayer2Dを使用して2Dアニメーションキャラクターを作成する方法を学習します。通常、アニメーションキャラクターを作成またはダウンロードする場合、2つの方法のいずれかが使用されます。個々の画像として、またはすべてのアニメーションのフレームを含む単一のスプライトシートとして。どちらも、AnimatedSprite2Dクラスを使用してGodotでアニメーション化できます。
まず、AnimatedSprite2D を使用して、個々の画像のコレクションをアニメーション化します。次に、このクラスを使用してスプライトシートをアニメーション化します。最後に、AnimationPlayer と Sprite2D の Animation プ ロパティを使用して、スプライトシートをアニメーション化する別の方法を学習します。
注釈
以下サンプルで使用するアートは https://opengameart.org/users/ansimuz および tgfcoder から入手しました。
AnimatedSprite2Dと個々の画像
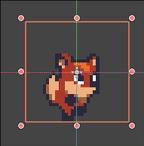
このシナリオでは、キャラクターのアニメーションフレームを1つづつ含む複数の画像を使います。この例では、次のアニメーションを使用します:

画像はここからダウンロードできます: 2d_sprite_animation_assets.zip
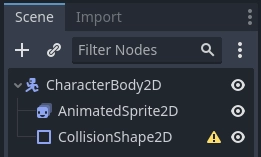
画像を解凍し、プロジェクトフォルダに配置します。次のノードを使用してシーンツリーを設定します:
注釈
ルートノードは、Area2D または RigidBody2D にすることもできます。アニメーションは引き続き同じ方法で作成されます。アニメーションが完成したら、CollisionShape2Dにシェイプを割り当てることができます。詳細については、Physics Introduction を参照してください。
次に、AnimatedSprite2D を選択し、その SpriteFrames プロパティで「新規 SpriteFrames」を選択します。
新しいSpriteFramesリソースをクリックすると、エディタウィンドウの下部に新しいパネルが表示されます:
左側のFileSystemドックから、8つの個別の画像をSpriteFramesパネルの中央部分にドラッグします。左側で、アニメーションの名前を "default" から "run" に変更します。
アニメーションをプレビューするには、 Filter Animations 入力の右上にある "Play " ボタンを使います。これでビューポートでアニメーションが再生されるはずです。しかし見てみると、アニメーションが少し遅いようです。これを修正するには、SpriteFramesパネルの Speed (FPS) 設定を10に変更してください。
アニメーションをさらに追加するには、"新規アニメーション" ボタンをクリックして新しく画像を追加します。
アニメーションのコントロール
アニメーションが完了すると、play() メソッドと stop() メソッドを使用して、コードでアニメーションを制御できます。右矢印キーを押したままアニメーションを再生し、キーを放したときにアニメーションを停止する簡単な例を次に示します。
extends CharacterBody2D

@onready var _animated_sprite = $AnimatedSprite2D

func _process(_delta):
    if Input.is_action_pressed("ui_right"):
        _animated_sprite.play("run")
    else:
        _animated_sprite.stop()
using Godot;

public partial class Character : CharacterBody2D
{
    private AnimatedSprite2D _animatedSprite;

    public override void _Ready()
    {
        _animatedSprite = GetNode<AnimatedSprite2D>("AnimatedSprite2D");
    }

    public override void _Process(double delta)
    {
        if (Input.IsActionPressed("ui_right"))
        {
            _animatedSprite.Play("run");
        }
        else
        {
            _animatedSprite.Stop();
        }
    }
}
AnimatedSprite2Dを使用したスプライトシート
クラス AnimatedSprite2D を使用して、スプライトシートから簡単にアニメーションさせることもできます。このパブリックドメインスプライトシートを使ってみます:
画像を右クリックして[名前を付けて保存]を選択してダウンロードし、イメージをプロジェクトフォルダにコピーします。
個々の画像を使用するときと同じ方法でシーンツリーを設定します。AnimatedSprite2D を選択し、その SpriteFrames プロパティで、[新規 SpriteFrames]を選択します。
新しいSpriteFramesリソースをクリックします。今回は、下のパネルが表示されたら、[スプライトシートからフレームを追加する]を選択します。
ファイルを開くように求められます。スプライトシートを選択します。
新しいウィンドウが開き、スプライトシートが表示されます。最初に行う必要があるのは、スプライトシートの垂直および水平画像の数を変更することです。このスプライトシートには、水平方向に4つの画像と垂直方向に2つの画像があります。
次に、アニメーションに含めるスプライトシートからフレームを選択します。上位4つを選択し、[4フレームを追加]をクリックしてアニメーションを作成します。
これで、下部パネルのアニメーションのリストの下にアニメーションが表示されます。デフォルトでダブルクリックして、ジャンプするアニメーションの名前を変更します。
最後に、SpriteFrames エディタでの再生ボタンをチェックして、カエルのジャンプを確認してください!
AnimationPlayerのスプライトシート
スプライトシート使用する時にアニメーション化させるもう1つの方法は、標準の Sprite2D ノードを使用してテクスチャを表示し、そして AnimationPlayer を使ってテクスチャからテクスチャを切り替えてアニメーションさせる方法です。
6フレームのアニメーションを含むこのスプライトシートを考えてみましょう。

画像を右クリックして[名前を付けて保存]を選択してダウンロードし、イメージをプロジェクトフォルダにコピーします。
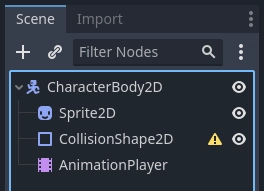
私たちの目標は、これらの画像をループで次々に表示することです。シーンツリーを設定することから始めます。
注釈
ルートノードは、Area2D または RigidBody2D にすることもできます。アニメーションは引き続き同じ方法で作成されます。アニメーションが完成したら、CollisionShape2Dにシェイプを割り当てることができます。詳細については、Physics Introduction を参照してください。
スプライトシートをスプライトの Texture プロパティにドラッグすると、シート全体が画面に表示されます。個々のフレームにスライスするには、インスペクタの Animation セクションを展開し、Hframes を 6 に設定します。Hframes および Vframes は、スプライトシート内の水平フレームと垂直フレームの数です。

次に、Frame プロパティの値を変更してみてください。範囲が 0 から 5 であり、それに応じて Sprite2D に表示される画像が変化することがわかります。これがこれからアニメーションさせるプロパティです。。
AnimationPlayer を選択し、[アニメーション] ボタンをクリックしてから [新規] をクリックします。新しいアニメーションに「walk」という名前を付けます。アニメーションの長さを 0.6 に設定し、[ループ] ボタンをクリックして、アニメーションが繰り返されるようにします。
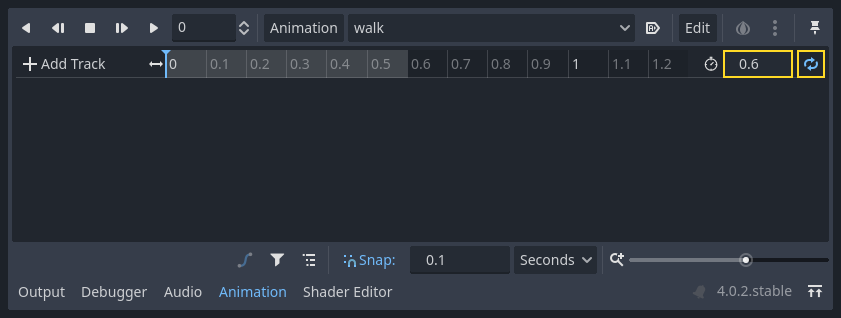
次に、Sprite2D ノードを選択し、鍵のアイコンをクリックして新しいトラックを追加します。

タイムラインの各ポイント(デフォルトでは 0.1秒刻み)で、0から5までのすべてのフレームが追加されるまで、鍵アイコンをクリックしてフレームの追加を続けます。アニメーショントラックに実際にフレームが表示されます:
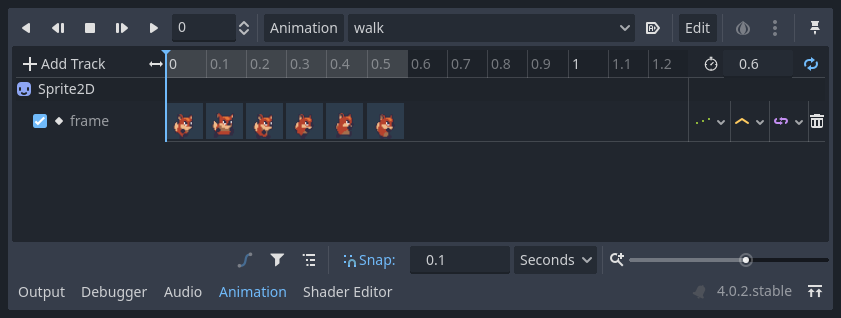
アニメーションの [再生] をクリックすると、アニメーションがどのように表示されるかを確認できます。
AnimationPlayerアニメーションの制御
AnimatedSprite2Dと同様に、play() メソッドと stop() メソッドを使用して、コードを介してアニメーションを制御できます。ここでアニメーションの例を示します。右矢印キーが押されているとアニメーションを再生し、キーが放されたときにアニメーションを停止します。
extends CharacterBody2D

@onready var _animation_player = $AnimationPlayer

func _process(_delta):
    if Input.is_action_pressed("ui_right"):
        _animation_player.play("walk")
    else:
        _animation_player.stop()
using Godot;

public partial class Character : CharacterBody2D
{
    private AnimationPlayer _animationPlayer;

    public override void _Ready()
    {
        _animationPlayer = GetNode<AnimationPlayer>("AnimationPlayer");
    }

    public override void _Process(double delta)
    {
        if (Input.IsActionPressed("ui_right"))
        {
            _animationPlayer.Play("walk");
        }
        else
        {
            _animationPlayer.Stop();
        }
    }
}
注釈
If updating both an animation and a separate property at once
(for example, a platformer may update the sprite's h_flip/v_flip
properties when a character turns while starting a 'turning' animation),
it's important to keep in mind that play() isn't applied instantly.
Instead, it's applied the next time the AnimationPlayer is processed.
This may end up being on the next frame, causing a 'glitch' frame,
where the property change was applied, but the animation was not.
If this turns out to be a problem, after calling play(), you can call advance(0)
to update the animation immediately.
要約
これらの例は、2Dアニメーション用にGodotで使用できる2つのクラスを示しています。AnimationPlayer は AnimatedSprite2D よりも少し複雑ですが、より多くの機能が提供され、位置やスケールなどの他のプロパティもアニメーション化できます。クラス AnimationPlayer は AnimatedSprite2D でも使用できます。ニーズに最適なものを試してみてください。