Attention: Here be dragons
This is the latest
(unstable) version of this documentation, which may document features
not available in or compatible with released stable versions of Godot.
Checking the stable version of the documentation...
入力の例
はじめに
このチュートリアルでは、GodotのInputEvent システムを使用してプレイヤーの入力をキャプチャする方法を学習します。ゲームで使用できる入力には、キーボード、ゲームパッド、マウスなど、さまざまな種類があり、それらの入力をゲームのアクションに変換するさまざまな方法があります。このドキュメントでは、最も一般的なシナリオをいくつか紹介します。これらのシナリオは、独自のプロジェクトの出発点として使用できます。
注釈
Godotの入力イベントシステムの動作の詳細については、InputEvent (入力イベント) を参照してください。
イベント対ポーリング
特定の入力イベントにゲームを応答させたい場合があります - たとえば、「ジャンプ」ボタンを押します。他の状況では、移動など、キーが押されている限り何かを実行したい場合があります。最初のケースでは、入力イベントが発生するたびに呼び出される _input() 関数を使用できます。 2番目の場合、Godotは Input シングルトンを提供します。これを使用して、入力の状態を照会できます。
例:
func _input(event):
    if event.is_action_pressed("jump"):
        jump()


func _physics_process(delta):
    if Input.is_action_pressed("move_right"):
        # Move as long as the key/button is pressed.
        position.x += speed * delta
public override void _Input(InputEvent @event)
{
    if (@event.IsActionPressed("jump"))
    {
        Jump();
    }
}

public override void _PhysicsProcess(double delta)
{
    if (Input.IsActionPressed("move_right"))
    {
        // Move as long as the key/button is pressed.
        position.X += speed * (float)delta;
    }
}
これにより、実行する入力処理のタイプを自由に組み合わせることができます。
このチュートリアルの残りの部分では、_ input() で個々のイベントをキャプチャすることに焦点を当てます。
入力イベント
入力イベントは、InputEvent を継承するオブジェクトです。イベントタイプに応じて、オブジェクトにはそのイベントに関連する特定のプロパティが含まれます。イベントが実際にどのように見えるかを確認するには、ノードを追加し、次のスクリプトをアタッチします:
extends Node


func _input(event):
    print(event.as_text())
using Godot;

public partial class Node : Godot.Node
{
    public override void _Input(InputEvent @event)
    {
        GD.Print(@event.AsText());
    }
}
キーを押したり、マウスを動かしたり、他の入力を実行したりすると、出力ウィンドウで各イベントがスクロールして表示されます。出力の例を次に示します:
A
Mouse motion at position ((971, 5)) with velocity ((0, 0))
Right Mouse Button
Mouse motion at position ((870, 243)) with velocity ((0.454937, -0.454937))
Left Mouse Button
Mouse Wheel Up
A
B
Shift
Alt+Shift
Alt
Shift+T
Mouse motion at position ((868, 242)) with velocity ((-2.134768, 2.134768))
ご覧のとおり、結果は入力の種類によって大きく異なります。キーイベントはキーシンボルとしても印刷されます。たとえば、InputEventMouseButton を考えてみましょう。次のクラスから継承します:
InputEvent - すべての入力イベントの基本クラス
InputEventWithModifiers - Shift や Alt などのモディファイヤが押されているかどうかをチェックする機能を追加します。
InputEventMouse -
positionなどのマウスイベントプロパティを追加しますInputEventMouseButton - 押されたボタンのインデックス、ダブルクリックかどうかなどが含まれます。
Tip
イベントの操作中は、イベントの種類で使用可能なプロパティとメソッドを確認できるように、クラス参照を開いたままにすることをお勧めします。
InputEventKey で position を呼び出すなど、その型を含まない入力型のプロパティにアクセスしようとすると、エラーが発生する可能性があります。これを回避するには、まずイベントタイプをテストしてください:
func _input(event):
    if event is InputEventMouseButton:
        print("mouse button event at ", event.position)
public override void _Input(InputEvent @event)
{
    if (@event is InputEventMouseButton mouseEvent)
    {
        GD.Print("mouse button event at ", mouseEvent.Position);
    }
}
インプットマップ
InputMap は、さまざまな入力を処理する最も柔軟な方法です。これを使用するには、名前付き入力 アクション を作成します。これに、キー入力やマウスクリックなど、任意の数の入力イベントを割り当てることができます。それらを表示し、独自のものを追加するには、[プロジェクト] -> [プロジェクト設定]を開き、インプットマップタブを選択します。
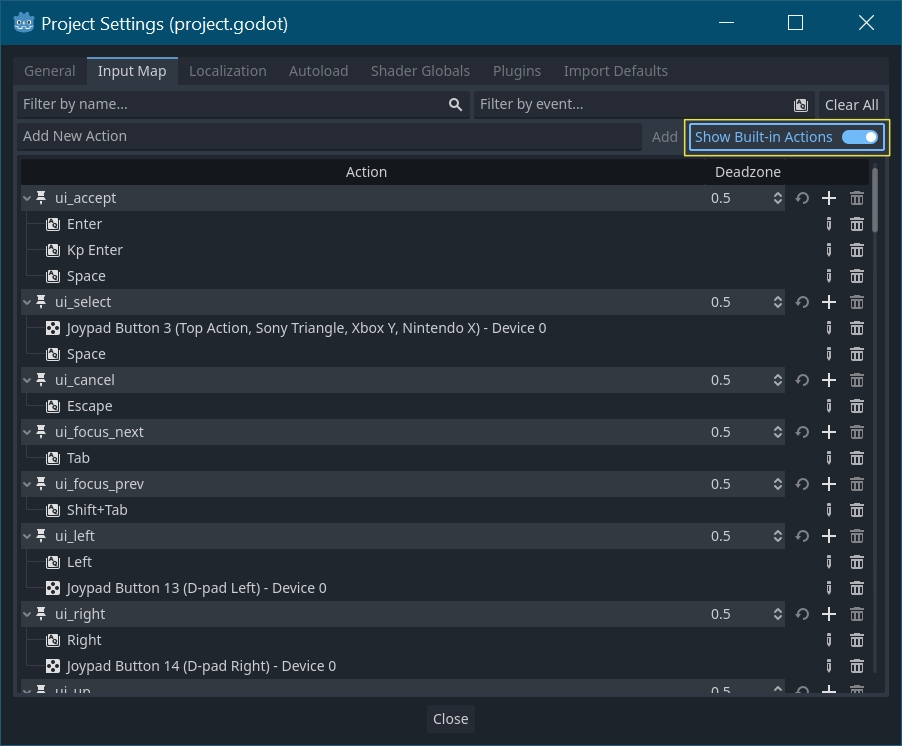
Tip
A new Godot project includes a number of default actions already defined. To see them, turn on in the InputMap dialog.
While not strictly required, it's recommended to use the snake_case naming
convention for input action names.
アクションの処理
アクションを定義したら、探しているアクションの名前を渡すことで is_action_pressed() と is_action_released() を使用してスクリプトでアクションを処理できます:
func _input(event):
    if event.is_action_pressed("my_action"):
        print("my_action occurred!")
public override void _Input(InputEvent @event)
{
    if (@event.IsActionPressed("my_action"))
    {
        GD.Print("my_action occurred!");
    }
}
キーボードイベント
キーボードイベントは InputEventKey でキャプチャされます。代わりに入力アクションを使用することをお勧めしますが、重要なイベントを具体的に調べたい場合もあります。この例では、T を確認します:
func _input(event):
    if event is InputEventKey and event.pressed:
        if event.keycode == KEY_T:
            print("T was pressed")
public override void _Input(InputEvent @event)
{
    if (@event is InputEventKey keyEvent && keyEvent.Pressed)
    {
        if (keyEvent.Keycode == Key.T)
        {
            GD.Print("T was pressed");
        }
    }
}
Tip
キーコード定数のリストについては @GlobalScope_Key を参照してください。
警告
一度に押したキーが多すぎると、すべてのキー入力が処理されないことがあります (キーボードのゴースト現象)。キーボード上の位置により、特定のキーは他のキーよりもゴーストが発生しやすくなります。一部のキーボードにはハードウェアレベルでアンチゴースト機能が備わっていますが、この機能は通常ローエンドのキーボードやラップトップのキーボードにはありません。
そのためアンチゴーストなしのキーボードでも適切に動作するように設計されたデフォルトのキーボードレイアウトを使用することをお勧めします。詳細については Gamedev Stack Exchange question を参照してください。
キーボード・モディファイヤ
モディファイヤのプロパティは、InputEventWithModifiers から継承されます。これにより、ブールプロパティを使用してモディファイヤの組み合わせを確認できます。T が押されたときに起こることが1つあり、Shift + T のときは何か違うことが起こると想像してみましょう。
func _input(event):
    if event is InputEventKey and event.pressed:
        if event.keycode == KEY_T:
            if event.shift_pressed:
                print("Shift+T was pressed")
            else:
                print("T was pressed")
public override void _Input(InputEvent @event)
{
    if (@event is InputEventKey keyEvent && keyEvent.Pressed)
    {
        switch (keyEvent.Keycode)
        {
            case Key.T:
                GD.Print(keyEvent.ShiftPressed ? "Shift+T was pressed" : "T was pressed");
                break;
        }
    }
}
Tip
キーコード定数のリストについては @GlobalScope_Key を参照してください。
マウスイベント
マウスイベントは InputEventMouse クラスから派生し、2つのタイプに分けられます: InputEventMouseButton および InputEventMouseMotion です。これは、すべてのマウスイベントに position プロパティが含まれることを意味することに注意してください。
マウスモーション
InputEventMouseMotion イベントは、マウスが移動するたびに発生します。relative プロパティで移動の距離を確認できます。
マウスイベントを使用して Sprite2D ノードをドラッグアンドドロップする例を次に示します:
extends Node


var dragging = false
var click_radius = 32 # Size of the sprite.


func _input(event):
    if event is InputEventMouseButton and event.button_index == MOUSE_BUTTON_LEFT:
        if (event.position - $Sprite2D.position).length() < click_radius:
            # Start dragging if the click is on the sprite.
            if not dragging and event.pressed:
                dragging = true
        # Stop dragging if the button is released.
        if dragging and not event.pressed:
            dragging = false

    if event is InputEventMouseMotion and dragging:
        # While dragging, move the sprite with the mouse.
        $Sprite2D.position = event.position
using Godot;

public partial class MyNode2D : Node2D
{
    private bool _dragging = false;
    private int _clickRadius = 32; // Size of the sprite.

    public override void _Input(InputEvent @event)
    {
        Sprite2D sprite = GetNodeOrNull<Sprite2D>("Sprite2D");
        if (sprite == null)
        {
            return; // No suitable node was found.
        }

        if (@event is InputEventMouseButton mouseEvent && mouseEvent.ButtonIndex == MouseButton.Left)
        {
            if ((mouseEvent.Position - sprite.Position).Length() < _clickRadius)
            {
                // Start dragging if the click is on the sprite.
                if (!_dragging && mouseEvent.Pressed)
                {
                    _dragging = true;
                }
            }
            // Stop dragging if the button is released.
            if (_dragging && !mouseEvent.Pressed)
            {
                _dragging = false;
            }
        }
        else
        {
            if (@event is InputEventMouseMotion motionEvent && _dragging)
            {
                // While dragging, move the sprite with the mouse.
                sprite.Position = motionEvent.Position;
            }
        }
    }
}
タッチイベント
タッチスクリーンデバイスを使用している場合、タッチイベントを生成できます。InputEventScreenTouch はマウスクリックイベントに相当し、InputEventScreenDrag はマウスの動きとほぼ同じように機能します。
Tip
非タッチスクリーンデバイスでタッチイベントをテストするには、プロジェクト設定を開き、"Input Devices/Pointing" セクションに進みます。 "Emulate Touch From Mouse" を有効にすると、プロジェクトはマウスクリックとモーションをタッチイベントとして解釈します。