Attention: Here be dragons
This is the latest
(unstable) version of this documentation, which may document features
not available in or compatible with released stable versions of Godot.
Checking the stable version of the documentation...
敵の作成
次はプレイヤーが避けるべき敵を作りましょう。敵の行動はあまり複雑ではありません。モブは画面の端でランダムに生まれると、ランダムな方向を選び、一直線に進みます。
これから Mob シーンを作り、それをインスタンス化して、ゲーム内に任意の数の独立したモブを作成します。
ノードの設定
トップメニューから [シーン → 新規シーン] をクリックして、次のノードを追加します:
RigidBody2D(
Mobという名前にする)
Don't forget to set the children so they can't be selected, like you did with
the Player scene. This is done by selecting the parent node (RigidBody2D) in the
Scene tree dock, then using the button at the top of the 2D editor
(Ctrl + G or Cmd + G on macOS).
Mob ノードを選択して、インスペクタの RigidBody2D セクション内の Gravity Scale プロパティを 0 に設定します。これはモブが下に落ちるのを防ぎます。
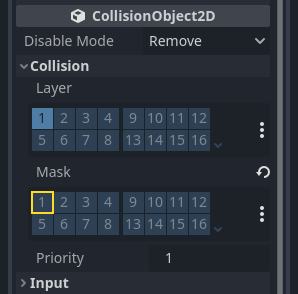
In addition, in the Mob node inspector,
under the CollisionObject2D
section, expand the Collision group and
uncheck the 1 inside the Mask property.
This will ensure the mobs do not collide with each other.
プレイヤーと同じように AnimatedSprite2D を設定します。 今回は、3つのアニメーションがあります: fly、swim、walkです。 artフォルダ内には、各アニメーション用の画像が2枚ずつ入っています。
Animation Speed プロパティは、アニメーションごとに設定する必要があります。3つのアニメーションすべてに対して 3 を設定します。
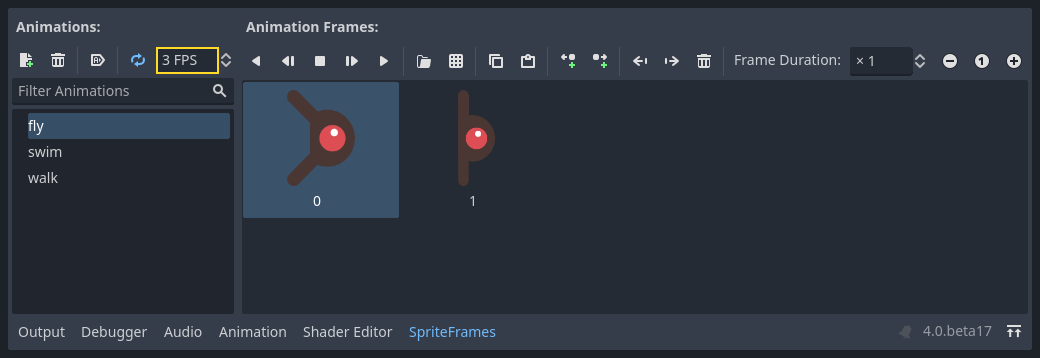
Animation Speed 入力フィールドの右側にある「▶」ボタンを使って、アニメーションをプレビューすることができます。
モブにバラエティを持たせるために、1つのアニメーションをランダムに選択します。
プレイヤーの画像と同じように、モブの画像も小さくする必要があります。 AnimatedSprite2Dの Scaleプロパティを (0.75, 0.75)に設定します。
Player シーンと同様に、コリジョンに CapsuleShape2D を追加します。図形を画像に合わせるには、Rotation プロパティを 90 に設定する必要があります (インスペクタの「Transform」下にあります)。
シーンを保存します。
敵のスクリプト
Mob にスクリプトをアタッチします。以下のようになるはずです:
extends RigidBody2D
using Godot;

public partial class Mob : RigidBody2D
{
    // Don't forget to rebuild the project.
}
それでは、スクリプトの残りの部分を見てみましょう。 _ready()では、アニメーションを再生し、3つのアニメーションタイプのいずれかをランダムに選択します:
func _ready():
    var mob_types = Array($AnimatedSprite2D.sprite_frames.get_animation_names())
    $AnimatedSprite2D.animation = mob_types.pick_random()
    $AnimatedSprite2D.play()
public override void _Ready()
{
    var animatedSprite2D = GetNode<AnimatedSprite2D>("AnimatedSprite2D");
    string[] mobTypes = animatedSprite2D.SpriteFrames.GetAnimationNames();
    animatedSprite2D.Play(mobTypes[GD.Randi() % mobTypes.Length]);
}
まず、アニメーション名のリストをAnimatedSprite2Dの sprite_framesプロパティから取得します。これは3つのアニメーション名 ["walk", "swim", "fly"] をすべて含む配列を返します。
GDScript コードでは、Array.pick_random メソッドを使用して、これらのアニメーション名をランダムに 1 つ選択します。一方、C# コードでは 0 から 2 までのランダムな数字を選択して、リストからこれらの名前の 1 つを選択します (配列インデックスは 0 から始まります)。式 GD.Randi() % n は 0 から n-1 までのランダムな整数を選択します。
最後に、``play()``を呼び出して選択したアニメーションを再生します。
最後のピースは、モブが画面を離れたときにモブ自身を削除することです。 VisibleOnScreenNotifier2D ノードの screen_exited() シグナルを接続し、次のコードを追加します:
func _on_visible_on_screen_notifier_2d_screen_exited():
    queue_free()
// We also specified this function name in PascalCase in the editor's connection window.
private void OnVisibleOnScreenNotifier2DScreenExited()
{
    QueueFree();
}
queue_free() は、基本的にフレームの最後にあるノードを「解放」または削除する関数です。
これで Mob シーンが完成します。
プレイヤーと敵が準備できたので、次のパートではそれらを新しいシーンでまとめます。ランダムに敵が出現、まっすぐ動くようにし、プロジェクトを遊べるゲームにします。