Up to date
This page is up to date for Godot 4.2.
If you still find outdated information, please open an issue.
シーンツリーの使用
はじめに
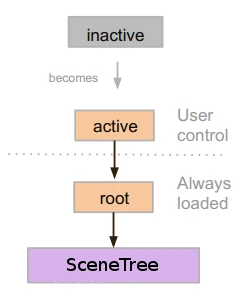
これまでのチュートリアルは、すべてがノードの概念を中心に展開していました。シーンはノードのコレクションです。それら シーンツリー に入るとアクティブになります。
メインループ
Godotの内部的な働きは次のとおりです。OSクラスがあります。これは最初に実行される唯一のインスタンスです。その後、すべてのドライバ、サーバ、スクリプト言語、シーンシステムなどがロードされます。
初期化が完了したら、実行するためにOSにメインループを提供する必要があります。これまでのところはすべて内部の作業です(これが内部でどのように機能するかを知りたい場合は、ソースコードのmain/main.cppファイルを確認できます)。
ユーザー プログラムまたはゲームは、MainLoopで起動します。このクラスには、初期化、アイドル (フレーム同期コールバック)、固定 (物理同期コールバック)、および入力のためのいくつかのメソッドがあります。繰り返しますが、これは低レベルの処理であり、Godotでゲームを作るときに、独自にMainLoopを書くことはめったに意味がありません。
シーンツリー
Godotの仕組みを説明する方法の1つは、Godotが低レベルのミドルウェアよりも高レベルなゲームエンジンであることです。
シーンシステムはゲームエンジンで、OSとサーバーは低レベルのAPIです。
シーンシステムは、OSに独自のメインループSceneTreeを提供します。これは自動的にインスタンス化され、シーンの実行時に設定されるので、余分な作業を行う必要はありません。
このクラスにはいくつかの重要な用途があるため、このクラスが存在することを知っておくことが重要です:
ルートViewportが含まれており、最初に開かれたときに、 シーン ツリー の一部になるためにシーンが子として追加されます(詳細は次のページを参照)。
それにはグループに関する情報が含まれており、グループ内のすべてのノードを呼び出すか、それらのリストを取得する手段があります。
これには、一時停止モードの設定やプロセスの終了など、いくつかのグローバル状態に関する機能が含まれています。
ノードがシーンツリーの一部である場合、 Node.get_tree() を呼び出すことで SceneTree シングルトンを取得できます。
ルートビューポート
ルートViewportは常にシーンの一番上にあります。ノードからは、次の2つの方法で取得できます:
get_tree().root # Access via scene main loop.
get_node("/root") # Access via absolute path.
GetTree().Root // Access via scene main loop.
GetNode("/root"); // Access via absolute path.
このノードにはメインビューポートが含まれます。 Viewport の子であるものはすべてデフォルトでその内部に描画されるため、すべてのノードの最上位は常にこのタイプのノードであり、そうでない場合は何も表示されません。
他のビューポートをシーンに作成することができますが(画面分割効果など)、これがユーザーによって作成されることのない唯一のビューポートです。 SceneTree内に自動的に作成されます。
シーンツリー
ノードがルートビューポートに直接または間接的に接続されると、 シーンツリー の一部になります。
つまり、前のチュートリアルで説明したように、 _enter_tree() と _ready() (または _exit_tree() ) の コールバック が取得されます。

ノードは シーン ツリー に入ると、アクティブになります。処理、入力、2Dおよび3Dビジュアルの表示、通知の送受信、サウンドの再生などに必要なすべてのものにアクセスできます。 シーンツリー から削除されると、これらの機能を失います。
ツリーの順序
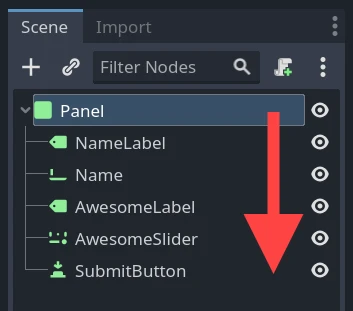
Most node operations in Godot, such as drawing 2D, processing, or getting notifications are done in tree order, or top to bottom as seen in the editor (also known as pre-order traversal):

For example, the top node in a scene has its _process() function
called first, then the node below it has its _process() function called,
then the node below that and so on.
An important exception is the _ready() function: each parent node has its
_ready() function called only after all its child nodes have their
_ready() functions called, so that the parent knows its children are
completely ready to be accessed. This is also known as post-order traversal.
In the above image, NameLabel would be notified first (but only after its
children, if it had any!), followed by Name, etc., and Panel would be
notified last.
The order of operations can also be overridden using the process_priority
node property. Nodes with a lower number are called first. For example, nodes
with the priorities "0, 1, 2, 3" would be called in that order from left to right.
シーンツリー に入って「アクティブになる」
シーンはディスクから読み込まれるか、スクリプトによって作成されます。
The root node of that scene (only one root, remember?) is added as either a child of the "root" Viewport (from SceneTree), or to any of its descendants.
Every node of the newly added scene will receive the "enter_tree" notification (
_enter_tree()callback in GDScript) in top-to-bottom order (pre-order traversal).Every node will receive the "ready" notification (
_ready()callback in GDScript) for convenience, once all its children have received the "ready" notification (post-order traversal).When a scene (or part of it) is removed, they receive the "exit scene" notification (
_exit_tree()callback in GDScript) in bottom-to-top order (the exact reverse of top-to-bottom order).
現在のシーンの変更
After a scene is loaded, you may want to change this scene for another one. One way to do this is to use the SceneTree.change_scene_to_file() function:
func _my_level_was_completed():
    get_tree().change_scene_to_file("res://levels/level2.tscn")
public void _MyLevelWasCompleted()
{
    GetTree().ChangeSceneToFile("res://levels/level2.tscn");
}
Rather than using file paths, one can also use ready-made PackedScene resources using the equivalent function SceneTree.change_scene_to_packed(PackedScene scene):
var next_scene = preload("res://levels/level2.tscn")

func _my_level_was_completed():
    get_tree().change_scene_to_packed(next_scene)
public void _MyLevelWasCompleted()
{
    var nextScene = (PackedScene)ResourceLoader.Load("res://levels/level2.tscn");
    GetTree().ChangeSceneToPacked(nextScene);
}
These are quick and useful ways to switch scenes but have the drawback that the game will stall until the new scene is loaded and running. At some point in the development of your game, it may be preferable to create proper loading screens with progress bar, animated indicators or threaded (background) loading. This must be done manually using Singletons (Autoload) and バックグラウンド読み込み.