Attention: Here be dragons
This is the latest
(unstable) version of this documentation, which may document features
not available in or compatible with released stable versions of Godot.
Checking the stable version of the documentation...
2Dライトとシャドウ
はじめに
By default, 2D scenes in Godot are unshaded, with no lights and shadows visible. While this is fast to render, unshaded scenes can look bland. Godot provides the ability to use real-time 2D lighting and shadows, which can greatly enhance the sense of depth in your project.
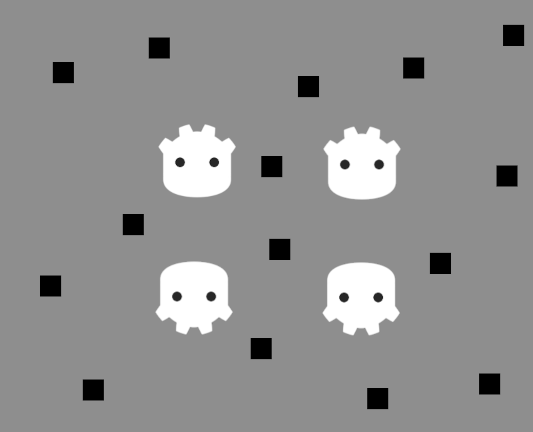
No 2D lights or shadows, scene is unshaded
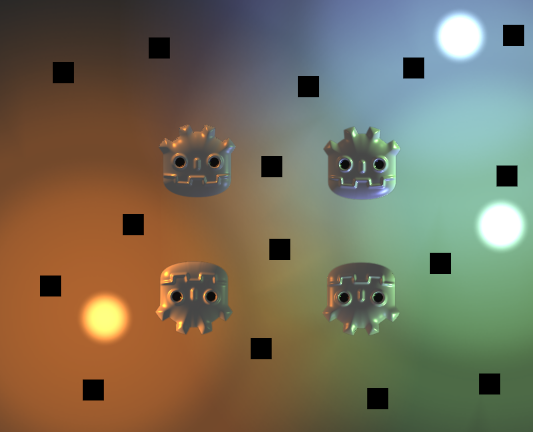
2D lights enabled (without shadows)

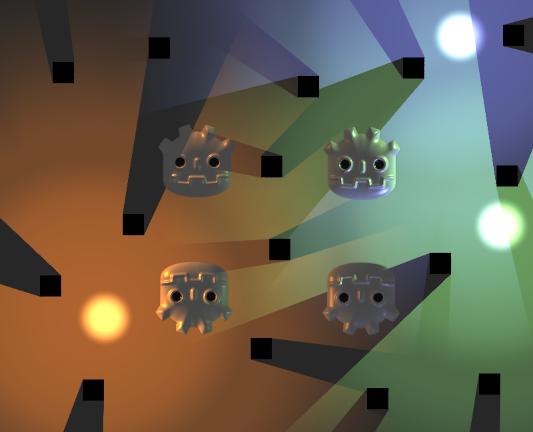
2D lights and shadows enabled
ノード
There are several nodes involved in a complete 2D lighting setup:
CanvasModulate (シーンの残りの部分を暗くするために使用します)
PointLight2D (for omnidirectional or spot lights)
DirectionalLight2D (for sunlight or moonlight)
LightOccluder2D (for light shadow casters)
Other 2D nodes that receive lighting, such as Sprite2D or TileMapLayer.
CanvasModulate is used to darken the scene by specifying a color that will act as the base "ambient" color. This is the final lighting color in areas that are not reached by any 2D light. Without a CanvasModulate node, the final scene would look too bright as 2D lights would only brighten the existing unshaded appearance (which appears fully lit).
Sprite2Ds are used to display the textures for the light blobs, the background, and for the shadow casters.
PointLight2Ds are used to light the scene. The way a light typically works is by adding a selected texture over the rest of the scene to simulate lighting.
LightOccluder2Ds are used to tell the shader which parts of the scene cast shadows. These occluders can be placed as independent nodes or can be part of a TileMapLayer node.
The shadows appear only on areas covered by the PointLight2D and their direction is based on the center of the Light.
注釈
The background color does not receive any lighting. If you want light to be cast on the background, you need to add a visual representation for the background, such as a Sprite2D.
The Sprite2D's Region properties can be helpful to quickly create a repeating background texture, but remember to also set Texture > Repeat to Enabled in the Sprite2D's properties.
Point lights
Point lights (also called positional lights) are the most common element in 2D lighting. Point lights can be used to represent light from torches, fire, projectiles, etc.
PointLight2D offers the following properties to tweak in the inspector:
Texture: The texture to use as a light source. The texture's size determines the size of the light. The texture may have an alpha channel, which is useful when using Light2D's Mix blend mode, but it is not required if using the Add (default) or Subtract blend modes.
Offset: The offset for the light texture. Unlike when you move the light node, changing the offset does not cause shadows to move.
Texture Scale: The multiplier for the light's size. Higher values will make the light extend out further. Larger lights have a higher performance cost as they affect more pixels on screen, so consider this before increasing a light's size.
Height: The light's virtual height with regards to normal mapping. By default, the light is very close to surfaces receiving lights. This will make lighting hardly visible if normal mapping is used, so consider increasing this value. Adjusting the light's height only makes a visible difference on surfaces that use normal mapping.
If you don't have a pre-made texture to use in a light, you can use this "neutral" point light texture (right-click > Save Image As…):
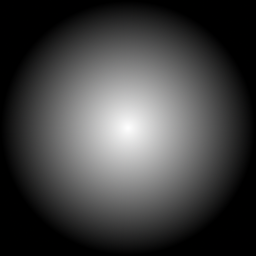
Neutral point light texture
If you need different falloff, you can procedurally create a texture by assigning a New GradientTexture2D on the light's Texture property. After creating the resource, expand its Fill section and set the fill mode to Radial. You will then have to adjust the gradient itself to start from opaque white to transparent white, and move its starting location to be in the center.
指向性(Directional)ライト
Directional lighting is used to represent sunlight or moonlight. Light rays are casted parallel to each other, as if the sun or moon was infinitely far away from the surface that is receiving the light.
DirectionalLight2D offers the following properties:
Height: The light's virtual height with regards to normal mapping (
0.0= parallel to surfaces,1.0= perpendicular to surfaces). By default, the light is fully parallel with the surfaces receiving lights. This will make lighting hardly visible if normal mapping is used, so consider increasing this value. Adjusting the light's height only makes a visual difference on surfaces that use normal mapping. Height does not affect shadows' appearance.Max Distance: The maximum distance from the camera center objects can be before their shadows are culled (in pixels). Decreasing this value can prevent objects located outside the camera from casting shadows (while also improving performance). Camera2D zoom is not taken into account by Max Distance, which means that at higher zoom values, shadows will appear to fade out sooner when zooming onto a given point.
注釈
Directional shadows will always appear to be infinitely long, regardless of the value of the Height property. This is a limitation of the shadow rendering method used for 2D lights in Godot.
To have directional shadows that are not infinitely long, you should disable shadows in the DirectionalLight2D and use a custom shader that reads from the 2D signed distance field instead. This distance field is automatically generated from LightOccluder2D nodes present in the scene.
Common light properties
Both PointLight2D and DirectionalLight2D offer common properties, which are part of the Light2D base class:
Enabled: Allows toggling the light's visibility. Unlike hiding the light node, disabling this property will not hide the light's children.
Editor Only: If enabled, the light is only visible within the editor. It will be automatically disabled in the running project.
Color: The light's color.
Energy: The light's intensity multiplier. Higher values result in a brighter light.
Blend Mode: The blending formula used for light computations. The default Add is suited for most use cases. Subtract can be used for negative lights, which are not physically accurate but can be used for special effects. The Mix blend mode mixes the value of pixels corresponding to the light's texture with the values of pixels under it by linear interpolation.
Range > Z Min: The lowest Z index affected by the light.
Range > Z Max: The highest Z index affected by the light.
Range > Layer Min: The lowest visual layer affected by the light.
Range > Layer Max: The highest visual layer affected by the light.
Range > Item Cull Mask: Controls which nodes receive light from this node, depending on the other nodes' enabled visual layers Occluder Light Mask. This can be used to prevent certain objects from receiving light.
Setting up shadows
After enabling the Shadow > Enabled property on a PointLight2D or DirectionalLight2D node, you will not see any visual difference initially. This is because no nodes in your scene have any occluders yet, which are used as a basis for shadow casting.
For shadows to appear in the scene, LightOccluder2D nodes must be added to the scene. These nodes must also have occluder polygons that are designed to match the sprite's outline.
Along with their polygon resource (which must be set to have any visual effect), LightOccluder2D nodes have 2 properties:
SDF Collision: If enabled, the occluder will be part of a real-time generated signed distance field that can be used in custom shaders. When not using custom shaders that read from this SDF, enabling this makes no visual difference and has no performance cost, so this is enabled by default for convenience.
Occluder Light Mask: This is used in tandem with PointLight2D and DirectionalLight2D's Shadow > Item Cull Mask property to control which objects cast shadows for each light. This can be used to prevent specific objects from casting shadows.
There are two ways to create light occluders:
Automatically generating a light occluder
Occluders can be created automatically from Sprite2D nodes by selecting the node, clicking the Sprite2D menu at the top of the 2D editor then choosing Create LightOccluder2D Sibling.
In the dialog that appears, an outline will surround your sprite's edges. If the outline matches the sprite's edges closely, you can click OK. If the outline is too far away from the sprite's edges (or is "eating" into the sprite's edges), adjust Grow (pixels) and Shrink (pixels), then click Update Preview. Repeat this operation until you get satisfactory results.
Manually drawing a light occluder
Create a LightOccluder2D node, then select the node and click the "+" button at the top of the 2D editor. When asked to create a polygon resource, answer Yes. You can then start drawing an occluder polygon by clicking to create new points. You can remove existing points by right-clicking them, and you can create new points from the existing line by clicking on the line then dragging.
The following properties can be adjusted on 2D lights that have shadows enabled:
Color: The color of shaded areas. By default, shaded areas are fully black, but this can be changed for artistic purposes. The color's alpha channel controls how much the shadow is tinted by the specified color.
Filter: The filter mode to use for shadows. The default None is the fastest to render, and is well suited for games with a pixel art aesthetic (due to its "blocky" visuals). If you want a soft shadow, use PCF5 instead. PCF13 is even softer, but is the most demanding to render. PCF13 should only be used for a few lights at once due to its high rendering cost.
Filter Smooth: Controls how much softening is applied to shadows when Filter is set to PCF5 or PCF13. Higher values result in a softer shadow, but may cause banding artifacts to be visible (especially with PCF5).
Item Cull Mask: Controls which LightOccluder2D nodes cast shadows, depending on their respective Occluder Light Mask properties.
注釈
Lighting and shadow resolution in pixel-art games
The engine computes 2D lighting and shadows at the Viewport's pixel resolution, not at the source texture's texel resolution. The appearance of lights and shadows depends on your window or Viewport resolution, not on the resolution of individual sprite textures.
If you create a pixel-art game and want pixelated or blocky lighting and shadows that match your art style, Nearest texture filtering will not achieve this effect. Nearest filtering affects only how the engine samples textures — it does not change how the engine renders lighting and shadows.
To achieve pixelated lighting and shadows, use a custom shader to modify
LIGHT_VERTEX and SHADOW_VERTEX to snap light sampling to a pixel grid.
The following shader snaps lighting to a grid using the floor() function:
shader_type canvas_item;

uniform float pixel_size = 4.0;

void fragment() {
    // Snap lighting and shadows to pixel grid.
    LIGHT_VERTEX.xy = floor(LIGHT_VERTEX.xy / pixel_size) * pixel_size;
    SHADOW_VERTEX = floor(SHADOW_VERTEX / pixel_size) * pixel_size;

    // Normal rendering.
    COLOR = texture(TEXTURE, UV);
}
This works by dividing the position by pixel_size to convert to grid space,
using floor() to round down to the nearest grid point, then multiplying back
to convert to screen space. The result forces the engine to sample lighting from
discrete grid positions, which creates the pixelated effect.
For more information on canvas item shaders, see CanvasItem shaders.
Hard shadows

Soft shadows (PCF13, Filter Smooth 1.5)

Soft shadows with streaking artifacts due to Filter Smooth being too high (PCF5, Filter Smooth 4)
Normal and specular maps
Normal maps and specular maps can greatly enhance the sense of depth of your 2D lighting. Similar to how these work in 3D rendering, normal maps can help make lighting look less flat by varying its intensity depending on the direction of the surface receiving light (on a per-pixel basis). Specular maps further help improve visuals by making some of the light reflect back to the viewer.
Both PointLight2D and DirectionalLight2D support normal mapping and specular mapping. Normal and specular maps can be assigned to any 2D element, including nodes that inherit from Node2D or Control.
A normal map represents the direction in which each pixel is "pointing" towards. This information is then used by the engine to correctly apply lighting to 2D surfaces in a physically plausible way. Normal maps are typically created from hand-painted height maps, but they can also be automatically generated from other textures.
A specular map defines how much each pixel should reflect light (and in which color, if the specular map contains color). Brighter values will result in a brighter reflection at that given spot on the texture. Specular maps are typically created with manual editing, using the diffuse texture as a base.
Tip
If you don't have normal or specular maps for your sprites, you can generate them using the free and open source Laigter tool.
To set up normal maps and/or specular maps on a 2D node, create a new CanvasTexture resource for the property that draws the node's texture. For example, on a Sprite2D:
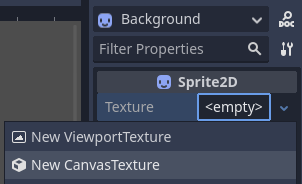
Creating a CanvasTexture resource for a Sprite2D node
Expand the newly created resource. You can find several properties you will need to adjust:
Diffuse > Texture: The base color texture. In this property, load the texture you're using for the sprite itself.
Normal Map > Texture: The normal map texture. In this property, load a normal map texture you've generated from a height map (see the tip above).
Specular > Texture: The specular map texture, which controls the specular intensity of each pixel on the diffuse texture. The specular map is usually grayscale, but it can also contain color to multiply the color of reflections accordingly. In this property, load a specular map texture you've created (see the tip above).
Specular > Color: The color multiplier for specular reflections.
Specular > Shininess: The specular exponent to use for reflections. Lower values will increase the brightness of reflections and make them more diffuse, while higher values will make reflections more localized. High values are more suited for wet-looking surfaces.
Texture > Filter: Can be set to override the texture filtering mode, regardless of what the node's property is set to (or the Rendering > Textures > Canvas Textures > Default Texture Filter project setting).
Texture > Repeat: Can be set to override the texture filtering mode, regardless of what the node's property is set to (or the Rendering > Textures > Canvas Textures > Default Texture Repeat project setting).
After enabling normal mapping, you may notice that your lights appear to be weaker. To resolve this, increase the Height property on your PointLight2D and DirectionalLight2D nodes. You may also want to increase the lights's Energy property slightly to get closer to how your lighting's intensity looked prior to enabling normal mapping.
Using additive sprites as a faster alternative to 2D lights
If you run into performance issues when using 2D lights, it may be worth replacing some of them with Sprite2D nodes that use additive blending. This is particularly suited for short-lived dynamic effects, such as bullets or explosions.
Additive sprites are much faster to render, since they don't need to go through a separate rendering pipeline. Additionally, it is possible to use this approach with AnimatedSprite2D (or Sprite2D + AnimationPlayer), which allows for animated 2D "lights" to be created.
However, additive sprites have a few downsides compared to 2D lights:
The blending formula is inaccurate compared to "actual" 2D lighting. This is usually not a problem in sufficiently lit areas, but this prevents additive sprites from correctly lighting up areas that are fully dark.
Additive sprites cannot cast shadows, since they are not lights.
Additive sprites ignore normal and specular maps used on other sprites.
To display a sprite with additive blending, create a Sprite2D node and assign a texture to it. In the inspector, scroll down to the CanvasItem > Material section, unfold it and click the dropdown next to the Material property. Choose New CanvasItemMaterial, click the newly created material to edit it, then set Blend Mode to Add.