Importing Images
Why importing them?
In Godot 3+, image files are no longer native resources and they must be imported. The reason behind this is the large amount of configuration parameters that image files can be imported with.
This small tutorial will explain what these parameters are and how to best make use of them.
Importing Textures
The default action in Godot is to import images as textures. Textures are stored in video memory and can’t be accessed directly. This is what makes drawing them efficient.
Import options are vast:
Compression:
Images are one of the largest assets in a game. To handle them efficiently, they need to be compressed. Godot offers several compression methods, depending on the use case.
Compress Mode
- VRAM Compression: This is the most common compression mode for 3D assets. File on disk is reduced and video memory usage is also reduced considerably. For 3D, it may present unwanted artifacts, though.
- Lossless Compression: This is the most common compression for 2D assets. It shows assets without any kind of artifacting, and disk compression is decent. It will use considerably more amount of video memory than VRAM, though.
- Lossy Compression: For games with lots of large 2D assets, lossy compression can be a great choice. It has some artifacting, but less than VRAM and the file size is almost a tenth of Lossless.
- Uncompressed: Only useful for formats that can’t be compressed (like, raw float).
In this table, each of the four options are described together with their
advantages and disadvantages (  = Best,
  =Worst ):
| Uncompressed | Compress Lossless (PNG) | Compress Lossy (WebP) | Compress VRAM | |
|---|---|---|---|---|
| Description | Stored as raw pixels | Stored as PNG | Stored as WebP | Stored as S3TC/BC,PVRTC/ETC, depending on platform |
| Size on Disk | Large |
 Small Small |
Very Small |
Small |
| Memory Usage | Large |
Large |
Large |
Small |
| Performance | Normal |
Normal |
Normal |
Fast |
| Quality Loss | None |
None |
Slight |
Moderate |
| Load Time | Normal |
Slow |
Slow |
Fast |
HDR Mode
Godot supports high dynamic range textures (as .HDR or .EXR). These are mostly useful as high dynamic range equirectancular panorama skys (the internet has plenty of if you look for them), which replace Cubemaps in Godot 2.x. Modern PCs support the BC6H VRAM format, but there are still plenty that do not.
If you want Godot to ensure full compatibility in for kind of textures, enable the “Force RGBE” option.
Normal Map
When using a texture as normal map, only the red and green channels are required. Given regular texture compression algorithms produce artifacts that don’t look that nice in normal maps, the RGTC compression format is the best fit for this data. Forcing this option to “Enabled” will make Godot import the image as RGTC compressed. By default, it’s set to “Detect” which means that if the texture is ever used as a normal map, it will be changed to “Enabled” and reimported automatically.
Flags
There are plenty of settings that can be toggled when importing an image as a texture, depending on the use case.
Repeat
This setting is mosty commonly used in 3D than 2D (thus it’s generally disabled in 2D). It makes UV coordinates going beyond the 0,0 - 1,1 range to “loop”. Repeating can optionally be set to mirrored mode.
Filter
When pixels become larger than the screen pixels, this options enable linear interpolation for them. The result is a smoother (less blocky) texture. This setting can be commonly used in 2D and 3D, but it’s usually disabled when making pixel perfect games.
Mipmaps
When pixels become smaller than the screen, mipmaps kick in. This helps reduce the grainy effect when shrinking the textures. Keep in mind that, in older hardware (GLES2, mainly mobile), there are some requirements to use mipmaps:
- Texture width and height must be powers of 2
- Repeat must be enabled
Keep in mind the above when making phone games and applications, want to aim for full compatibility, and need mipmaps.
When doing 3D, mipmap should be turned on as this also improves performance (smaller versions of the texture are used for objects further away).
Anisotropic
When textures are near parallel to the view (like floors), this option makes them have more detail by reducing blurryness.
SRGB
Godot uses Linear colorspace when rendering 3D. Textures mapped to albedo or detail channels need to have this option turned on in order for colors to look correct. When set to “Detect” mode, the texture will be marked as SRGB when used in albedo channels.
Process
Some special processes can be applied to images when importe as texture.
Fix Alpha Border
This puts pixels of the same surrounding color in transition from transparency to non transparency. It helps mitigate the outline effect when exporting images from Photoshop and the likes.
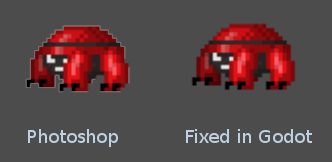
It’s a good idea to leave it on by default, unless specific values are needed.
Premultiplied Alpha
An alternative to fix darkened borders is to use premultiplied alpha. By enabling this option, the texture will be converted to this format. Keep in mind that a material will need to be created that uses the PREMULT ALPHA blend mode on canvas items that need it.
HDR as SRGB
Some few HDR files are broken and contain SRGB color data. It is advised to not use them but, in the worst case, toggling this option on will make them look right.
Detect 3D
This option makes Godot be aware of when a texture (which is imported for 2D as default) is used in 3D. If this happens, setting are changed so the texture flags are friendlier to 3D (mipmaps, filter and repeat become enabled and compression is changed to VRAM). Texture is also reimported automatically.