High dynamic range
Introduction
Normally, an artist does all the 3D modelling, then all the texturing, looks at their awesome looking model in the 3D DCC and says “looks fantastic, ready for integration!” then goes into the game, lighting is setup and the game runs.
So where does all this HDR stuff thing come from? The idea is that instead of dealing with colors that go from black to white (0 to 1), we use colors whiter than white (for example, 0 to 8 times white).
To be more practical, imagine that in a regular scene, the intensity of a light (generally 1.0) is set to 5.0. The whole scene will turn very bright (towards white) and look horrible.
After this the luminance of the scene is computed by averaging the luminance of every pixel of it, and this value is used to bring the scene back to normal ranges. This last operation is called tone-mapping. Finally, we are at a similar place from where we started:
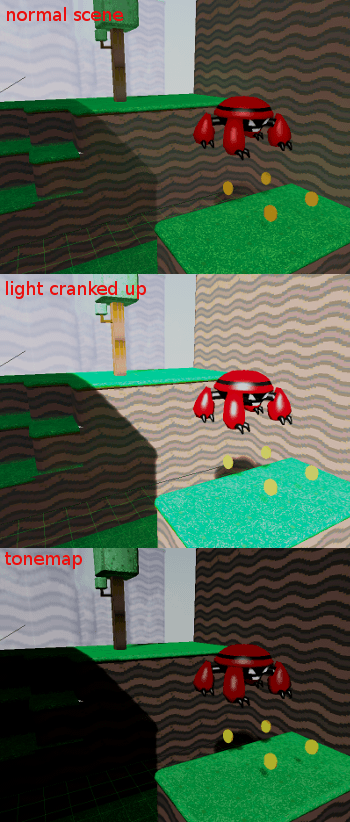
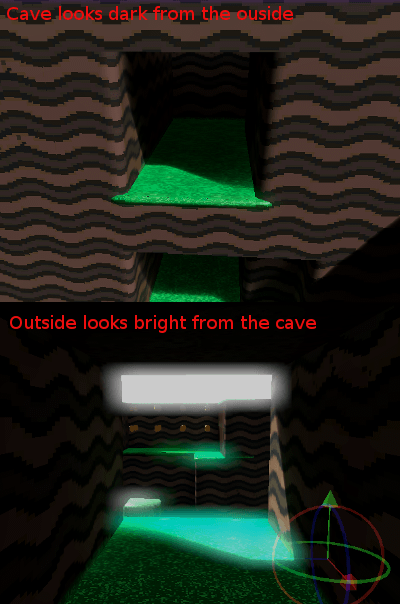
Except the scene is more contrasted because there is a higher light range at play. What is this all useful for? The idea is that the scene luminance will change while you move through the world, allowing situations like this to happen:
Additionally, it is possible to set a threshold value to send to the glow buffer depending on the pixel luminance. This allows for more realistic light bleeding effects in the scene.
Linear color space
The problem with this technique is that computer monitors apply a gamma curve to adapt better to the way the human eye sees. Artists create their art on the screen too, so their art has an implicit gamma curve applied to it.
The color space where images created in computer monitors exist is called “sRGB”. All visual content that people have on their computers or download from the internet (such as pictures, movies, etc.) is in this colorspace.
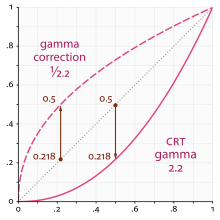
The mathematics of HDR require that we multiply the scene by different values to adjust the luminance and exposure to different light ranges, and this curve gets in the way as we need colors in linear space for this.
Linear color space & asset pipeline
Working in HDR is not just pressing a switch. First, imported image assets must be converted to linear space on import. There are two ways to do this:
SRGB -> linear conversion on image import
This is the most compatible way of using linear-space assets, and it will work everywhere including all mobile devices. The main issue with this is loss of quality, as sRGB exists to avoid this same problem. Using 8 bits per channel to represent linear colors is inefficient from the point of view of the human eye. These textures might be later compressed too which makes the problem worse.
In any case though, this is the easy solution that works everywhere.
Hardware sRGB -> linear conversion.
This is the most correct way to use assets in linear-space, as the texture sampler on the GPU will do the conversion after reading the texel using floating point. This works fine on PC and consoles, but most mobile devices do no support it, or do not support it on compressed texture format (iOS for example).
Linear -> sRGB at the end.
After all the rendering is done, the linear-space rendered image must be converted back to sRGB. To do this, simply enable sRGB conversion in the current Environment (more on that below).
Keep in mind that sRGB -> Linear and Linear -> sRGB conversions must always be both enabled. Failing to enable one of them will result in horrible visuals suitable only for avant-garde experimental indie games.
Parameters of HDR
HDR is found in the Environment resource. These are found most of the time inside a WorldEnvironment node or set in a camera. There are many parameters for HDR:
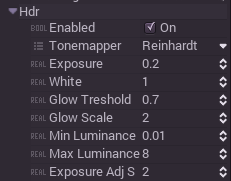
ToneMapper
The ToneMapper is the heart of the algorithm. Many options for tonemappers are provided:
- Linear: Simplest tonemapper. It does its job for adjusting scene brightness, but if the differences in light are too big, it will cause colors to be too saturated.
- Log: Similar to linear but not as extreme.
- Reinhardt: Classical tonemapper (modified so it will not desaturate as much)
- ReinhardtAutoWhite: Same as above but uses the max scene luminance to adjust the white value.
Exposure
The same exposure parameter as in real cameras. Controls how much light enters the camera. Higher values will result in a brighter scene, and lower values will result in a darker scene.
White
Maximum value of white.
Glow threshold
Determine above which value (from 0 to 1 after the scene is tonemapped), light will start bleeding.
Glow scale
Determine how much light will bleed.
Min luminance
Lower bound value of light for the scene at which the tonemapper stops working. This allows dark scenes to remain dark.
Max luminance
Upper bound value of light for the scene at which the tonemapper stops working. This allows bright scenes to remain saturated.
Exposure adjustment speed
Auto-exposure will change slowly and will take a while to adjust (like in real cameras). Bigger values means faster adjustment.