Making Plugins
About Plugins
A plugin is a great way to extend the editor with useful tools. It can be made entirely with GDScript and standard scenes, without even reloading the editor. Unlike modules, you don’t need to create C++ code nor recompile the engine. While this makes plugins not as powerful, there’s still a lot of things you can do with them. Note that a plugin is not different from any scene you already can make, except that it is made via script to add functionality.
This tutorial will guide you through the creation of two simple plugins so you can understand how they work and be able to develop your own. The first will be a custom node that you can add to any scene in the project and the other will be a custom dock added to the editor.
Creating a plugin
Before starting, create a new empty project wherever you want. This will serve as base to develop and test the plugins.
The first thing you need to do is to create a new plugin that the editor can
understand as such. For that you need two files: plugin.cfg for the
configuration and a custom GDScript with the functionality.
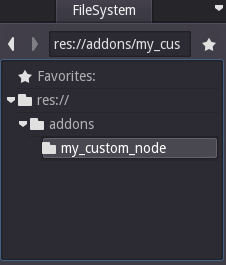
Plugins have a standard path like addons/plugin_name inside the project
folder. So create the folder my_custom_node inside addons. So you’ll
have a directory structure like this:
To make the plugin.cfg file, open your favorite text editor with a blank
file. Godot is not able (yet) to open text files besides scripts, so this must
be done in an external editor. Add the following structure to your
plugin.cfg:
[plugin]

name="My Custom Node"
description="A custom node made to extend the Godot Engine."
author="Your Name Here"
version="1.0"
script="custom_node.gd"
This is a simple ini file with metadata about your plugin. You need to set
up the name and description so users can understand what it does. Add your
own name so you can be properly credited. A version number is useful so users can see if
they have an outdated version (if you are unsure on how to come up with
the version number, check SemVer). And finally a main
script file to load when your plugin is active.
The script file
Open the script editor (F3) and create a new GDScript file called
custom_node.gd inside the my_custom_node folder. This script is special
and it has two requirements: it must be a tool script and it has to
inherit from EditorPlugin.
It’s important to deal with initialization and clean-up of resources. So a good practice is to use the virtual function _enter_tree() to initialize your plugin and _exit_tree() to clean it up. You can delete the default GDScript template from your file and replace it with the following structure:
tool
extends EditorPlugin

func _enter_tree():
    # Initialization of the plugin goes here
    pass

func _exit_tree():
    # Clean-up of the plugin goes here
    pass
This is a good template to use when devising new plugins.
A custom node
Sometimes you want a certain behavior in many nodes. Maybe a custom scene or control that can be reused. Instancing is helpful in a lot of cases but sometimes it can be cumbersome, especially if you’re using it between many projects. A good solution to this is to make a plugin that adds a node with a custom behavior.
To create a new node type, you can avail of the function
add_custom_type() from the
EditorPlugin class. This function can add new types to the editor,
be it nodes or resources. But before you can create the type you need a script
that will act as the logic for the type. While such script doesn’t need to have
the tool keyword, it is interesting to use it so the user can see it acting
on the editor.
For this tutorial, we’ll create a simple button that prints a message when clicked. And for that we’ll need a simple script that extends from Button. It could also extend BaseButton if you prefer:
tool
extends Button

func _enter_tree():
    connect("pressed", self, "clicked")

func clicked():
    print("You clicked me!")
That’s it for our basic button. You can save this as button.gd inside the
plugin folder. You’ll also need a 16x16 icon to show in the scene tree. If you
don’t have one, you can grab the default one from the engine:
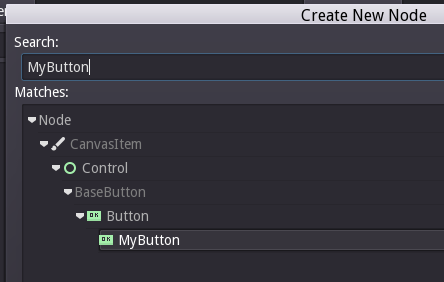
Now we need to add it as a custom type so it shows on the Create New Node
dialog. For that, change the custom_node.gd script to the following:
tool
extends EditorPlugin

func _enter_tree():
    # Initialization of the plugin goes here
    # Add the new type with a name, a parent type, a script and an icon
    add_custom_type("MyButton", "Button", preload("button.gd"), preload("icon.png"))

func _exit_tree():
    # Clean-up of the plugin goes here
    # Always remember to remove it from the engine when deactivated
    remove_custom_type("MyButton")
With that done, the plugin should already be available in the plugin list at Project Settings. So activate it and try to add a new node to see the result:
When you add the node, you can see that it already have the script you created attached to it. Set a text to the button, save and run the scene. When you click the button, you can see a text in the console:

A custom dock
Maybe you need to extend the editor and add tools that are always available. An easy way to do it is to add a new dock with a plugin. Docks are just scenes based on control, so how to create them is not far beyond your knowledge.
The way to start this plugin is similar to the custom node. So create a new
plugin.cfg file in the addons/my_custom_dock folder. And then with
your favorite text editor add the following content to it:
[plugin]

name="My Custom Dock"
description="A custom dock made so I can learn how to make plugins."
author="Your Name Here"
version="1.0"
script="custom_dock.gd"
Then create the script custom_dock.gd in the same folder. Fill with the
template we’ve seen before to get a
good start.
Since we’re trying to add a new custom dock, we need to create the contents of such dock. This is nothing more than a standard Godot scene. So you can create a new scene in the editor and start creating it.
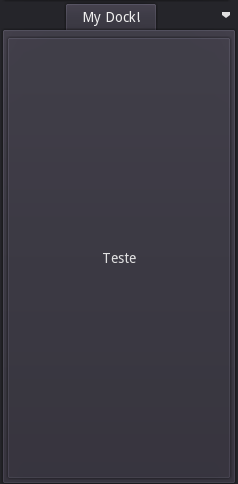
For an editor dock, it is mandatory that the root of the scene is a Control or one of its child classes. For this tutorial, you can make a single button. The name of the root node will also be the name that appears on the dock tab, so be sure to put a descriptive but short one. Don’t forget to add a text to your button.
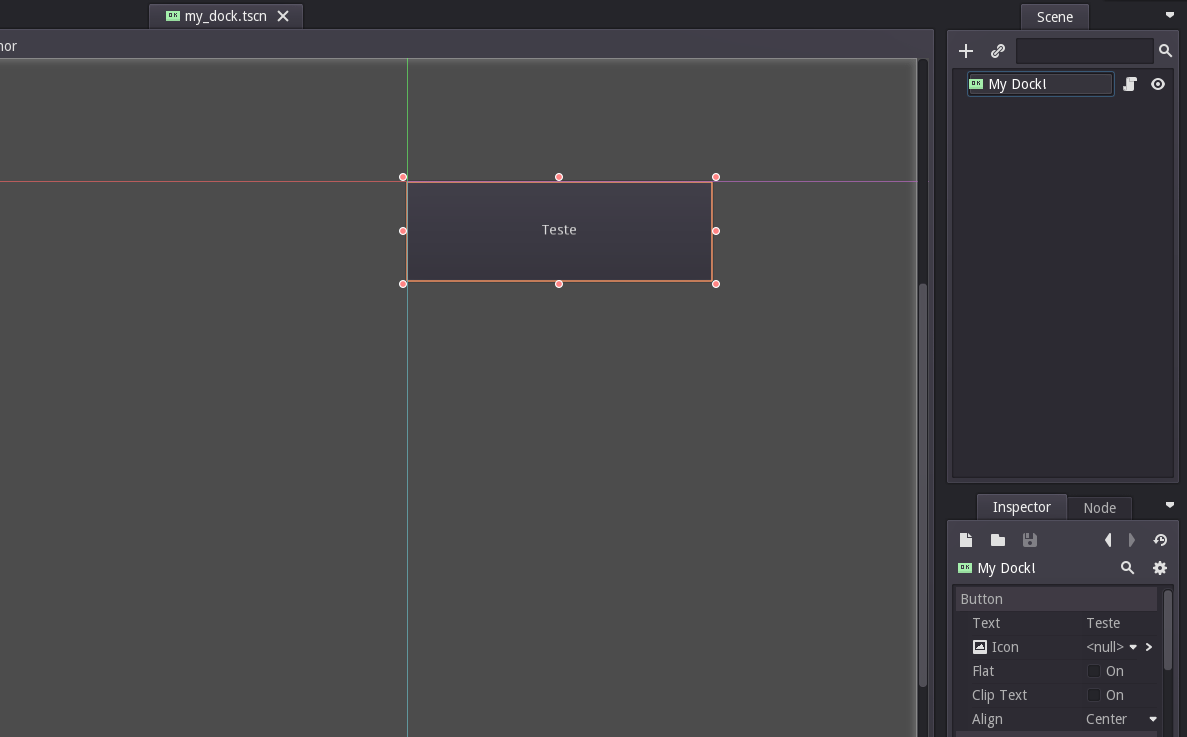
Save this scene as my_dock.tscn.
Now you need to grab that scene you created and add it as a dock in the editor. For this you can rely on the function add_control_to_dock() from the EditorPlugin class.
The code is straightforward, you need to select a dock position to add it and have a control to add (which is the scene you just created). It is also important that you remember to remove the dock when the plugin is deactivated. The code can be like this:
tool
extends EditorPlugin

var dock # A class member to hold the dock during the plugin lifecycle

func _enter_tree():
    # Initialization of the plugin goes here
    # First load the dock scene and instance it:
    dock = preload("res://addons/my_custom_dock/my_dock.tscn").instance()

    # Add the loaded scene to the docks:
    add_control_to_dock(DOCK_SLOT_LEFT_UL, dock)
    # Note that LEFT_UL means the left of the editor, upper-left dock

func _exit_tree():
    # Clean-up of the plugin goes here
    # Remove the scene from the docks:
    remove_control_from_docks(dock) # Remove the dock
    dock.free() # Erase the control from the memory
While the dock position is chosen when adding it, the user is free to move it and save the layout with the dock in any position.
Checking the results
Now it is the moment to check the results of your work. Open the Project Settings and click on the Plugins tab. Your plugin should be the only on the list. If it is not showing, click on the Update button at the top right corner.
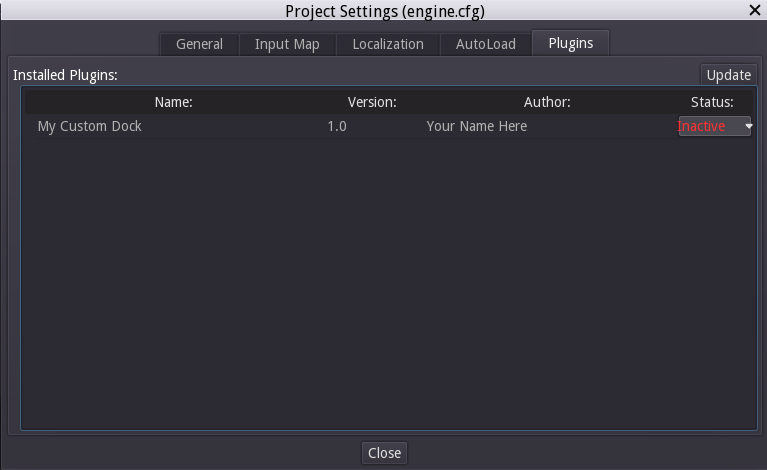
At the Status column, you can see that the plugin is inactive. So you need to click on the status to select Active. The dock should be immediately visible, even before you close the settings window. You should have a custom dock:
Going beyond
Now that you learned how to make basic plugins, you can extend the editor in many nice ways. Many functions can be added to editor on the fly with GDScript, it is a powerful way to create special editors without having to delve into C++ modules.
You can make your own plugins to help you and also share them in Godot’s Asset Library so many people can benefit of your work.