Audio Buses
Introduction
Beginning Godot 3.0, the audio engine has been rewritten from scratch. The aim now is to present an interface much friendlier to sound design professionals. To achieve this, the audio engine contains a virtual rack where unlimited audio buses can be created and, on each of it, unlimited amount of effect processors can be added (or more like, as long as your CPU holds up!)
The implementation in Godot is pretty efficient and has been written entirely from the ground up, without relying on any existing audio libraries.
Even the effect processors were written exclusively for Godot (save for the pitch shifting library), with games in mind. This allows a efficient tradeoff between performance and sound quality.
Decibel Scale
The new audio engine works primarily using the decibel scale. We have chosen this over linear representation of amplitude because it’s more intuitive for audio professionals.
For those unfamiliar with it, it can be explained with a few facts:
- The decibel (dB) scale is a relative scale. It represents the ratio of sound power by using 10 times the base 10 logarithm of the ratio (10×log10(P/P0)).
- For every 3dB, sound doubles or halves. 6dB represents a factor 4, 9dB a factor 8, 10dB a factor 10, 20dB a factor 100, etc.
- Since the scale is logarithmic, true zero (no audio) can’t be represented.
- 0dB is considered the maximum audible volume without clipping. This limit is not the human limit but a limit from the sound hardware. Your sound output simply can’t output any sound louder than 0dB without distorting it (clipping it).
- Because of the above, your sound mix should work in a way where the sound output of the Master Bus (more on that later), should never be above 0dB.
- Every 3dB below the 0dB limit, sound energy is halved. It means the sound volume at -3dB is half as loud as 0dB. -6dB is half as loud as -3dB and so on.
- When working with decibels, sound is considered no longer audible between -60dB and -80dB. This makes your working range generally between -60dB and 0dB.
This can take a bit getting used to, but it’s friendlier in the end and will allow you to communicate better with audio professionals.
Audio Buses
Audio buses can be found in the bottom panel of Godot Editor:
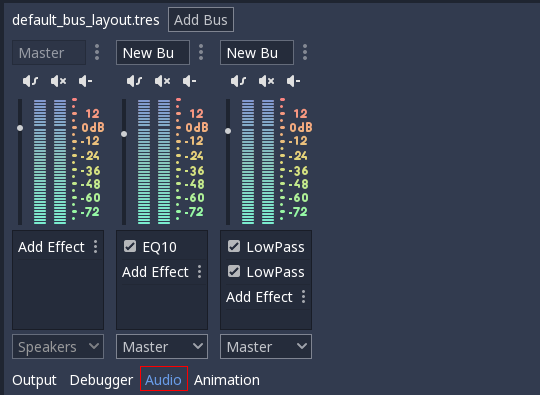
An Audio Bus bus (often called “Audio Channels” too) is a device where audio is channeled. Audio data passes through it and can be modified and re-routed. A VU-Meter (the bars that go up and down when sound is played) can measure the loudness of the sound in Decibel scale.
The leftmost bus is the Master Bus. This bus outputs the mix to your speakers so, as mentioned in the item above (Decibel Scale), make sure that your mix rarely or never goes above 0dB in this bus. The rest of the audio buses are used for routing. This means that, after modifying the sound, they must send it to another bus to the left. Routing is always from right to left without exception as this avoids creating infinite routing loops!
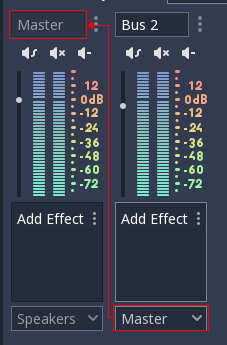
In the above image, Bus 2 is routing its output to Master bus.
Playback of Audio to a Bus
To test playback to a bus, create an AudioStreamPlayer node, load an AudioStream and select a target bus for playback:
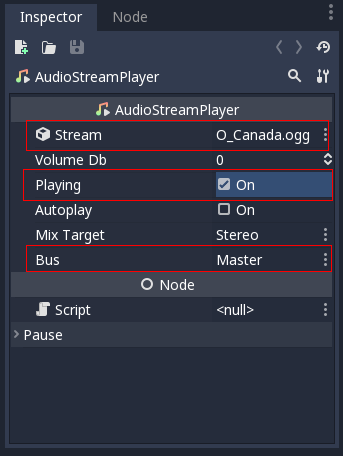
Finally toggle the “playing” property to on and sound will flow.
To learn more about Audio Streams, please read the related tutorial later! (@TODO link to audio streams tute)
Adding Effects
Audio buses can contain all sorts of effects. These effects modify the sound in one way or another and are applied in order.

Following is a short description of available effects:
Amplify
It’s the most basic effect. It changes the sound volume. Amplifying too much can make the sound clip, so be wary of that.
BandLimit and BandPass
These are resonant filters which block frequencies around the Cutoff point. BandPass is resonant, while BandLimit stretches to the sides.
Chorus
This effect adds extra voices, detuned by LFO and with a small delay, to add more richness to the sound harmonics and stereo width.
Compressor
The aim of a dynamic range compressor is to reduce the level of the sound when the amplitude goes over a certain threshold in Decibels. One of the main uses of a compressor is to increase the dynamic range while clipping the least possible (when sound goes over 0dB).
Compressor has may uses in the mix, for example: * It can be used in the Master bus to compress the whole output (Although a Limiter is probably better) * It can be used in voice channels to ensure they sound as even as possible. * It can be Sidechained. This means, it can reduce the sound level using another audio bus for threshold detection. This technique is very common in video game mixing to download the level of Music/SFX while voices are being heard. * It can accentuate transients by using a bit wider attack, meaning it can make sound effects sound more punchy.
There is a lot of bibliography written about compressors, and Godot implementation is rather standard.
Delay
Adds an “Echo” effect with a feedback loop. It can be used, together with Reverb, to simulate wide rooms, canyons, etc. where sound bounces are far apart.
Distortion
Adds classical effects to modify the sound and make it dirty. Godot supports effects like overdrive, tan, or bit crushing. For games, it can simulate sound coming from some saturated device or speaker efficiently.
EQ6, EQ10, EQ21
Godot provides three model of equalizers with different band counts. Equalizers are useful on the Master Bus to completely master a mix and give it character. They are also useful when a game is run on a mobile device, to adjust the mix to that kind of speakers (it can be added but disabled when headphones are plugged).
HighPassFilter, HighShelfFilter
These are filters that cut frequencies below a specific Cutoff. A common use of high pass filters is to add it to effects (or voice) that were recorded too close too a mic and need to sound more realistic. It is commonly used for some types of environment like space.
Limiter
A limiter is similar to a compressor, but it’s less flexible and designed to disallow sound going over a given dB threshold. Adding one in the Master Bus is always recommended to reduce the effects of clipping.
LowPassFilter, LowShelfFilter
These are the most common filters, they cut frequencies above a specific Cutoff and can also resonate. They can be used for a wide amount of effects, from underwater sound to simulating a sound coming from far away.
NotchFilter
The opposite to the BandPassFilter, it removes a band of sound from the frequency spectrum at a given Cutoff.
Panner
This is a simple helper to pan sound left or right.
Phaser
It probably does not make much sense to explain that this effect is formed by two signals being dephased and cancelling each other out. It will be sufficient to note that you can make a Darth Vader voice with it, or jet-like sounds.
PitchShift
This effect allows for modulating pitch independently of tempo. All frequencies can be increased/decreased with minimal effect on transients. Can be used for effects such as voice modulation.
Reverb
Reverb simulates rooms of different sizes. It has adjustable parameters that can be tweaked to obtain the sound of a specific room. Reverb is commonly outputted from Areas (@TODO LINK TO TUTORIAL WHEN DONE), or to apply chamber feel to all sounds.
StereoEnhance
This effect has a few algorithms available to enhance the stereo spectrum, in case this is needed.
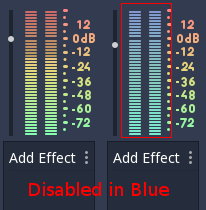
Automatic Bus Disabling
There is no need to disable buses manually when not in use, Godot detects that the bus has been silent for a few seconds and disable it (including all effects).
Bus Rearrangement
Stream Players use bus names to identify a bus, which allows adding, removing and moving buses around while the reference to them is kept. If a bus is renamed, however, the reference will be lost and the Stream Player will output to Master. This system was chosen because rearranging buses is a more common process than renaming them.
Default Bus Layout
The default bus layout is automatically saved to the “res://default_bus_layout.res” file. Other bus layouts can be saved/retrieved from files in case of having to change snapshots, but in most cases this is not necessary.