GDNative C++ example
Introduction
This tutorial builds on top of the information given in the GDNative C example so we highly recommend you read that first.
The C++ bindings for GDNative are build on top of the nativescript GDNative API and provide a nicer way to “extend” nodes in Godot using C++. Basically this is the equivalent to writing GDScript scripts but in C++.
We’ll be looking at nativescript 1.0 which is available in Godot 3.0. Godot 3.1 will see the introduction of nativescript 1.1 which has a number of improvements. We’ll update this tutorial once that is officially released but the overal structure is much the same.
You can download the full example we’ll be creating in this tutorial here: https://github.com/BastiaanOlij/gdnative_cpp_example
Setting up your project
There are a few prerequisites you’ll need:
- A Godot 3.x executable
- a C++ compiler
- scons as a build tool
- a copy of the godot_headers repository you can find here: https://github.com/GodotNativeTools/godot_headers
- a copy of the godot_cpp repository you can find here: https://github.com/GodotNativeTools/godot-cpp
See also http://docs.godotengine.org/en/latest/development/compiling/index.html as the build tools are identical to those you need to compile Godot from source.
You can just download these repositories from GitHub or let git do all the work for you. I’ve started to submodule them into my project folder. This is how I usually start my projects:
mkdir gdnative_cpp_example
cd gdnative_cpp_example
git init
git submodule add https://github.com/GodotNativeTools/godot_headers
git submodule add https://github.com/GodotNativeTools/godot-cpp
You don’t have to do it this way but I’ve found it easiest to manage. If you decide to just download the repositories or just clone them into your folder, makes sure to keep the folder layout the same as I’ve setup here as much of the code we’ll be showcasing here assumes the project has this layout.
If you downloaded or cloned my example from the link specified in the introduction the submodules aren’t automatically included. You will need to execute the following:
cd gdnative_cpp_example
git submodule init
git submodule update
This will trigger downloading these two repositories into your project folder.
Building the C++ bindings
Now that we’ve downloaded our prerequisites it is time to build our C++ bindings.
Now the repository contains a copy of the meta data for the current Godot release but if you need to build these bindings for a newer version of Godot you simply call the godot executable:
godot --gdnative-generate-json-api godot_api.json
And place the resulting godot_api.json file in our godot-cpp folder.
Now to generate and compile our bindings we do (do chose either Windows, Linux or OSX):
cd godot-cpp
scons platform=windows/linux/osx headers_dir=../godot_headers generate_bindings=yes
cd ..
This step will take a while but at the end of it, you should have static libraries you can compile into your project stored in godot-cpp/bin.
At some point we’ll probably start making compiled binaries available for download so you can skip this whole section.
Creating a simple plugin
Now it’s time to build an actual plugin.
To start we want to create an empty Godot project in which we’ll be able to place a few files so open up Godot and create a new project. I like to place an demo project in my repository that shows how my GDNative module works so for our example we’ll create a project in a folder called “demo” inside of our GDNative modules folder structure.
Inside our demo we’ll create a scene with a single Node of type Node called “Main” and we’ll save this as main.tscn. We’ll come back to that later.
Back in the top-level gdnative module folder, we’re also going to create a subfolder called src into which we’ll place our source files.
You should now have demo, godot-cpp, godot_headers, and src directories in your gdnative module.
In the src folder, we’ll start with creating our header file for the GDNative node we’ll be creating. This we’ll call gdexample.h:
#ifndef GDEXAMPLE_H
#define GDEXAMPLE_H

#include <Godot.hpp>
#include <Sprite.hpp>

namespace godot {

class gdexample : public godot::GodotScript<Sprite> {
    GODOT_CLASS(gdexample)

private:
    float time_passed;

public:
    static void _register_methods();

    gdexample();
    ~gdexample();

    void _process(float delta);
};

}

#endif
There are a few things of note to the above.
We’re including Godot.hpp which contains all our basic definitions. After that we include Sprite.hpp which includes the bindings to our sprite class. This class we’ll be extending in our module.
We’re using the namespace godot, everything in GDNative is defined within this namespace.
Then we have our class definition and we see that we’re inheriting from our Sprite but through a container class. We’ll see a few side effects from this later on. This is also the main bit that is going to improve in nativescript 1.1. The GODOT_CLASS macro sets up a few internal things for us.
After that we declare a single member variables called time_passed.
In the next block we’re defining our methods, we obviously have our constructor and destructor defined but there are two other functions that will likely look familiar to some.
The first is _register_methods which is a static function that Godot will call to find out what our methods can be called on our native_script and what properties it has.
The second is our _process function which will work exactly the same as the _process function you’re used to using in GDScript.
So, let’s implement our functions by creating our gdexample.cpp file:
#include "gdexample.h"

using namespace godot;

void gdexample::_register_methods() {
    register_method((char *)"_process", &gdexample::_process);
}

gdexample::gdexample() {
    // initialize any variables here
    time_passed = 0.0;
}

gdexample::~gdexample() {
    // add your cleanup here
}

void gdexample::_process(float delta) {
    time_passed += delta;

    Vector2 new_position = Vector2(10.0 + (10.0 * sin(time_passed * 2.0)), 10.0 + (10.0 * cos(time_passed * 1.5)));

    owner->set_position(new_position);
}
This one should be straight forward. We’re implementing each method of our class that we defined in our header file. Of note is the register_method call that informs Godot that we have a _process method. We do not have to tell Godot about our constructor nor destructor.
The other method of note is our _process function where I’m simply keeping track of how much time has passed and calculating a new position for our sprite using a simple sine and cosine function.
What does stand out is calling owner->set_position to call one of the build in methods of our Sprite. This is because our class is a container class and owner points to the actual sprite node our script relates to.
Once we can use nativescript 1.1 we’ll be able to call set_position directly on our class.
Now there is one more C++ file we need that we call gdlibrary.cpp. Our GDNative plugin can contain multiple native_scripts each one with their own header and source file like we’ve implemented gdexample up above. What we now need is a small bit of code that tells Godot about all the native_scripts in our GDNative plugin.
#include "gdexample.h"

extern "C" void GDN_EXPORT godot_gdnative_init(godot_gdnative_init_options *o) {
    godot::Godot::gdnative_init(o);
}

extern "C" void GDN_EXPORT godot_gdnative_terminate(godot_gdnative_terminate_options *o) {
    godot::Godot::gdnative_terminate(o);
}

extern "C" void GDN_EXPORT godot_nativescript_init(void *handle) {
    godot::Godot::nativescript_init(handle);

    godot::register_class<godot::gdexample>();
}
Note that we are not using our namespace here because the three functions implemented here need to be defined without a namespace.
The godot_gdnative_init and godot_gdnative_terminate functions get called respectively when Godot loads our plugin and when it unloads it. All we’re doing here is parse through to the functions in our bindings module that does some initialisation for us but you might have a need to setup more things.
The important function is the third function called godot_nativescript_init. Again we first call a function in our bindings library that does its usual stuff.
After that we call the function register_class for each of our classes in our library.
Compiling our plugin
We can’t really make pretty the SConstruct files used for building in scons. For the purpose of this example, just use this hardcoded build file we’ve prepared. We’ll cover a more customizable, detailed example on how to use these build files in a subsequent tutorial: SConstruct
Once you’ve downloaded the SConstruct file, place it in your gdnative module folder, beside godot-cpp, godot_headers, and demo. Next just run:
scons platform=windows/linux/osx
And our module should compile. You should now be able to find your module in demo/bin/<platform>
Note, we’ve compiled both godot-cpp and our gdexample library as debug builds. For release you should recompile them using the target=release switch.
Using your GDNative module
Before we jump back into Godot we need to create two more files in demo/bin/ . Both can now be created through the interface in Godot but I find it easier to just create them directly.
The first is a file that lets Godot know what dynamic libraries should be loaded for each platform and is called gdexample.gdnlib.
[general]

singleton=false
load_once=true
symbol_prefix="godot_"

[entry]

X11.64="res://bin/x11/libgdexample.so"
Windows.64="res://bin/win64/libgdexample.dll"
OSX.64="res://bin/osx/libgdexample.dylib"

[dependencies]

X11.64=[]
Windows.64=[]
OSX.64=[]
So what’s in this file? Well there is a general section that controls how our module is loaded. It also contains a prefix section which we should leave on godot_ for now. If you change this you’ll need to rename various functions that are used as entry points. This was added for the iPhone platform because it doesn’t allow dynamic libraries to be deployed and GDNative modules are statically linked.
The entry section is the important bit, it tells Godot for each platform we support where our dynamic library is on disk. It will also result in just that file being exported when you export your game.
Finally the dependencies section allows you to name additional dynamic libraries that should be included as well. This is important when your GDNative plugin implements someone elses library and requires you to supply a 3rd party dynamic library with your game.
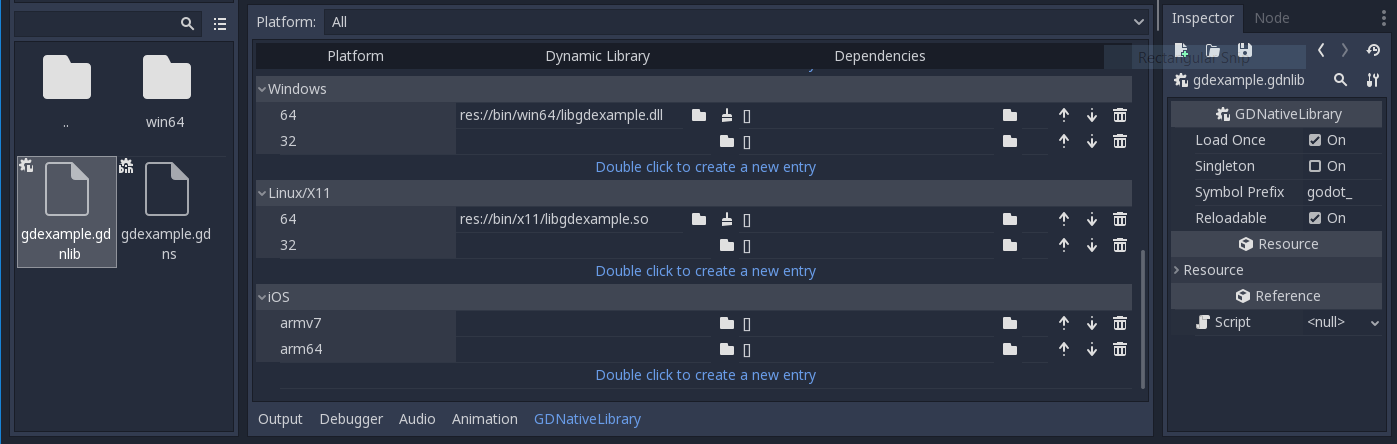
If you double click on the gdexample.gdnlib file within Godot you’ll see there are far more options to set:
The second file we need to create is a file we need to create for each native_script we’ve added to our plugin. We name it gdexample.gdns for our gdexample native_script.
[gd_resource type="NativeScript" load_steps=2 format=2]

[ext_resource path="res://bin/gdexample.gdnlib" type="GDNativeLibrary" id=1]

[resource]

resource_name = "gdexample"
class_name = "gdexample"
library = ExtResource( 1 )
_sections_unfolded = [ "Resource" ]
This is a standard Godot resource and you could just create that directly inside of your scene but having this as a resource file makes life a lot easier in (re)using your native_script.
The important bits here are that we’re pointing to our gdnlib file so Godot knows which dynamic library contains our native_script, and the class_name which identifies the native_script in our plugin we want to use.
Ok, we’re all setup. Time to jump back into Godot. We load up the main scene we created way back in the beginning and now we add a Sprite to our scene:
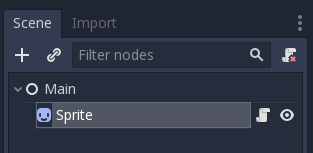
We’re going to assign our Godot logo to this sprite as our texture, turn off centered, and drag our gdexample.gdns file onto the script property of our sprite:
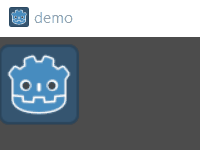
And we’re ready to run our project:
Next steps
Obviously the above is a very basic example just to get you setup but we hope it shows the basics. You can build upon this example to create full fledged scripts to control the nodes in Godot but using C++ as the language.
You should be able to edit and recompile your plugin while the Godot editor remains open and just rerun the project.