Up to date
This page is up to date for Godot 4.2.
If you still find outdated information, please open an issue.
Windows用のコンパイル
参考
This page describes how to compile Windows editor and export template binaries from source. If you're looking to export your project to Windows instead, read Exporting for Windows.
必要条件
Windowsでコンパイルするには、次のことが必要です:
Visual Studio Community, version 2017 or later. VS 2019 is recommended. Make sure to read "Installing Visual Studio caveats" below or you will have to run/download the installer again.
MinGW-w64 with GCC can be used as an alternative to Visual Studio. Be sure to install/configure it to use the
posixthread model. Important: When using MinGW to compile themasterbranch, you need GCC 9 or later.Python 3.6+. Make sure to enable the option to add Python to the ``PATH`` in the installer.
SCons 3.0+ build system. Using the latest release is recommended, especially for proper support of recent Visual Studio releases.
注釈
もし Scoop がインストールされていれば、MinGWや他の依存関係を、次のコマンドで簡単にインストールできます:
scoop install gcc python scons make mingw
注釈
もし MSYS2 がインストールされていれば、MinGWや他の依存関係を、次のコマンドで簡単にインストールできます:
pacman -S mingw-w64-x86_64-python3-pip mingw-w64-x86_64-gcc  \
    mingw-w64-i686-python3-pip mingw-w64-i686-gcc make
For each MSYS2 MinGW subsystem, you should then run pip3 install scons in its shell.
参考
To get the Godot source code for compiling, see ソースの取得.
Godotにおける基本的なSconsの使い方については、ビルドシステムの説明を参照してください。
SConsの設定
To install SCons, open the command prompt and run the following command:
python -m pip install scons
If you are prompted with the message
Defaulting to user installation because normal site-packages is not
writeable
, you may have to run that command again using elevated
permissions. Open a new command prompt as an Administrator then run the command
again to ensure that SCons is available from the PATH.
PythonとSConsがきちんとインストールされたかどうか確認するには、コマンドプロンプト (cmd.exe) にてpython --versionおよびscons --versionとタイプしてみてください。
上記のコマンドが失敗した場合は、インストール後にPythonを環境変数PATHに含めてから、ふたたび確認してください。そうするには、Pythonインストーラーを再実行して、PythonをPATHに含めるオプションを有効にすればできます。
If SCons cannot detect your Visual Studio installation, it might be that your
SCons version is too old. Update it to the latest version with
python -m pip install --upgrade scons.
Visual Studioのインストールに関する注意事項
Visual Studio 2017あるいは2019をインストールする場合は、ワークロードのリストから C++ を有効しなければなりません。
Visual Studio 2015をインストールする場合は、標準ではなくカスタムを選択し、言語から C++ を選んでください。
もし間違ってC++サポート無しでVisual Studioをインストールしてしまったなら、ふたたびインストーラーを実行してください。変更 (Modify)ボタンが表示されるはずです。プログラムの追加と削除 からインストーラーを起動しても、修復オプションしか表示されず、C++ツールはインストールできません。
Godotのソースをダウンロードする
Refer to ソースの取得 for detailed instructions.
ここからのチュートリアルは、ソースコードをC:\godotに置いたとして進めます。
警告
To prevent slowdowns caused by continuous virus scanning during compilation, add the Godot source folder to the list of exceptions in your antivirus software.
For Windows Defender, hit the Windows key, type "Windows Security" then hit Enter. Click on Virus & threat protection on the left panel. Under Virus & threat protection settings click on Mange Settings and scroll down to Exclusions. Click Add or remove exclusions then add the Godot source folder.
コンパイル
コンパイラの選択
SCons will automatically find and use an existing Visual Studio installation.
If you do not have Visual Studio installed, it will attempt to use
MinGW instead. If you already have Visual Studio installed and want to
use MinGW, pass use_mingw=yes to the SCons command line. Note that MSVC
builds cannot be performed from the MSYS2 or MinGW shells. Use either
cmd.exe or PowerShell instead.
開発版には、MinGWよりも早くGodotバイナリをリンクできるVisual Studioのほうが、通常は好ましいでしょう。しかし、MinGWはリンク時最適化を用いることにより、さらに最適化されたバイナリを出力できるので (下記を参照)、製品版ではより良い選択肢になるでしょう。
SConsの実行
コマンド プロンプトを開き、エンジンのソースコードがあるディレクトリのルートに移動して (cdを使用)、次のように打ちます:
C:\godot> scons platform=windows
注釈
複数CPUスレッドでコンパイルするとき、pywin32が無いという警告をSConsは出すかもしれません。しかし、これは無視しても大丈夫です。
If all goes well, the resulting binary executable will be placed in
C:\godot\bin\ with the name godot.windows.editor.x86_32.exe or
godot.windows.editor.x86_64.exe. By default, SCons will build a binary matching
your CPU architecture, but this can be overridden using arch=x86_64 or
arch=x86_32.
この実行ファイルにはエンジン全体が含まれていて、単体で起動できます。実行すると、プロジェクト マネージャーが現れます。
注釈
If you are compiling Godot for production use, then you can
make the final executable smaller and faster by adding the
SCons option target=template_release.
If you are compiling Godot with MinGW, you can make the binary
even smaller and faster by adding the SCons option lto=full.
As link-time optimization is a memory-intensive process,
this will require about 7 GB of available RAM while compiling.
注釈
If you want to use separate editor settings for your own Godot builds
and official releases, you can enable
自己完結型モード by creating a file called
._sc_ or _sc_ in the bin/ folder.
Development in Visual Studio
Using an IDE is not required to compile Godot, as SCons takes care of everything. But if you intend to do engine development or debugging of the engine's C++ code, you may be interested in configuring a code editor or an IDE.
Folder-based editors don't require any particular setup to start working with Godot's codebase. To edit projects with Visual Studio they need to be set up as a solution.
SConsを vsproj=yes パラメーターとともに実行すれば、Visual Studioソリューションを生成できます:
scons p=windows vsproj=yes
これでGodotのソースをVisual Studioのソリューションとして開けるようになり、Visual Studioのビルド (Build)ボタンでビルドできます。
参考
See Visual Studio for further details.
他のオペレーティングシステムからのWindowsのクロスコンパイル
If you are a Linux or macOS user, you need to install MinGW-w64, which typically comes in 32-bit and 64-bit variants. The package names may differ based on your distribution, here are some known ones:
Arch Linux |
pacman -Sy mingw-w64
|
Debian / Ubuntu |
apt install mingw-w64
|
Fedora |
dnf install mingw64-gcc-c++ mingw64-winpthreads-static \
            mingw32-gcc-c++ mingw32-winpthreads-static
|
macOS |
brew install mingw-w64
|
Mageia |
urpmi mingw64-gcc-c++ mingw64-winpthreads-static \
      mingw32-gcc-c++ mingw32-winpthreads-static
|
コンパイルする前に、SConsは下記のバイナリが PATH 環境変数にあるかチェックします:
i686-w64-mingw32-gcc
x86_64-w64-mingw32-gcc
If the binaries are not located in the PATH (e.g. /usr/bin),
you can define the following environment variable to give a hint to
the build system:
export MINGW_PREFIX="/path/to/mingw"
Where /path/to/mingw is the path containing the bin directory where
i686-w64-mingw32-gcc and x86_64-w64-mingw32-gcc are located (e.g.
/opt/mingw-w64 if the binaries are located in /opt/mingw-w64/bin).
正しく設定できたか確認するには、下記のシェルを実行することで動くコンパイラが呼ばれるはずです (バージョン表示はシステムにより異なります):
${MINGW_PREFIX}/bin/x86_64-w64-mingw32-gcc --version
# x86_64-w64-mingw32-gcc (GCC) 13.2.0
注釈
When cross-compiling for Windows using MinGW-w64, keep in mind only
x86_64 and x86_32 architectures are supported. Be sure to
specify the right arch= option when invoking SCons if building
from a different architecture.
トラブルシューティング
Ubuntuのいくつかのバージョンでは、標準設定でPOSIXスレッディングが有効になっていないので、クロスコンパイルするとこのバグ (英語) が発生する可能性があります。
下記のとおりにすれば設定を変更できます。64ビットの場合 (それぞれ実行してから、リストにある x86_64-w64-mingw32-gcc-posix および x86_64-w64-mingw32-g++-posix を選択する):
sudo update-alternatives --config x86_64-w64-mingw32-gcc
<choose x86_64-w64-mingw32-gcc-posix from the list>
sudo update-alternatives --config x86_64-w64-mingw32-g++
<choose x86_64-w64-mingw32-g++-posix from the list>
そして32ビットの場合 (それぞれ実行してから、リストにある i686-w64-mingw32-gcc-posix および i686-w64-mingw32-g++-posix を選択する):
sudo update-alternatives --config i686-w64-mingw32-gcc
<choose i686-w64-mingw32-gcc-posix from the list>
sudo update-alternatives --config i686-w64-mingw32-g++
<choose i686-w64-mingw32-g++-posix from the list>
Windowsエクスポートテンプレートの作成
Windowsのエクスポート テンプレートは、Godotをエディタ無しでコンパイルすることで作成します。次のフラグを使用してください:
C:\godot> scons platform=windows target=template_debug arch=x86_32
C:\godot> scons platform=windows target=template_release arch=x86_32
C:\godot> scons platform=windows target=template_debug arch=x86_64
C:\godot> scons platform=windows target=template_release arch=x86_64
もし標準のエクスポート テンプレートを置き換えるつもりであるなら、それらを下記の場所にコピーしてください。<version> の部分はバージョン識別子で置き換えます (3.1.1.stable や 3.2.dev のように):
%USERPROFILE%\AppData\Roaming\Godot\templates\<version>\
名前は次のようにします:
windows_32_debug.exe
windows_32_release.exe
windows_64_debug.exe
windows_64_release.exe
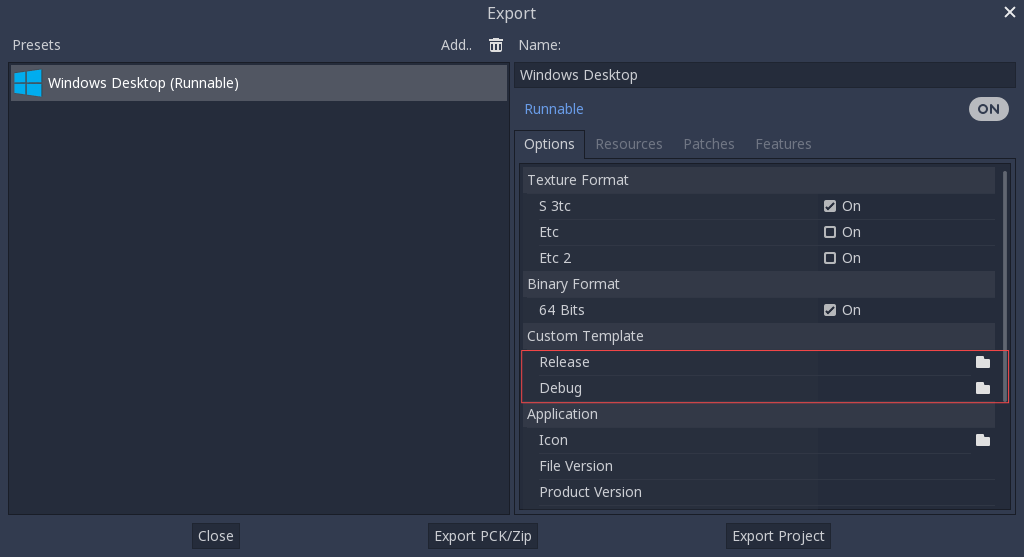
一方、もしカスタム モジュールやカスタム エンジンコードを使用しているなら、バイナリをカスタムのエクスポート テンプレートとして指定することもできます。

この場合はコピーする必要はなく、Godotのソースフォルダ内にある bin\ ディレクトリに出力されたファイルを指定するだけです。こうすれば、次にビルドした時も、自動的にカスタム テンプレートを参照するようになります。