Up to date
This page is up to date for Godot 4.2.
If you still find outdated information, please open an issue.
矩阵与变换
前言
在阅读本教程之前,我们推荐你从头到尾阅读 向量数学 教程,因为本教程需要向量的知识,故需要对其内容有较为全面的理解。
本教程会介绍变换以及如何在 Godot 中使用矩阵来表示变换,并不会深入完整地介绍矩阵与变换。变换在大多数情况下应用于平移、旋转、缩放,我们将会重点讲述如何使用矩阵来表示平移、旋转和缩放。
虽然本教程主要侧重于 2D 的变换,用的是 Transform2D 和 Vector2,但是对于 3D 中的变换,其工作方式也与 2D 的十分相似。
备注
正如之前的教程中所提到的,在 Godot 中,要记住 2D 的 Y 轴的正方向是向下的,而学校里教的线性代数的坐标系,其 Y 轴正方向是向上的,这两个 Y 轴的方向是相反的,这一点需要注意。
备注
我们习惯 X 轴用红色表示、Y 轴用绿色表示、Z 轴用蓝色表示,本教程中的颜色都遵循这个惯例,不过我们也在原点向量上使用蓝色表示。
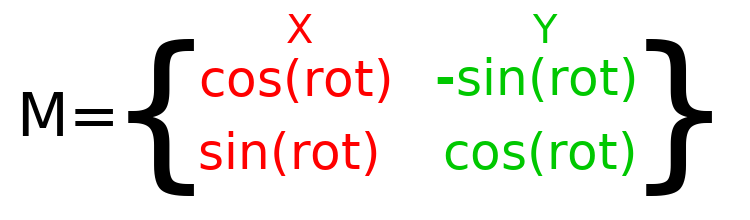
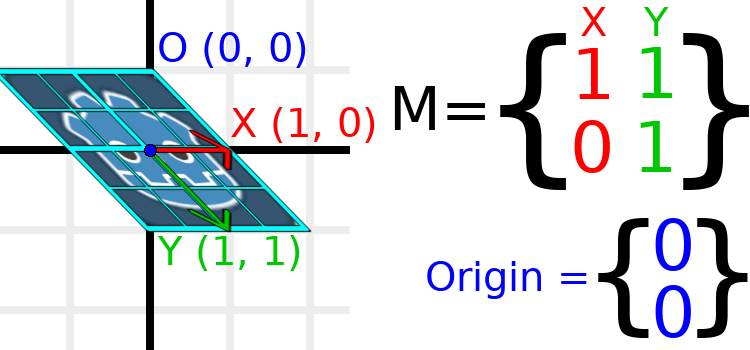
矩阵分量和单位矩阵
单位矩阵代表一个没有平移、没有旋转、没有缩放的变换,现在就让我们看看单位矩阵以及其分量是如何与其视觉表现相联系的吧。
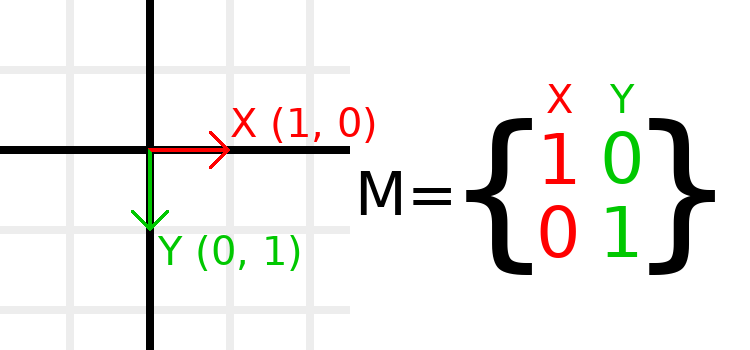
矩阵有行和列,变换矩阵对行和列有特定的规定。
在上图中,我们可以看到红色的 X 向量由矩阵的第一列数对表示,绿色的 Y 向量则由第二列数对表示,改变这几列数对就会改变这些数对所对应的向量。接下来,我们将会在几个例子中看到如何操作这些数对。
由于我们通常使用列来进行操作,因此不必担心直接操作行可能会带来的问题。不过,你也可以把矩阵的行看作是一组表示在给定的方向上移动的向量。
我们指定诸如 t.x.y 这样的值时,表示这是 X 列向量的 Y 分量,换言之,就是这个矩阵的左下角。类似地, t.x.x 就是左上角, t.y.x 就是右上角,那么 t.y.y 自然就是右下角。这里的 t 是一个 Transform2D。
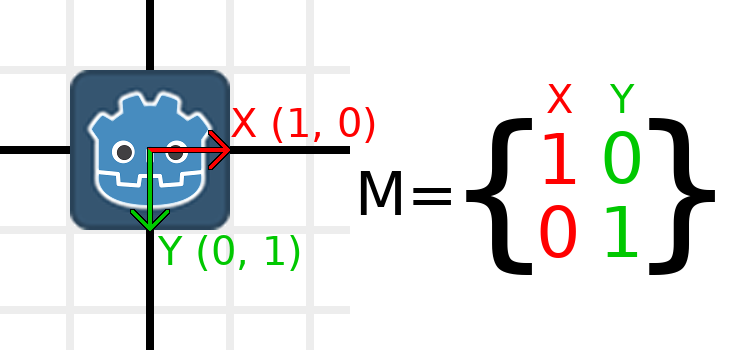
缩放变换矩阵
应用缩放变换是最容易理解的操作之一,既然如此,那就让我们开始动手尝试吧!把 Godot logo 放置于我们的向量之下,这样我们就可以直观地看出变换该对象上的应用效果:
现在,要缩放矩阵,我们唯一需要做的就是将每个矩阵分量乘以我们想要缩放的比例。现在来将这个矩阵缩放两倍,1 × 2 = 2,0 × 2 = 0,于是我们便得到了这个结果:
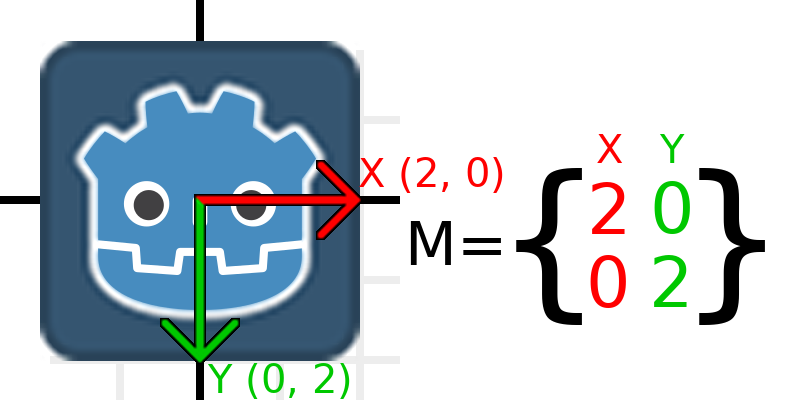
要在代码中实现这点,我们可以让缩放倍数去乘上每个列向量:
var t = Transform2D()
# Scale
t.x *= 2
t.y *= 2
transform = t # Change the node's transform to what we calculated.
Transform2D t = Transform2D.Identity;
// Scale
t.X *= 2;
t.Y *= 2;
Transform = t; // Change the node's transform to what we calculated.
如果我们想要让该变换缩回到原来的尺度,那么我们可以让每个分向量乘以 0.5(即1/2)。以上便是缩放变换矩阵的所有基本介绍了。
要从已存在的变换矩阵中计算对象的缩放尺度,可以对该矩阵的每个列向量使用 length() 方法。
备注
在实际项目中,你可以使用 scaled() 方法去执行缩放变换操作。
旋转变换矩阵
我们将以与前面相同的方式开始本节内容,先在单位矩阵下方叠加一个 Godot logo 吧:
举个例子,假设我们想让 Godot logo 顺时针旋转 90 度,而现在 X 轴正方形向右,Y 轴正方向向下。如果我们在脑海中模拟旋转这两个轴,那么我们脑海中就理应会想到:旋转后的 X 轴正方向应该向下,旋转后的 Y 轴正方向应该向左。
你可以这样子想:你用手抓住 Godot 的 logo 和其变换矩阵的列向量,然后绕着logo的中心点旋转这个logo以及这些向量。无论你在哪里完成该旋转,向量的方向都将会决定矩阵最终呈现的模样。
我们需要在标准坐标系中表示“下方向”和“左方向”,故我们将 X 设为 (0, 1),将 Y 设为 (-1, 0)。这些也正是 Vector2.DOWN 和 Vector2.LEFT 的值。这样做的话,我们就会得到旋转对象后所想看到的结果:
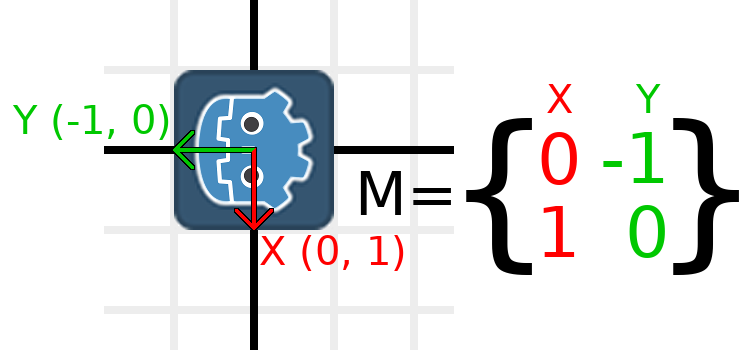
如果你还是难以理解上面的内容,那就试着做下这个小实践:剪一个正方形的纸,在上面画 X 向量和 Y 向量,然后把它放在图表纸上,旋转这张正方形的纸,并记下其端点。
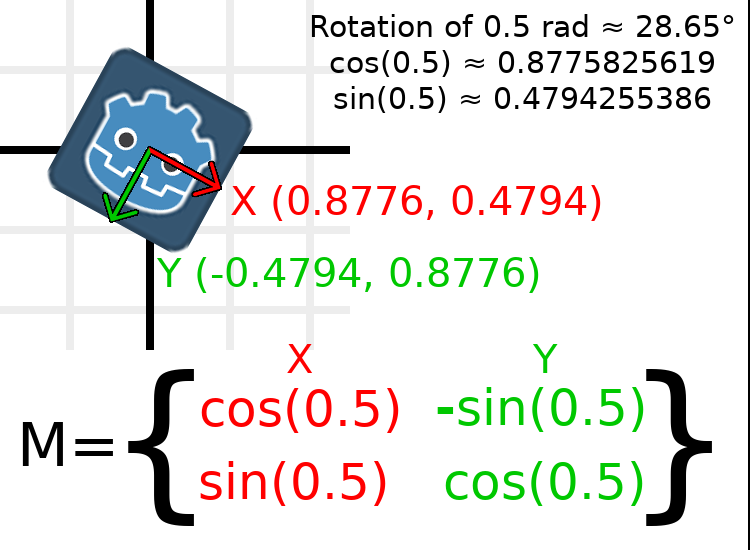
要在代码中执行旋转,我们需要能以编程的方式计算旋转后的变换值。下图展示了由旋转角度计算旋转变换矩阵所需的公式。如果看下图觉得很复杂,不用担心,这保准是你需要知道的那个最难理解矩阵旋转的地方。
备注
Godot 用弧度(radians)表示所有的旋转,不用角度。完整转一圈是 TAU 或 PI*2 弧度,90 度(四分之一圈)是 TAU/4 或 PI/2 弧度。使用 TAU 通常会让代码更易读。
备注
有趣的事实:在 Godot 中,不仅 Y 是朝下的,连旋转也成了顺时针的,也就是说,Godot 2D 所有的数学和三角函数行为都与 Y 轴朝上的 CCW 坐标系相同,因为这些差异“相互抵消”了。你可以认为在标准平面直角坐标系和 Godot 2D 的直角坐标系这两个坐标系中的旋转都是“从 X 到 Y”。
为了执行 0.5 弧度的旋转(约 28.65 度),我们只需将 0.5 代入上面的公式中,然后计算出实际的数值:
这是在代码中完成的方法(将脚本放在 Node2D 上):
var rot = 0.5 # The rotation to apply.
var t = Transform2D()
t.x.x = cos(rot)
t.y.y = cos(rot)
t.x.y = sin(rot)
t.y.x = -sin(rot)
transform = t # Change the node's transform to what we calculated.
float rot = 0.5f; // The rotation to apply.
Transform2D t = Transform2D.Identity;
t.X.X = t.Y.Y = Mathf.Cos(rot);
t.X.Y = t.Y.X = Mathf.Sin(rot);
t.Y.X *= -1;
Transform = t; // Change the node's transform to what we calculated.
To calculate the object's rotation from an existing transformation
matrix, you can use atan2(t.x.y, t.x.x), where t is the Transform2D.
备注
In actual projects, you can use the rotated()
method to perform rotations.
变换矩阵的基
So far we have only been working with the x and y, vectors, which
are in charge of representing rotation, scale, and/or shearing
(advanced, covered at the end). The X and Y vectors are together
called the basis of the transformation matrix. The terms "basis"
and "basis vectors" are important to know.
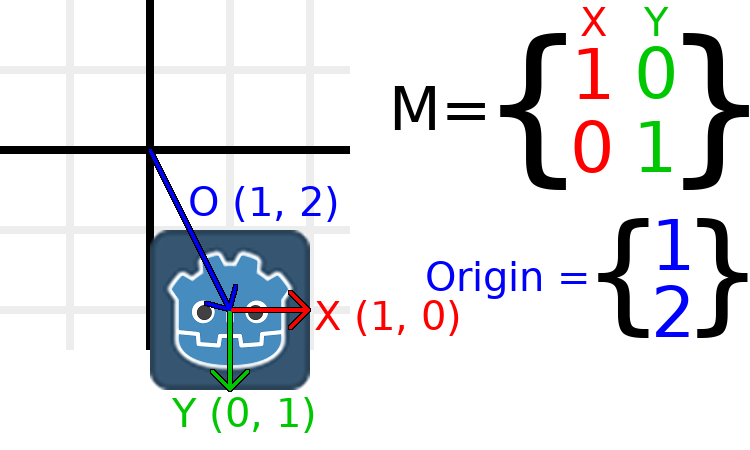
You might have noticed that Transform2D actually
has three Vector2 values: x, y, and origin.
The origin value is not part of the basis, but it is part of the
transform, and we need it to represent position. From now on we'll
keep track of the origin vector in all examples. You can think of
origin as another column, but it's often better to think of it as
completely separate.
Note that in 3D, Godot has a separate Basis structure for holding the three Vector3 values of the basis, since the code can get complex and it makes sense to separate it from Transform3D (which is composed of one Basis and one extra Vector3 for the origin).
变换矩阵的平移
Changing the origin vector is called translating the transformation
matrix. Translating is basically a technical term for "moving" the
object, but it explicitly does not involve any rotation.
让我们通过一个例子来帮助理解这一点。我们将像上次一样从恒等变换开始,但这次我们将记录原点向量。

If we want to move the object to a position of (1, 2), we need
to set its origin vector to (1, 2):
There is also a translated() method, which performs a different
operation to adding or changing origin directly. The translated()
method will translate the object relative to its own rotation.
For example, an object rotated 90 degrees clockwise will move to
the right when translated() with Vector2.UP.
备注
Godot 的 2D 使用基于像素的坐标,所以在实际项目中,你会想要转换成数百个单位。
融会贯通
We're going to apply everything we mentioned so far onto one transform. To follow along, create a project with a Sprite2D node and use the Godot logo for the texture resource.
让我们将平移设置为 (350, 150),旋转设为 -0.5 rad,缩放设为 3。我把屏幕截图和重现代码都发出来了,但我鼓励你不看代码来尝试重现屏幕截图!
var t = Transform2D()
# Translation
t.origin = Vector2(350, 150)
# Rotation
var rot = -0.5 # The rotation to apply.
t.x.x = cos(rot)
t.y.y = cos(rot)
t.x.y = sin(rot)
t.y.x = -sin(rot)
# Scale
t.x *= 3
t.y *= 3
transform = t # Change the node's transform to what we calculated.
Transform2D t = Transform2D.Identity;
// Translation
t.Origin = new Vector2(350, 150);
// Rotation
float rot = -0.5f; // The rotation to apply.
t.X.X = t.Y.Y = Mathf.Cos(rot);
t.X.Y = t.Y.X = Mathf.Sin(rot);
t.Y.X *= -1;
// Scale
t.X *= 3;
t.Y *= 3;
Transform = t; // Change the node's transform to what we calculated.
剪切变换矩阵(高级)
备注
如果你只想了解如何使用变换矩阵,请随意跳过本教程的这一节。本节探讨变换矩阵的一个不常用的方面,目的是为了你建立对它们的理解。
Node2D provides a shearing property out of the box.
你可能已经注意到,变换的自由度比上述操作的组合要多。2D 变换矩阵的基在两个 Vector2 值中总共有四个数,而旋转值和缩放的 Vector2 只有三个数字。缺失自由度的高级概念称为剪切(Shearing)。
通常,你将始终拥有彼此垂直的基向量。但是,剪切在某些情况下可能很有用,了解剪切可以帮助你理解变换的工作原理。
为了直观地向你展示它的外观, 让我们在Godot徽标上叠加一个网格:

此网格上的每个点都是通过将基向量相加而获得的。右下角是 X + Y,而右上角是 X - Y。如果我们更改基向量,整个栅格也会随之移动,因为栅格是由基向量组成的。无论我们对基向量做什么更改,栅格上当前平行的所有直线都将保持平行。
例如, 让我们将Y设置为(1,1):
var t = Transform2D()
# Shear by setting Y to (1, 1)
t.y = Vector2.ONE
transform = t # Change the node's transform to what we calculated.
Transform2D t = Transform2D.Identity;
// Shear by setting Y to (1, 1)
t.Y = Vector2.One;
Transform = t; // Change the node's transform to what we calculated.
备注
不能在编辑器中设置Transform2D的原始值, 所以想要剪切对象, 必须使用代码.
由于向量不再垂直, 因此对象已被剪切. 栅格的底部中心(相对于自身为(0,1))现在位于世界位置(1,1).
对象内部坐标在纹理中称为UV坐标, 因此我们借用此处的术语. 要从相对位置找到世界位置, 公式为U*X+V*Y, 其中U和V是数字,X和Y是基向量.
栅格的右下角始终位于UV位置(1,1), 位于世界位置(2,1), 该位置是从X*1+Y*1(即(1,0)+(1,1)或(1+1,0+1)或(2,1)计算得出的. 这与我们观察到的图像右下角的位置相吻合.
同样, 栅格的右上角始终位于UV位置(1, -1), 位于世界位置(0, -1), 该位置是从X*1+Y*-1计算得出的,X*1+Y*-1是(1,0)-(1,1)或(1-1,0-1)或(0, -1). 这与我们观察到的图像右上角的位置相吻合.
希望你现在完全了解变换矩阵如何影响对象,以及基向量之间的关系以及对象的“UV”或“内部坐标”如何更改其世界位置。
备注
在Godot中, 所有变换数学运算都是相对于父节点完成的. 当我们提到 "世界位置" 时, 如果节点有父节点, 那么它将相对于节点的父位置.
如果你想要更多的解释,你可以查看 3Blue1Brown 关于线性变换的精彩视频:http://www.bilibili.com/video/BV1ys411472E?p=4
变换的实际应用
In actual projects, you will usually be working with transforms inside transforms by having multiple Node2D or Node3D nodes parented to each other.
However, it's useful to understand how to manually calculate the values we need. We will go over how you could use Transform2D or Transform3D to manually calculate transforms of nodes.
在变换之间转换位置
在许多情况下,你可能需要将某个位置转换为变换前或者变换后的位置。例如,如果你有一个相对于玩家的位置并想要查找世界(相对于玩家来说是父级)位置,或者如果你有一个世界位置并想知道它相对于玩家的位置。
We can find what a vector relative to the player would be defined in
world space as using the * operator:
# World space vector 100 units below the player.
print(transform * Vector2(0, 100))
// World space vector 100 units below the player.
GD.Print(Transform * new Vector2(0, 100));
And we can use the * operator in the opposite order to find a what world
space position would be if it was defined relative to the player:
# Where is (0, 100) relative to the player?
print(Vector2(0, 100) * transform)
// Where is (0, 100) relative to the player?
GD.Print(new Vector2(0, 100) * Transform);
备注
如果你事先知道变换位于 (0, 0) 处,则可以改用“basis_xform”或“basis_xform_inv”方法,这将跳过处理平移的过程。
相对于对象本身移动对象
一种常见的操作,尤其是在 3D 游戏中,是相对于自身移动对象。例如,在第一人称射击游戏中,当你按下 W 键时,你希望角色向前移动(-Z 轴)。
Since the basis vectors are the orientation relative to the parent, and the origin vector is the position relative to the parent, we can add multiples of the basis vectors to move an object relative to itself.
此代码会让对象向它自己的右边移动 100 个单位:
transform.origin += transform.x * 100
Transform2D t = Transform;
t.Origin += t.X * 100;
Transform = t;
要在 3D 中移动,需要将“x”替换为“basis.x”。
备注
In actual projects, you can use translate_object_local in 3D
or move_local_x and move_local_y in 2D to do this.
将变换应用于变换
关于转换, 需要了解的最重要的事情之一是如何将几个转换一起使用. 父节点的变换会影响其所有子节点. 让我们来剖析一个例子.
在此图像中, 子节点的组件名称后面有一个 "2", 以将其与父节点区分开来. 这么多数字可能看起来有点令人不知所措, 但请记住, 每个数字都会显示两次(在箭头旁边和矩阵中), 而且几乎一半的数字都是零.
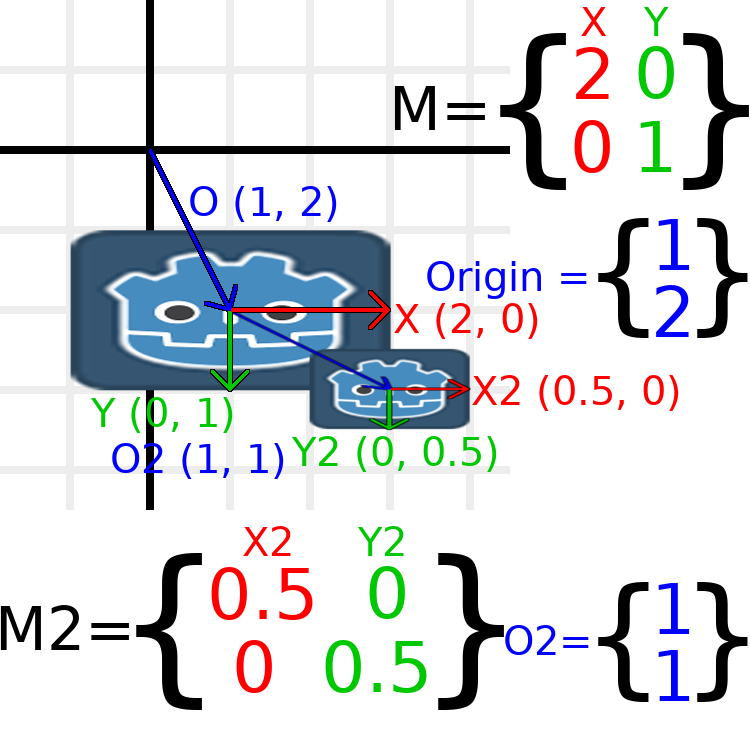
这里进行的唯一转换是父节点的比例为(2,1), 子节点的比例为(0.5,0.5), 两个节点都指定了位置.
All child transformations are affected by the parent transformations.
The child has a scale of (0.5, 0.5), so you would expect it to be
a 1:1 ratio square, and it is, but only relative to the parent.
The child's X vector ends up being (1, 0) in world space, because
it is scaled by the parent's basis vectors.
Similarly, the child node's origin vector is set to (1, 1), but this
actually moves it (2, 1) in world space, due to the parent node's
basis vectors.
要手动计算子变换的世界空间变换, 我们将使用以下代码:
# Set up transforms like in the image, except make positions be 100 times bigger.
var parent = Transform2D(Vector2(2, 0), Vector2(0, 1), Vector2(100, 200))
var child = Transform2D(Vector2(0.5, 0), Vector2(0, 0.5), Vector2(100, 100))

# Calculate the child's world space transform
# origin = (2, 0) * 100 + (0, 1) * 100 + (100, 200)
var origin = parent.x * child.origin.x + parent.y * child.origin.y + parent.origin
# basis_x = (2, 0) * 0.5 + (0, 1) * 0
var basis_x = parent.x * child.x.x + parent.y * child.x.y
# basis_y = (2, 0) * 0 + (0, 1) * 0.5
var basis_y = parent.x * child.y.x + parent.y * child.y.y

# Change the node's transform to what we calculated.
transform = Transform2D(basis_x, basis_y, origin)
// Set up transforms like in the image, except make positions be 100 times bigger.
Transform2D parent = new Transform2D(2, 0, 0, 1, 100, 200);
Transform2D child = new Transform2D(0.5f, 0, 0, 0.5f, 100, 100);

// Calculate the child's world space transform
// origin = (2, 0) * 100 + (0, 1) * 100 + (100, 200)
Vector2 origin = parent.X * child.Origin.X + parent.Y * child.Origin.Y + parent.Origin;
// basisX = (2, 0) * 0.5 + (0, 1) * 0 = (0.5, 0)
Vector2 basisX = parent.X * child.X.X + parent.Y * child.X.Y;
// basisY = (2, 0) * 0 + (0, 1) * 0.5 = (0.5, 0)
Vector2 basisY = parent.X * child.Y.X + parent.Y * child.Y.Y;

// Change the node's transform to what we calculated.
Transform = new Transform2D(basisX, basisY, origin);
In actual projects, we can find the world transform of the child by
applying one transform onto another using the * operator:
# Set up transforms like in the image, except make positions be 100 times bigger.
var parent = Transform2D(Vector2(2, 0), Vector2(0, 1), Vector2(100, 200))
var child = Transform2D(Vector2(0.5, 0), Vector2(0, 0.5), Vector2(100, 100))

# Change the node's transform to what would be the child's world transform.
transform = parent * child
// Set up transforms like in the image, except make positions be 100 times bigger.
Transform2D parent = new Transform2D(2, 0, 0, 1, 100, 200);
Transform2D child = new Transform2D(0.5f, 0, 0, 0.5f, 100, 100);

// Change the node's transform to what would be the child's world transform.
Transform = parent * child;
备注
当矩阵相乘时, 顺序很重要!别把它们弄混了.
最后, 应用身份变换始终不起任何作用.
如果你想了解更多信息,可以查看 3Blue1Brown 关于矩阵组成的精彩视频:http://www.bilibili.com/video/BV1ys411472E?p=5
求逆变换矩阵
The "affine_inverse" function returns a transform that "undoes" the previous transform. This can be useful in some situations. Let's take a look at a few examples.
将反变换乘以法线变换将撤消所有变换:
var ti = transform.affine_inverse()
var t = ti * transform
# The transform is the identity transform.
Transform2D ti = Transform.AffineInverse();
Transform2D t = ti * Transform;
// The transform is the identity transform.
Transforming a position by a transform and its inverse results in the same position:
var ti = transform.affine_inverse()
position = transform * position
position = ti * position
# The position is the same as before.
Transform2D ti = Transform.AffineInverse();
Position = Transform * Position;
Position = ti * Position;
// The position is the same as before.
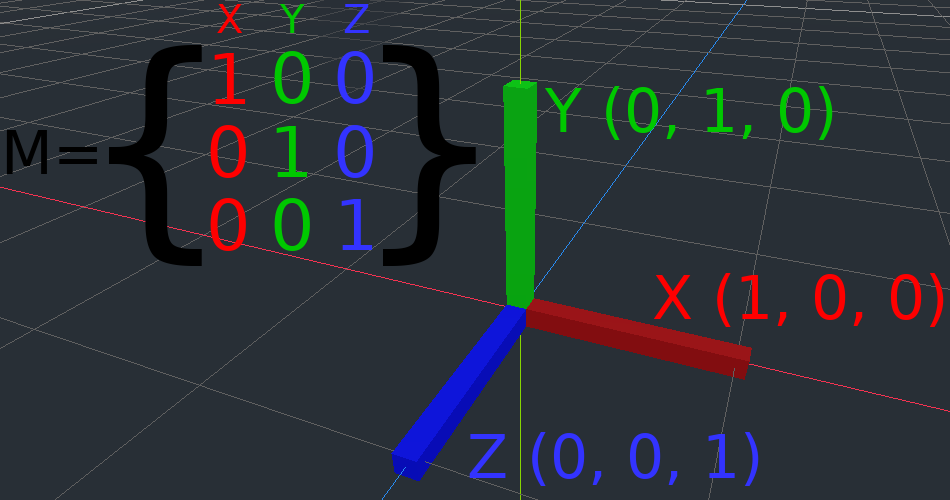
这一切是如何在 3D 模式下工作的?
One of the great things about transformation matrices is that they work very similarly between 2D and 3D transformations. All the code and formulas used above for 2D work the same in 3D, with 3 exceptions: the addition of a third axis, that each axis is of type Vector3, and also that Godot stores the Basis separately from the Transform3D, since the math can get complex and it makes sense to separate it.
与二维相比, 有关平移, 旋转, 缩放和剪切在三维中的工作方式的所有概念都是相同的. 要缩放, 我们取每个分量并将其相乘;要旋转, 我们更改每个基向量指向的位置;要平移, 我们操纵原点;要剪切, 我们将基向量更改为不垂直.
如果你愿意, 最好尝试一下转换, 以了解它们是如何工作的. Godot 允许你直接从检查器编辑 3D 变换矩阵. 你可以下载此项目, 其中包含彩色线条和立方体, 以帮助在 2D 和 3D 中可视化 Basis 向量和原点: https://github.com/godotengine/godot-demo-projects/tree/master/misc/matrix_transform
备注
You cannot edit Node2D's transform matrix directly in Godot 4.0's inspector. This may be changed in a future release of Godot.
如果你想要更多的解释,你可以查看 3Blue1Brown 关于 3D 线性变换的精彩视频:http://www.bilibili.com/video/BV1ys411472E?p=6
表示 3D 中的旋转(高级)
2D 和 3D 变换矩阵之间最大的区别在于你如何在没有基向量的情况下自行表示旋转。
With 2D, we have an easy way (atan2) to switch between a transformation matrix and an angle. In 3D, rotation is too complex to represent as one number. There is something called Euler angles, which can represent rotations as a set of 3 numbers, however, they are limited and not very useful, except for trivial cases.
In 3D we do not typically use angles, we either use a transformation basis (used pretty much everywhere in Godot), or we use quaternions. Godot can represent quaternions using the Quaternion struct. My suggestion to you is to completely ignore how they work under-the-hood, because they are very complicated and unintuitive.
然而, 如果你真的想知道它是如何工作的, 这里有一些很棒的参考资料, 你可以按顺序跟随它们:
http://www.bilibili.com/video/BV1fx41187tZ