Up to date
This page is up to date for Godot 4.2.
If you still find outdated information, please open an issue.
屏幕读取着色器
前言
很多人想要让着色器在写屏幕的同时读取该屏幕的数据。因为内部硬件限制,OpenGL 和 DirectX 等 3D API 都很难实现这一功能。GPU 是极其并行的,所以同时进行读写会导致各种缓存和一致性问题。因此,即便是最新的硬件也对此进行无法正确的支持。
解决办法是将屏幕或屏幕的一部分复制到一个后台缓冲区,然后在绘图时从那里读取。Godot 提供了一些工具,可以使这一过程变得很容易。
屏幕纹理
Godot 着色语言 has a special texture to access the already
rendered contents of the screen. It is used by specifying a hint when declaring
a sampler2D uniform: hint_screen_texture. A special built-in varying
SCREEN_UV can be used to obtain the UV relative to the screen for the current
fragment. As a result, this canvas_item fragment shader results in an invisible
object, because it only shows what lies behind:
shader_type canvas_item;

uniform sampler2D screen_texture : hint_screen_texture, repeat_disable, filter_nearest;

void fragment() {
    COLOR = textureLod(screen_texture, SCREEN_UV, 0.0);
}
textureLod is used here as we only want to read from the bottom mipmap. If
you want to read from a blurred version of the texture instead, you can increase
the third argument to textureLod and change the hint filter_nearest to
filter_nearest_mipmap (or any other filter with mipmaps enabled). If using a
filter with mipmaps, Godot will automatically calculate the blurred texture for
you.
警告
If the filter mode is not changed to a filter mode that contains mipmap in its name,
textureLod with a LOD parameter greater than 0.0 will have the same appearance
as with the 0.0 LOD parameter.
屏幕纹理示例
屏幕纹理可以用来做很多事情。有一个针对屏幕空间着色器的特殊演示项目,你可以下载后查看学习。其中的一个例子就是用简单的着色器来调整亮度、对比度以及饱和度:
shader_type canvas_item;

uniform sampler2D screen_texture : hint_screen_texture, repeat_disable, filter_nearest;

uniform float brightness = 1.0;
uniform float contrast = 1.0;
uniform float saturation = 1.0;

void fragment() {
    vec3 c = textureLod(screen_texture, SCREEN_UV, 0.0).rgb;

    c.rgb = mix(vec3(0.0), c.rgb, brightness);
    c.rgb = mix(vec3(0.5), c.rgb, contrast);
    c.rgb = mix(vec3(dot(vec3(1.0), c.rgb) * 0.33333), c.rgb, saturation);

    COLOR.rgb = c;
}
幕后
虽然这看起来很神奇,但其实不然。在 2D 中,第一次在即将绘制的节点中发现 hint_screen_texture 时,Godot 就会将整个屏幕拷贝到后台缓冲之中。后续在着色器中使用它的节点将不会造成屏幕的复制,因为否则的话效率非常低。在 3D 中,进行屏幕拷贝的时机是在不透明几何体阶段之后、透明几何体阶段之前,所以透明的物体不会被捕捉到屏幕纹理之中。
因此,在 2D 中,如果使用 hint_screen_texture 的着色器存在覆盖,那么后一个着色器使用的就不是第一个着色器的结果,会导致意外的图像:
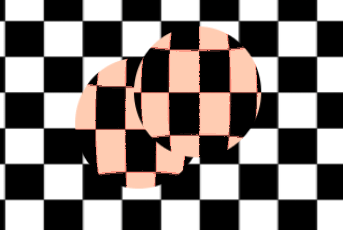
在上图中,第二个球体(右上)所使用的屏幕纹理和第一个球体所使用的屏幕纹理的来源是一致的,所以第一个球体会“消失”,或者说不可见。
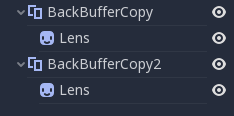
在 2D 中,这个问题可以通过 BackBufferCopy 节点修正,在这两个球体之间实例化即可。BackBufferCopy 可以指定屏幕上的某个区域进行复制,也可以复制整个屏幕:
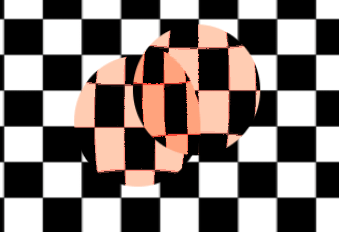
正确复制后台缓冲之后,这两个球体就能够正确混合了:
警告
In 3D, materials that use hint_screen_texture are considered transparent themselves and
will not appear in the resulting screen texture of other materials.
If you plan to instance a scene that uses a material with hint_screen_texture,
you will need to use a BackBufferCopy node.
在 3D 中,这个问题解决起来就没有那么灵活,因为屏幕纹理只会捕捉一次。在 3D 中使用屏幕纹理时请多加小心,因为它并不会捕获到透明的对象,反而可能捕获到位于使用屏幕纹理的对象之前的不透明对象。
要在 3D 中重现后台缓冲的逻辑,可以创建一个 Viewport 并在对象的位置创建一个相机,然后就可以使用该 Viewport 的纹理来代替屏幕纹理。
后台缓冲逻辑
好的,想要对后台缓冲有更清晰的理解的话,Godot 在 2D 中后台缓冲复制的原理是这样的:
如果某个节点使用了
hint_screen_texture,那么绘制该节点之前就会将整个屏幕复制到后台缓冲之中。只有第一次才会这么做,后续的节点不会触发。如果上述情况发生前遇到过 BackBufferCopy 节点(即便尚未使用过
hint_screen_texture),那么也不会执行相关的行为。换句话说,自动复制整个屏幕的条件只有:某个节点中首次使用hint_screen_texture并且按照树顺序不存在更早的(未被禁用的)BackBufferCopy 节点。BackBufferCopy 可以选择复制整个屏幕或者只复制某个区域。如果设置为区域(非整个屏幕),但是着色器使用了复制区域之外的像素,那么读取到的结果就是未定义的(很可能是上一帧残留的垃圾数据)。换句话说,你确实能够使用 BackBufferCopy 复制屏幕上的某个区域,然后读取屏幕纹理上的其他区域。但请避免这样的行为!
深度纹理
3D 着色器也可以访问屏幕深度缓冲,使用 hint_depth_texture 提示即可。该纹理不是线性的;必须通过逆投影矩阵进行转换。
以下代码会获取正在绘制的像素所在的 3D 位置:
uniform sampler2D depth_texture : hint_depth_texture, repeat_disable, filter_nearest;

void fragment() {
    float depth = textureLod(depth_texture, SCREEN_UV, 0.0).r;
    vec4 upos = INV_PROJECTION_MATRIX * vec4(SCREEN_UV * 2.0 - 1.0, depth, 1.0);
    vec3 pixel_position = upos.xyz / upos.w;
}
法线-粗糙度纹理
备注
Normal-roughness texture is only supported in the Forward+ rendering method, not Mobile or Compatibility.
类似的,如果对象在深度预阶段中进行了渲染,就可以用法线-粗糙度纹理来读取该对象的法线和粗糙度。法线存储在 .xyz 通道中(映射到了 0-1 范围内),而粗糙度则存储在 .w 通道中。
uniform sampler2D normal_roughness_texture : hint_normal_roughness_texture, repeat_disable, filter_nearest;

void fragment() {
    float screen_roughness = texture(normal_roughness_texture, SCREEN_UV).w;
    vec3 screen_normal = texture(normal_roughness_texture, SCREEN_UV).xyz;
    screen_normal = screen_normal * 2.0 - 1.0;
重定义屏幕纹理
可以对多个 uniform 使用屏幕纹理提示(hint_screen_texture、hint_depth_texture、hint_normal_roughness_texture)。例如,你可能会想要使用不同的重复标志和过滤标志多次读取该纹理。
下面的例子中,着色器在读取屏幕空间法线时使用的就是线性过滤,而读取屏幕空间粗糙度时使用的就是最邻近过滤。
uniform sampler2D normal_roughness_texture : hint_normal_roughness_texture, repeat_disable, filter_nearest;
uniform sampler2D normal_roughness_texture2 : hint_normal_roughness_texture, repeat_enable, filter_linear;

void fragment() {
    float screen_roughness = texture(normal_roughness_texture, SCREEN_UV).w;
    vec3 screen_normal = texture(normal_roughness_texture2, SCREEN_UV).xyz;
    screen_normal = screen_normal * 2.0 - 1.0;