Up to date
This page is up to date for Godot 4.2.
If you still find outdated information, please open an issue.
你的第一个 2D 着色器
前言
着色器是在 GPU 上运行,用来渲染图像的一种特殊程序。现代渲染都是通过着色器实现的。若想了解关于着色器更详细的说明,请查看着色器是什么。
本教程将重点介绍实际编写着色器程序的各个方面, 引导你走过使用顶点和片段函数编写着色器的整个流程. 本教程面向着色器.
备注
如果你在着色器方面有一定的经验,只是想知道着色器在 Godot 中是如何运作的,请参阅着色器参考。
场景布置
CanvasItem shaders are used to draw all 2D objects in Godot, while Spatial shaders are used to draw all 3D objects.
In order to use a shader it must be attached inside a Material which must be attached to an object. Materials are a type of Resource. To draw multiple objects with the same material, the material must be attached to each object.
All objects derived from a CanvasItem have a material property. This includes all GUI elements, Sprite2Ds, TileMaps, MeshInstance2Ds etc. They also have an option to inherit their parent's material. This can be useful if you have a large number of nodes that you want to use the same material.
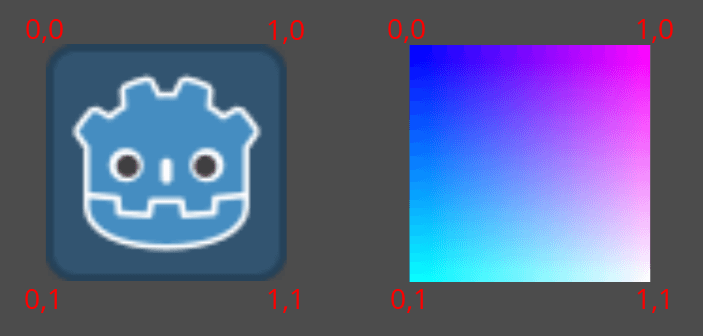
To begin, create a Sprite2D node. You can use any CanvasItem, so long as it is drawing to the canvas, so for this tutorial we will use a Sprite2D, as it is the easiest CanvasItem to start drawing with.
In the Inspector, click beside "Texture" where it says "[empty]" and select "Load", then select "icon.svg". For new projects, this is the Godot icon. You should now see the icon in the viewport.
接下来,在“检查器”下的 CanvasItem 部分中,在“Material”旁点击并选择“新建 ShaderMaterial”。这会创建一个新的材质资源。然后点击新出现的球体。Godot 目前还不知道你是要写 CanvasItem 着色器还是 Spatial 着色器,它显示 Spatial 着色器的输出预览,所以你看到的是默认的 Spatial 着色器的输出。
Click beside "Shader" and select "New Shader". Finally, click on the shader you just created and the shader editor will open. You are now ready to begin writing your first shader.
你的第一个 CanvasItem 着色器
在Godot中, 所有的着色器第一行都是指定着色器类型的, 格式如下:
shader_type canvas_item;
因为我们正在编写CanvasItem着色器, 所以我们在第一行中指定了 canvas_item. 我们所有的代码都会在这个声明下面.
这一行告诉游戏引擎要提供你哪些内置变量以及函数.
在Godot中, 你可以重写三个函数来控制着色器的运作, 它们是 vertex (顶点函数), fragment (片段函数)和 light (光照函数). 本教程会引导你写出一个包含顶点和片段函数的着色器. 因为光照函数比另外两个函数要复杂非常多, 所以在这里不会进行讲解.
你的第一个片段函数
The fragment function runs for every pixel in a Sprite2D and determines what color that pixel should be.
They are restricted to the pixels covered by the Sprite2D, that means you cannot use one to, for example, create an outline around a Sprite2D.
最基础的片段函数仅仅给每个像素赋予一个颜色.
We do so by writing a vec4 to the built-in variable COLOR. vec4 is
shorthand for constructing a vector with 4 numbers. For more information about
vectors see the Vector math tutorial. COLOR is both
an input variable to the fragment function and the final output from it.
void fragment(){
  COLOR = vec4(0.4, 0.6, 0.9, 1.0);
}

恭喜你!你成功在 Godot 中写出了你的第一个着色器。
接着, 我们来讨论更复杂的事情.
There are many inputs to the fragment function that you can use for calculating
COLOR. UV is one of them. UV coordinates are specified in your Sprite2D
(without you knowing it!) and they tell the shader where to read from textures
for each part of the mesh.
在片段函数中你只能从 UV 中读取, 但是你可以在其他函数中使用, 或者直接对 COLOR 赋值.
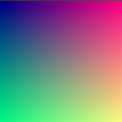
UV 取值在0-1之间, 从左到右, 由上到下.
void fragment() {
  COLOR = vec4(UV, 0.5, 1.0);
}
使用内置变量 TEXTURE
The default fragment function reads from the set Sprite2D texture and displays it.
When you want to adjust a color in a Sprite2D you can adjust the color from the texture manually like in the code below.
void fragment(){
  // This shader will result in a blue-tinted icon
  COLOR.b = 1.0;
}
Certain nodes, like Sprite2Ds, have a dedicated texture variable that can be accessed
in the shader using TEXTURE. If you want to use the Sprite2D texture to combine
with other colors, you can use the UV with the texture function to access
this variable. Use them to redraw the Sprite2D with the texture.
void fragment(){
  COLOR = texture(TEXTURE, UV); // Read from texture again.
  COLOR.b = 1.0; //set blue channel to 1.0
}

Uniform 输入
Uniform 输入是用来向着色器传递数据的,这些数据在整个着色器中都是一致的。
你可以像这样通过在着色器顶部定义来使用 Uniform 值:
uniform float size;
用法的更多详情请参见着色语言文档。
Add a uniform to change the amount of blue in our Sprite2D.
uniform float blue = 1.0; // you can assign a default value to uniforms

void fragment(){
  COLOR = texture(TEXTURE, UV); // Read from texture
  COLOR.b = blue;
}
Now you can change the amount of blue in the Sprite2D from the editor. Look back at the Inspector under where you created your shader. You should see a section called "Shader Param". Unfold that section and you will see the uniform you just declared. If you change the value in the editor, it will overwrite the default value you provided in the shader.
代码与着色器的交互
You can change uniforms from code using the function set_shader_parameter()
which is called on the node's material resource. With a Sprite2D node, the
following code can be used to set the blue uniform.
var blue_value = 1.0
material.set_shader_parameter("blue", blue_value)
注意,uniform值的名称是一个字符串. 字符串必须与它在着色器中的书写方式完全匹配, 包括拼写和大小写.
你的第一个顶点函数
现在我们有了一个片段函数, 我们再写一个顶点函数.
使用顶点函数计算屏幕上每个顶点的结束位置.
顶点函数中最重要的变量是 VERTEX。它最初指定的是模型中的顶点坐标,但你也会通过往里面写值来决定把这些顶点画到哪里。VERTEX 是一个 vec2,最初使用的是局部空间(即与摄像机、视口、父节点无关)。
你可以通过直接调整 VERTEX 来偏移顶点。
void vertex() {
  VERTEX += vec2(10.0, 0.0);
}
Combined with the TIME built-in variable, this can be used for basic
animation.
void vertex() {
  // Animate Sprite2D moving in big circle around its location
  VERTEX += vec2(cos(TIME)*100.0, sin(TIME)*100.0);
}
总结
着色器的核心, 如你所见, 是计算 VERTEX 和 COLOR. 你可以制定更复杂的数学策略来给这些变量赋值.