Up to date
This page is up to date for Godot 4.2.
If you still find outdated information, please open an issue.
使用 SceneTree
前言
在之前的教程中,所有内容都是围绕节点这一概念展开的。场景是节点的合集,节点一进入 场景树 就会被激活。
MainLoop
Godot 内部的工作方式是这样的:开始的时候只会有一个 OS 类的实例在运行,然后才会把驱动程序、服务器、脚本语言、场景系统等等这些加载进来。
初始化完成后,就会为 OS 提供一个 MainLoop 来运行。目前为止的所有内容都是内部工作(如果你有兴趣查看内部如何工作,可以在源代码中查看 main/main.cpp 文件)。
用户程序或游戏会在 MainLoop 中启动,这个类包含初始化、空闲(帧同步回调)、固定(物理同步回调)、输入等方法。当然这也属于底层,用 Godot 制作游戏时几乎不会遇到需要自行编写 MainLoop 的情况。
SceneTree
解释Godot的工作方式的一种方法是, 它是基于低级中间件的高级游戏引擎.
场景系统是游戏引擎, 而 OS 和服务是底层API.
场景系统为OS提供了自己的主循环, 即 SceneTree. 运行场景时会自动实例化并设置该场景, 无需执行任何其他工作.
重要的是要知道此类的存在, 因为它有一些重要的用途:
它包含根 Viewport, 当场景第一次打开成为 Scene Tree 的一部分时, 会将场景作为子级添加到其中(接下来会有更多).
它包含有关编组的信息, 并具有调用编组中所有节点或获取它们的列表的方法.
它包含一些全局状态功能, 例如设置暂停模式或退出进程.
当节点是场景树的一部分时, 可以通过调用 Node.get_tree() 获得 SceneTree 单例.
根视图
根 Viewport 始终位于场景的顶部. 从一个节点, 可以通过两种不同的方式获得它:
get_tree().root # Access via scene main loop.
get_node("/root") # Access via absolute path.
GetTree().Root // Access via scene main loop.
GetNode("/root"); // Access via absolute path.
此节点包含主视口, 默认情况下, Viewport 的任何子节点都将绘制在其中, 因此以Viewport作为根节点是有意义的, 否则将看不到任何内容.
尽管可以在场景中创建其他视图(用于分屏效果等), 但该视图是唯一不由用户创建的视图. 它是在 SceneTree 内部自动创建的.
场景树
当节点直接或间接连接到根视图时,它就成为了场景树的一部分。
因此,正如在之前的教程中所解释的,它将获得 _enter_tree() 和 _ready() 回调(以及 _exit_tree() )。
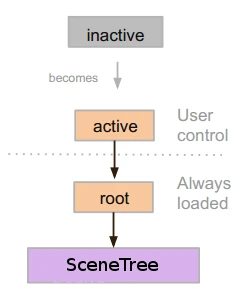
当节点进入场景树时,它们将变为活动状态。它们可以访问需要处理的所有内容、获取输入、显示 2D 和 3D 视觉效果、收发通知、播放声音等。当从场景树中删除时,它们将失去这些能力。
树顺序
Most node operations in Godot, such as drawing 2D, processing, or getting notifications are done in tree order, or top to bottom as seen in the editor (also known as pre-order traversal):
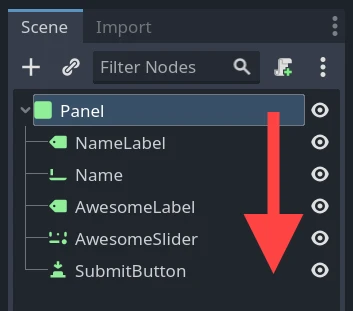
For example, the top node in a scene has its _process() function
called first, then the node below it has its _process() function called,
then the node below that and so on.
An important exception is the _ready() function: each parent node has its
_ready() function called only after all its child nodes have their
_ready() functions called, so that the parent knows its children are
completely ready to be accessed. This is also known as post-order traversal.
In the above image, NameLabel would be notified first (but only after its
children, if it had any!), followed by Name, etc., and Panel would be
notified last.
The order of operations can also be overridden using the process_priority
node property. Nodes with a lower number are called first. For example, nodes
with the priorities "0, 1, 2, 3" would be called in that order from left to right.
通过进入场景树“变为活动状态”
从磁盘加载场景或通过脚本创建场景。
The root node of that scene (only one root, remember?) is added as either a child of the "root" Viewport (from SceneTree), or to any of its descendants.
新添加的场景的每个节点都将按照从上到下的顺序接收
enter_tree通知(GDScript 中的_enter_tree()回调函数)。Every node will receive the "ready" notification (
_ready()callback in GDScript) for convenience, once all its children have received the "ready" notification (post-order traversal).删除场景(或场景的一部分)后,它们将按照自底向上的顺序(自顶向下的逆序)收到
exit scene通知(GDScript中的_exit_tree()回调函数)。
更改当前场景
After a scene is loaded, you may want to change this scene for another one. One way to do this is to use the SceneTree.change_scene_to_file() function:
func _my_level_was_completed():
    get_tree().change_scene_to_file("res://levels/level2.tscn")
public void _MyLevelWasCompleted()
{
    GetTree().ChangeSceneToFile("res://levels/level2.tscn");
}
Rather than using file paths, one can also use ready-made PackedScene resources using the equivalent function SceneTree.change_scene_to_packed(PackedScene scene):
var next_scene = preload("res://levels/level2.tscn")

func _my_level_was_completed():
    get_tree().change_scene_to_packed(next_scene)
public void _MyLevelWasCompleted()
{
    var nextScene = (PackedScene)ResourceLoader.Load("res://levels/level2.tscn");
    GetTree().ChangeSceneToPacked(nextScene);
}
These are quick and useful ways to switch scenes but have the drawback that the game will stall until the new scene is loaded and running. At some point in the development of your game, it may be preferable to create proper loading screens with progress bar, animated indicators or threaded (background) loading. This must be done manually using 单例(自动加载) and 后台加载.