Attention: Here be dragons
This is the latest
(unstable) version of this documentation, which may document features
not available in or compatible with released stable versions of Godot.
Checking the stable version of the documentation...
Функції контролера
Godot підтримує функції, специфічні для контролерів, які можуть ще більше покращити ігровий процес. На цій сторінці описано ці функції, як їх використовували в існуючих іграх і як почати використовувати їх у Godot.
Попередження
These controller features are currently only supported on Windows, macOS, iOS, and Linux.
Попередження
Якщо ви спеціально не рекламуєте свою гру як таку, що вимагає певних контролерів, пам’ятайте, що немає гарантії, що гравці матимуть контролер з будь-якими заданими функціями.
Як наслідок, ми пропонуємо використовувати ці функції для покращення ігрового процесу для гравців, чиї контролери їх підтримують, не відволікаючи при цьому тих, у кого контролерів немає.
Колір світлодіода
Ігри можуть використовувати світлодіодні індикатори на певних контролерах, щоб ненав’язливо доповнювати ігровий процес на екрані, забезпечуючи відповідні візуальні ефекти в руках гравця. Ось кілька яскравих прикладів:
У Аїді колір світла відповідає богу, від якого ви отримуєте благословення.
У грі Resident Evil 2 колір світла вказує на ваш рівень здоров'я (зелений — повний, жовтий — середній, червоний — низький).
У грі Зоряні війни: Джедаї: Занепад Ордена колір світла відповідає кольору вашого світлового меча.
Використовуйте метод Input.set_joy_light() для встановлення кольору світлодіодів заданого контролера.
Щоб визначити, чи підтримує даний контролер налаштування світлодіодного підсвічування, скористайтеся методом Input.has_joy_light(). Відомо, що контролери PlayStation DualShock та DualSense підтримують світлодіодне підсвічування.
Наступний метод _process() встановлює колір світлодіода відповідно до натиснутої кнопки та вимикає його, якщо жодна кнопка не натискається:
func _process(_delta):
    var color := Color.BLACK

    if Input.is_joy_button_pressed(0, JOY_BUTTON_A):
        color = Color.BLUE
    elif Input.is_joy_button_pressed(0, JOY_BUTTON_X):
        color = Color.MAGENTA
    elif Input.is_joy_button_pressed(0, JOY_BUTTON_B):
        color = Color.RED
    elif Input.is_joy_button_pressed(0, JOY_BUTTON_Y):
        color = Color.GREEN

    Input.set_joy_light(0, color)
У наступному прикладі світлодіод плавно змінюється за допомогою відтінків у циклі:
var hue = 0.0

func _process(delta):
    var col = Color.from_hsv(hue, 1.0, 1.0)
    Input.set_joy_light(0, col)
    hue += delta * 0.1
У наступному прикладі світлодіод блимає червоним тричі, коли натискається кнопка «південь» (Cross/X на контролерах PlayStation):
var blink_tween: Tween = null

func _process(_delta):
    var ready_to_blink = not blink_tween or not blink_tween.is_running()
    if Input.is_joy_button_pressed(0, JOY_BUTTON_A) and ready_to_blink:
        do_blink()

func do_blink():
    if blink_tween:
        blink_tween.kill()

    blink_tween = create_tween()
    blink_tween.tween_callback(func(): Input.set_joy_light(0, Color.RED))
    blink_tween.tween_interval(0.2)
    blink_tween.tween_callback(func(): Input.set_joy_light(0, Color.BLACK))
    blink_tween.tween_interval(0.2)
    blink_tween.set_loops(3)
Motion sensors (gyroscope and accelerometer)
With motion controls, games can track the controller's physical rotation and movement. This can be used to let the player turn the in-game camera by moving their controller, or shaking their controller to perform a special action.
There are several controller brands that have implemented gyroscope and accelerometer sensors into their modern controllers, the biggest two being PlayStation and Nintendo. Note that the Xbox controllers don't have motion sensors inside of them.
To check if a connected controller has motion sensors, use Input.has_joy_motion_sensors().
Motion sensors are disabled by default to avoid draining the controller battery when games don't use those features. To enable them, call Input.set_joy_motion_sensors_enabled().
Note that the axes of the values that controller's motion sensors report are always relative to the controller's natural orientation. Here's an image of the axes mapping for more clarity:
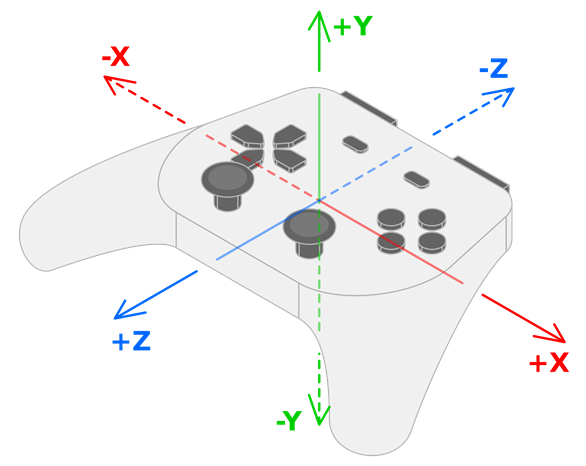
The controller's gyroscope values show rotation around their respective axes:
the X value of the gyroscope data shows the rotation around the X axis (roll).
the Y value of the gyroscope data shows the rotation around the Y axis (yaw).
the Z value of the gyroscope data shows the rotation around the Z axis (pitch).
The controller's accelerometer will provide values in the following ways, respectively:
Movement left and right are reported as +X and -X.
Movement down and up are reported as +Y and -Y.
Movement away from and towards the user are reported as +Z and -Z.
Gyroscope
A gyroscope is a type of sensor that detects the controller's rotation. Here are some notable examples of gyroscope use in games:
In Helldivers 2, Horizon Forbidden West, Star Wars: Dark Forces Remaster, and Fortnite, tilting the controller causes the camera to rotate accordingly ("gyro aiming"). This video by *Daven On The Moon* demonstrates and discusses gyro aiming in more detail.
In Death Stranding, BB can be soothed by rotating the controller softly.
The following example rotates an object using a controller's gyroscope sensor. You can also access this example by taking a look at the Input.start_joy_motion_sensors_calibration() documentation.
const GYRO_SENSITIVITY = 10.0

func _ready():
    # In this example we only use the first connected joypad (id 0).
    if 0 not in Input.get_connected_joypads():
        return

    if not Input.has_joy_motion_sensors(0):
        return

    # We must enable the motion sensors before using them.
    Input.set_joy_motion_sensors_enabled(0, true)

    # (Tell the users here that they need to put their joypads on a flat surface and wait for confirmation.)

    # Start the calibration process.
    calibrate_motion()

func _process(delta):
    # Only move the object if the joypad motion sensors are calibrated.
    if Input.is_joy_motion_sensors_calibrated(0):
        move_object(delta)

func calibrate_motion():
    Input.start_joy_motion_sensors_calibration(0)

    # Wait for some time.
    await get_tree().create_timer(1.0).timeout

    Input.stop_joy_motion_sensors_calibration(0)
    # The joypad is now calibrated.

func move_object(delta):
    var node: Node3D = ... # Put your object here.

    var gyro := Input.get_joy_gyroscope(0)
    node.rotation.x -= -gyro.y * GYRO_SENSITIVITY * delta  # Use rotation around the Y axis (yaw) here.
    node.rotation.y += -gyro.x * GYRO_SENSITIVITY * delta  # Use rotation around the X axis (pitch) here.
Note that before using the gyroscope's data, we must first calibrate it by calling Input.start_joy_motion_sensors_calibration() and Input.stop_joy_motion_sensors_calibration(). That's because modern gyroscopes often need calibration. This is like how a weighing scale can need calibration to tell it what "zero" is. Like a weighing scale, only a correctly calibrated gyroscope will give an accurate reading. During calibration, the user sets the controller down on a flat surface. The controller then determines what values its gyroscope reports when it is actually not moving at all (its "bias"), and uses this information to make its rotation data more accurate.
See the article on GyroWiki for information on how to use gyroscope input as a mouse.
After the controller's gyroscope has been enabled and correctly calibrated, you can read its reported values by using Input.get_joy_gyroscope().
Accelerometer
Попередження
Do not use accelerometer data to find the controller's position in 3D space; the accelerometers in general are not precise enough for this.
An accelerometer is a type of sensor that detects a controller's acceleration in m/s². For example, it can detect if the player quickly raises their controller, moves it to the side, or shakes it.
The acceleration that an accelerometer detects includes gravity by default. To get only the acceleration imparted by the user, subtract gravity from the detected acceleration:
Input.get_joy_accelerometer(device) - Input.get_joy_gravity(device)
Due to how accelerometers work physically, after movement in one direction stops they almost immediately report movement in the opposite direction. After detecting movement in one direction, you may want to ignore further readings for a small period of time to avoid detecting this opposite movement.
The following example prints the controller movement when it's being quickly moved by using its accelerometer.
If the sensitivity doesn't feel right for you,
you can tweak the THRESHOLD constant or you can replace it by using a different value in the code below.
var detect_accelerometer = true

# Change to make the game detect movement at different thresholds.
# With a lower value, smaller movements will be detected, and with a
# larger value, only big movements will be detected.
const THRESHOLD = 10.0

func _ready():
    # In this example, we only use the first connected joypad (ID 0).
    if 0 not in Input.get_connected_joypads():
        return

    if not Input.has_joy_motion_sensors(0):
        return

    # We must enable the motion sensors before using them.
    Input.set_joy_motion_sensors_enabled(0, true)

func _process(delta):
    if Input.has_joy_motion_sensors(0):
        accelerometer_example()

func accelerometer_example():
    if not detect_accelerometer:
        return

    var acceleration = Input.get_joy_accelerometer(0) - Input.get_joy_gravity(0)
    if acceleration.length() > THRESHOLD:
        if acceleration.x > THRESHOLD:
            print("Moved left")
        elif acceleration.x < -THRESHOLD:
            print("Moved right")
        if acceleration.y < -THRESHOLD:
            print("Moved up")
        elif acceleration.y > THRESHOLD:
            print("Moved down")
        if acceleration.z < -THRESHOLD:
            print("Moved closer to the player")
        elif acceleration.z > THRESHOLD:
            print("Moved away from the player")

        # After detecting movement in one direction, the accelerometer sensor
        # will briefly report movement in the opposite direction, even though the controller only moved once.
        # So we need to ignore these reported values for a short amount of time.
        detect_accelerometer = false
        await get_tree().create_timer(0.5, false).timeout
        detect_accelerometer = true