Attention: Here be dragons
This is the latest
(unstable) version of this documentation, which may document features
not available in or compatible with released stable versions of Godot.
Checking the stable version of the documentation...
Відтворення відео
Godot підтримує відтворення відео за допомогою вузла class_VideoStreamPlayer.
Підтримувані формати відтворення
Єдиний підтримуваний формат в ядрі — це Ogg Theora (не плутати з аудіо Ogg Vorbis) з додатковими аудіодоріжками Ogg Vorbis. Розширення можуть додавати підтримку додаткових форматів.
H.264 і H.265 не підтримуються в ядрі Godot, оскільки обидва вони обтяжені патентами на програмне забезпечення. AV1 не потребує ліцензійних відрахувань, але він повільно декодується на CPU, а апаратна підтримка декодування поки що доступна не на всіх графічних процесорах, що використовуються.
WebM підтримувався в основному в Godot 3.x, але його підтримку було вилучено в 4.0, оскільки він був надто глюковим і важким у підтримці.
Примітка
Ви можете знайти відео з розширеннями .ogg або .ogx, які є загальними розширеннями для даних у контейнері Ogg.
Перейменування цих розширень на .ogv може дозволити імпортувати відео до Godot. Однак не всі файли з розширеннями .ogg або .ogx є відео - деякі з них можуть містити лише аудіо.
Налаштування VideoStreamPlayer
Створіть вузол VideoStreamPlayer за допомогою діалогового вікна «Створити новий вузол».
Виберіть вузол VideoStreamPlayer у доці дерева сцен, перейдіть до інспектора та завантажте файл
.ogvу властивість Stream.Якщо у вас ще немає відео у форматі Ogg Theora, перейдіть за посиланням Рекомендовані параметри кодування Theora.
“ ви хочете, щоб відео почало відтворюватися відразу після завантаження сцени, встановіть галочку Autoplay в інспекторі. Якщо ні, залиште Autoplay вимкненим і викличте
play()на вузлі VideoPlayer у скрипті, щоб почати відтворення по необхідності.
Робота зі зміною розміру та різними співвідношеннями сторін
За замовчуванням розмір VideoStreamPlayer автоматично змінюється відповідно до роздільної здатності відео. Ви можете налаштувати його розмір так, як зазвичай Control, увімкнувши Expand для вузла VideoStreamPlayer.
Щоб налаштувати спосіб зміни розміру вузла VideoStreamPlayer залежно від розміру вікна, налаштуйте прив’язки за допомогою меню Макет у верхній частині вікна перегляду 2D-редактора. Однак це налаштування може бути недостатньо потужним, щоб впоратися з усіма випадками використання, як-от відтворення повноекранного відео без спотворення відео (але замість цього з порожнім простором по краях). Для більшого контролю ви можете використовувати вузол AspectRatioContainer, який призначений для обробки таких варіантів використання:
Додайте вузол AspectRatioContainer. Переконайтеся, що він не є нащадком іншого вузла контейнера. Виділіть вузол AspectRatioContainer, а потім встановіть його Макет у верхній частині 2D-редактора на Увесь прямокутник. Встановіть Ratio у вузлі AspectRatioContainer відповідно до співвідношення сторін вашого відео. Ви можете використовувати математичні формули в інспекторі, щоб допомогти собі. Не забудьте зробити один з операндів десятковим. Інакше результат ділення завжди буде цілим числом.
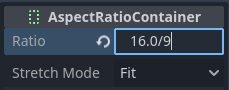
Результат буде (приблизно) 1.777778
Після того, як ви налаштували AspectRatioContainer, повторно створіть свій вузол VideoStreamPlayer, щоб він був дочірнім вузлом AspectRatioContainer. Переконайтеся, що Розгорнути увімкнено у VideoStreamPlayer. Тепер ваше відео має автоматично змінюватися на весь екран, уникаючи спотворень.
Дивись також
Дивіться Кілька дозволів для отримання додаткових порад щодо підтримки різних співвідношень сторін у вашому проекті.
Відображення відео на 3D-поверхні
Використовуючи вузол VideoStreamPlayer як дочірнього вузла class_SubViewport, можна відобразити будь-який 2D-вузол на 3D-поверхні. Наприклад, це можна використовувати для відображення анімованих рекламних щитів, коли покадрова анімація вимагає забагато пам’яті.
Це можна зробити за допомогою наступних кроків:
Створіть вузол class_SubViewport. Установіть його розмір відповідно до розміру вашого відео в пікселях.
Створіть вузол VideoStreamPlayer як дочірній вузол SubViewport і вкажіть у ньому відеошлях. Переконайтеся, що Розгорнути вимкнено, і за потреби увімкніть Автовідтворення.
Створіть вузол MeshInstance3D із ресурсом PlaneMesh або QuadMesh у його властивості Mesh. Змініть розмір сітки відповідно до формату відео (інакше воно виглядатиме спотвореним).
Створіть новий ресурс StandardMaterial3D у властивості Material Override у розділі GeometryInstance3D.
Увімкніть Local To Scene у розділі ресурсів StandardMaterial3D (внизу). Це обов’язково перед використанням ViewportTexture у властивості Albedo Texture.
У StandardMaterial3D встановіть для властивості Albedo > Texture значення New ViewportTexture. Відредагуйте новий ресурс, клацнувши його, а потім укажіть шлях до вузла SubViewport у властивості Viewport Path.
Увімкніть Albedo Texture Force sRGB у StandardMaterial3D, щоб запобігти розмиванню кольорів.
Якщо рекламний щит має випромінювати власне світло, встановіть для Shading Mode значення Unshaded, щоб покращити продуктивність візуалізації.
Дивіться Використання вікон перегляду та демонстрацію графічного інтерфейсу у 3D для отримання додаткової інформації про налаштування.
Зациклення відео
Для циклічного відтворення відео можна ввімкнути властивість Loop. Це плавно перезапустить відео, коли воно досягне кінця.
Зауважте, що налаштування параметра проекту Компенсація затримки відео на відмінне від нуля значення може призвести до того, що ваш цикл не буде безперебійним, оскільки синхронізація аудіо та відео відбувається на початку кожного циклу, спричиняючи випадкові пропуски кадрів. Встановіть Компенсацію затримки відео в налаштуваннях проекту на 0, щоб уникнути проблем із пропуском кадрів.
Умови декодування відео та рекомендована роздільна здатність
Декодування відео виконується на центральному процесорі, оскільки графічні процесори не мають апаратного прискорення для декодування відео Theora. Сучасні настільні центральні процесори можуть декодувати відео Ogg Theora з роздільною здатністю 1440p при 60 FPS або більше, але мобільні процесори низького класу, швидше за все, не зможуть впоратися з відео високої роздільної здатності.
Щоб забезпечити плавне декодування ваших відео на різному обладнанні:
При розробці ігор для настільних платформ рекомендується кодувати відео з роздільною здатністю не вище 1080p (бажано з частотою 30 кадрів в секунду). Більшість людей все ще використовують дисплеї з роздільною здатністю 1080p або нижчою, тому кодування відео з вищою роздільною здатністю може бути не варте збільшення розміру файлу та вимог до процесора.
При розробці ігор для мобільних або веб-платформ рекомендується кодувати в 720p максимум (бажано з частотою 30 кадрів в секунду або навіть нижче). Візуальна різниця між відео 720p і 1080p на мобільному пристрої зазвичай не дуже помітна.
Обмеження відтворення
Існують деякі обмеження щодо поточної реалізації відтворення відео в Godot:
Потокове відео з URL-адреси не підтримується.
Підтримується лише моно- та стереоаудіовихід. Відео з аудіоканалами 4, 5.1 та 7.1 підтримуються, але зведені до стерео.
Рекомендовані параметри кодування Theora
Порада: не покладайтеся на вбудовані експортери Ogg Theora (здебільшого). Є 2 причини, чому вам краще віддати перевагу зовнішній програмі для кодування вашого відео:
Деякі програми, такі як Blender, можуть рендерити в Ogg Theora. Однак, стандартні параметри якості за замовчуванням зазвичай дуже низькі за сучасними стандартами. Ви можете збільшити параметри якості у програмному забезпеченні, яке ви використовуєте, але ви можете виявити, що якість на виході залишається не ідеальною (враховуючи збільшений розмір файлу). Зазвичай це означає, що програмне забезпечення підтримує лише кодування з постійним бітрейтом (CBR), а не зі змінним бітрейтом (VBR). У більшості випадків слід надавати перевагу кодуванню VBR, оскільки воно забезпечує краще співвідношення якості та розміру файлу.
Деякі інші програми взагалі не можуть рендерити в Ogg Theora.
У цьому випадку ви можете рендерити відео у проміжний високоякісний формат (наприклад, відео з високим бітрейтом H.264), а потім перекодувати його в Ogg Theora. В ідеалі, вам слід використовувати формат без втрат або без стиснення як проміжний формат, щоб максимізувати якість вихідного відео Ogg Theora, але це може вимагати багато місця на диску.
FFmpeg (CLI) – популярний інструмент з відкритим кодом для цієї мети. FFmpeg має крутий процес навчання, але це потужний інструмент.
Ось приклади команд FFmpeg для перетворення відео MP4 на Ogg Theora. Оскільки FFmpeg підтримує багато вхідних форматів, ви зможете використовувати наведені нижче команди майже з будь-яким вхідним відеоформатом (AVI, MOV, WebM, …).
Примітка
Переконайтеся, що вашу копію FFmpeg скомпільовано з підтримкою libtheora і libvorbis. Ви можете перевірити це, виконавши команду ffmpeg без жодних аргументів, а потім переглянувши рядок configuration: у виведенні команди.
Попередження
Поточні офіційні релізи FFmpeg містять деякі помилки в мультиплексорі Ogg/Theora. Наполегливо рекомендується використовувати одну з останніх статичних щоденних збірок або збирати з їхньої гілки master, щоб отримати останні виправлення.
On Windows, make sure to use 32-bit builds of FFmpeg. Windows 64-bit builds have known issues with Theora encoding, which result in artifacts in the output file.
Баланс якості та розміру файлу
Рівень якості відео (-q:v) повинен бути між 1 і 10. Якість 6 є хорошим компромісом між якістю та розміром файлу. Якщо ви кодуєте з високою роздільною здатністю (наприклад, 1440p або 4K), ви, ймовірно, захочете зменшити -q:v до 5, щоб зберегти розмір файлу розумним. Оскільки щільність пікселів у відео з роздільною здатністю 1440p, або 4K, вища, пресети з нижчою якістю у вищій роздільній здатності виглядатимуть так само добре, або навіть краще, ніж відео з низькою роздільною здатністю.
Рівень якості аудіо (-q:a) має бути між -1 і 10. Якість 6 забезпечує хороший компроміс між якістю та розміром файлу. На відміну від якості відео, підвищення якості звуку майже не збільшує розмір вихідного файлу. Тому, якщо вам потрібен найчистіший звук, ви можете збільшити значення до 9, щоб отримати звук без втрат. Це особливо цінно, якщо ваш вхідний файл уже використовує стиснення звуку з втратами. Аудіо вищої якості дійсно збільшує використання ЦП декодера, тому це може призвести до випадання звуку в разі високого навантаження на систему. Перегляньте цю сторінку для таблиці зі списком попередніх налаштувань якості аудіо Ogg Vorbis і відповідних змінних бітрейтів.
Розмір GOP (групи зображень) (-g:v) – це максимальний інтервал між ключовими кадрами. Збільшення цього значення може покращити стиснення майже без впливу на якість. Розмір за замовчуванням (12) є занадто малим для більшості типів контенту, тому рекомендується використовувати вищі значення GOP перед зниженням якості відео. Однак переваги стиснення зникатимуть зі збільшенням розміру GOP. Значення від 64 до 512 зазвичай забезпечують найкраще стиснення.
Примітка
Більші розміри GOP призведуть до збільшення максимального часу пошуку, що різко зросте при перевищенні степенів двійки, починаючи з 64. Максимальний час пошуку з розміром GOP 65 може бути майже вдвічі довшим, ніж з розміром GOP 64, залежно від швидкості декодування.
FFmpeg: Конвертуйте, зберігаючи оригінальну роздільну здатність відео
Наступна команда конвертує відео зі збереженням початкової роздільної здатності. Бітрейт відео та аудіо буде змінюватися, щоб максимізувати якість і заощадити місце в тих частинах відео/аудіо, які не потребують високого бітрейту (наприклад, статичні сцени).
ffmpeg -i input.mp4 -q:v 6 -q:a 6 -g:v 64 output.ogv
FFmpeg: Змініть розмір відео, а потім конвертуйте його
Наступна команда змінює розмір відео до 720 пікселів (720p) зі збереженням існуючого співвідношення сторін. Це допомагає значно зменшити розмір файлу, якщо джерело записано з вищою роздільною здатністю, ніж 720p:
ffmpeg -i input.mp4 -vf "scale=-1:720" -q:v 6 -q:a 6 -g:v 64 output.ogv
Відео Chroma Key
Хроматичний ключ, широко відомий як ефект «зеленого екрану» або «синього екрану», дозволяє видалити певний колір із зображення чи відео та замінити його іншим фоном. Цей ефект широко використовується у відеовиробництві для бездоганного поєднання різних елементів.

Ми досягнемо ефекту кольоровості, написавши спеціальний шейдер у GDScript і використовуючи вузол VideoStreamPlayer для відображення відеовмісту.
Налаштування сцени
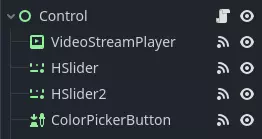
Переконайтеся, що сцена містить вузол «VideoStreamPlayer» для відтворення відео та вузол «Control» для зберігання елементів інтерфейсу користувача для керування ефектом кольоровості.
Написання спеціального шейдера
Щоб реалізувати ефект кольоровості, виконайте такі дії:
Виберіть у сцені вузол VideoStreamPlayer і перейдіть до його властивостей. У розділі «CanvasItem > Material» створіть новий шейдер під назвою «ChromaKeyShader.gdshader»
У файлі "ChromaKeyShader.gdshader" напишіть спеціальний код шейдера, як показано нижче:
shader_type canvas_item;

// Uniform variables for chroma key effect
uniform vec3 chroma_key_color : source_color = vec3(0.0, 1.0, 0.0);
uniform float pickup_range : hint_range(0.0, 1.0) = 0.1;
uniform float fade_amount : hint_range(0.0, 1.0) = 0.1;

void fragment() {
    // Get the color from the texture at the given UV coordinates
    vec4 color = texture(TEXTURE, UV);

    // Calculate the distance between the current color and the chroma key color
    float distance = length(color.rgb - chroma_key_color);

    // If the distance is within the pickup range, discard the pixel
    // the lesser the distance more likely the colors are
    if (distance <= pickup_range) {
        discard;
    }

    // Calculate the fade factor based on the pickup range and fade amount
    float fade_factor = smoothstep(pickup_range, pickup_range + fade_amount, distance);

    // Set the output color with the original RGB values and the calculated fade factor
    COLOR = vec4(color.rgb, fade_factor);
}
Шейдер використовує обчислення відстані, щоб ідентифікувати пікселі, близькі до кольору кольорового ключа, і відкидає їх, фактично видаляючи вибраний колір. Пікселі, які знаходяться трохи далі від кольору ключа кольоровості, зникають на основі fade_factor, плавно змішуючи їх із навколишніми кольорами. Цей процес створює бажаний ефект кольоровості, створюючи враження, ніби фон було замінено іншим зображенням або відео.
Наведений вище код представляє просту демонстрацію шейдера Chroma Key, і користувачі можуть налаштувати його відповідно до своїх конкретних вимог.
Елементи керування інтерфейсу користувача
Щоб дозволити користувачам маніпулювати ефектом кольоровості в режимі реального часу, ми створили повзунки у вузлі «Керування». Скрипт вузла Control містить такі функції:
 extends Control

 func _on_color_picker_button_color_changed(color):
     # Update the "chroma_key_color" shader parameter of the VideoStreamPlayer's material.
     $VideoStreamPlayer.material.set("shader_parameter/chroma_key_color", color)

 func _on_h_slider_value_changed(value):
     # Update the "pickup_range" shader parameter of the VideoStreamPlayer's material.
     $VideoStreamPlayer.material.set("shader_parameter/pickup_range", value)

 func _on_h_slider_2_value_changed(value):
     # Update the "fade_amount" shader parameter of the VideoStreamPlayer's material.
     $VideoStreamPlayer.material.set("shader_parameter/fade_amount", value)

func _on_video_stream_player_finished():
     # Restart the video playback when it's finished.
     $VideoStreamPlayer.play()
using Godot;

public partial class MyControl : Control
{
    private VideoStreamPlayer _videoStreamPlayer;

    public override void _Ready()
    {
        _videoStreamPlayer = GetNode<VideoStreamPlayer>("VideoStreamPlayer");
    }

    private void OnColorPickerButtonColorChanged(Color color)
    {
        // Update the "chroma_key_color" shader parameter of the VideoStreamPlayer's material.
        _videoStreamPlayer.Material.Set("shader_parameter/chroma_key_color", color);
    }

    private void OnHSliderValueChanged(double value)
    {
        // Update the "pickup_range" shader parameter of the VideoStreamPlayer's material.
        _videoStreamPlayer.Material.Set("shader_parameter/pickup_range", value);
    }

    private void OnHSlider2ValueChanged(double value)
    {
        // Update the "fade_amount" shader parameter of the VideoStreamPlayer's material.
        _videoStreamPlayer.Material.Set("shader_parameter/fade_amount", value);
    }

    private void OnVideoStreamPlayerFinished()
    {
        // Restart the video playback when it's finished.
        _videoStreamPlayer.Play();
    }
}
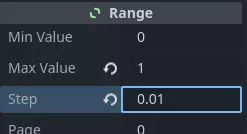
також переконайтеся, що діапазон повзунків є відповідним, наші налаштування:
Обробка сигналів
Підключіть відповідний сигнал від елементів UI до сценарію вузла Control. ви створили у сценарії вузла Control для керування ефектом кольоровості. Ці обробники сигналів оновлюватимуть уніфіковані змінні шейдера у відповідь на введення користувача.
Збережіть і запустіть сцену, щоб побачити ефект кольоровості в дії! За допомогою наданих елементів керування користувальницького інтерфейсу тепер ви можете регулювати колір ключа кольоровості, діапазон звукозапису та ступінь затухання в режимі реального часу, досягаючи бажаної функціональності ключа кольоровості для свого відеовмісту.