Baked lightmaps
Introduction
Baked lightmaps are an alternative workflow for adding indirect (or fully baked) lighting to a scene. Unlike the Using GIProbe approach, baked lightmaps work fine on low-end PCs and mobile devices, as they consume almost no resources at run-time. Also unlike GIProbe, baked lightmaps can optionally be used to store direct lighting, which provides even further performance gains.
Unlike GIProbes, Baked Lightmaps are completely static. Once baked, they can't be modified at all. They also don't provide the scene with reflections, so using Reflection probes together with it on interiors (or using a Sky on exteriors) is a requirement to get good quality.
As they are baked, they have fewer problems than GIProbe regarding light
bleeding, and indirect light will often look better. The downside is that baking
lightmaps takes much longer than baking a GIProbe. While baking a GIProbe can be
done in a matter of seconds, baking lightmaps will take several minutes if not
more. This can slow down iteration speed significantly, so it is recommended to
bake lightmaps only when you actually need to see changes in lighting.
Baking lightmaps will also reserve baked materials' UV2 slot, which means you can no longer use it for other purposes in materials (either in the built-in Spatial Material or in custom shaders).
In the end, deciding which indirect lighting approach is better depends on your use case. In general, GIProbe is easier to set up and works better with dynamic objects. For mobile or low-end compatibility, though, baked lightmaps are your only choice.
Visual comparison
Here are some comparisons of how BakedLightmap vs. GIProbe look. Notice that lightmaps are more accurate, but also suffer from the fact that lighting is on an unwrapped texture, so transitions and resolution may not be that good. GIProbe looks less accurate (as it's an approximation), but smoother overall.

Setting up
First of all, before the lightmapper can do anything, the objects to be baked need an UV2 layer and a texture size. An UV2 layer is a set of secondary texture coordinates that ensures any face in the object has its own place in the UV map. Faces must not share pixels in the texture.
There are a few ways to ensure your object has a unique UV2 layer and texture size:
Unwrap on scene import
This is probably the best approach overall. The only downside is that, on large models, unwrapping can take a while on import. Nonetheless, Godot will cache the UV2 across reimports, so it will only be regenerated when needed.
Select the imported scene in the filesystem dock, then go to the Import dock. There, the following option can be modified:
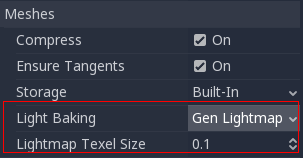
The Light Baking mode needs to be set to Gen Lightmaps. A texel size in world units must also be provided, as this will determine the final size of the lightmap texture (and, in consequence, the UV padding in the map).
The effect of setting this option is that all meshes within the scene will have their UV2 maps properly generated.
Warning
When reusing a mesh within a scene, keep in mind that UVs will be generated for the first instance found. If the mesh is re-used with different scales (and the scales are wildly different, more than half or twice), this will result in inefficient lightmaps. Don't reuse a source mesh at significantly different scales if you are planning to use lightmapping.
Also, the *.unwrap_cache files should not be ignored in version control
as these files guarantee that UV2 reimports are consistent across platforms
and engine versions.
Unwrap from within Godot
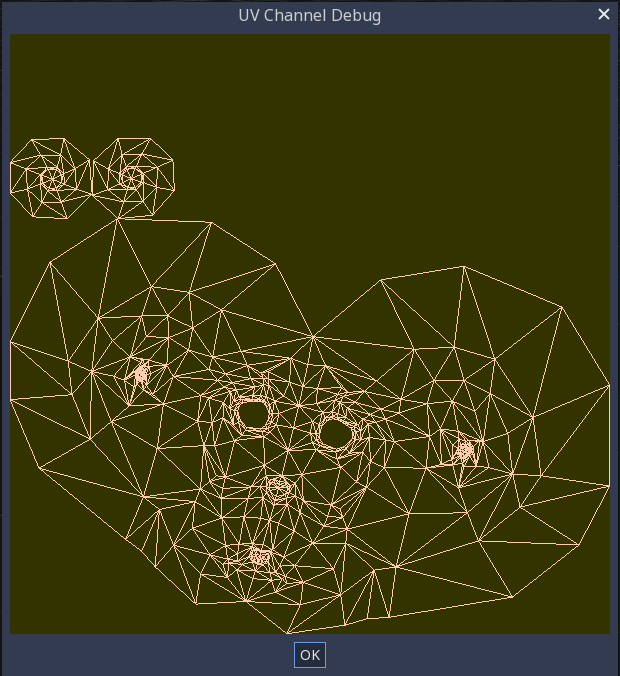
Godot has an option to unwrap meshes and visualize the UV channels. It can be found in the Mesh menu:

This will generate a second set of UV2 coordinates which can be used for baking, and it will also set the texture size automatically.
Unwrap from your 3D DCC
The last option is to do it from your favorite 3D app. This approach is generally not recommended, but it's explained first so that you know it exists. The main advantage is that, on complex objects that you may want to re-import a lot, the texture generation process can be quite costly within Godot, so having it unwrapped before import can be faster.
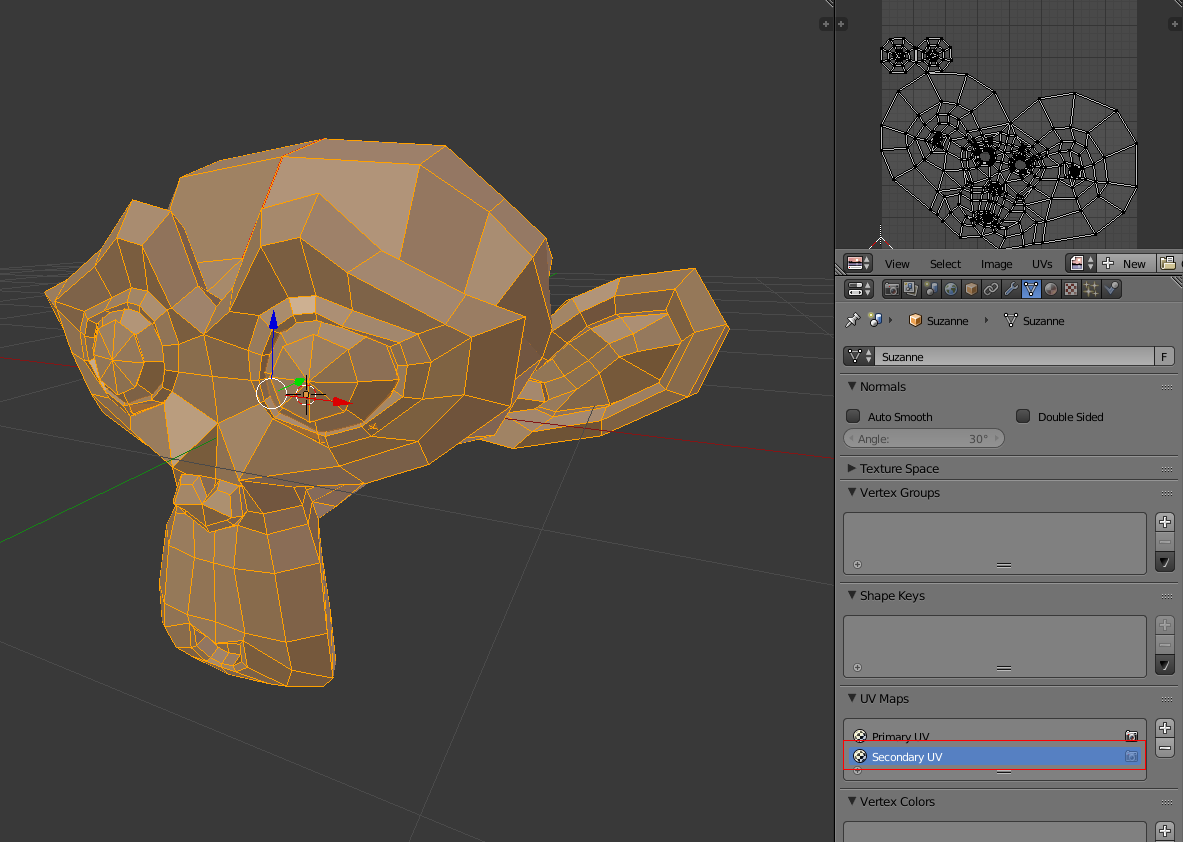
Simply do an unwrap on the second UV2 layer.
Then import the 3D scene normally. Remember you will need to set the texture size on the mesh after import.

If you use external meshes on import, the size will be kept. Be wary that most unwrappers in 3D DCCs are not quality oriented, as they are meant to work quickly. You will mostly need to use seams or other techniques to create better unwrapping.
Checking UV2
In the mesh menu mentioned before, the UV2 texture coordinates can be visualized. Make sure, if something is failing, to check that the meshes have these UV2 coordinates:
Setting up the scene
Before anything is done, a BakedLightmap node needs to be added to a scene. This will enable light baking on all nodes (and sub-nodes) in that scene, even on instanced scenes.
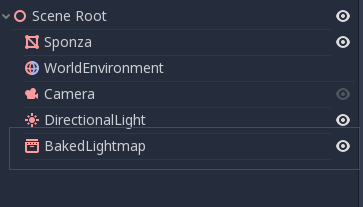
A sub-scene can be instanced several times, as this is supported by the baker, and each will be assigned a lightmap of its own (just make sure to respect the rule about scaling mentioned before):
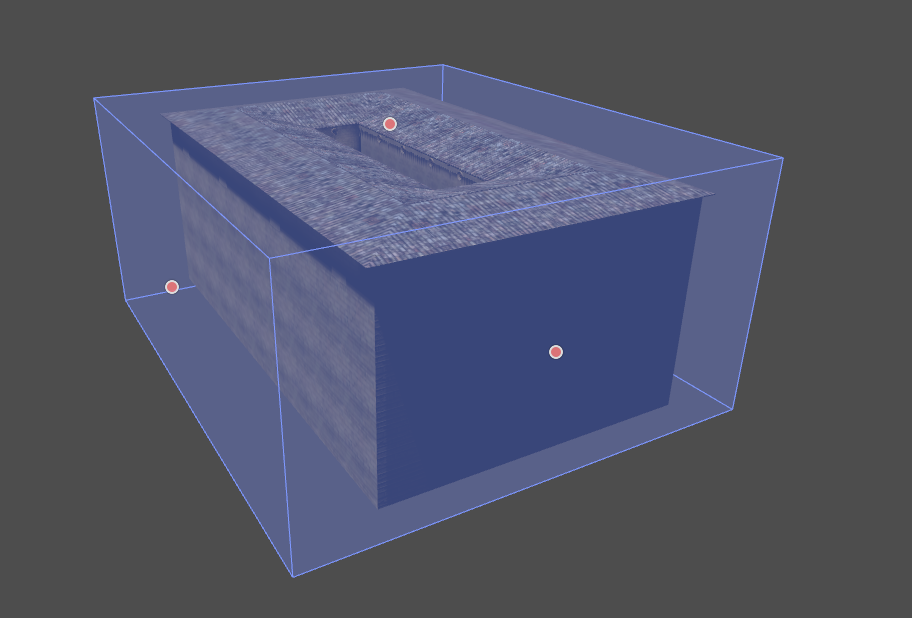
Configure bounds
Lightmap needs an approximate volume of the area affected because it uses it to
transfer light to dynamic objects inside it (more on that later). Just
cover the scene with the volume as you do with GIProbe:
Setting up meshes
For a MeshInstance node to take part in the baking process, it needs to have the Use in Baked Light property enabled.
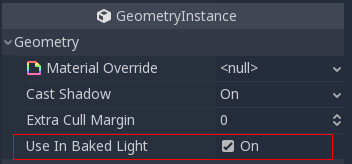
When auto-generating lightmaps on scene import, this is enabled automatically.
Setting up lights
Lights are baked with indirect light by default. This means that shadowmapping and lighting are still dynamic and affect moving objects, but light bounces from that light will be baked.
Lights can be disabled (no bake) or be fully baked (direct and indirect). This can be controlled from the Bake Mode menu in lights:
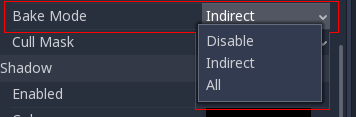
The modes are:
Disabled
The light is ignored when baking lightmaps. Keep in mind hiding a light will have no effect for baking, so this must be used instead of hiding the Light node.
This is the mode to use for dynamic lighting effects such as explosions and weapon effects.
Indirect
This is the default mode, and is a compromise between performance and real-time friendliness. Only indirect lighting will be baked. Direct light and shadows are still real-time, as they would be without BakedLightmap.
This mode allows performing subtle changes to a light's color, energy and position while still looking fairly correct. For example, you can use this to create flickering static torches that have their indirect light baked.
All
Both indirect and direct lighting will be baked. Since static surfaces can skip lighting and shadow computations entirely, this mode provides the best performance along with smooth shadows that never fade based on distance. The real-time light will not affect baked surfaces anymore, but it will still affect dynamic objects. When using the All bake mode on a light, dynamic objects will not cast real-time shadows onto baked surfaces, so you need to use a different approach such as blob shadows instead. Blob shadows can be implemented with a Sprite3D + RayCast setup, or a negative SpotLight pointing down with its bake mode set to Disabled.
The light will not be adjustable at all during gameplay. Moving the light and changing its color or energy will not have any effect on static surfaces.
Since bake modes can be adjusted on a per-light basis, it is possible to create hybrid baked light setups. One popular option is to use a real-time DirectionalLight with its bake mode set to Indirect, and use the All bake mode for OmniLights and SpotLights. This provides good performance while still allowing dynamic objects to cast real-time shadows in outdoor areas.
After selecting the All bake mode on a light, you can optionally specify a Size greater than 0 for the light in the inspector. This size is used to provide softer shadows depending on the distance between the shadow caster and the object receiving the shadow. This mimics real life shadow appearance:
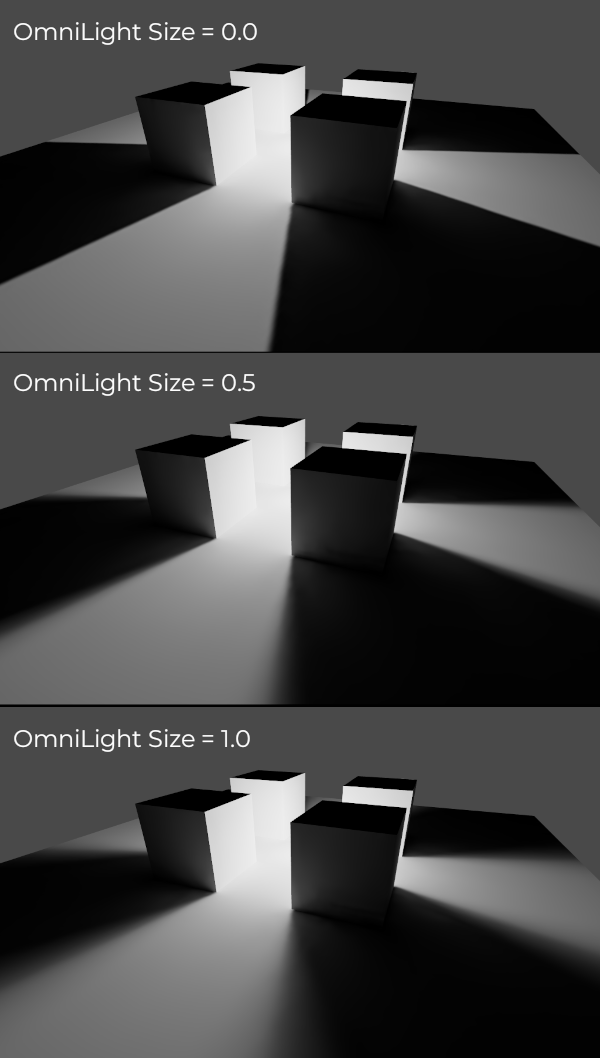
The light's Size property is ignored for real-time shadows; it will only affect baked shadows. When the Size property is changed, lightmaps must be baked again to make changes visible.
Baking
To begin the bake process, just push the Bake Lightmaps button on top when selecting the BakedLightmap node:

This can take from seconds to minutes (or hours) depending on scene size, bake method and quality selected.
Balancing bake times with quality
Since high-quality bakes can take very long (up to several hours for large complex scenes), it is recommended to use lower quality settings at first. Then, once you are confident with your scene's lighting setup, raise the quality settings and perform a "final" bake before exporting your project.
Note
By default, the lightmap baker will use all the system's logical CPU cores to speed up baking. This can reduce system responsiveness. To preserve system responsiveness while lightmaps are baking, you can reduce the number of CPU threads used to bake lightmaps. Keeping 1 or 2 CPU threads free will help improve system responsiveness, which is useful when multi-tasking while lightmaps are baking at the cost of slowing down lightmap baking slightly.
To do so, open Editor > Editor Settings and adjust
Editors > 3d > Lightmap Baking Number Of Cpu Threads.
The default value (0) uses all of the system's logical CPU cores.
Positive values will specify a number of threads to use, while negative
values will subtract from the total number of logical CPU cores in the system.
For example, on a system with 8 logical CPU cores, adjusting the setting to
-1 will use 7 CPU threads for lightmap baking.
Configuring bake
Several more options are present for baking:
Bake Extents: The size of the area affected. This can be edited in the 3D editor viewport using the handles. Any object that can have lightmaps baked and is touching the bake extents will have lightmaps baked for it, but dynamic object capture will only work within the extents.
Tweaks
Quality: Four bake quality modes are provided: Low, Medium, High, and Ultra. Higher quality takes more time, but result in a better-looking lightmap with less noise. The difference is especially noticeable with emissive materials or areas that get little to no direct lighting.
Bounces: The number of bounces to use for indirect lighting. The default value (3) is a good compromise between bake times and quality. Higher values will make light bounce around more times before it stops, which makes indirect lighting look smoother (but also brighter). During the initial lighting iteration work, it is recommended to decrease the number of bounces to 1 to speed up baking. Remember that your scene will be darker when decreasing the number of bounces.
Use Denoiser: If enabled, uses OpenImageDenoise to make the lightmap significantly less noisy. This increases bake times and can occasionally introduce artifacts, but the result is often worth it.
Use Hdr: If disabled, lightmaps are smaller on disk, but they won't be able to capture any light over white (1.0). This will result in visible clipping if you have bright lights in your scene. When HDR is disabled, banding may also be visible in the lightmap.
Use Color: If disabled, lightmaps are smaller on disk, but the lightmap won't be able to store colored lighting. When baking indirect light only, the difference may be barely visible since indirect light is generally not highly saturated. However, when baking both direct and indirect lighting using the All bake mode on a light, this will turn colored lighting into grayscale lighting. This can be disabled together with HDR to get the smallest possible lightmap file at a given resolution.
Bias: The offset value to use for shadows in 3D units. You generally don't need to change this value, except if you run into issues with light bleeding or dark spots in your lightmap after baking. This setting does not affect real-time shadows casted on baked surfaces.
Default Texels Per Unit: For meshes that do not specify their own lightmap texel density, this will be used as the value. Higher values result in lower-resolution lightmaps, which result in faster bake times and lower file sizes at the cost of blurrier indirect lighting and shadows.
Atlas
Generate: If enabled, a texture atlas will be generated for the lightmap. This results in more efficient rendering, but is only compatible with the GLES3 rendering backend. Disable this setting if your project is allowed to fall back to GLES2. (This is not the case by default and must be enabled in the Project Settings.) This setting is ignored when the project is configured to use GLES2 by default.
Max Size: The maximum size of the atlas in pixels. Higher values result in a more efficient atlas, but are less compatible with old/low-end hardware. If in doubt, leave this setting on its default value (4096).
Capture
Enabled: This enables probe capture so that dynamic objects can receive indirect lighting. Regardless of this setting's value, dynamic objects will not be able to contribute indirect lighting to the scene. This is a limitation of lightmaps.
Cell Size: The distance between lightmap probes in 3D units. Higher values result in more sparse probe placement, which decreases bake times and file size at the cost of lower lighting accuracy for dynamic objects.
Quality: The lightmap probe generation quality. Higher values result in more accurate lighting, but take longer to bake. This setting does not affect the density of the lightmap probes, only their quality.
Propagation: Similar to GIProbe's Propagation property. Higher values result in brighter and more diffuse indirect lighting for dynamic objects. Adjust this value depending on your scene to make dynamic objects better fit with static baked lighting.
Data
Light Data: Contains the light baked data after baking. Textures are saved to disk, but this also contains the capture data for dynamic objects, which can be heavy. If you are using a scene in
.tscnformat, you should save this resource to an external binary.lmbakefile to avoid bloating the.tscnscene with binary data encoded in Base64.
The Light Data resource can be edited to adjust two additional properties:
Energy: Adjusts the lightmap's brightness. Higher values result in brighter lightmaps. This can be adjusted at run-time for short-lived dynamic effects such as thunderstorms. However, keep in mind that it will affect all baked lights.
Interior: If enabled, dynamic objects will not make use of environment lighting and will use light probes for ambient lighting exclusively. If disabled, both environment lighting and light probes are used to light up dynamic objects.
Tip
The generated EXR file can be viewed and even edited using an image editor to perform post-processing if needed. However, keep in mind that changes to the EXR file will be lost when baking lightmaps again.
Dynamic objects
In other engines or lightmapper implementations, you are generally required to manually place small objects called "lightprobes" all around the level to generate capture data. This is then used to transfer the light to dynamic objects that move around the scene.
However, this implementation of lightmapping uses a different method. The process is automatic, so you don't have to do anything. Just move your objects around, and they will be lit accordingly. Of course, you have to make sure you set up your scene bounds accordingly or it won't work.
