Attention: Here be dragons
This is the latest
(unstable) version of this documentation, which may document features
not available in or compatible with released stable versions of Godot.
Checking the stable version of the documentation...
StandardMaterial3D と ORMMaterial3D
はじめに
StandardMaterial3D と ORMMaterial3D (オクルージョン、ラフネス、メタリック) は、シェーダーコードを記述することなく、アーティストがマテリアルに求めるほとんどの機能を提供することを目的とした標準の3Dマテリアルです。ただし追加の機能が必要な場合は、シェーダーコードへ変換することができます。
このチュートリアルでは、両方のマテリアルに存在するパラメータについて説明します。
これらのマテリアルをオブジェクトに追加するには、4つの方法があります。メッシュの Material プロパティにマテリアルを追加できます。メッシュを使用するノード (MeshInstance3D ノードなど) の Material プロパティ、メッシュを使用するノードの Material Override プロパティ、および Material Overlay に追加できます。
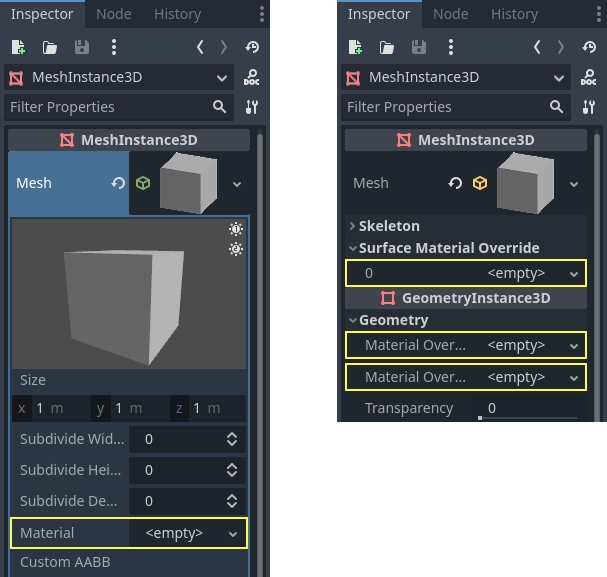
メッシュ自体にマテリアルを追加すると、そのメッシュが使用されるたびにそのマテリアルが追加されます。メッシュを使用してノードにマテリアルを追加すると、マテリアルはそのノードでのみ使用され、メッシュのマテリアルプロパティもオーバーライドします。マテリアルがノードの Material Override プロパティに追加された場合、そのノードでのみ使用されます。また、ノードの通常のマテリアルプロパティとメッシュのマテリアルプロパティもオーバーライドします。
Material Overlay プロパティは、メッシュで現在使用されているマテリアルの上にそのマテリアルを重ねてレンダリングします。たとえばこれを使用してメッシュに半透明なシールドエフェクトを適用できます。
BaseMaterial3D の設定
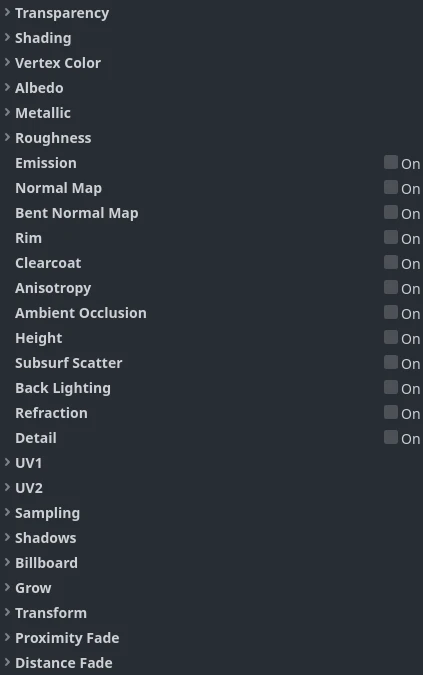
StandardMaterial3Dには、マテリアルの外観を決定する多くの設定があります。これらはすべてBaseMaterial3Dカテゴリにあります
ORMマテリアルは、1つの違いを除いてほとんど同じです。オクルージョン、ラフネス、メタリックの個別の設定とテクスチャの代わりに、単一の ORMテクスチャがあります。そのテクスチャのさまざまなカラーチャネルが各パラメーターに使用されます。Substance Painter や Armor Paint などのプログラムでは、この形式でエクスポートするオプションが提供されます。これら2つのプログラムでは、ORMテクスチャも使用する Unreal Engine のエクスポート プリセットが使用されます。
透明度 (Transparency)
デフォルトでは Godot のマテリアルは不透明です。これによりレンダリングが高速になりますが、Albedo > Texture プロパティで半透明なテクスチャを使用した場合 (または Albedo > Color を半透明に設定した場合) でも、マテリアルは透けずに不透明になります。
マテリアルを透視するには、マテリアルを「透過」にする必要があります。Godot にはいくつかの透過モードがあります。
Disabled: マテリアルは不透明です。すべてのレンダリング機能がサポートされており、レンダリングは最も高速です。
Alpha: 半透明の領域はブレンディングで描画されます。レンダリングは遅くなりますが、部分的な透明度 (半透明性とも呼ばれます) が可能になります。アルファブレンディングを使用するマテリアルは影を落とすこともできず、スクリーンスペース反射では見えません。
Alpha はパーティクルエフェクトや VFX に適しています。
Alpha Scissor: 不透明度が Alpha Scissor Threshold 未満の半透明領域は描画されません (この不透明度を超えると、不透明として描画されます)。これはAlphaよりもレンダリングが速く、透明度のソートの問題は発生しません。欠点は中間値の表現が不可能であり、不透明または完全透明のどちらかになります。Alpha Scissorを使用するマテリアルは影を落とすことができます。
Alpha Scissor は、葉やフェンスに最適です。これらの植物はエッジが固く、見栄えを良くするためには正しい選別が必要なためです。
Alpha Hash: 半透明の領域はディザリングを使用して描画されます。これも不透明または完全透明のどちらかになりますが、ディザリングはビューポートの解像度に応じて限られた精度で部分的に不透明な領域を表現するのに役立ちます。Alpha Hashを使用するマテリアルは影を落とすことができます。
Alpha Hash はリアルな髪に適していますが、スタイライズな髪にはAlpha Scissorの方が適している場合があります。
Depth Pre-Pass: 最初に不透明パイプラインを介してオブジェクトの完全に不透明なピクセルをレンダリングし、次にアルファブレンディングを使用して残りをレンダリングします。これにより透明度のソートが ほぼ 正しくなります (ただし部分的に透明な領域では誤ったソートが示される可能性があるため、完全に正しいわけではありません)。Depth Pre-Passを使用するマテリアルは影を落とすことができます。
注釈
Godot は以下の条件のいずれかが満たされた場合、アルファブレンディングを使用してマテリアルを自動的に半透明にします。
透過モードを Alpha に設定します (ここで説明されているとおり)。
デフォルトの Mix 以外のブレンドモードを設定する
Refraction、Proximity Fade、または**Distance Fade** を有効にします。
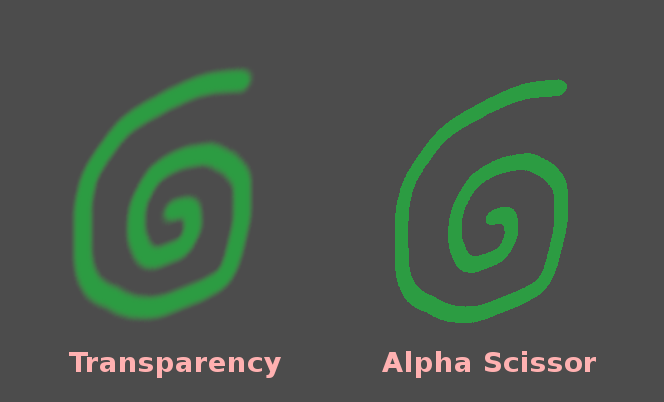
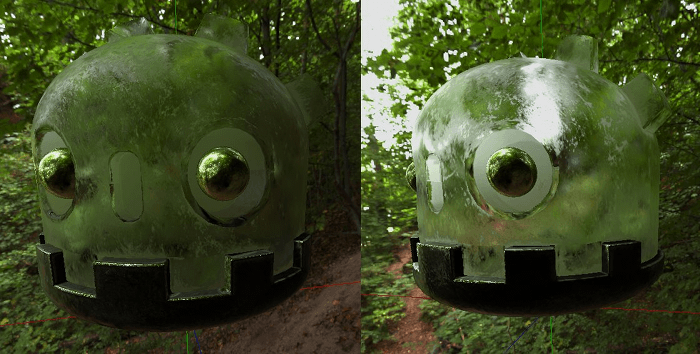
アルファブレンディング(左)とアルファシザー(右)の透明度の比較:
警告
アルファブレンドの透明度には、いくつかの 制限 があります。
アルファブレンドのマテリアルは、特に重なり合っている場合、レンダリングに多くの時間がかかります。
アルファブレンドのマテリアルでは、透明なサーフェスが互いに重なり合うとソートの問題が発生する場合があります。つまりサーフェスが間違った順序でレンダリングされ、実際にはカメラに近いサーフェスよりも後ろのサーフェスが前にあるように見える場合があります。
アルファブレンドのマテリアルは影を受け取ることはできますが、逆に影を投影しません。
アルファブレンドのマテリアルは、リフレクション(リフレクションプローブ以外)には表示されません。
スクリーンスペース反射とシャープな SDFGI 反射は、アルファブレンドのマテリアルには表示されません。SDFGI が有効になっている場合、マテリアルのラフネスに関係なく、ラフネス反射がフォールバックとして使用されます。
Alpha 透過モードを使用する前に、別の透過モードがニーズに適しているかどうかを必ず検討してください。
アンチエイリアシング
注釈
このプロパティは、透過モードが Alpha Scissor または Alpha Hash の場合にのみ表示されます。
Alpha ScissorとAlpha Hashはアルファブレンドよりもレンダリングが高速ですが、不透明領域と透明領域の間にハードエッジが現れます。FXAA や TAA などのポスト処理ベースの アンチエイリアシングテクニック を使用することもできますが、これらのテクニックを使用すると最終結果がぼやけたり、ゴーストアーティファクトが現れたりする傾向があるため、必ずしも望ましいとは限りません。
利用可能なアルファアンチエイリアシング モードは3つあります。
Disabled: アルファアンチエイリアシングなし。ポストプロセスベースのアンチエイリアシングを使用しない限り、透明なマテリアルのエッジはエイリアスされて表示されます。
Alpha Edge Blend: 不透明領域と透明領域の間をなめらかに遷移させます。「Alpha to Coverage」とも呼ばれます。
Alpha Edge Clip: 不透明領域と透明領域の間の遷移はシャープになりますが、アンチエイリアス処理された状態になります。「Alpha to Coverage + Alpha to One」とも呼ばれます。
アルファアンチエイリアシングモードが Alpha Edge Blend または Alpha Edge Clip に設定されている場合、新しい Alpha Antialiasing Edge プロパティがインスペクターの下に表示されます。このプロパティはピクセルを透明にするしきい値を制御します。Alpha Scissor Thresholdは既に定義されていますが (Alpha Scissor のみを使用する場合)、この追加のThreshold (閾値)は不透明ピクセルと透明ピクセル間のスムーズな遷移に使用されます。Alpha Antialiasing Edge は、Alpha Scissor Thresholdより厳密に低い値に 常に 設定する必要があります。デフォルトの 0.3 は、アルファ シザーしきい値が 0.5 の場合に適切な値ですが、Alpha Scissor Thresholdを変更する場合は、このAlpha Antialiasing Edgeを調整することを忘れないでください。
アンチエイリアシング効果が十分でないと思われる場合は、Alpha Antialiasing Edge を増やして、Alpha Scissor Threshold を下回っていることを確認してください (マテリアルがAlpha Scissorを使用している場合)。一方、カメラがマテリアルに近づくにつれてテクスチャの外観が目に見えて変化していることに気付いた場合は、Alpha Antialiasing Edge を減らしてみてください。
重要
最良の結果を得るには、アルファアンチエイリアシングを使用する場合、プロジェクト設定で MSAA 3D を少なくとも2倍に設定する必要があります。これはこの機能が MSAA によって提供される機能であるAlpha to Coverageに依存しているためです。
MSAA がない場合、固定のディザリングパターンがマテリアルのエッジに適用されますが、エッジを滑らかにするのにはあまり効果的ではありません (それでも少しは役立ちます)。
ブレンドモード
マテリアルのブレンドモードをコントロールします。Mix 以外のモードでは、オブジェクトが強制的に透過パイプラインをスルーする(処理されない)ことに注意してください。
Mix: デフォルトのブレンドモード、アルファはオブジェクトの表示量(透け方)を制御します。
Add: オブジェクトの最終的な色が画面の色に加算されます。フレアや火のようなエフェクトに適しています。
Subtract: The final color of the object is subtracted from the color of the screen.
Multiply: The final color of the object is multiplied with the color of the screen.
Premultiplied Alpha: The color of the object is expected to have already been multiplied by the alpha. This behaves like Add when the alpha is
0.0(fully transparent) and like Mix when the alpha is1.0(opaque).
カリングモード
背面がレンダリングされるときにオブジェクトのどちら側が描画されないかを決定します:
Back: オブジェクトの背面は、表示されていないときにカリングされます(デフォルト)。
Front: 表示されていない場合、オブジェクトの前面がカリングされます。
Disabled: 両面オブジェクトに使用します(カリングは実行されません)。
注釈
デフォルトでは Blender はマテリアルの背面カリングを無効にしており、Blender でのレンダリング方法に合わせてマテリアルをエクスポートします。つまり Godot のマテリアルのカリング モードは 無効 に設定されます。これにより他の面によってカリングされている場合でも背面がレンダリングされるため、パフォーマンスが低下する可能性があります。これを解決するには、Blender の [マテリアル] タブで 背面カリング を有効にしてから、シーンを再度 glTF にエクスポートします。
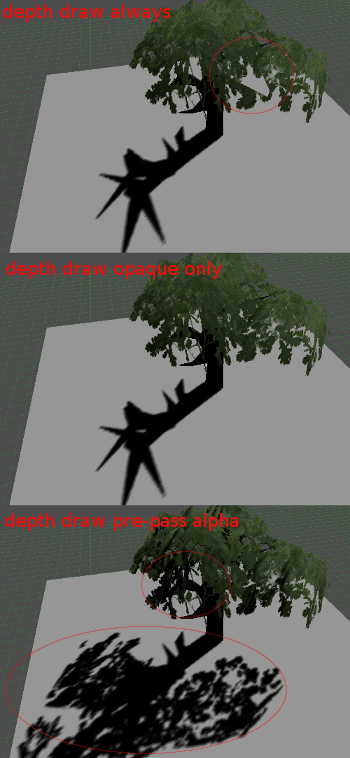
Depth Draw Mode (深度描画モード)
深度レンダリングを実行する必要がある場合を指定します。
Opaque Only(デフォルト): 深度(奥行き)は不透明オブジェクトに対してのみ描画されます。
Always: 不透明オブジェクトと透明オブジェクトの両方に対して深度描画が描画されます。
Never: 深度描画は行われません (以下の No Depth Test オプションと混同しないでください)。
Depth Pre-Pass: 透明なオブジェクトの場合、まず不透明な部分で不透明なパスが作成され、次に透明度が上に描画されます。このオプションは、透明な草や木の葉で使用します。
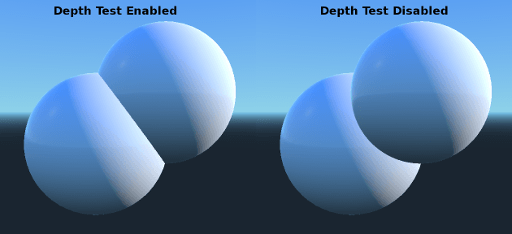
No Depth Test(深度テスト無し)
近くのオブジェクトを遠くのオブジェクトの上に表示するために、深度テストが実行されます。無効にすると、オブジェクトが他のすべての上(または下)に表示されます。
これを無効にすることは、ワールド空間でインジケータを描画する場合に最適で、Materialの Render Priority プロパティともに非常にうまく機能します(このページの下部を参照)。
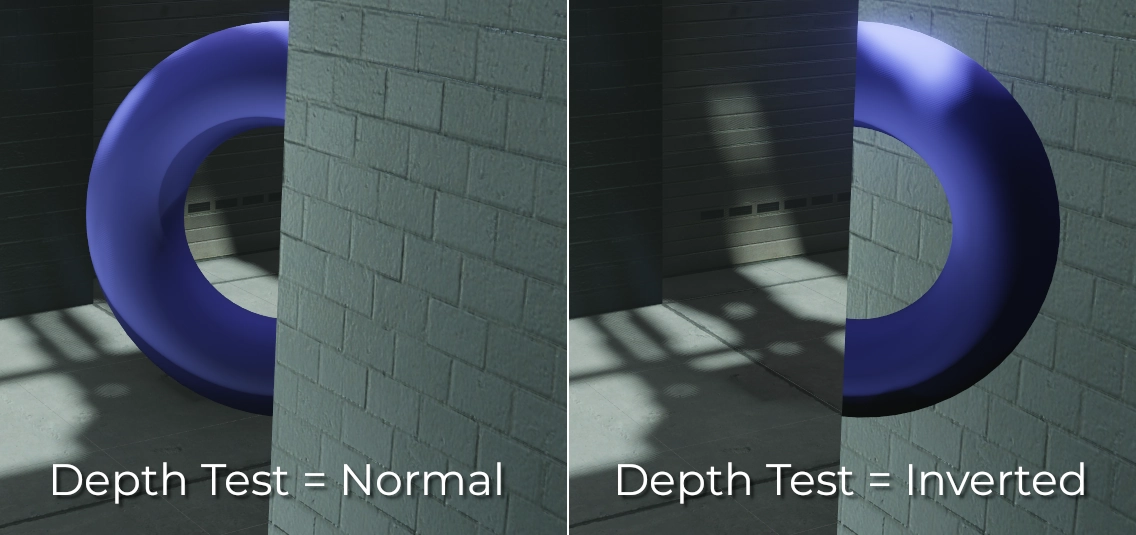
Depth Test
This can be used to invert the standard depth test. When set to Inverted, the object will only appear when occluded, and will be hidden otherwise.
This has no effect if No Depth Test is enabled.
シェーディング
シェーディングモード
Materials support three shading modes: Per-Pixel, Per-Vertex, and Unshaded.
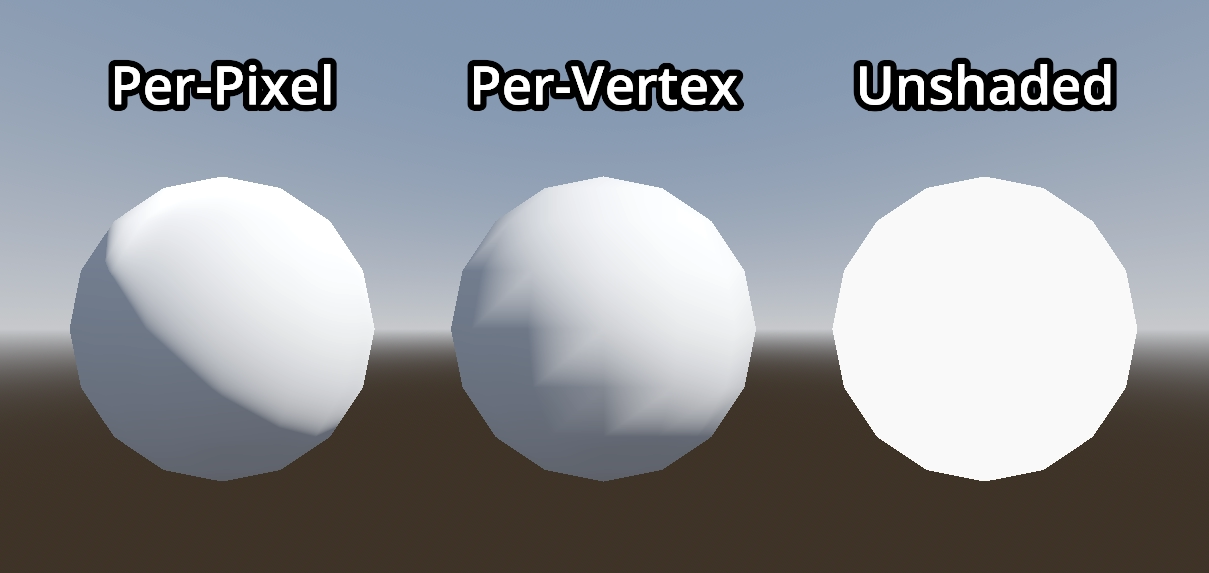
The Per-Pixel shading mode calculates lighting for each pixel, and is a good fit for most use cases. However, in some cases you may want to increase performance by using another shading mode.
The Per-Vertex shading mode, often called "vertex shading" or "vertex lighting", instead calculates lighting once for each vertex, and interpolates the result between each pixel.
On low-end or mobile devices, using per-vertex lighting can considerably increase rendering performance. When rendering several layers of transparency, such as when using particle systems, using per-vertex shading can improve performance, especially when the camera is close to particles.
You can also use per-vertex lighting to achieve a retro look.
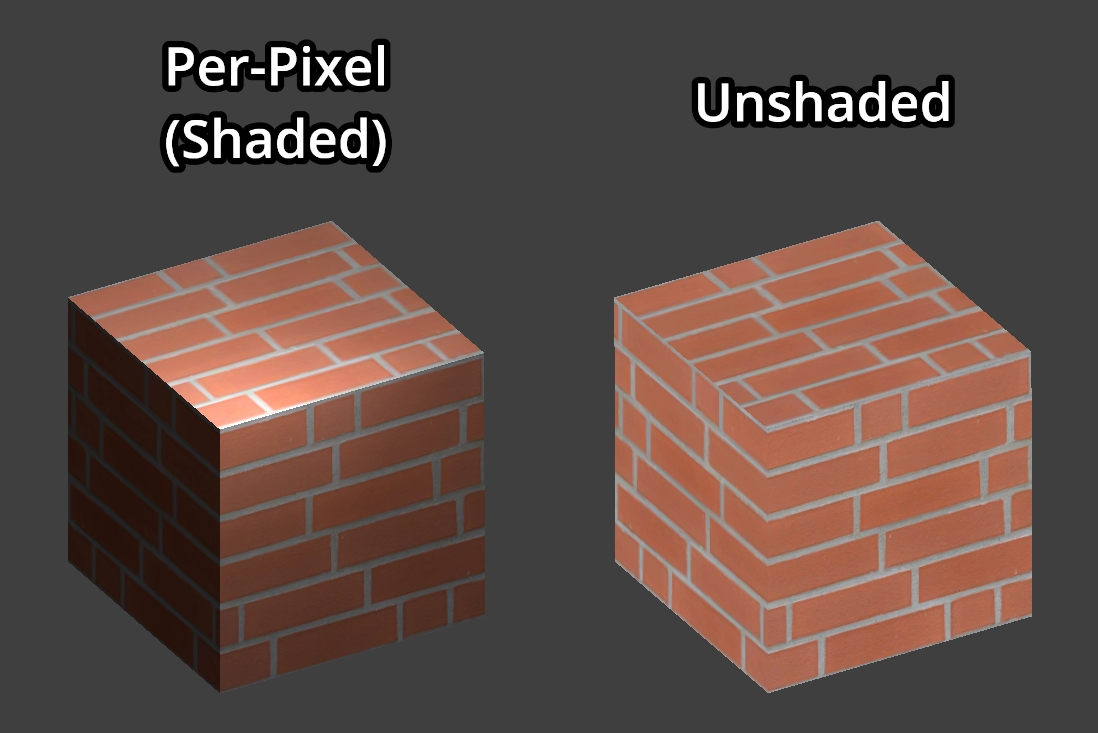
The Unshaded shading mode does not calculate lighting at all. Instead, the Albedo color is output directly. Lights will not affect the material at all, and unshaded materials will tend to appear considerably brighter than shaded materials.
Rendering unshaded is useful for some specific visual effects. If maximum performance is needed, it can also be used for particles, or low-end or mobile devices.
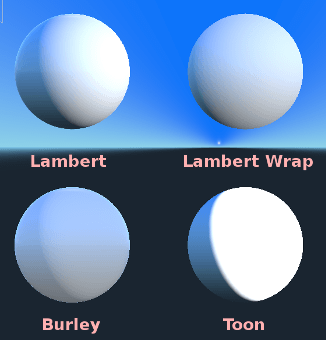
Diffuse Mode (拡散モード)
光がオブジェクトに当たるときの拡散散乱で使用されるアルゴリズムを指定します。デフォルトは Burley です。他のモードも利用可能です:
Burley: デフォルトモード、オリジナルのDisney Principled PBS拡散アルゴリズム。
Lambert: ラフネスの影響を受けません。
Lambert Wrap: ラフネスが増すと、Lambertを90度以上に広げます。髪の毛や低コストのサブサーフェススキャッタリングのシミュレーションに最適です。この実装は省コストです。
Toon: ライティングにハードカットを使用し、スムージングはラフネスによって影響を受けます。より良い効果を得るには、環境の周囲光設定から空の寄与を無効にするか、StandardMaterial3D で周囲光を無効にすることをお勧めします。
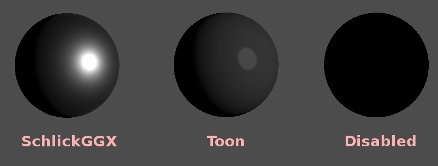
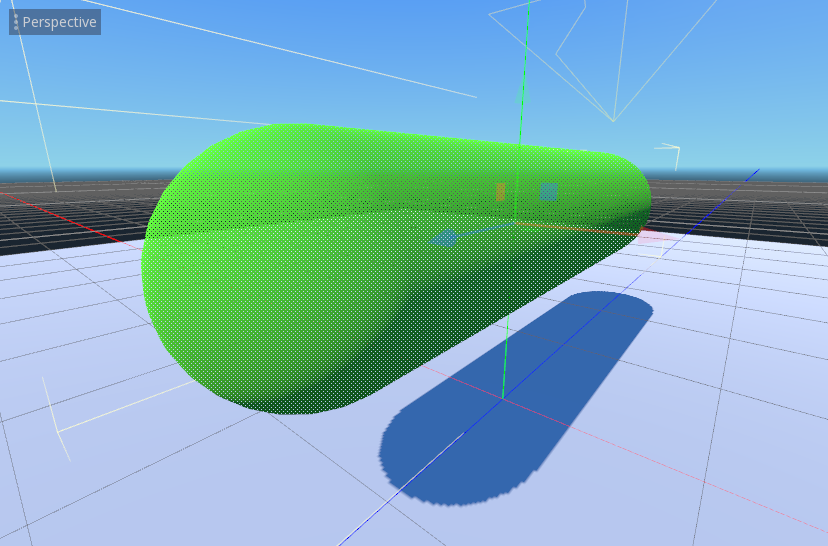
Specular Mode (鏡面反射モード )
鏡面反射(スペキュラ) のレンダリング方法を指定します。これはオブジェクトに反射される光源の形状を表します。
ShlickGGX: 最近の PBR 3D エンジンで使用される最も一般的な手法。
Toon: トゥーンblobを作成します。これは、roughnessに応じてサイズを変更します。
Disabled: 時々blobが邪魔になります。なので立ち去りなさい!
Disable Ambient Light (アンビエントライト無効)
他のライトが無い場合でも照明を行うアンビエントライトをオブジェクトが受けないようにします。
Disable Fog (フォグを無効化)
オブジェクトが深度ベースフォグまたはボリューメトリックフォグの影響を受けないようにします。これはパーティクルやその他の加算ブレンドされたマテリアルでメッシュ形状を(フォグがなければ見えないような場所でも)見えるようにする場合に便利です。
Disable Specular Occlusion
Makes the object not have its reflections reduced where they would usually be occluded.
Vertex Color (頂点色)
この設定では、3Dモデリングソフトからの頂点色に対してデフォルトで何を行うかを選択できます。デフォルトでは無視されます。
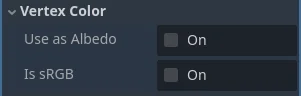
Use as Albedo (アルベドとして使用)
このオプションを選択すると、頂点色がアルベド色として使用されます。
Is sRGB (頂点色をsRGBとして扱う)
ほとんどの3Dモデリングソフトは頂点カラーを sRGB としてエクスポートする可能性が高いため、このオプションをオンにすると頂点色が正しく表示されます。
Albedo (アルベド)
Albedo は、他のすべての設定に関連するマテリアルのベースカラーです。Unshaded に設定すると、これが表示される唯一の色になります。 Godotの以前のバージョンでは、このチャネルの名前は Diffuse でした。名前の変更を行った主な理由は、PBR(Physically Based Rendering)では、この色が単なる拡散照明パスよりも多くの計算に影響するためです。
アルベドの色とテクスチャは、乗算されて一緒に使用されます。
アルベド色とテクスチャの アルファチャンネル は、オブジェクトの透明度にも使用されます。色またはテクスチャで アルファチャンネル を使用する場合は、transparencyを有効にするか、*alpha scissoring* を有効にしてください。
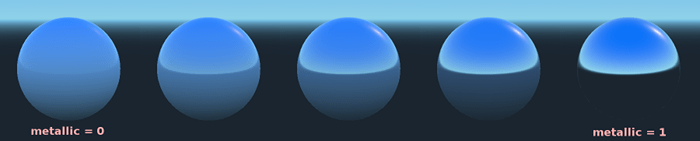
Metallic (メタリック)
Godotは、そのシンプルさから、競合する他のモデルではなくMetalicモデルを使用しています。このパラメーターは、マテリアルの反射率を定義します。反射が多いほど、拡散光や周囲光が材料に影響を及ぼし、反射光が多くなります。このモデルは「省エネルギー」だといわれています。
Specular パラメーターは、反射率の一般的な量です(Metallic とは異なり、これはエネルギーを節約しませんので、0.5 のままにして、必要でない限り触れないでください)。
最小の内部反射率は 0.04 であるため、現実の世界のようにマテリアルを完全に無反射にすることはできません。
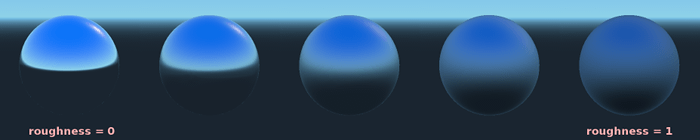
Roughness (ラフネス)
Roughness は反射の発生方法に影響します。0 の値は完璧な鏡になり、1 の値は反射を完全にぼかします(自然なマイクロサーフェシングをシミュレートします)。最も一般的な種類のマテリアルは、Metaric と Roughness の適切な組み合わせで実現できます。
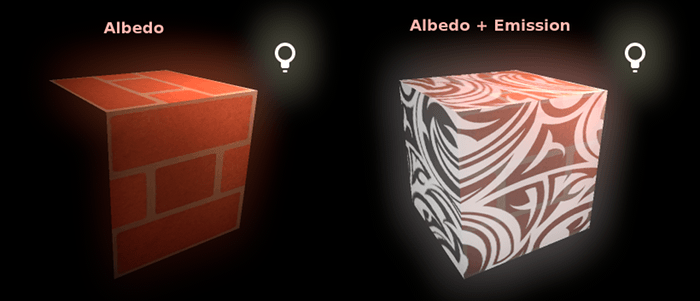
Emission (発光)
Emission は、マテリアルから放出される光の量を指定します (VoxelGI または SDFGI が使用されない限り、ジオメトリを囲む光は含まれないことに注意してください)。この値は結果として得られる最終画像に加算されます。シーン内の他の照明の影響は受けません。
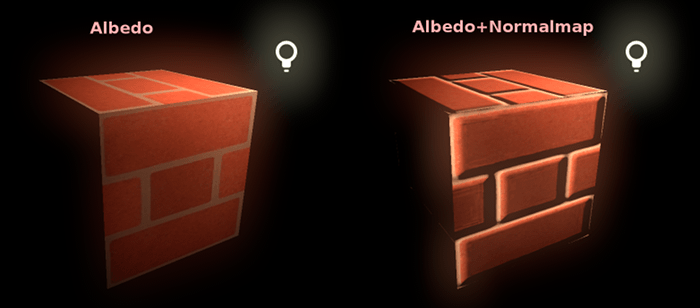
NormalMap (法線マップ)
法線マッピングを使用すると、より詳細な形状細部を表すテクスチャを設定できます。これはジオメトリを変更せず、光の入射角のみが変わります。Godot では圧縮率の向上と互換性を維持するため、法線マップのRとGのチャンネルのみが使用されます。
注釈
Godot では法線マップで X+, Y+, Z+ 座標を使用する必要があります。これは OpenGL スタイルと呼ばれます。別のエンジンで使用するために作成されたマテリアルをインポートする場合、DirectX スタイルである可能性があります。その場合は法線マップの Y軸を反転する必要があります。
法線マップに関する詳細情報 (一般的なエンジンの座標順序テーブルを含む) については、こちら を参照してください。
Bent normal map
A bent normal map describes the average direction of ambient lighting. Unlike a regular normal map, this is used to improve how a material reacts to lighting rather than add surface detail.
This is achieved in two ways:
Indirect diffuse lighting is made to match global illumination more closely.
If specular occlusion is enabled, it is calculated using the bent normals and ambient occlusion instead of just from ambient light. This includes screen-space ambient occlusion (SSAO) and other sources of ambient occlusion.
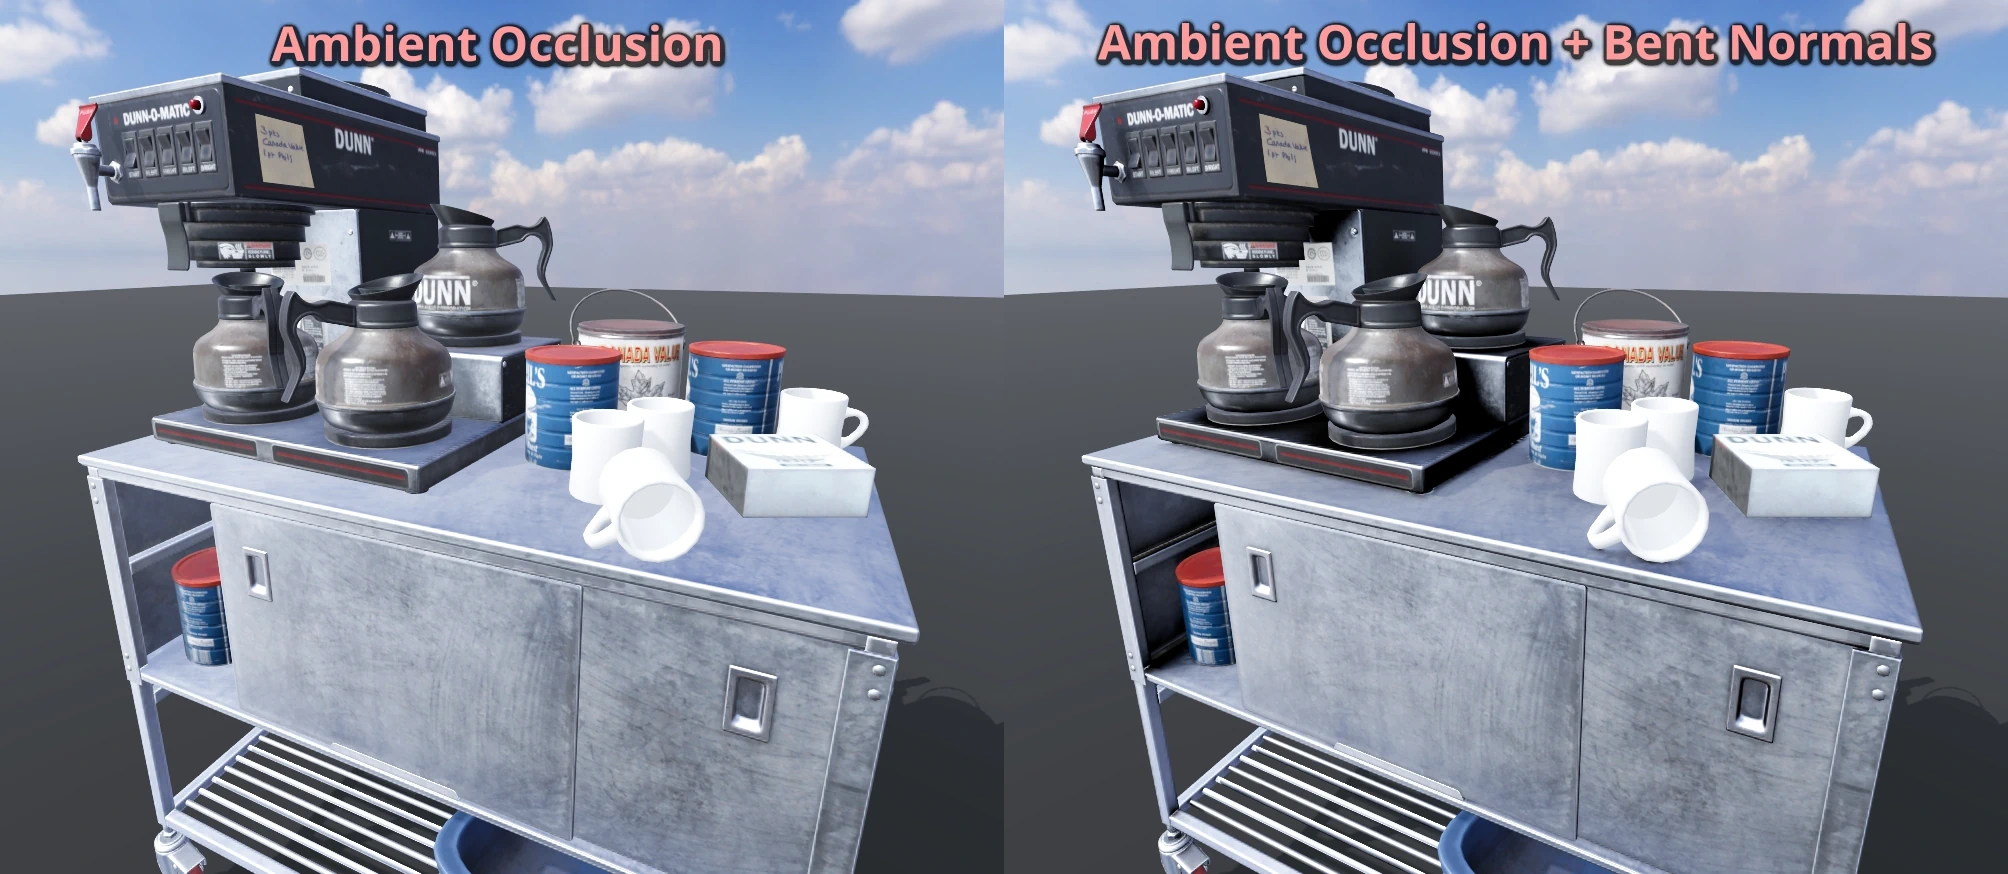
Godot only uses the red and green channels of a bent normal map for better compression and wider compatibility.
When creating a bent normal map, there are three things required for it to work correctly in Godot:
A cosine distribution of rays has to be used when baking.
The texture must be created in tangent space.
The bent normal map needs to use the X+, Y+, and Z+ coordinates, this is known as OpenGL style. If you've imported a material made to be used with another engine it may be DirectX style, in which case the bent normal map needs to be converted so its Y axis is flipped. This can be achieved by setting the green channel under the Channel Remap section to Inverted Green in the import dock.
注釈
A bent normal map is different from a regular normal map. The two are not interchangeable.
Rim (縁)
一部の布地には、周囲に光を散乱させる小さなマイクロファーがあります。 Godotは、これを Rim パラメーターでエミュレートします。Emissionチャネルのみを使用する他のリム照明の実装とは異なり、この実装では実際に光が考慮されます(光がない場合はリムが現れないことを意味します)。これにより、より真実味を作り出す効果がえられます。
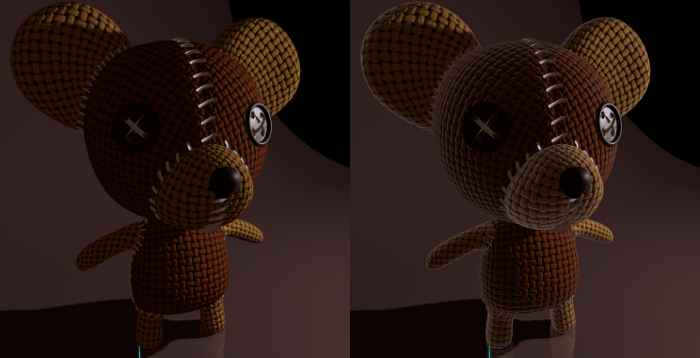
リムのサイズはroughnessに依存し、色の付け方を指定する特別なパラメーターがあります。Tint*が ``0`` の場合、ライトの色がリムに使用されます。*Tint が 1 の場合、素材のアルベドが使用されます。通常、中間値を使用するのが最適です。
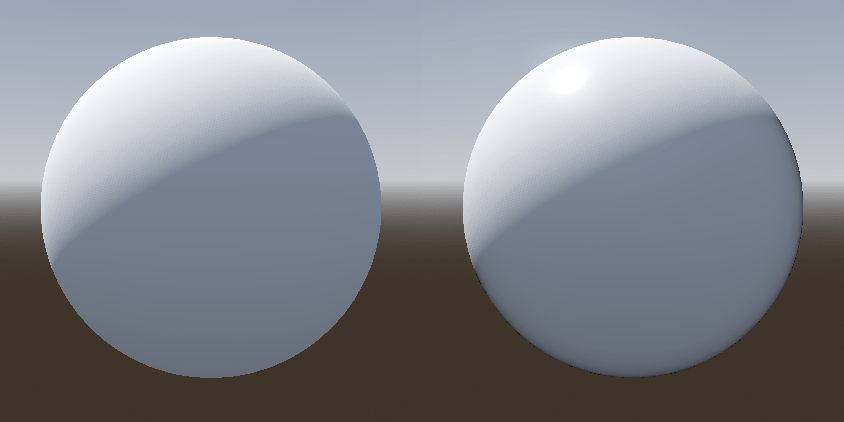
Clearcoat (クリアコート)
Clearcoat パラメーターは、透明なコーティングの2次パスをマテリアルに追加するために使用されます。これは、車の塗装やおもちゃでは一般的です。実際には、既存のマテリアルの上に追加される小さなスペキュラblobです。
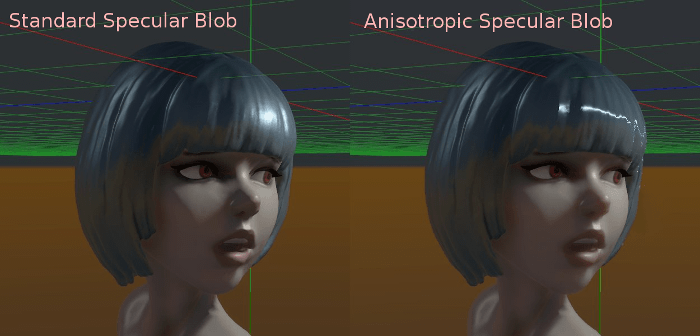
Anisotropy (異方性)
これにより、スペキュラblobの形状が変更され、接線空間に位置合わせされます。異方性は一般に髪の毛に使用されるか、ブラシをかけられたアルミニウムなどの素材をよりリアルにするために使用されます。フローマップ(flowmap)と組み合わせると、特にうまく機能します。
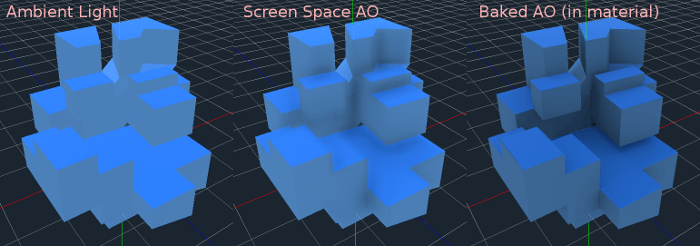
Ambient Occlusion (アンビエントオクルージョン)
焼き込み(ベイク)処理されたアンビエントオクルージョンマップを指定することができます。このマップは、オブジェクトの各表面に到達する環境光の光量に影響します(デフォルトでは、直接光には影響しません)。スクリーンスペースアンビエントオクルージョン(SSAO)を使用してアンビエントオクルージョンを生成することは可能ですが、よく焼き込まれたAOマップの品質に勝るものはありません。可能な場合は、アンビエントオクルージョンを焼き込むことをお勧めします。
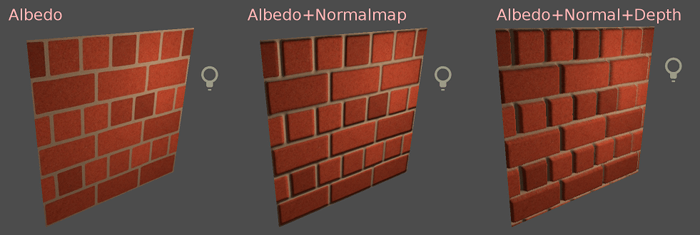
Height (高さ)
Setting a height map on a material produces a ray-marched search to emulate the proper displacement of cavities along the view direction. This only creates an illusion of depth, and does not add real geometry — for a height map shape used for physics collision (such as terrain), see HeightMapShape3D. It may not work for complex objects, but it produces a realistic depth effect for textures. For best results, Height should be used together with normal mapping.
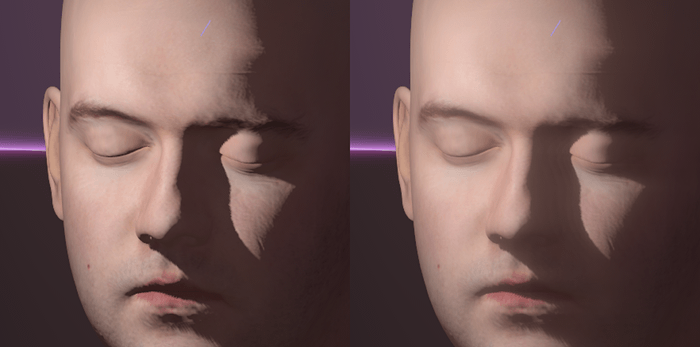
Subsurface Scattering (サブサーフェススキャタリング)
This is only available in the Forward+ renderer, not the Mobile or Compatibility renderers.
この効果は、オブジェクトの表面を透過し、散乱してから出る光をエミュレートします。リアルな肌、大理石、色のついた液体などを作成すると便利です。
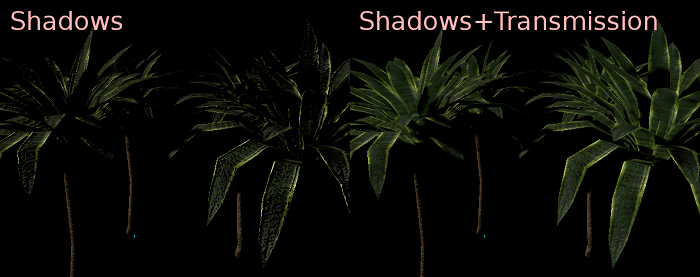
Back Lighting (背面照明)
これは、明るい側(光源から見える)からの光が暗い側(光源とは反対側)に透過される量を制御します。これは、植物の葉、草、人間の耳などの薄いオブジェクトに適しています。
Refraction (屈折)
Refractionが有効な場合、Godotはレンダリングされるオブジェクトの背景から情報を取得しようとします。これにより現実の屈折と同様に背景の透過を歪めることができます。
Refractionが目に見える効果をもたらすにはオブジェクトの透明性が必要なので、屈折を目立たせるには透明なアルベドテクスチャを使用する (またはアルベド色のアルファチャネルを減らす) ことを忘れないでください。
Refractionではマテリアルのラフネスも考慮されます。ラフネスの値が高いほど、背後にあるオブジェクトがぼやけて見え、現実の見た目をシミュレートします。Refractionが有効でアルベドのアルファ値を下げてもオブジェクトの背後が見えない場合は、マテリアルの ラフネス 値を下げます。
オプションで法線マップを Refraction Texture プロパティに指定すると、屈折の方向をピクセルごとに歪めることができます。
注釈
Refractionはスクリーンスペースエフェクトとして実装され、マテリアルを透過にします。これによりレンダリングは比較的高速になりますが、いくつかの制限が生じます。
半透明のソート の問題が発生する可能性があります。
屈折マテリアルは、それ自体や他の透過マテリアルに屈折することはできません。別の透過マテリアルの後ろにある屈折マテリアルは見えなくなります。
画面外のオブジェクトはRefractionで表示されません。これは屈折強度の値が高い場合に最も顕著になります。
屈折マテリアルの前にある不透明マテリアルは、実際にはそうではないにもかかわらず、「屈折した」エッジがあるように見えます。
Detail (詳細)
Godot は第二のアルベドマップと法線マップを使用して、さまざまな方法でブレンドできる詳細なテクスチャを生成できます。これをセカンダリUV またはTriplanar(3平面)モードと組み合わせることで、多くの興味深いテクスチャを実現できます。
詳細機能の使用をコントロールする設定がいくつかあります。
Mask: 詳細マスクはテクスチャ上でブレンドが行われる場所を制御するために使用される白黒画像です。白は詳細テクスチャ用、黒は通常のマテリアル テクスチャ用、間のグレーの色合いはマテリアルテクスチャと詳細テクスチャの部分的なブレンド用です。
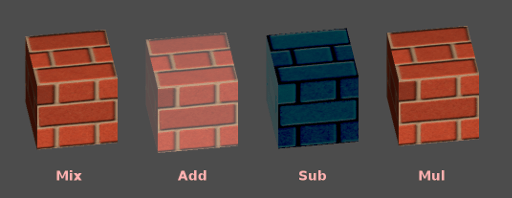
Blend Mode: これらの4つのモードは、テクスチャのブレンド方法をコントロールします。
Mix: 両方のテクスチャのピクセル値を組み合わせます。黒の場合はマテリアルテクスチャのみが表示され、白の場合は詳細テクスチャのみが表示されます。グレーの値では2つのテクスチャは滑らかにブレンドされます。
Add: 一方のテクスチャのピクセル値をもう一方のテクスチャと追加します。Mixモードとは異なり、両方のテクスチャはマスクの白い部分で完全に混合されますが、グレーの部分では混合されません。元のテクスチャは黒の部分ではほとんど変更されません
Sub: 1つのテクスチャのピクセル値を他のテクスチャで減算します。2番目のテクスチャは、マスクの白い部分で完全に減算され、黒い部分ではわずかに減算されます。灰色の部分は正確なテクスチャに基づいて異なるレベルの減算になります。
Mul: 上のテクスチャの各ピクセルの RGB チャネル番号を、下のテクスチャの対応するピクセルの値で乗算します。
Albedo: ブレンドするアルベドテクスチャを配置する場所です。このスロットに何もない場合は、デフォルトで白として解釈されます。
Normal: ブレンドする法線テクスチャを配置する場所です。このスロットに何もない場合は、フラットな法線マップとして解釈されます。マテリアルで法線マップが有効になっていない場合でも、これを使用できます。
UV1 と UV2
Godotは、マテリアルごとに2つのUVチャネルをサポートします。第二UVは、アンビエントオクルージョンまたは放出(焼き込みライト)に役立つことがよくあります。 UVはスケーリングとオフセットが可能で、繰り返しテクスチャを使用する場合に便利です。
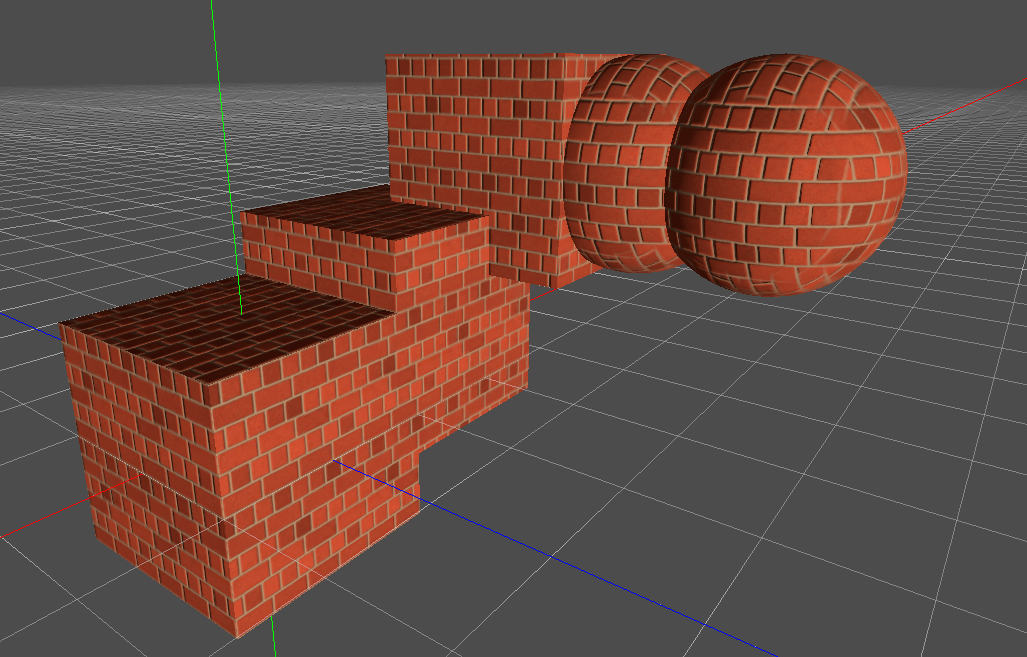
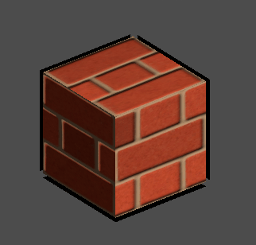
Triplanar Mapping (3面マッピング)
Triplanarマッピングは、UV1とUV2の両方でサポートされています。これは、テクスチャ座標を取得する代替方法であり、「オートテクスチャ」とも呼ばれます。テクスチャは、X、Y、Zでサンプリングされ、法線によってブレンドされます。 Triplanarマッピングは、ワールド空間またはオブジェクト空間で実行できます。
下の画像では、すべてのプリミティブがワールドTriplanarと同じマテリアルを共有する方法を確認できるため、レンガのテクスチャはそれらの間でスムーズに連続しています。
World Triplanar (ワールド空間での3平面)
Triplanarマッピングを使用する場合、オブジェクトのローカル空間で計算されます。このオプションを選択すると代わりにワールド空間が使用されます。
Sampling (テクスチャサンプリング)
Filter (フィルター)
マテリアルで使用されるテクスチャのフィルタリング方法。オプションの完全なリストとその説明については、 このページ を参照してください。
Repeat (繰り返し)
マテリアルで使用されるテクスチャが繰り返されるかどうか、またどのように繰り返されるか。オプションの完全なリストとその説明については、 このページ を参照してください。
Shadows (シャドウ)
Disable Receive Shadows
オブジェクトに投影されるあらゆる種類の影がオブジェクトに当たらないようにします。
Shadow to Opacity
ライティングはアルファを修正し、影のある領域は不透明になり、影のない領域は透明になります。 ARのカメラフィードに影を重ねるのに便利です。
Billboard (ビルボード)
Billboard Mode (ビルボードモード)
描画するマテリアルのビルボード モードを有効にします。これは、オブジェクトがカメラに向く方法を制御します:
Disabled: ビルボードモードは無効です。
Enabled: ビルボードモードが有効になります。オブジェクトの-Z方向は常にカメラに向きます。
Y-Billboard: オブジェクトの X 軸は常にカメラの表示面と揃います。
Particle Billboard: パーティクル システムに最適です。フリップブックアニメーション を指定できます。
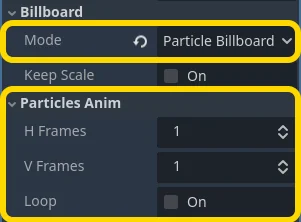
Particles Anim セクションは、Billboard Modeが Particle Billboard のときにのみ表示されます。
Billboard Keep Scale (ビルボードのスケールを維持する)
ビルボードモードでメッシュのスケーリングを有効にします。
Grow (頂点の押し出し)
法線が指す方向にオブジェクトの頂点を押し出します:
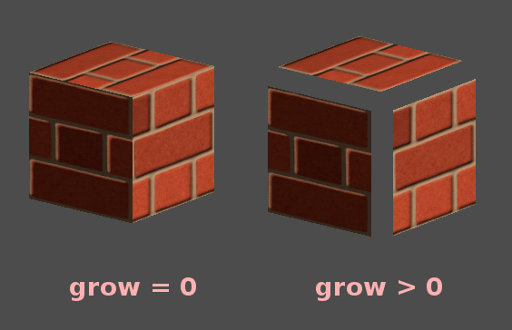
これは一般的に安価にアウトラインを作成するためによく使用されます。2番目のマテリアルパスを追加し、色を黒に設定、シェーディング無し(Unshaded)、逆カリング(Cull Front)にして、Growを追加します:
注釈
For Grow to work as expected, the mesh must have connected faces with shared vertices, or "smooth shading". If the mesh has disconnected faces with unique vertices, or "flat shading", the mesh will appear to have gaps when using Grow.
Note that in Godot 4.5 onwards, stencil buffer-based outlines are available using the Outline stencil mode. This can be used as an alternative to Grow for outlines.
Transform (トランスフォーム)
Fixed Size (固定サイズ)
これにより、オブジェクトは距離に関係なく同じサイズでレンダリングされます。これは主にインジケーター(深度テストなし、高いレンダリング優先度)および一部のタイプのビルボードに役立ちます。
Use Point Size (ポイントのサイズを使用)
このオプションはレンダリングされたジオメトリがポイントで構成されている場合にのみ有効です (一般的に3Dモデリングソフトからインポートされたメッシュは三角形で構成されます)。その場合それらのポイントのサイズを変更できます (以下を参照)。
Point Size (ポイントサイズ)
ポイントを描画するときの、ポイントサイズをピクセル単位で指定します。
Use Particle Trails
This is only available in the Forward+ and Mobile renderers, not the Compatibility renderer.
If true, enables parts of the shader required for GPUParticles3D trails to function. This also requires using a mesh with appropriate skinning, such as RibbonTrailMesh or TubeTrailMesh. Enabling this feature outside of materials used in GPUParticles3D meshes will break material rendering.
Use Z Clip Scale
Scales the object being rendered towards the camera to avoid clipping into things like walls. This is intended to be used for objects that are fixed with respect to the camera like player arms, tools, etc. Lighting and shadows will continue to work correctly when this setting is adjusted, but screen-space effects like SSAO and SSR may break with lower scales. Therefore, try to keep this setting as close to 1.0 as possible.
Use FOV Override
Overrides the Camera3D's field of view angle (in degrees).
注釈
This behaves as if the field of view is set on a Camera3D with
Camera3D.keep_aspect set to Camera3D.KEEP_HEIGHT. Additionally, it may not
look correct on a non-perspective camera where the field of view setting is
ignored.
Proximity and Distance Fade (近接と距離のフェード)
Godotでは視点からの距離やマテリアル同士の近さに応じてマテリアルをフェードさせることができます。Proximity フェードは、ソフトパーティクルや、海岸に滑らかにブレンドされた水の塊などの効果に役立ちます。
Distanceフェードは、視点から特定の距離まで離れると表示されるライトシャフトやインジケーターなどに役立ちます。
Pixel Alpha モードでProximityフェードまたはDistanceフェードを有効にすると、アルファブレンディングが有効になることに注意してください。アルファブレンディングは GPU に負荷がかかり、半透明ソートの問題が発生する可能性があります。アルファブレンディングは影を落とす機能など、多くのマテリアル機能も無効になります。
注釈
キャラクターがカメラに近付いたときに非表示にするには、Pixel Dither または、より高速で優れた Object Dither の使用を検討してください。
Pixel Alpha モード: オブジェクトのピクセルの実際のアルファは、カメラまでの距離に応じて変化します。これは最も効果がありますがマテリアルの半透明パイプラインに強制されます(例えば影がなくなります)。
Pixel Dither モード: ピクセルの一部のみをレンダリングすることで半透明に似た効果が得られます。
Object Dither モード: 前のモードと同様ですが、計算された透明度はオブジェクトの表面全体で同じになります。
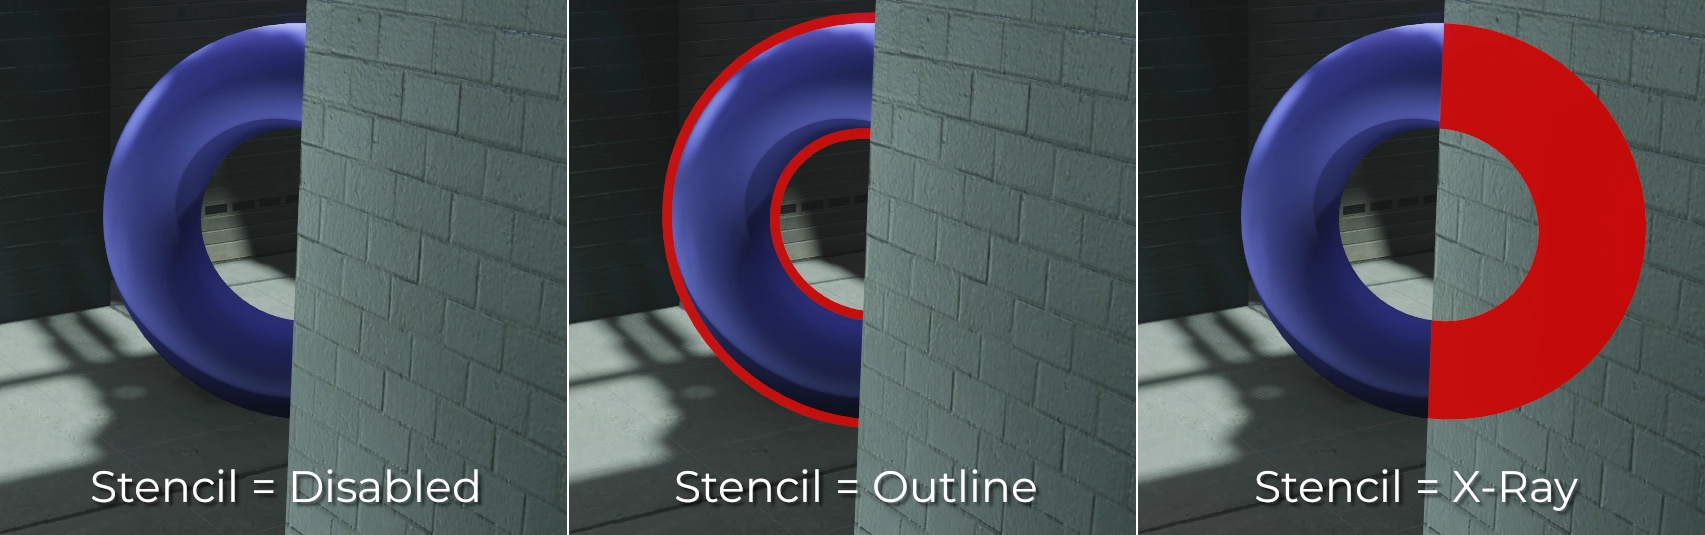
Stencil
Since Godot 4.5, Godot allows materials to make use of the stencil buffer. This feature is commonly used to create outlines and X-ray effects, which can be useful to highlight objects, especially behind walls.
The Outline and X-Ray modes assign a preconfigured stencil material in the material's Next Pass property. The Custom mode can be used for advanced effects.
Materials that write to the stencil buffer are always drawn in the transparent pass, so they are subject to the usual transparency limitations.
注釈
Like with the Grow property, for the stencil outline to work as expected, the mesh must have connected faces with shared vertices, or "smooth shading". If the mesh has disconnected faces with unique vertices, or "flat shading", the mesh will appear to have gaps when using a stencil outline.
Stencil outlines render similarly to the Grow property, but won't look identical in every scenario, especially when intersections with opaque surfaces are involved.
マテリアル設定
Render priority (レンダリングの優先度)
オブジェクトのレンダリング順序は変更できますが、これは主に透明なオブジェクト(または、床の亀裂などの深さの描画は行うが色の描画は行わない不透明なオブジェクト)に役立ちます。
Objects are sorted by an opaque/transparent queue, then render_priority, with higher priority being drawn later. Transparent objects are also sorted by depth.
Depth testing overrules priority. Priority alone cannot force opaque objects to be drawn over each other.
Next Pass (次の描画ステップ)
Setting next_pass on a material will cause an object to be rendered again with that next material.
Materials are sorted by an opaque/transparent queue, then render_priority, with higher priority being drawn later.
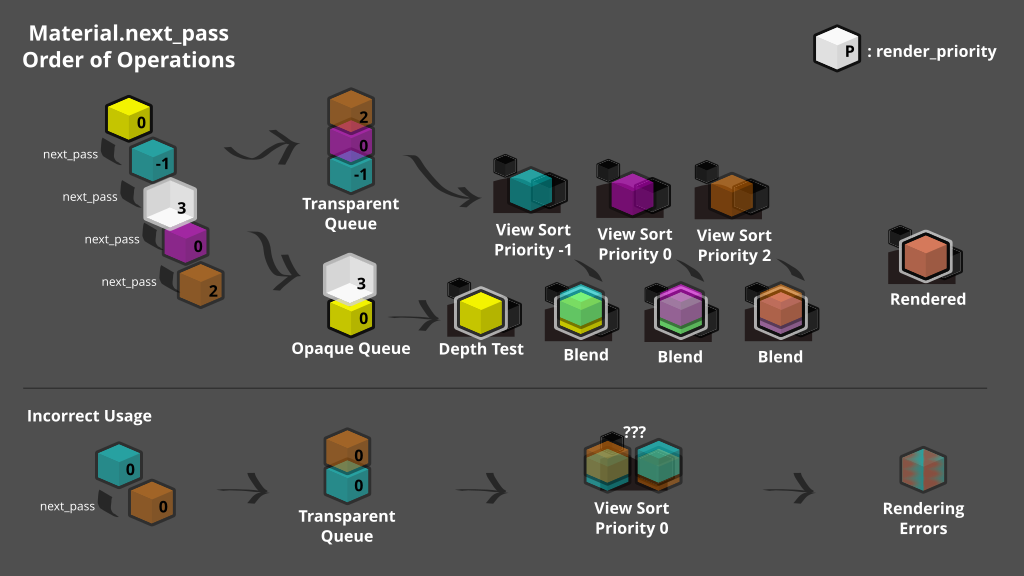
Depth will test equal between both materials unless the grow setting or other vertex transformations are used. Multiple transparent passes should use render_priority to ensure correct ordering.