Attention: Here be dragons
This is the latest
(unstable) version of this documentation, which may document features
not available in or compatible with released stable versions of Godot.
Checking the stable version of the documentation...
キャラクターのアニメーション
最後のレッスンでは、Godot に内蔵されたアニメーションツールを使って、キャラクターを浮かせたり羽ばたかせたりします。エディターでアニメーションをデザインし、プログラムのコーディングを行ってゲームを生き生きとしたものにすることを学びます。
まずはアニメーションエディターの使い方から始めます。
アニメーションエディターを使う
Godot エンジンのエディタには、アニメーションを作成するためのツールが付属しています。さらに、Godot エンジンのエディタでコードを書いて、実行時にアニメーションを再生したり、制御したりすることができます。
プレイヤーシーンを開き、 Player ノードを選択し、 AnimationPlayer ノードを追加します。
下のパネルに アニメーション (Animation)のドックが表示されます。
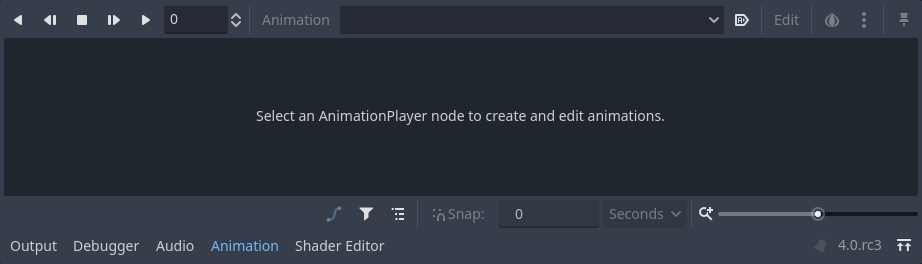
上部にはツールバーとアニメーションのドロップダウンメニュー、中央にはトラックエディター(現在は空)、下部にはフィルター、スナップ、ズームの各オプションを備えています。
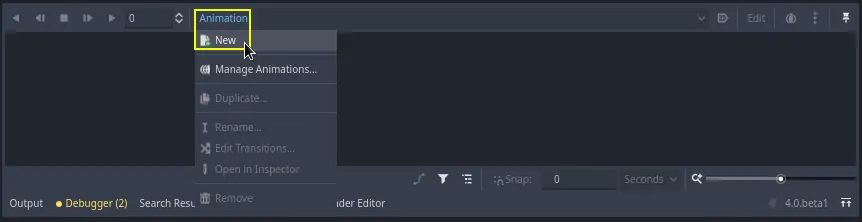
それではアニメーションを作ってみましょう。 アニメーション (Animation) -> New... をクリックします。
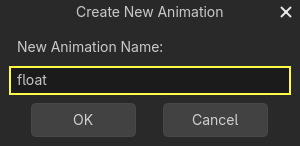
アニメーションの名前は "float" にします。
アニメーションを作成すると、タイムラインに秒単位の時間が表示されます。

ゲーム開始時に自動的にアニメーションの再生が開始されるようにします。また、アニメーションがループ再生するようにします。
これを行うには、アニメーションツールバーの自動再生ボタン ( ) とアニメーションループの矢印をそれぞれクリックします。

また、右上のピンアイコンをクリックすることで、アニメーションエディタを固定することが可能です。これにより、ビューポートをクリックしてノードの選択を解除したときに、エディタが折りたたまれるのを防ぐことができます。
![]()
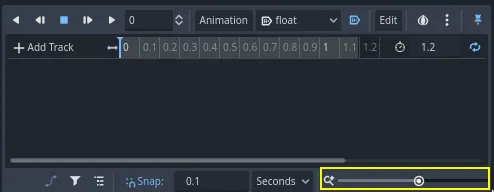
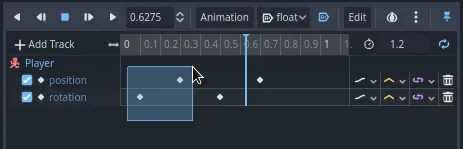
ドック右上のアニメーションの長さを 1.2 秒に設定します。
灰色のリボンが少し広がっているのが見えるはずです。これはアニメーションの開始と終了を表し、青い縦線がタイムカーソルになります。

右下のスライダーをクリックし、左右にドラッグすることで、タイムラインの拡大・縮小が可能です。
浮遊アニメーション
アニメーション プレーヤー ノードを使用すると、必要な数だけノード上のほとんどのプロパティをアニメーション化できます。 インスペクター (Inspector) のプロパティの横にある鍵のアイコンに注目してください。これらをクリックすると、対応するプロパティの時間と値のペアであるキーフレームを作成することができます。キーフレームは、タイムライン上のタイムカーソルがある場所に挿入されます。
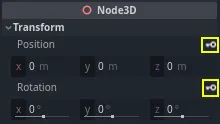
最初のキーを挿入してみましょう。ここでは Character ノードの位置と回転の両方をアニメーションさせます。
Character を選択し、 インスペクター (Inspector)で Transform セクションを展開します。 Position(位置) と Rotation(回転) の横にある鍵のアイコンをクリックします。
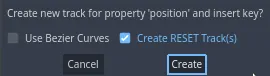
このチュートリアルでは、デフォルトの選択としてRESETトラックを作成します
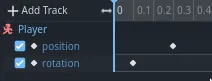
エディタに2つのトラックが表示され、それぞれのキーフレームを表すひし形のアイコン(◆)が表示されます。
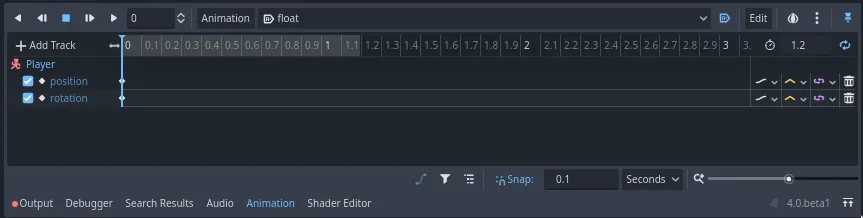
ひし形のアイコンをクリック&ドラッグすると、時間軸の中を移動させることができます。position のキーを 0.3 秒、rotation のキーを 0.1 秒に合わせてください。
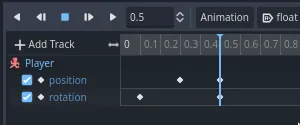
Move the time cursor to 0.5 seconds by clicking and dragging on the gray
timeline, or by entering it into the input field.

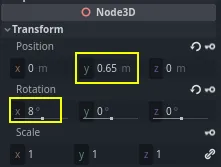
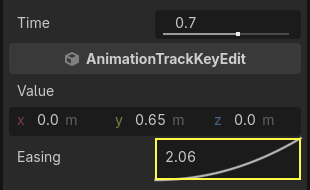
インスペクター (Inspector)で、 Position(位置) の y 軸を 0.65 メートルに、 Rotation(回転) の x 軸を 8 ° に設定します。
インスペクター (Inspector)パネルにプロパティが表示されていない場合は、まず シーン (Scene)ドックにある Character ノードをもう一度クリックしてください。
両方のプロパティのキーフレームを作成します
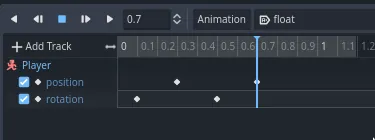
次に、position のキーフレームをタイムライン上でドラッグして、 0.7 秒まで移動させてください。
注釈
アニメーションの原理についての講義は、このチュートリアルの範囲を超えています。ただ、すべての動作のタイミングとスペーシングを均等にしたいわけではないことに注意してください。アニメーターはアニメーションの2つの基本原則であるタイミングとスペーシングを使います。キャラクターを生きているように感じさせるには、オフセット(前の位置からどれくらいキャラクターをずらしたか)とコントラスト(どれくらい違いがあるか)をキャラクターの動きに設定することが必要です。
タイムカーソルをアニメーションの終了地点( 1.2 秒)に合わせます。Y軸の位置を約 0.35 、X軸の回転を -9 度に設定します。もう一度、両方のプロパティにキーを作成します。

再生ボタンをクリックするか、 Shift + D を押すと、結果をプレビューすることができます。停止ボタンをクリックするか S を押すと再生が停止します。

エンジンがキーフレーム間を補間して連続したアニメーションを生成しているのがわかります。しかし現時点では、この動きは非常に機械的な感じがします。これは、デフォルトの補間が直線的で、現実世界での生き物の動きとは異なり、キーフレーム間の動作が一定だからです。
イージングカーブ(モーションカーブ)を使い、キーフレーム間の遷移をコントロールすることができます。
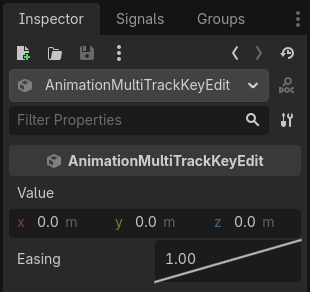
タイムライン上の最初の2つのキー周辺をクリックしてドラッグし、ボックス選択します。
インスペクター (Inspector) では、両方のキーのプロパティを同時に編集できます。そこに Easing のプロパティが表示されています。
線をクリックし、ドラッグして左方向に動かします。これによりイーズアウト(ease-out)、つまり最初は速く移行し、タイムカーソルが次のキーフレームに近づくにつれて遅くなるようにします。
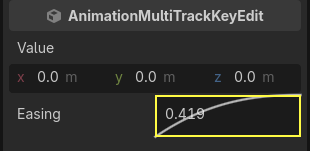
もう一度アニメーションを再生して、その違いを確認しましょう。もう既に、前半の動作は少し弾力が増したように感じるはずです。
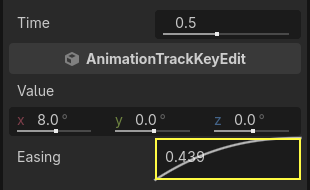
回転(rotation_degrees)トラックの2番目のキーフレームにイーズアウトを適用してみてください。
2つ目の位置にあるキーフレームは逆に右にドラッグしてください。
アニメーションはこのような感じになります。
注釈
アニメーションは、フレームごとにアニメーション ノードのプロパティを更新し、初期値を上書きします。 Player ノードを直接アニメーションさせると、コードを使って移動や回転を行うことができなくなります。そこで、 Pivot ノードが役に立ちます。 Character をアニメーションしていても、 Pivot を移動および回転させて、アニメーションしているキャラクターの移動や回転をスクリプト内で行うことができるのです。
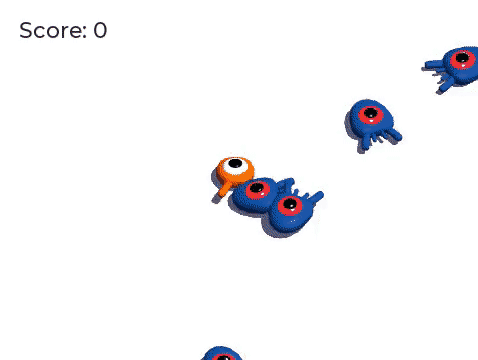
ゲームをプレイすると、プレイヤーのクリーチャーが浮き上がるようになりました!
クリーチャーが少し床に近すぎる場合は、 Pivot を上に動かして高さを調整することができます。
コードからアニメーションを制御する
コーディングによって、プレイヤーの入力に応じてアニメーションの再生を制御することができます。キャラクターが動いているときのアニメーションの速度を変えてみましょう。
Player ノードの横にあるスクリプトアイコンをクリックして Player のスクリプトを開きます。
![]()
_physics_process() 関数の中で、 direction ベクトルを確認する処理の後の行に、次のコードを追加します。
func _physics_process(delta):
    #...
    if direction != Vector3.ZERO:
        #...
        $AnimationPlayer.speed_scale = 4
    else:
        $AnimationPlayer.speed_scale = 1
public override void _PhysicsProcess(double delta)
{
    // ...
    if (direction != Vector3.Zero)
    {
        // ...
        GetNode<AnimationPlayer>("AnimationPlayer").SpeedScale = 4;
    }
    else
    {
        GetNode<AnimationPlayer>("AnimationPlayer").SpeedScale = 1;
    }
}
このコードでは、プレイヤーがクリーチャーを動かしたときに、再生速度を 4 倍にします。停止したら、再生速度を通常に戻します。
先ほど、 Pivot ノードは親ノードのアニメーションに移動や回転などの変化を追加することができると述べました。そこで、次のコードでキャラクターがジャンプした時に弧を描かせることができます。これを _physics_process() 関数の最後に追加します。
func _physics_process(delta):
    #...
    $Pivot.rotation.x = PI / 6 * velocity.y / jump_impulse
public override void _PhysicsProcess(double delta)
{
    // ...
    var pivot = GetNode<Node3D>("Pivot");
    pivot.Rotation = new Vector3(Mathf.Pi / 6.0f * Velocity.Y / JumpImpulse, pivot.Rotation.Y, pivot.Rotation.Z);
}
モブキャラクターをアニメーションさせる
Godot のアニメーションには、もう一つ便利な機能があります。同じようなノード構造を使用する限り、そのノードに設定されているアニメーションを異なるシーンにコピーできるのです。
例えば、 Mob シーンと Player シーンの両方が Pivot ノードと Character ノードを持っているので、これらの間でアニメーションを再利用することができます。
Player シーンを開き、AnimationPlayerノードを選択し、下部のメニュー内の アニメーション > アニメーションの管理... をクリックします。 float アニメーションの横にある クリップボードにアニメーションをコピー ボタン(2つの小さな四角のアイコンのボタン)をクリックします。OKをクリックしてウィンドウを閉じます。
Then open mob.tscn, create an AnimationPlayer child
node and select it. Click Animation > Manage Animations, then New Library. You
should see the message "Global library will be created." Leave the text field blank and
click OK. Click the Paste icon (clipboard) and it should appear in the window. Click OK
to close the window.
次に、下のパネルのアニメーション・エディターで、自動再生ボタン () とアニメーションループのアイコン (Animation looping) もオンになっていることを確認しましょう。これですべてのモンスターが宙に浮かぶアニメーションを再生するようになりました。
クリーチャーの random_speed に基づいて、アニメーションの再生速度を変更できます。 Mob のスクリプトを開き、 initialize() 関数の最後に、次の行を追加してください。
func initialize(start_position, player_position):
    #...
    $AnimationPlayer.speed_scale = random_speed / min_speed
public void Initialize(Vector3 startPosition, Vector3 playerPosition)
{
    // ...
    GetNode<AnimationPlayer>("AnimationPlayer").SpeedScale = randomSpeed / MinSpeed;
}
これで、初めての完璧な3Dゲームのコーディングが完了しました。
おめでとうございます!
次のパートでは、学んだことを簡単にまとめ、さらに発展的な内容を学ぶためのリンクもいくつか紹介します。しかしその前に、ここに player.gd と mob.gd の全体のコードがあるので、自分のコードと照らし合わせてチェックしてみてください。
Player スクリプトは以下の通りです。
extends CharacterBody3D

signal hit

# How fast the player moves in meters per second.
@export var speed = 14
# The downward acceleration while in the air, in meters per second squared.
@export var fall_acceleration = 75
# Vertical impulse applied to the character upon jumping in meters per second.
@export var jump_impulse = 20
# Vertical impulse applied to the character upon bouncing over a mob
# in meters per second.
@export var bounce_impulse = 16

var target_velocity = Vector3.ZERO


func _physics_process(delta):
    # We create a local variable to store the input direction
    var direction = Vector3.ZERO

    # We check for each move input and update the direction accordingly
    if Input.is_action_pressed("move_right"):
        direction.x = direction.x + 1
    if Input.is_action_pressed("move_left"):
        direction.x = direction.x - 1
    if Input.is_action_pressed("move_back"):
        # Notice how we are working with the vector's x and z axes.
        # In 3D, the XZ plane is the ground plane.
        direction.z = direction.z + 1
    if Input.is_action_pressed("move_forward"):
        direction.z = direction.z - 1

    # Prevent diagonal movement being very fast
    if direction != Vector3.ZERO:
        direction = direction.normalized()
        # Setting the basis property will affect the rotation of the node.
        $Pivot.basis = Basis.looking_at(direction)
        $AnimationPlayer.speed_scale = 4
    else:
        $AnimationPlayer.speed_scale = 1

    # Ground Velocity
    target_velocity.x = direction.x * speed
    target_velocity.z = direction.z * speed

    # Vertical Velocity
    if not is_on_floor(): # If in the air, fall towards the floor
        target_velocity.y = target_velocity.y - (fall_acceleration * delta)

    # Jumping.
    if is_on_floor() and Input.is_action_just_pressed("jump"):
        target_velocity.y = jump_impulse

    # Iterate through all collisions that occurred this frame
    # in C this would be for(int i = 0; i < collisions.Count; i++)
    for index in range(get_slide_collision_count()):
        # We get one of the collisions with the player
        var collision = get_slide_collision(index)

        # If the collision is with ground
        if collision.get_collider() == null:
            continue

        # If the collider is with a mob
        if collision.get_collider().is_in_group("mob"):
            var mob = collision.get_collider()
            # we check that we are hitting it from above.
            if Vector3.UP.dot(collision.get_normal()) > 0.1:
                # If so, we squash it and bounce.
                mob.squash()
                target_velocity.y = bounce_impulse
                # Prevent further duplicate calls.
                break

    # Moving the Character
    velocity = target_velocity
    move_and_slide()

    $Pivot.rotation.x = PI / 6 * velocity.y / jump_impulse

# And this function at the bottom.
func die():
    hit.emit()
    queue_free()

func _on_mob_detector_body_entered(body):
    die()
using Godot;

public partial class Player : CharacterBody3D
{
    // Emitted when the player was hit by a mob.
    [Signal]
    public delegate void HitEventHandler();

    // How fast the player moves in meters per second.
    [Export]
    public int Speed { get; set; } = 14;
    // The downward acceleration when in the air, in meters per second squared.
    [Export]
    public int FallAcceleration { get; set; } = 75;
    // Vertical impulse applied to the character upon jumping in meters per second.
    [Export]
    public int JumpImpulse { get; set; } = 20;
    // Vertical impulse applied to the character upon bouncing over a mob in meters per second.
    [Export]
    public int BounceImpulse { get; set; } = 16;

    private Vector3 _targetVelocity = Vector3.Zero;

    public override void _PhysicsProcess(double delta)
    {
        // We create a local variable to store the input direction.
        var direction = Vector3.Zero;

        // We check for each move input and update the direction accordingly.
        if (Input.IsActionPressed("move_right"))
        {
            direction.X += 1.0f;
        }
        if (Input.IsActionPressed("move_left"))
        {
            direction.X -= 1.0f;
        }
        if (Input.IsActionPressed("move_back"))
        {
            // Notice how we are working with the vector's X and Z axes.
            // In 3D, the XZ plane is the ground plane.
            direction.Z += 1.0f;
        }
        if (Input.IsActionPressed("move_forward"))
        {
            direction.Z -= 1.0f;
        }

        // Prevent diagonal movement being very fast.
        if (direction != Vector3.Zero)
        {
            direction = direction.Normalized();
            // Setting the basis property will affect the rotation of the node.
            GetNode<Node3D>("Pivot").Basis = Basis.LookingAt(direction);
            GetNode<AnimationPlayer>("AnimationPlayer").SpeedScale = 4;
        }
        else
        {
            GetNode<AnimationPlayer>("AnimationPlayer").SpeedScale = 1;
        }

        // Ground velocity
        _targetVelocity.X = direction.X * Speed;
        _targetVelocity.Z = direction.Z * Speed;

        // Vertical velocity
        if (!IsOnFloor())
        {
            _targetVelocity.Y -= FallAcceleration * (float)delta;
        }

        // Jumping.
        if (IsOnFloor() && Input.IsActionJustPressed("jump"))
        {
            _targetVelocity.Y += JumpImpulse;
        }

        // Iterate through all collisions that occurred this frame.
        for (int index = 0; index < GetSlideCollisionCount(); index++)
        {
            // We get one of the collisions with the player.
            KinematicCollision3D collision = GetSlideCollision(index);

            // If the collision is with a mob.
            if (collision.GetCollider() is Mob mob)
            {
                // We check that we are hitting it from above.
                if (Vector3.Up.Dot(collision.GetNormal()) > 0.1f)
                {
                    // If so, we squash it and bounce.
                    mob.Squash();
                    _targetVelocity.Y = BounceImpulse;
                    // Prevent further duplicate calls.
                    break;
                }
            }
        }

        // Moving the character
        Velocity = _targetVelocity;
        MoveAndSlide();

        var pivot = GetNode<Node3D>("Pivot");
        pivot.Rotation = new Vector3(Mathf.Pi / 6.0f * Velocity.Y / JumpImpulse, pivot.Rotation.Y, pivot.Rotation.Z);
    }

    private void Die()
    {
        EmitSignal(SignalName.Hit);
        QueueFree();
    }

    private void OnMobDetectorBodyEntered(Node body)
    {
        Die();
    }
}
Mob のスクリプトは以下の通りです。
extends CharacterBody3D

# Minimum speed of the mob in meters per second.
@export var min_speed = 10
# Maximum speed of the mob in meters per second.
@export var max_speed = 18

# Emitted when the player jumped on the mob
signal squashed

func _physics_process(_delta):
    move_and_slide()

# This function will be called from the Main scene.
func initialize(start_position, player_position):
    # We position the mob by placing it at start_position
    # and rotate it towards player_position, so it looks at the player.
    look_at_from_position(start_position, player_position, Vector3.UP)
    # Rotate this mob randomly within range of -45 and +45 degrees,
    # so that it doesn't move directly towards the player.
    rotate_y(randf_range(-PI / 4, PI / 4))

    # We calculate a random speed (integer)
    var random_speed = randi_range(min_speed, max_speed)
    # We calculate a forward velocity that represents the speed.
    velocity = Vector3.FORWARD * random_speed
    # We then rotate the velocity vector based on the mob's Y rotation
    # in order to move in the direction the mob is looking.
    velocity = velocity.rotated(Vector3.UP, rotation.y)

    $AnimationPlayer.speed_scale = random_speed / min_speed

func _on_visible_on_screen_notifier_3d_screen_exited():
    queue_free()

func squash():
    squashed.emit()
    queue_free() # Destroy this node
using Godot;

public partial class Mob : CharacterBody3D
{
    // Emitted when the played jumped on the mob.
    [Signal]
    public delegate void SquashedEventHandler();

    // Minimum speed of the mob in meters per second
    [Export]
    public int MinSpeed { get; set; } = 10;
    // Maximum speed of the mob in meters per second
    [Export]
    public int MaxSpeed { get; set; } = 18;

    public override void _PhysicsProcess(double delta)
    {
        MoveAndSlide();
    }

    // This function will be called from the Main scene.
    public void Initialize(Vector3 startPosition, Vector3 playerPosition)
    {
        // We position the mob by placing it at startPosition
        // and rotate it towards playerPosition, so it looks at the player.
        LookAtFromPosition(startPosition, playerPosition, Vector3.Up);
        // Rotate this mob randomly within range of -45 and +45 degrees,
        // so that it doesn't move directly towards the player.
        RotateY((float)GD.RandRange(-Mathf.Pi / 4.0, Mathf.Pi / 4.0));

        // We calculate a random speed (integer).
        int randomSpeed = GD.RandRange(MinSpeed, MaxSpeed);
        // We calculate a forward velocity that represents the speed.
        Velocity = Vector3.Forward * randomSpeed;
        // We then rotate the velocity vector based on the mob's Y rotation
        // in order to move in the direction the mob is looking.
        Velocity = Velocity.Rotated(Vector3.Up, Rotation.Y);

        GetNode<AnimationPlayer>("AnimationPlayer").SpeedScale = randomSpeed / MinSpeed;
    }

    public void Squash()
    {
        EmitSignal(SignalName.Squashed);
        QueueFree(); // Destroy this node
    }

    private void OnVisibilityNotifierScreenExited()
    {
        QueueFree();
    }
}