Attention: Here be dragons
This is the latest
(unstable) version of this documentation, which may document features
not available in or compatible with released stable versions of Godot.
Checking the stable version of the documentation...
Limitaciones del renderizado 3D
Introducción
Debido a su enfoque en el rendimiento, los motores de representación en tiempo real tienen muchas limitaciones. El renderizador de Godot no es una excepción. Para trabajar eficazmente con esas limitaciones, es necesario entenderlas.
Límites de tamaño de textura
En los ordenadores de sobremesa y portátiles, las texturas superiores a 8192×8192 pueden no ser compatibles con los dispositivos más antiguos. Puedes comprobar las limitaciones de tu GPU de destino en GPUinfo.org.
Las GPUs para móviles suelen estar limitadas a texturas de 4096×4096. Además, algunas GPU para móviles no admiten la repetición de texturas sin potencia de dos tamaños. Por lo tanto, si quieres que tu textura se muestre correctamente en todas las plataformas, debes evitar usar texturas más grandes que 4096×4096 y usar una potencia de dos tamaños si la textura necesita repetirse.
Para limitar el tamaño de una textura específica que puede ser demasiado grande para renderizar, puedes establecer la opción de importación Proceso > Límite de tamaño en un valor mayor que 0. Esto reducirá las dimensiones de la textura al importarla (preservando la relación de aspecto) sin afectar el archivo de origen.
Bandas de color
When using the Forward+ or Mobile rendering methods, Godot's 3D engine renders internally in HDR. However, the rendering output will typically be written to a lower precision buffer. This can result in visible banding, especially when using untextured materials. For performance reasons, color precision is also lower when using the Mobile rendering method compared to Forward+.
When using the Compatibility rendering method, internal HDR rendering is not used and the color precision is the lowest of all rendering methods. This also applies to 2D rendering, where banding may be visible when using smooth gradient textures.
Hay dos caminos principales para solucionar las bandas:
If using the Forward+ or Forward Mobile rendering methods, enable Use Debanding in Project Settings > Rendering > Anti Aliasing. This applies a fullscreen debanding shader as a post-processing effect and is very cheap.
Alternatively, bake some noise into your textures. This is mainly effective in 2D, e.g. for vignetting effects. In 3D, you can also use a custom debanding shader to be applied on your materials. This technique works even if your project is rendered with low color precision, which means it will work when using the Mobile and Compatibility rendering methods.
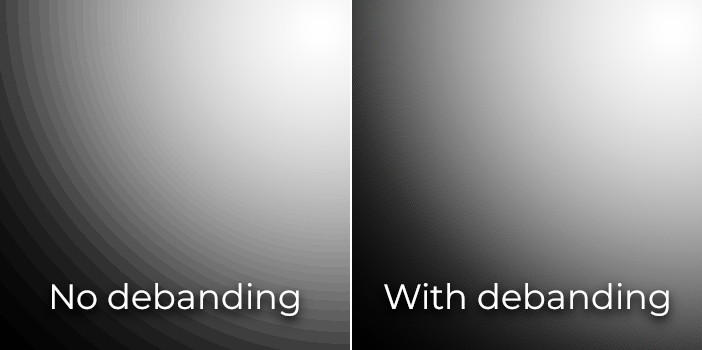
Comparación de bandas de color (contraste aumentado para mayor visibilidad)
Ver también
See Banding in Games: A Noisy Rant (PDF) for more details about banding and ways to combat it.
Precisión del buffer de profundidad
To sort objects in 3D space, rendering engines rely on a depth buffer (also called Z-buffer). This buffer has a finite precision: 32-bit on desktop platforms, 24-bit on mobile platforms (for performance reasons). If two different objects end up on the same buffer value, then Z-fighting will occur. This will materialize as textures flickering back and forth as the camera moves or rotates.
Para que la memoria intermedia de profundidad sea más precisa en el área de renderizado, deberías aumentar la propiedad Casi del nodo de la cámara. Sin embargo, ten cuidado: si lo pones demasiado alto, los jugadores podrán ver a través de la geometría cercana. También deberías disminuir la propiedad Lejos del nodo de la cámara al valor más bajo permitido para tu caso de uso, aunque ten en cuenta que no afectará a la precisión tanto como la propiedad Cercana.
Si sólo necesitas alta precisión cuando el jugador puede ver a lo lejos, podrías cambiarlo dinámicamente según las condiciones del juego. Por ejemplo, si el jugador entra en un avión, la propiedad Casi puede ser aumentada temporalmente para evitar la lucha Z en la distancia. Entonces puede ser disminuido una vez que el jugador deja el avión.
Dependiendo de la escena y de las condiciones de visualización, también puede ser capaz de mover los objetos del combate Z más lejos sin que la diferencia sea visible para el jugador.
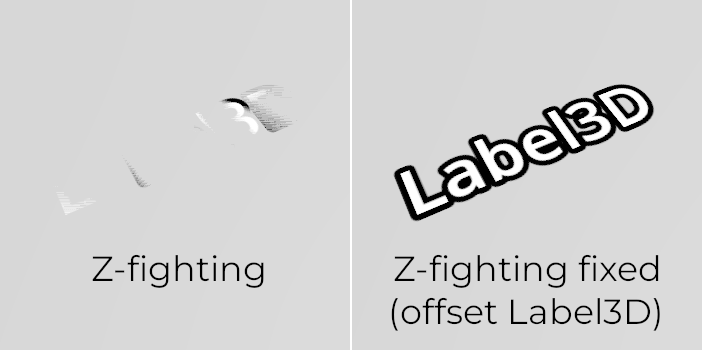
Comparación de Z-fighting (antes y después de ajustar la escena alejando el Label3D del suelo)
Orden de transparencia
In Godot, transparent materials are drawn after opaque materials. Transparent objects are sorted back to front before being drawn based on the Node3D's position, not the vertex position in world space. Due to this, overlapping objects may often be sorted out of order. To fix improperly sorted objects, tweak the material's Render Priority property or the node's Sorting Offset. Render Priority will force specific materials to appear in front of or behind other transparent materials, while Sorting Offset will move the object forward or backward for the purpose of sorting. Even then, these may not always be sufficient.
Los objetos transparentes no se renderizan en el búfer de normal-rugosidad (normal-roughness buffer), ya que se dibujan después de la geometría opaca. Como resultado, las características que dependen de dicho búfer no afectarán a los materiales transparentes.
Algunos motores de renderizado cuentan con técnicas de transparencia independiente del orden para aliviar esto, pero esto es costoso en la GPU. Godot actualmente no proporciona esta característica. Todavía hay varias maneras de evitar este problema:
Only make materials transparent if you actually need it. If a material only has a small transparent part, consider splitting it into a separate material. This will allow the opaque part to cast shadows and will also improve performance.
If your texture mostly has fully opaque and fully transparent areas, you can use alpha testing instead of alpha blending. This transparency mode is faster to render and doesn't suffer from transparency issues. Enable Transparency > Transparency to Alpha Scissor in StandardMaterial3D, and adjust Transparency > Alpha Scissor Threshold accordingly if needed. Note that MSAA will not antialias the texture's edges unless alpha antialiasing is enabled in the material's properties. However, FXAA, TAA and supersampling will be able to antialias the texture's edges regardless of whether alpha antialiasing is enabled on the material.
If you need to render semi-transparent areas of the texture, alpha scissor isn't suitable. Instead, setting the StandardMaterial3D's Transparency > Transparency property to Depth Pre-Pass can sometimes work (at a performance cost). You can also try the Alpha Hash mode.
If you want a material to fade with distance, use the StandardMaterial3D distance fade mode Pixel Dither or Object Dither instead of Pixel Alpha. This will make the material opaque, which also speeds up rendering.

Comparación de clasificación de transparencia (materiales con mezcla alfa a la izquierda, materiales con tijera alfa a la derecha)