Attention: Here be dragons
This is the latest
(unstable) version of this documentation, which may document features
not available in or compatible with released stable versions of Godot.
Checking the stable version of the documentation...
Crear plugins
Acerca de los plugins
Un plugin es una gran manera de ampliar el editor con herramientas útiles. Se puede hacer completamente con GDScript y escenas estándar, sin siquiera recargar el editor. A diferencia de los módulos, no es necesario crear código C++ ni recompilar el motor. Aunque esto hace que los plugin sean menos potentes, todavía hay muchas cosas que puedes hacer con ellos. Ten en cuenta que un plugin es similar a cualquier escena que ya puedas hacer, excepto que se crea usando un script para añadir funcionalidad de edición.
This tutorial will guide you through the creation of two plugins so you can understand how they work and be able to develop your own. The first is a custom node that you can add to any scene in the project, and the other is a custom dock added to the editor.
Crear un plugin
Antes de empezar, crea un proyecto vacío nuevo donde quieras. Esto servirá como base para desarrollar y probar los plugins.
Lo primero que necesita el editor para identificar un nuevo plugin es crear dos archivos: un plugin.cfg para la configuración y un script de herramientas con la funcionalidad. Los plugins tienen una ruta estándar como addons/plugin_name dentro de la carpeta del proyecto. Godot proporciona un diálogo para generar esos archivos y colocarlos donde deben estar.
In the main toolbar, click the Project dropdown. Then click
Project Settings.... Go to the Plugins tab and then click
on the button in the top-right.
Verás aparecer el diálogo, así:
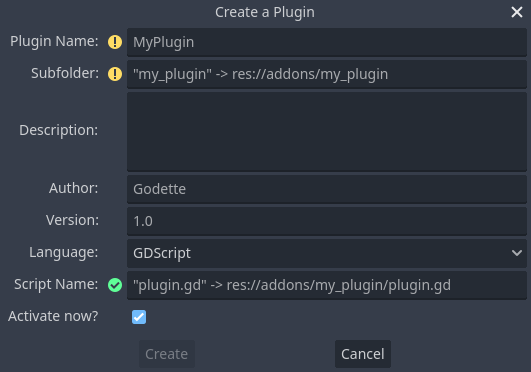
El texto del marcador de posición en cada campo describe cómo afecta a la creación de los archivos del plugin y a los valores del archivo de configuración.
Para continuar con el ejemplo, utiliza los siguientes valores:
Plugin Name: My Custom Node
Subfolder: my_custom_node
Description: A custom node made to extend the Godot Engine.
Author: Your Name Here
Version: 1.0.0
Language: GDScript
Script Name: custom_node.gd
Plugin Name: My Custom Node
Subfolder: MyCustomNode
Description: A custom node made to extend the Godot Engine.
Author: Your Name Here
Version: 1.0.0
Language: C#
Script Name: CustomNode.cs
Advertencia
In C#, the EditorPlugin script needs to be compiled, which
requires building the project. After building the project the plugin can be
enabled in the Plugins tab of Project Settings.
Feberías terminar con una estructura de directorios como esta:

plugin.cfg is an INI file with metadata about your plugin.
The name and description help people understand what it does.
Your name helps you get properly credited for your work.
The version number helps others know if they have an outdated version;
if you are unsure on how to come up with the version number, check out Semantic Versioning.
The main script file will instruct Godot what your plugin does in the editor
once it is active.
El archivo del script
Upon creation of the plugin, the dialog will automatically open the
EditorPlugin script for you. The script has two requirements that you cannot
change: it must be a @tool script, or else it will not load properly in the
editor, and it must inherit from EditorPlugin.
Advertencia
In addition to the EditorPlugin script, any other GDScript that your plugin uses
must also be a tool. Any GDScript without @tool used by the editor
will act like an empty file!
It's important to deal with initialization and clean-up of resources. A good practice is to use the virtual function _enter_tree() to initialize your plugin and _exit_tree() to clean it up. Thankfully, the dialog generates these callbacks for you. Your script should look something like this:
@tool
extends EditorPlugin


func _enter_tree():
    # Initialization of the plugin goes here.
    pass


func _exit_tree():
    # Clean-up of the plugin goes here.
    pass
#if TOOLS
using Godot;

[Tool]
public partial class CustomNode : EditorPlugin
{
    public override void _EnterTree()
    {
        // Initialization of the plugin goes here.
    }

    public override void _ExitTree()
    {
        // Clean-up of the plugin goes here.
    }
}
#endif
Esta es una buena plantilla para usar cuando se crean nuevos plugins.
Un nodo personalizado
A veces queremos un cierto comportamiento en muchos nodos, como una escena personalizada o o un control que pueda ser reutilizado. Instanciarlo es útil en muchos casos, pero a veces puede ser incómodo, especialmente si lo está usando en varios proyectos . Una buena solución es crear un plugin que agregue un nodo con un comportamiento personalizado.
For this tutorial, we'll create a button that prints a message when clicked. For that, we'll need a script that extends from Button. It could also extend BaseButton if you prefer:
# Optional, add to execute in the editor.
@tool

# Icons are optional.
# Alternatively, you may use the UID of the icon or the absolute path.
@icon("icon.svg")

# Automatically register the node in the Create New Node dialog
# and make it available for use with other scripts.
class_name MyButton
extends Button


func _enter_tree():
    pressed.connect(clicked)


func clicked():
    print("You clicked me!")
using Godot;

// Optional, add to execute in the editor.
[Tool]

// Icons are optional.
// Alternatively, you may use the UID of the icon or the absolute path.
[Icon("icon.svg")]

// Automatically register the node in the Create New Node dialog
// and make it available for use with other scripts.
[GlobalClass]
public partial class MyButton : Button
{
    public override void _EnterTree()
    {
        Pressed += Clicked;
    }

    public void Clicked()
    {
        GD.Print("You clicked me!");
    }
}
That's it for our basic button. You can save this as my_button.gd inside the
plugin folder. You may have a 16×16 icon to show in the scene tree. If you
don't have one, you can grab the default one from the engine and save it in your
addons/my_custom_node folder as icon.svg, or use the default Godot logo
(@icon("res://icon.svg")).
Truco
SVG images that are used as custom node icons should have the Editor > Scale With Editor Scale and Editor > Convert Colors With Editor Theme import options enabled. This allows icons to follow the editor's scale and theming settings if the icons are designed with the same color palette as Godot's own icons.
Una vez hecho esto, el plugin ya debería estar disponible en la lista de plugins en Configuración del proyecto, así que actívalo como se explica en Verificación de los resultados.
Luego pruébalo y agregando tu nuevo nodo:
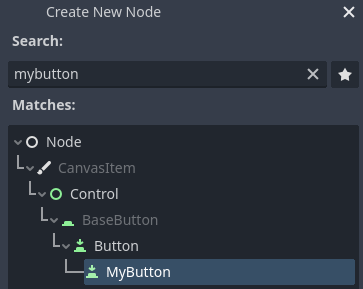
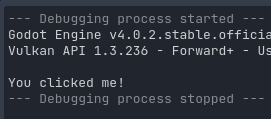
Cuando agrega el nodo, puedes ver que ya tiene adjunto el script que creó. Establezca un texto para el botón, guarde y ejecute la escena. Al hacer clic en el botón, puedes ver un texto en la consola:
Un panel personalizado
Algunas veces necesitarás ampliar el editor y añadir herramientas que estén siempre disponibles. Una forma fácil de hacerlo es añadir un nuevo panel con un plugin. Los paneles son sólo escenas basadas en Control, estas son creadas de una manera similar a las escenas GUI comunes.
La creación de un muelle personalizado se realiza como un nodo personalizado. Crea un nuevo archivo plugin.cfg en la carpeta``addons/my_custom_dock``, luego agrega el siguiente contenido:
[plugin]

name="My Custom Dock"
description="A custom dock made so I can learn how to make plugins."
author="Your Name Here"
version="1.0"
script="custom_dock.gd"
[plugin]

name="My Custom Dock"
description="A custom dock made so I can learn how to make plugins."
author="Your Name Here"
version="1.0"
script="CustomDock.cs"
Luego cree el script custom_dock.gd en la misma carpeta. Rellénelo con la plantilla que hemos visto antes de para comenzar bien.
Dado que estamos intentando añadir un nuevo panel personalizado, necesitamos crear el contenido de dicho panel. Esto no es más que una escena estándar de Godot. sólo crea una nueva escena y luego editarla.
For an editor dock, the root node must be a Control or one of its child classes. For this tutorial, you can create a single button. Don't forget to add some text to your button.
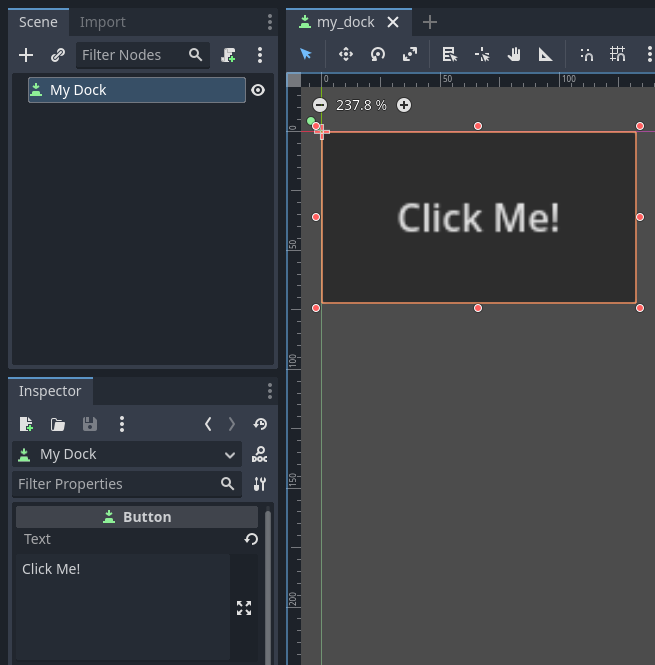
Save this scene as my_dock.tscn. Now, we need to grab the scene we created
then add it as a dock in the editor. For this, you can rely on the function
add_dock() from the
EditorPlugin class.
Necesitas seleccionar una posición de panel para añadirlo y tener un Control para añadir (que es la escena que acabas de crear). No olvides quitar el panel cuando el plugin es desactivado. El código debería verse así:
@tool
extends EditorPlugin


# A class member to hold the dock during the plugin life cycle.
var dock


func _enter_tree():
    # Initialization of the plugin goes here.
    # Load the dock scene and instantiate it.
    var dock_scene = preload("res://addons/my_custom_dock/my_dock.tscn").instantiate()

    # Create the dock and add the loaded scene to it.
    dock = EditorDock.new()
    dock.add_child(dock_scene)

    dock.title = "My Dock"

    # Note that LEFT_UL means the left of the editor, upper-left dock.
    dock.default_slot = DOCK_SLOT_LEFT_UL

    # Allow the dock to be on the left or right of the editor, and to be made floating.
    dock.available_layouts = EditorDock.DOCK_LAYOUT_VERTICAL | EditorDock.DOCK_LAYOUT_FLOATING

    add_dock(dock)


func _exit_tree():
    # Clean-up of the plugin goes here.
    # Remove the dock.
    remove_dock(dock)
    # Erase the control from the memory.
    dock.queue_free()
#if TOOLS
using Godot;

[Tool]
public partial class CustomDock : EditorPlugin
{
    private EditorDock _dock;

    public override void _EnterTree()
    {
        var _dock_scene = GD.Load<PackedScene>("res://addons/MyCustomDock/MyDock.tscn").Instantiate<Control>();

        // Create the dock and add the loaded scene to it.
        _dock = new EditorDock();
        _dock.AddChild(dock_scene);

        _dock.Title = "My Dock";

        // Note that LeftUl means the left of the editor, upper-left dock.
        _dock.DefaultSlot = DockSlot.LeftUl;

        // Allow the dock to be on the left or right of the editor, and to be made floating.
        _dock.AvailableLayouts = DockLayout.Horizontal | DockLayout.Floating;

        AddDock(_dock);
    }

    public override void _ExitTree()
    {
        // Clean-up of the plugin goes here.
        // Remove the dock.
        RemoveDock(_dock);
        // Erase the control from the memory.
        _dock.QueueFree();
    }
}
#endif
Ten en cuenta que, si bien el muelle aparecerá inicialmente en su posición especificada, el usuario puede cambiar libremente su posición y guardar el diseño resultante.
Comprobar los resultados
It's now time to check the results of your work. Open the Project Settings and click on the Plugins tab. Your plugin should be the only one on the list.

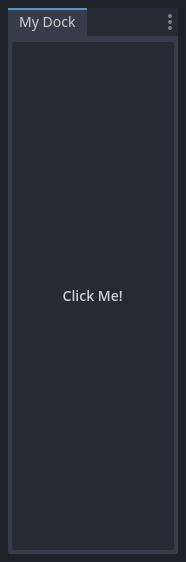
You can see the plugin is not enabled. Click the Enable checkbox to activate the plugin. The dock should become visible before you even close the settings window. You should now have a custom dock:
Registrando autoloads/singletons en plugins
Es posible que los plugins del editor se registren automáticamente autoloads cuando el plugin está habilitado. Esto incluye también la des-registración del autoload cuando el plugin está deshabilitado.
Esto agiliza la configuración de los plugins para los usuarios, ya que ya no tienen que añadir manualmente los autoloads a la configuración de su proyecto si el plugin del editor requiere el uso de un autoload.
Utiliza el siguiente código para registrar un singleton desde un plugin del editor:
@tool
extends EditorPlugin

# Replace this value with a PascalCase autoload name, as per the GDScript style guide.
const AUTOLOAD_NAME = "SomeAutoload"


func _enable_plugin():
    # The autoload can be a scene or script file.
    add_autoload_singleton(AUTOLOAD_NAME, "res://addons/my_addon/some_autoload.tscn")


func _disable_plugin():
    remove_autoload_singleton(AUTOLOAD_NAME)
#if TOOLS
using Godot;

[Tool]
public partial class MyEditorPlugin : EditorPlugin
{
    // Replace this value with a PascalCase autoload name.
    private const string AutoloadName = "SomeAutoload";

    public override void _EnablePlugin()
    {
        // The autoload can be a scene or script file.
        AddAutoloadSingleton(AutoloadName, "res://addons/MyAddon/SomeAutoload.tscn");
    }

    public override void _DisablePlugin()
    {
        RemoveAutoloadSingleton(AutoloadName);
    }
}
#endif
Using sub-plugins
Often a plugin adds multiple things, for example a custom node and a panel. In those cases it might be easier to have a separate plugin script for each of those features. Sub-plugins can be used for this.
First create all plugins and sub plugins as normal plugins:

Then move the sub plugins into the main plugin folder:

Godot will hide sub-plugins from the plugin list, so that a user can't enable or disable them. Instead the main plugin script should enable and disable sub-plugins like this:
@tool
extends EditorPlugin

# The main plugin is located at res://addons/my_plugin/
const PLUGIN_NAME = "my_plugin"

func _enable_plugin():
    EditorInterface.set_plugin_enabled(PLUGIN_NAME + "/node", true)
    EditorInterface.set_plugin_enabled(PLUGIN_NAME + "/panel", true)

func _disable_plugin():
    EditorInterface.set_plugin_enabled(PLUGIN_NAME + "/node", false)
    EditorInterface.set_plugin_enabled(PLUGIN_NAME + "/panel", false)
Ir más allá
Ahora que ha aprendido a como crear plugins básicos, puedes ampliar el editor de varias formas. Se pueden agregar muchas funciones al editor con GDScript; es una forma poderosa de crear editores especializados sin tener que profundizar en los módulos de C ++.
You can make your own plugins to help yourself and share them in the Asset Library so that people can benefit from your work.