Attention: Here be dragons
This is the latest
(unstable) version of this documentation, which may document features
not available in or compatible with released stable versions of Godot.
Checking the stable version of the documentation...
Luces y sombras 3D
Introducción
Las luces emiten luz que se mezcla con los materiales produciendo un resultado visible. La luz puede proceder de varias fuentes en una escena:
Del propio material, en forma de color de emisión (aunque no afecta a los objetos cercanos a menos que se habilite la iluminación indirecta del espacio de la pantalla o horneada).
Nodos de luz: DirectionalLight3D, OmniLight3D y SpotLight3D.
Luz Ambiental en Environment o Reflection Probe.
Iluminación global (LightmapGI, VoxelGI o SDFGI).
El color de emisión es una propiedad del material. Puedes leer más sobre ello en el tutorial Material estándar 3D y material ORM 3D.
Ver también
You can compare various types of lights in action using the 3D Lights and Shadows demo project.
Nodos de luz
Existen tres tipos de nodos de luz: DirectionalLight3D, OmniLight3D and SpotLight3D. Echemos un vistazo a los parámetros comunes para las luces:
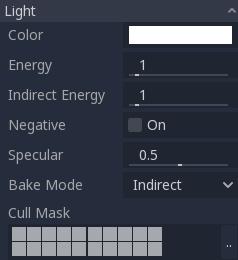
Cada propiedad tiene una función específica:
Color: Color base para la luz emitida.
Energía: Multiplicador de energía. Resulta útil para saturar luces o para trabajar con Iluminación de alto rango dinámico.
Energía indirecta: Multiplicador secundario utilizado con luz indirecta (rebote de luz). Funciona con Using Lightmap global illumination, VoxelGI o SDFGI.
Energía de niebla volumétrica: Multiplicador secundario utilizado con la niebla volumétrica. Esto solo tiene efecto cuando la niebla volumétrica está activada.
Negativa: La luz se vuelve sustractiva en lugar de aditiva. A veces resulta útil compensar manualmente algunas esquinas oscuras.
Especular: Afecta la intensidad de la mancha especular en los objetos afectados por esta luz. En cero, esta luz se convierte en una luz difusa pura.
Bake Mode: Establece el modo de "bake" para la luz. Véase Using Lightmap global illumination.
Cull Mask: Objects that are in the selected layers below will be affected by this light. Note that objects disabled via this cull mask will still cast shadows. If you don't want disabled objects to cast shadows, adjust the Cast Shadow property on the GeometryInstance3D to the desired value.
Ver también
Consulta Unidades físicas de luz y cámara si deseas utilizar unidades del mundo real para configurar la intensidad y la temperatura de color de tus luces.
Límites de número de luces
Al utilizar el renderizador Forward+, Godot emplea un enfoque de clustering (agrupación) para la iluminación en tiempo real. Se pueden añadir tantas luces como se desee (siempre que el rendimiento lo permita). Sin embargo, sigue existiendo un límite predeterminado de 512 elementos agrupados (clustered elements) que pueden estar presentes en la vista de la cámara actual. Un elemento agrupado es una luz omnidireccional (omni light), una luz focal (spot light), un decal o una reflection probe (sonda de reflexión). Este límite puede aumentarse ajustando Max Clustered Elements en Configuración del Proyecto... > Renderizado > Límites > Constructor de Clústeres (habilitar configuraciones avanzadas).
Al usar el renderizador Mobile, existe un límite de 8 OmniLights + 8 SpotLights por recurso de modelo. También existe un límite de 256 OmniLights + 256 SpotLights que se pueden renderizar en la vista de cámara actual. Estos límites no se pueden modificar actualmente.
Al utilizar el renderizador de Compatibilidad (Compatibility), se pueden renderizar hasta 8 OmniLights + 8 SpotLights por cada recurso de malla (mesh). Este límite se puede aumentar en la Configuración Avanzada del Proyecto ajustando Max Renderable Elements y/o Max Lights per Object en Renderizado > Límites > OpenGL, a costa del rendimiento y de tiempos de compilación de shaders más largos. El límite también se puede reducir para acortar los tiempos de compilación de los shaders y mejorar ligeramente el rendimiento.
Con todos los métodos de renderizado, se pueden ver hasta 8 luces direccionales simultáneamente. Sin embargo, cada luz direccional adicional con sombras habilitadas reducirá la resolución efectiva de las sombras. Esto se debe a que el atlas de sombras direccionales se comparte entre todas las luces.
Si se supera el límite de renderizado, las luces empezarán a aparecer y desaparecer durante el movimiento de la cámara, lo que puede resultar molesto. Activar la función Desvanecimiento de Distancia en los nodos de luz puede ayudar a reducir este problema y, al mismo tiempo, mejorar el rendimiento. Dividir las mallas en porciones más pequeñas también puede ser útil, especialmente para la geometría de nivel (lo que también mejora la eficiencia de la selección).
Si necesitas renderizar más luces de las que permite un renderizador determinado, considera usar lightmaps bakeados con el modo de bake de las luces configurado en Static. Esto permite que las luces se realicen por completo mediante un proceso de bake, lo que también hace que su renderizado sea mucho más rápido. También puedes utilizar materiales emisivos con cualquier técnica de iluminación global como sustituto de los nodos de luz que emiten iluminación sobre un área grande.
Mapeo de sombras
Las luces opcionalmente pueden proyectar sombras. Esto les da mayor realismo (la luz no llega a las zonas ocluidas), pero puede incurrir en un mayor coste de rendimiento. Hay una lista de parámetros de sombra genéricos, cada uno también tiene una función específica:
Enabled: Check to enable shadow mapping in this light.
Opacidad: Las áreas ocluidas se oscurecen con este factor de opacidad. Las sombras son completamente opacas por defecto, pero se puede modificar para que sean translúcidas para una luz determinada.
Bias: When this parameter is too low, self-shadowing occurs. When too high, shadows separate from the casters. Tweak to what works best for you.
Normal Bias: When this parameter is too low, self-shadowing occurs. When too high, shadows appear misaligned from the casters. Tweak to what works best for you.
Transmittance Bias: When this parameter is too low, self-shadowing occurs on materials that have transmittance enabled. When too high, shadows will not affect materials that have transmittance enabled consistently. Tweak to what works best for you.
Reverse Cull Face: Some scenes work better when shadow mapping is rendered with face-culling inverted.
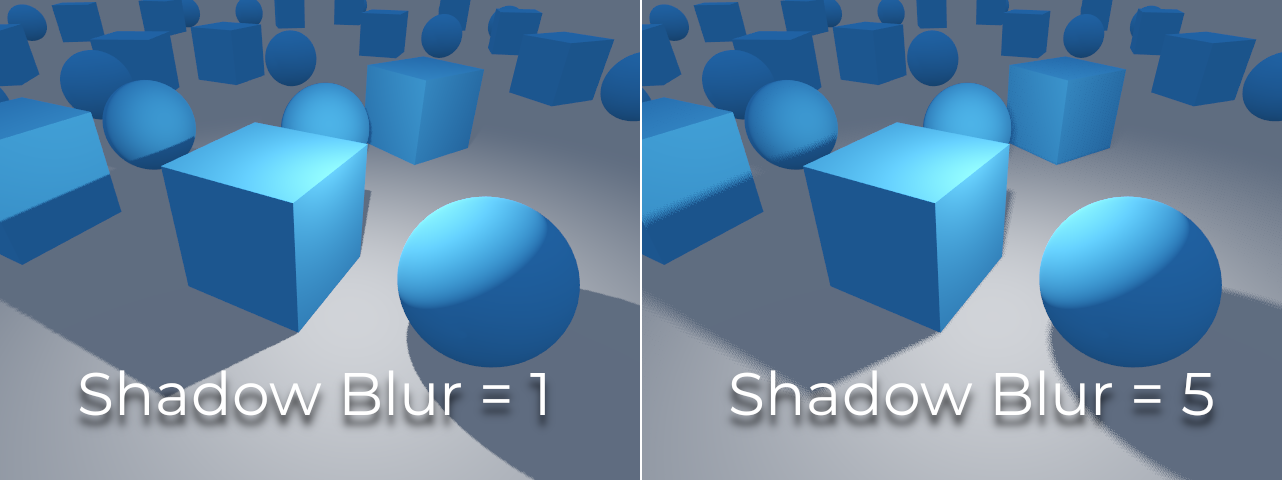
Blur: Multiplica el radio de desenfoque (blur) de la sombra para esta luz. Esto funciona tanto con el mapeo de sombras tradicional como con las sombras de endurecimiento por contacto (luces con Angular Distance o Size superior a
0.0). Valores más altos dan como resultado sombras más suaves, que también parecerán ser más estables temporalmente para los objetos en movimiento. La desventaja de aumentar el desenfoque de la sombra es que hará que el patrón granulado utilizado para el filtrado sea más notorio. Consulta también Modo del filtro de sombras.Caster Mask: Las sombras solo son proyectadas por los objetos que se encuentren en estas capas. Ten en cuenta que esta máscara no afecta a los objetos sobre los cuales se proyectan las sombras.
Ajustar el sesgo de sombra
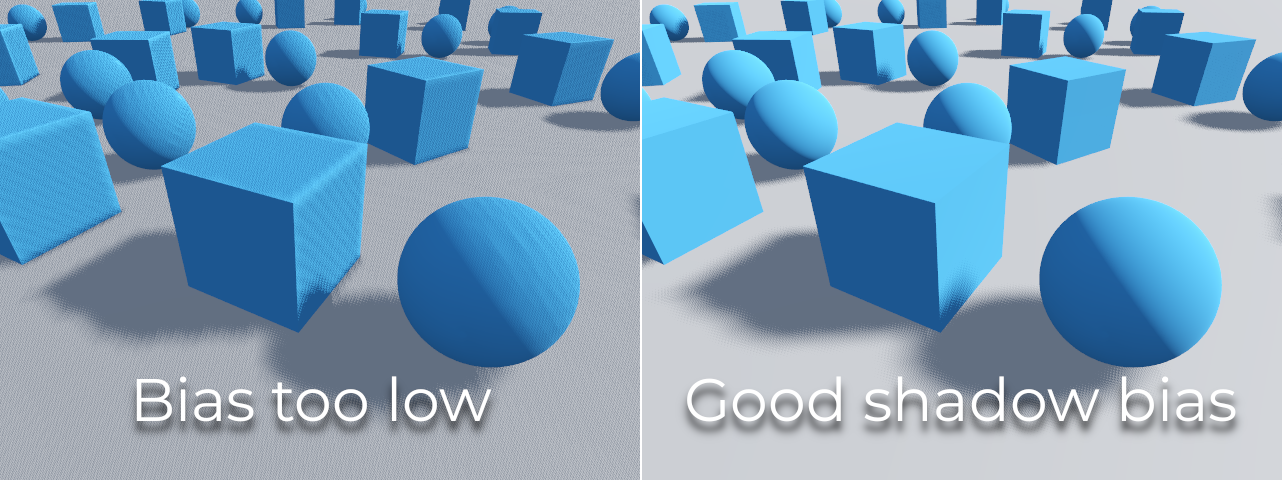
Below is an image of what tweaking bias looks like. Default values work for most cases, but in general, it depends on the size and complexity of geometry.
Si el Shadow Bias o el Shadow Normal Bias se configuran con un valor demasiado bajo para una luz determinada, la sombra se "esparcirá" sobre los objetos. Esto hará que la apariencia prevista de la luz se oscurezca, y es lo que se conoce como shadow acne:
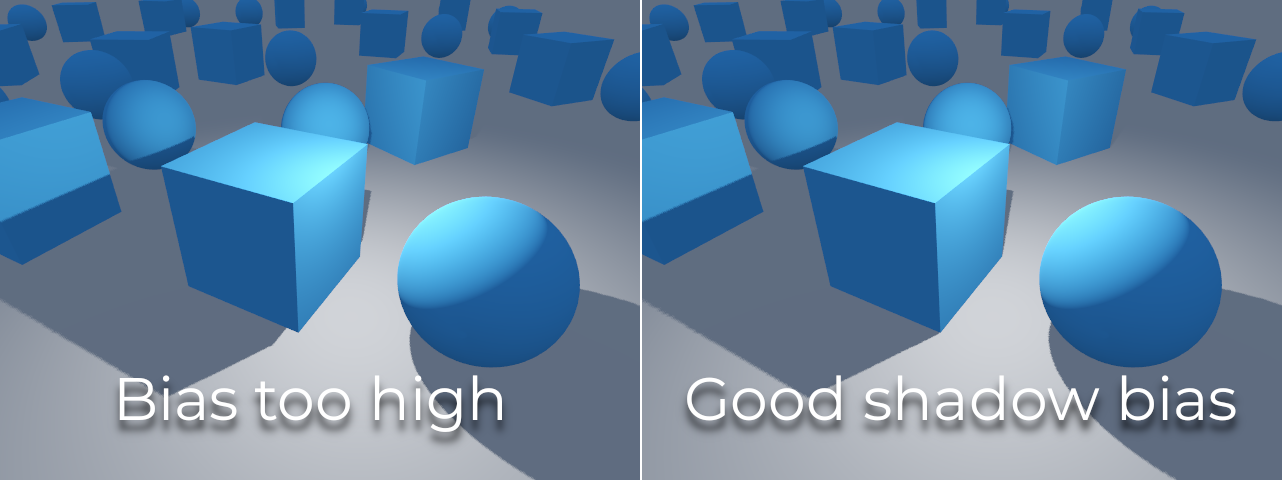
Por otro lado, si Shadow Bias o Shadow Normal Bias se establecen con un valor demasiado alto para una luz determinada, la sombra puede parecer desconectada del objeto. Esto se denomina peter-panning:
En general, aumentar Shadow Normal Bias es preferible en lugar de aumentar Shadow Bias. Aumentar Shadow Normal Bias no provoca tanto peter-panning como aumentar Shadow Bias, pero aun así puede resolver la mayoría de los problemas de shadow acne de manera eficiente. La desventaja de aumentar Shadow Normal Bias es que puede hacer que las sombras parezcan más delgadas en ciertos objetos.
Any sort of bias issues can be fixed by increasing the shadow map resolution, at the cost of decreased performance.
Nota
Ajustar la configuración del mapeo de sombras es un arte; no existen configuraciones de "talla única" que sirvan para todo. Para lograr los mejores resultados visuales, es posible que necesites utilizar diferentes valores de shadow bias de forma individual para cada luz.
Nota sobre Cambios de Apariencia: Al activar las sombras en una luz, ten en cuenta que la apariencia de la luz puede cambiar en comparación a cuando se renderiza sin sombras en el renderizador de Compatibilidad (Compatibility). Debido a las limitaciones de los dispositivos móviles más antiguos, las sombras se implementan mediante un enfoque de renderizado de pases múltiples (multi-pass), por lo que las luces con sombras se renderizan en el espacio sRGB en lugar del espacio lineal. Este cambio en el espacio de renderizado a veces puede alterar drásticamente la apariencia de la luz. Para lograr una apariencia similar a la de una luz sin sombras, es posible que debas ajustar la configuración de energía de la luz.
Directional light (Luz direccional)
Este es el tipo de luz más común y representa una fuente de luz muy lejana (como el sol). También es la luz menos costosa de calcular y debería utilizarse siempre que sea posible (aunque no es el mapa de sombras menos costoso de calcular, pero eso se explicará más adelante).
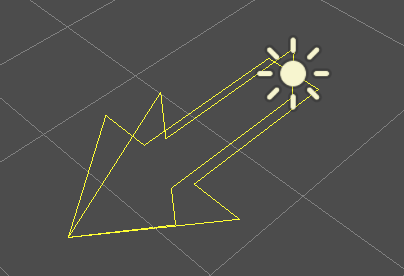
La luz direccional modela un número infinito de rayos de luz paralelos que cubren la escena completa. El nodo de luz direccional es representado por una gran flecha que indica la dirección de los rayos de luz. Sin embargo, la posición del nodo no afecta al comportamiento de luz y puede ser colocado en cualquier lugar de la escena.
Every face whose front-side is hit by the light rays is lit, while the others stay dark. Unlike most other light types, directional lights don't have specific parameters.
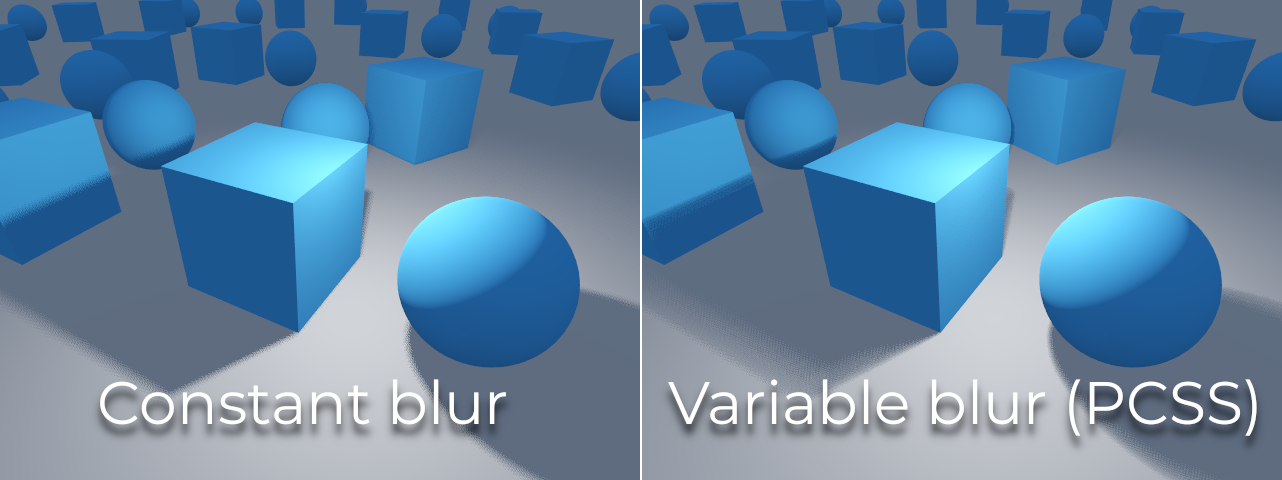
La luz direccional también ofrece una propiedad de Angular Distance, que determina el tamaño angular de la luz en grados. Aumentar este valor por encima de 0.0 hará que las sombras sean más suaves a mayores distancias del objeto que las proyecta (caster), al tiempo que afecta la apariencia del sol en los materiales de cielo procedimental (procedural sky). Esto se conoce como una sombra de "endurecimiento por contacto" o contact-hardening shadow (también conocida como PCSS).
Como referencia, la distancia angular del Sol visto desde la Tierra es de aproximadamente 0.5. Este tipo de sombra es costosa en términos de rendimiento, por lo que te recomendamos consultar PCSS recommendations si vas a establecer este valor por encima de 0.0 en luces que tengan las sombras activadas.
Mapeo de sombras direccional
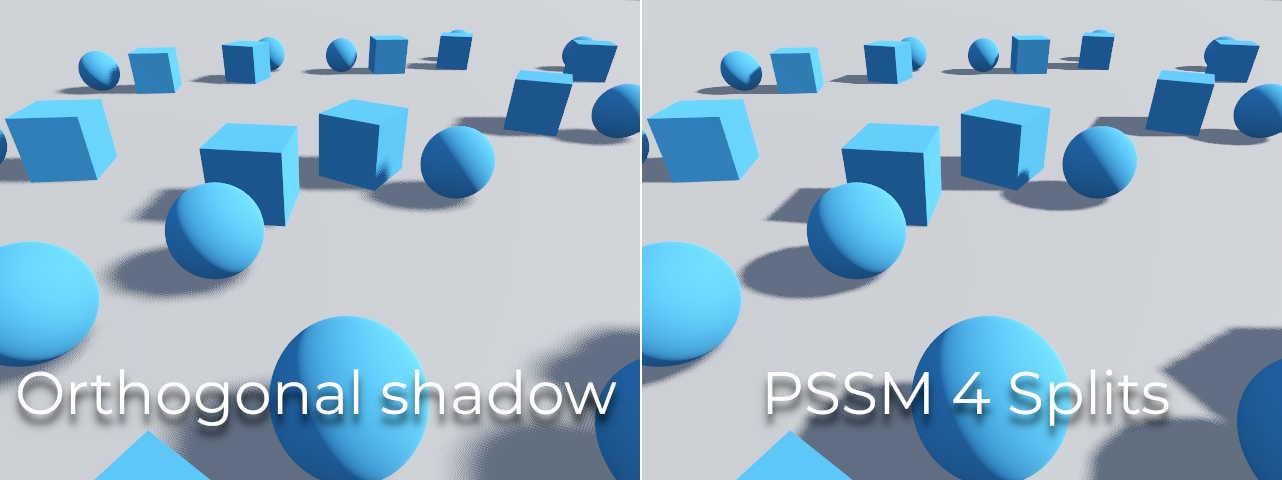
To compute shadow maps, the scene is rendered (only depth) from an orthogonal point of view that covers the whole scene (or up to the max distance). There is, however, a problem with this approach because objects closer to the camera receive low-resolution shadows that may appear blocky.
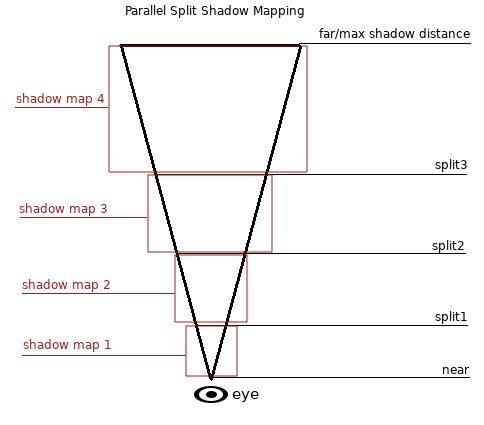
Para solucionar esto, se utiliza una técnica llamada Mapas de Sombra Divididos Paralelos (Parallel Split Shadow Maps, o PSSM). Esto divide el frustum de visión en 2 o 4 áreas. Cada área obtiene su propio mapa de sombras. Esto permite que áreas pequeñas cercanas al espectador tengan la misma resolución de sombras que un área enorme y lejana. Cuando las sombras están habilitadas para DirectionalLight3D, el modo de sombra predeterminado es PSSM con 4 divisiones. En escenarios donde un objeto es lo suficientemente grande como para aparecer en las cuatro divisiones, resulta en un aumento de las llamadas de dibujado. Específicamente, dicho objeto se renderizará cinco veces en total: una vez por cada una de las cuatro divisiones de sombra y una vez para el renderizado final de la escena. Esto puede afectar el rendimiento, por lo que es importante comprender este comportamiento para optimizar su escena y gestionar las expectativas de rendimiento.
Con esto, las sombras se vuelven más detalladas:
Para controlar PSSM, se exponen varios parámetros:
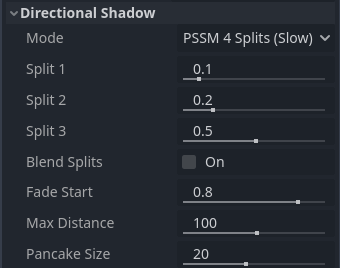
Each split distance is controlled relative to the camera far (or shadow
Max Distance if greater than 0.0). 0.0 is the eye position and
1.0 is where the shadow ends at a distance. Splits are in-between.
Default values generally work well, but tweaking the first split a bit is common
to give more detail to close objects (like a character in a third-person game).
Asegúrate siempre de establecer una Distancia Máxima de sombra según las necesidades de la escena. Una distancia máxima menor dará como resultado sombras de mejor aspecto y un mejor rendimiento, ya que será necesario incluir menos objetos en la representación de sombras. También puedes ajustar Inicio de Desvanecimiento (Fade Start) para controlar qué tan agresivo debe ser el desvanecimiento de la sombra en la distancia. Para escenas en las que la Distancia Máxima cubre completamente la escena en cualquier posición de la cámara, puedes aumentar Inicio de Desvanecimiento a 1.0 para evitar que la sombra se desvanezca a distancia. Esto no debe hacerse en escenas en las que la Distancia Máxima no cubre completamente la escena, ya que la sombra parecerá cortarse de repente.
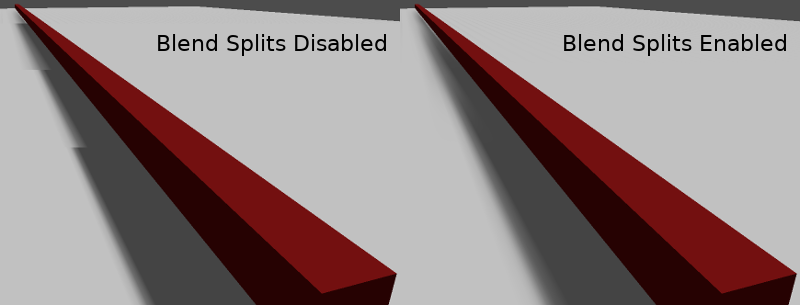
Sometimes, the transition between a split and the next can look bad. To fix this, the Blend Splits option can be turned on, which sacrifices detail and performance in exchange for smoother transitions:
The Shadow > Normal Bias parameter can be used to fix special cases of self-shadowing when objects are perpendicular to the light. The only downside is that it makes the shadow a bit thinner. Consider increasing Shadow > Normal Bias before increasing Shadow > Bias in most situations.
Por último, Pancake Size es una propiedad que puede ajustarse para solucionar el problema de sombras faltantes cuando se utilizan objetos grandes con mallas que no están subdivididas. Cambia este valor únicamente si notas que faltan sombras y el problema no está relacionado con el sesgo de sombras (shadow biasing).
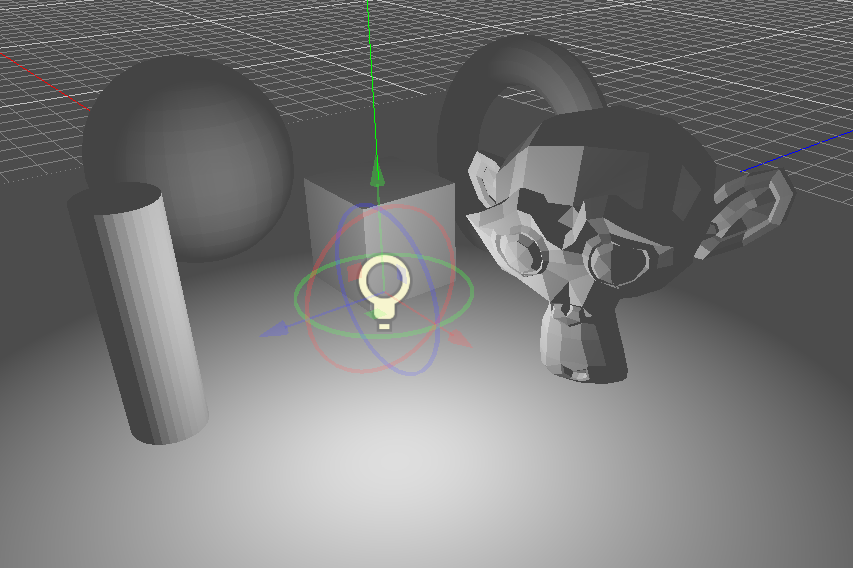
Omni light (luz omnidireccional)
Omni light es un punto que emite luz esféricamente en todas las direcciones hasta un radio dado.
En la vida real, la atenuación de la luz es una función inversa, lo que significa que las luces omnidireccionales no tienen radio. Esto es un problema porque calcular un gran número de este tipo de luces se volvería costoso.
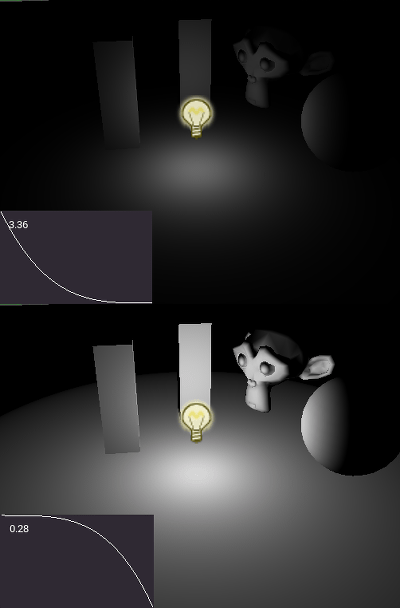
To solve this, a Range parameter is introduced together with an attenuation function.
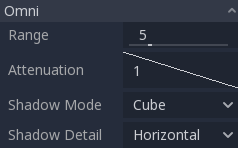
Estos dos parámetros permiten ajustar cómo funciona esto visualmente para encontrar resultados estéticamente agradables.
Un parámetro de Size (Tamaño) también está disponible en OmniLight3D. Aumentar este valor hará que la luz se desvanezca más lentamente y que las sombras se vean más desenfocadas cuando están lejos del objeto que las proyecta (caster). Esto se puede utilizar para simular luces de área hasta cierto punto. Esto se conoce como una sombra de "endurecimiento por contacto" o contact-hardening shadow (también conocida como PCSS). Este tipo de sombra es costosa, por lo que te recomendamos consultar PCSS recommendations si estableces este valor por encima de 0.0 en luces que tengan las sombras activadas.
Mapeo de sombras omnidireccional
El mapeo de sombras para una Omni light es relativamente sencillo. Lo principal a considerar es el algoritmo que se utilizará para renderizarlo.
Omni Shadows can be rendered as either Dual Paraboloid or Cube mapped. Dual Paraboloid renders quickly, but can cause deformations, while Cube is more correct, but slower. The default is Cube, but consider changing it to Dual Paraboloid for lights where it doesn't make much of a visual difference.
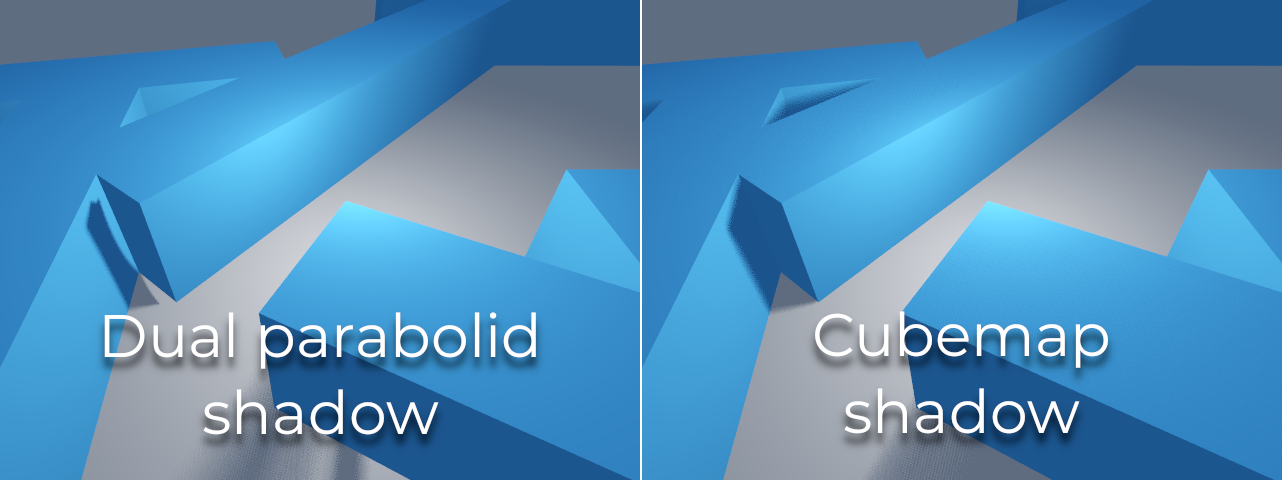
If the objects being rendered are mostly irregular and subdivided, Dual Paraboloid is usually enough. In any case, as these shadows are cached in a shadow atlas (more on that at the end), it may not make a difference in performance for most scenes.
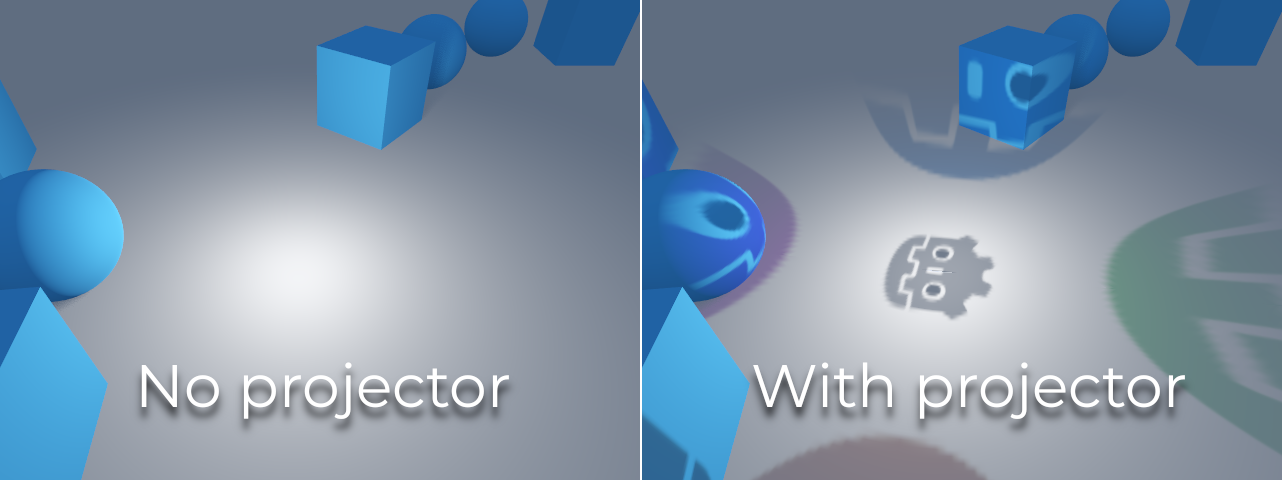
Las luces Omni con las sombras activadas pueden hacer uso de proyectores. La textura del proyector multiplicará el color de la luz por el color en un punto determinado de la textura. Como resultado, las luces generalmente parecerán ser más oscuras una vez que se asigna una textura de proyector; puedes aumentar la Energy para compensar esto.
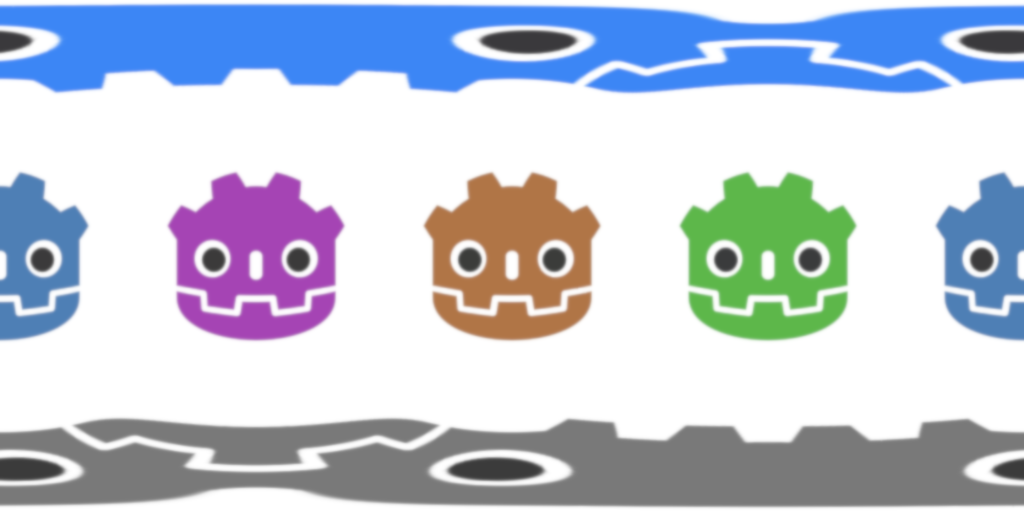
Las texturas de proyector para las luces Omni requieren un mapeo panorámico de 360°, similar a las texturas de PanoramaSkyMaterial.
Con la textura del proyector a continuación, se obtiene el siguiente resultado:
Truco
Si has obtenido proyectores omni en forma de imágenes cubemap, puedes utilizar esta herramienta web de conversión para convertirlos en una única imagen panorámica.
Spot light (luz focal)
Las luces focales (o puntuales) son similares a las omnidireccionales (omni lights), excepto porque emiten luz solamente en un cono (o "corte"). Son útiles para simular linternas, luces de coche, reflectores, focos, etc. Este tipo de luz además se atenúa en la dirección opuesta a la que apunta.
Spot lights share the same Range, Attenuation and Size as OmniLight3D, and add two extra parameters:
Angle: El ángulo de apertura de la luz.
Angle Attenuation: The cone attenuation, which helps soften the cone borders.
Mapeo de sombras focal
Las luces focales (Spots) cuentan con los mismos parámetros que las luces omnidireccionales para el mapeado de sombras. El renderizado de mapas de sombras focales es significativamente más rápido en comparación con las luces omnidireccionales, ya que solo es necesario renderizar una textura de sombra (en lugar de renderizar 6 caras, o 2 en el modo de paraboloide dual).
Las luces focales (Spot lights) con sombras habilitadas pueden hacer uso de proyectores. La textura del proyector multiplicará el color de la luz por el color de un punto determinado en la textura. Como resultado, las luces suelen parecer más oscuras una vez que se asigna una textura de proyector; puedes aumentar la Energy para compensar esto.
A diferencia de los proyectores de luces omnidireccionales, la textura del proyector de una luz focal no necesita seguir un formato especial para verse correctamente. Se mapeará de forma similar a un decal.
Con la textura del proyector a continuación, se obtiene el siguiente resultado:


Nota
Las luces focales con ángulos amplios tendrán sombras de menor calidad que las luces focales con ángulos estrechos, ya que el mapa de sombras se distribuye sobre una superficie mayor. En ángulos superiores a 89 grados, las sombras de las luces focales dejarán de funcionar por completo. Si necesitas sombras para luces más amplias, utiliza una luz omnidireccional en su lugar.
Area light
Sometimes, you want lighting to come from a large area instead of a single point. Area lights are useful for simulating soft, diffuse lighting, such as light coming from a window or a lit billboard.
Godot provides the AreaLight3D node for this purpose, which emits light from a rectangular area. The node only emits light and has no other visual representation in the scene. The screenshots below use a Sprite3D node as a child of the area light for visualization purposes.
Advertencia
This type of light is the most expensive to render in real-time. It should be used sparingly, especially when shadows are enabled. Consider using them only for cinematics or when targeting high-end devices.
In Forward+, as soon as one area light is visible in the view frustum, it incurs an additional performance cost on all rendered objects in the scene, even those that are not reached by an area light. This tradeoff allows for a greater number of area lights to be rendered (clustered lighting).
In Mobile and Compatibility, only objects that are reached by an area light incur an additional performance cost.
Area lights can also cast shadows, with variable penumbra simulated using
PCSS by default. The size
of this penumbra can be controlled with the Light3D Size property. This
effect can be quite demanding, so it can be turned off by setting Size to
0.0.
Nota
Shadows cast by an area light may look incorrect if the object casting shadows doesn't have enough subdivisions and it's very close to the area light. This is the same limitation as Dual Paraboloid shadow mode on an omni light.

Nota
Since area lights are difficult to simulate in a real-time rasterized renderer, they come with a number of limitations.
For small light sources, you will likely get better results when using point lights. Shadows from area lights are crude approximations, as they are calculated as if they were point lights, and may appear to be distorted at the edges. To get a better result, make sure the meshes in the light's range are sufficiently subdivided.
Area lights suffer from light leaking on the backside of geometry closely in front of them at grazing angles, so be careful with where you place them.
Lastly, not all material features are fully supported; area lights are practically limited to Lambertian diffuse and GGX specular shading, while anisotropic materials will appear as if isotropic. Vertex shading is also not implemented for area lights.
Area lights emit light in a rectangular area defined by the Area > Size
property (not to be confused with the generic Light3D Size property). To get
a physically accurate result, you should resize this area to match the size of
the real-life light source you are trying to simulate. For example, if you are
simulating a 1-meter neon tube that is 10 centimeters wide, set the area
size to (1, 0.1) and adjust the energy accordingly.
By default, the light's energy is normalized: the larger the area, the weaker the light. This allows you to change the area size without needing to adjust the energy to compensate, which is useful for animation. You can disable this behavior by unchecking Area > Normalize Energy if you want the energy to be independent of the area size.
The rectangular area can optionally be textured. This can be effectively used to change the light's shape into any 2D shape, or tint it in different colors. The texture's alpha channel is treated as black (no light coming through). The area light's texture will be visible in reflections according to the surface's roughness. This behavior is different from omni/spot projectors, as it does not project the texture directly onto all diffuse lighting.
When using a textures that are transparent or black toward the edges, you might want to leave a gap of a few pixels to make sure the texture is blurred smoothly.

Nota
Changing the area light's texture at runtime can be expensive, especially if the texture is large.
To reduce the performance impact of switching textures at runtime, make sure each dimension of an area texture is either a multiple of 128 pixels, or a power of two. This removes the need for a scaling pass, which slows down texture changes. The textures don't necessarily have to be square to be optimal. Examples of optimal texture sizes include 32×64, 128×128, and 256×384.
Textured area lights are not supported in the Compatibility renderer.
Atlas de sombras
Unlike Directional lights, which have their own shadow texture, omni and spot lights are assigned to slots of a shadow atlas. This atlas can be configured in the advanced Project Settings (Rendering > Lights And Shadows > Positional Shadow).
The resolution applies to the whole shadow atlas. This atlas is divided into four quadrants:
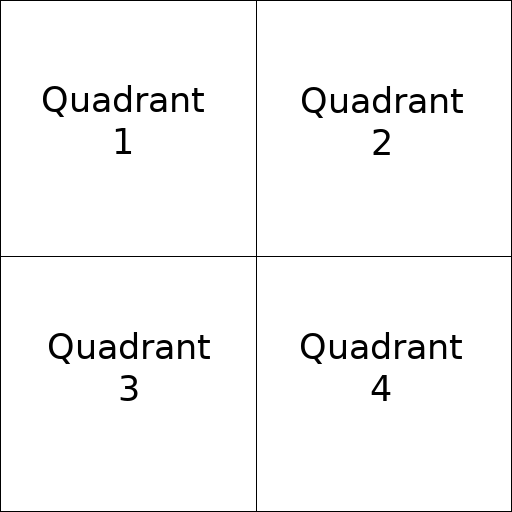
Cada cuadrante se puede subdividir para asignar cualquier número de mapas de sombras; la siguiente es la subdivisión predeterminada:
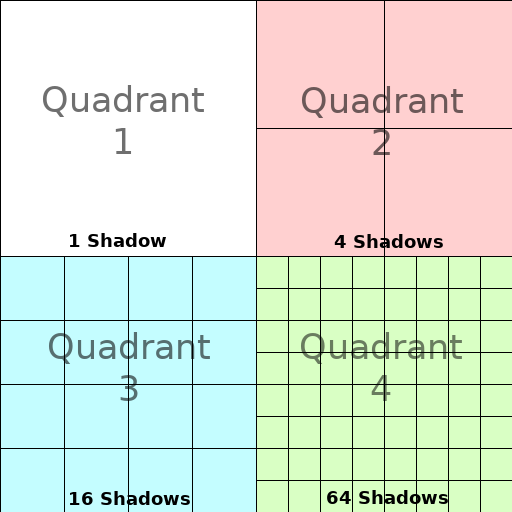
El atlas de sombras asigna el espacio de la siguiente manera:
The biggest shadow map size (when no subdivision is used) represents a light the size of the screen (or bigger).
Subdivisions (smaller maps) represent shadows for lights that are further away from view and proportionally smaller.
En Cada fotograma, se realiza el siguiente procedimiento para todas las luces:
Se comprueba si la luz está en un espacio del tamaño correcto. Si no es así, se vuelve a renderizar y se mueve a un espacio más grande o más pequeño.
Se comprueba si ha cambiado algún objeto que afecte al mapa de sombras. Si esto sucedió, se renderiza de nuevo la luz.
Si no ha ocurrido nada de lo anterior, no se hace nada, y la sombra queda intacta.
If the slots in a quadrant are full, lights are pushed back to smaller slots, depending on size and distance. If all slots in all quadrants are full, some lights will not be able to render shadows even if shadows are enabled on them.
La estrategia de asignación de sombras por defecto permite renderizar hasta 88 luces con sombras habilitadas dentro del frustum de la cámara (4 + 4 + 16 + 64):
El primer y más detallado cuadrante puede almacenar 4 sombras.
El segundo cuadrante puede almacenar otras 4 sombras.
El tercer cuadrante puede almacenar 16 sombras, con menos detalles.
El cuarto cuadrante, el menos detallado, puede almacenar 64 sombras, con aún menos detalles.
Utilizar un mayor número de sombras por cuadrante permite soportar una mayor cantidad total de luces con sombras habilitadas, al tiempo que mejora el rendimiento (ya que las sombras se renderizarán a una resolución menor para cada luz). Sin embargo, aumentar el número de sombras por cuadrante se hace a costa de una menor calidad de las sombras.
In some cases, you may want to use a different allocation strategy. For example, in a top-down game where all lights are around the same size, you may want to set all quadrants to have the same subdivision so that all lights have shadows of similar quality level.
Balancing performance and quality
La representación de sombras es un aspecto crucial del rendimiento del renderizado 3D. Es fundamental tomar las decisiones correctas para evitar cuellos de botella.
La configuración de la calidad de la sombra direccional se puede cambiar en tiempo de ejecución llamando a los métodos de RenderingServer apropiados.
La configuración de calidad de las sombras posicionales (omni/focales) se puede cambiar en tiempo de ejecución en el Viewport raíz.
Tamaño del mapa de sombras
Las altas resoluciones de sombra dan como resultado sombras más nítidas, pero con un coste de rendimiento significativo. También debe tenerse en cuenta que las sombras más nítidas no siempre son más realistas. En la mayoría de los casos, esto debería mantenerse en su valor por defecto de 4096 o disminuirse a 2048 para GPUs de gama baja.
Si las sombras posicionales se vuelven demasiado borrosas tras reducir el tamaño del mapa de sombras, puedes solucionarlo ajustando los cuadrantes del shadow atlas para que contengan menos sombras. Esto permitirá que cada sombra se renderice con mayor resolución.
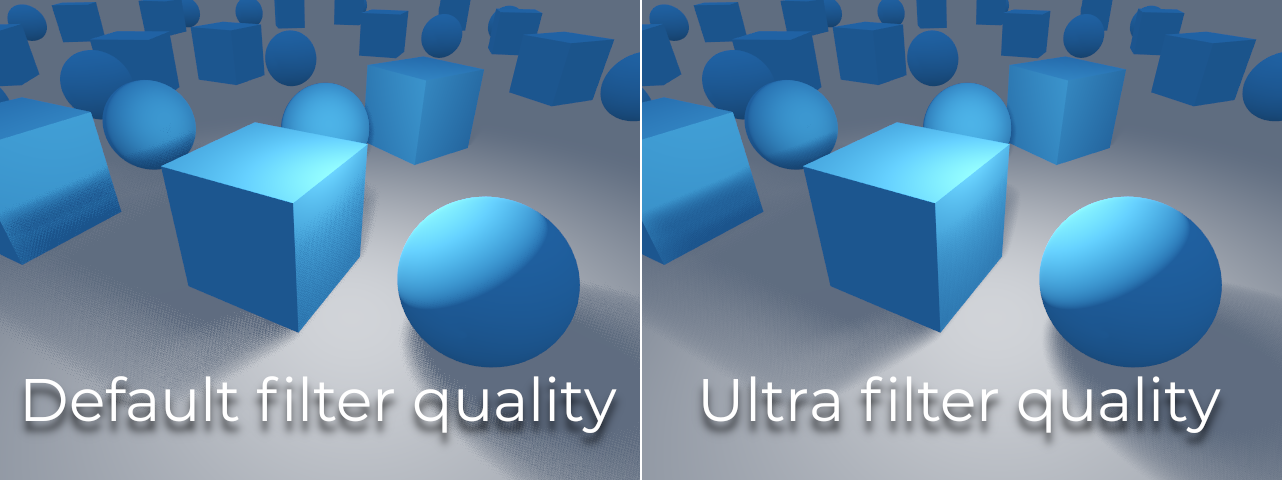
Modo del filtro de sombras
Aquí se pueden elegir varios ajustes de calidad del mapa de sombras. El valor predeterminado Soft Low (Suave Bajo) es un buen equilibrio entre rendimiento y calidad para escenas con texturas detalladas, ya que el detalle de la textura ayudará a que el patrón de dithering sea menos perceptible.
Sin embargo, en proyectos con texturas menos detalladas, el patrón de dithering de las sombras puede ser más visible. Para ocultar este patrón, puedes habilitar Antialiasing temporal (TAA), AMD FidelityFX Super Resolution 2.2 (FSR2), Antialiasing aproximado rápido (FXAA), o aumentar la calidad del filtro de sombras a Soft Medium (Suave Medio) o superior.
La configuración Soft Very Low (Suave Muy Bajo) disminuirá automáticamente el desenfoque de la sombra para que los artefactos derivados de la baja cantidad de muestras sean menos visibles. Por el contrario, los ajustes Soft High (Suave Alto) y Soft Ultra (Suave Ultra) aumentarán automáticamente el desenfoque de la sombra para aprovechar mejor el mayor conteo de muestras.
16-bits versus 32-bits
De forma predeterminada, Godot utiliza texturas de profundidad de 16 bits para la representación de mapas de sombras. Esto se recomienda en la mayoría de los casos, ya que ofrece un mejor rendimiento sin una diferencia apreciable en la calidad.
Si se deshabilita la opción 16 Bits, se usarán texturas de profundidad de 32 bits. Esto puede resultar en menos artefactos en escenas grandes y luces grandes con sombras activadas. Sin embargo, la diferencia suele ser apenas perceptible, lo que puede afectar significativamente el rendimiento.
Light/shadow distance fade
OmniLight3D y SpotLight3D ofrecen varias propiedades para ocultar luces distantes. Esto puede mejorar significativamente el rendimiento en escenas grandes con docenas de luces o más.
Habilitado: Controla si el desvanecimiento por distancia (una forma de LOD) está habilitado. La luz se desvanecerá a lo largo de Begin + Length (Inicio + Longitud), tras lo cual será descartada (culled) y no se enviará en absoluto al shader. Utiliza esto para reducir el número de luces activas en una escena y, por tanto, mejorar el rendimiento.
Inicio: La distancia desde la cámara a la que la luz comienza a desvanecerse (en unidades 3D).
Sombra: La distancia desde la cámara a la que la sombra comienza a desvanecerse (en unidades 3D). Esto se puede utilizar para desvanecer las sombras antes que la luz, mejorando aún más el rendimiento. Solo está disponible si las sombras están habilitadas para la luz.
Longitud: La distancia a lo largo de la cual la luz y la sombra se desvanecen (en unidades 3D). La luz se vuelve lentamente más transparente a lo largo de esta distancia y es completamente invisible al final. Valores más altos resultan en una transición de desvanecimiento más suave, lo cual es más adecuado cuando la cámara se mueve rápido.
PCSS recommendations
Las sombras suaves de porcentaje de cercanía (Percentage-closer soft shadows o PCSS) proporcionan una apariencia de mapeado de sombras más realista, con un tamaño de penumbra que varía dependiendo de la distancia entre el objeto que proyecta la sombra (caster) y la superficie que la recibe. Esto conlleva un alto coste de rendimiento, especialmente para las luces direccionales.
Para evitar problemas de rendimiento, se recomienda:
Utiliza solo unas pocas luces con sombras PCSS habilitadas al mismo tiempo. El efecto es generalmente más visible en luces grandes y brillantes. Las fuentes de luz secundarias que son más tenues no suelen beneficiarse mucho del uso de sombras PCSS.
Proporciona un ajuste para que los usuarios puedan desactivar las sombras PCSS. En luces direccionales, esto se puede hacer estableciendo la propiedad
light_angular_distancede la DirectionalLight3D a0.0mediante un script. En luces posicionales, esto se puede hacer estableciendo la propiedadlight_sizede la OmniLight3D o SpotLight3D a0.0en un script.
Modo de filtro del proyector
La forma en que se renderizan los proyectores también tiene un impacto en el rendimiento. El ajuste de configuración avanzada Renderizado > Texturas > Proyectores de Luz > Filtro permite controlar cómo se deben filtrar las texturas de los proyectores. Nearest/Linear no utilizan mipmaps, lo que hace que su renderizado sea más rápido. Sin embargo, los proyectores se verán granulados a la distancia. Nearest/Linear Mipmaps se verán más suaves a distancia, pero los proyectores se verán borrosos cuando se vean desde ángulos oblicuos. Esto se puede resolver utilizando Nearest/Linear Mipmaps Anisotropic, que es el modo de mayor calidad, pero también el más costoso.
Si tu proyecto tiene un estilo pixel art, considera configurar el filtro con uno de los valores Más cercano para que los proyectores utilicen el filtro por vecino más cercano. De lo contrario, utiliza Lineal.